PRESONUS StudioLive RM16AI Quick start guide

Category
Audio equalizers
Type
Quick start guide

This manual is also suitable for

PRESONUS StudioLive RM16AI is a compact digital mixer with 16 microphone preamplifiers and a 32-channel digital mixer core that makes it easy to mix and record live performances or studio sessions. It features 25 mix buses, 4 subgroups, and 3 stereo FX processors, providing extensive routing and processing capabilities. With its built-in Wi-Fi connectivity and the free UC Surface control app, you can mix wirelessly from anywhere in the venue or studio.

PRESONUS StudioLive RM16AI is a compact digital mixer with 16 microphone preamplifiers and a 32-channel digital mixer core that makes it easy to mix and record live performances or studio sessions. It features 25 mix buses, 4 subgroups, and 3 stereo FX processors, providing extensive routing and processing capabilities. With its built-in Wi-Fi connectivity and the free UC Surface control app, you can mix wirelessly from anywhere in the venue or studio.

Table of Contents PreSonus
®
StudioLive
RM32AI/RM16AI
Visual Quick Start Guide
Table of Contents
1.0 What’s in the Box 1
2.0 Register Your StudioLive RM-Series Mixer!2
3.0 Download UC-Surface for iPad® and QMix
-AI2
4.0 Meet the StudioLive RM32AI and RM16AI3
Front 3
Rear4
5.0 Wired Ethernet Control Setup4
6.0 Wireless Control Setup5
7.0 Computer Recording Setup6
8.0 Getting Started with UC-Surface7
9.0 Fat Channel Area9
9.1 Parameter Box9
9.2 Channel Options10
10.0 Presets Button10
11.0 Channel Strip Area11
12.0 Flex Master Channel Strip11
13.0 Mix Selection Area12
13.1 Mix Settings12
13.2 FX Settings13
14.0 Main Output Area13
15.0 Input Meter Bridge and Navigation14
1
1.0 What’s in the Box
PreSonus
®
StudioLive
RM32AI/RM16AI
Visual Quick Start Guide
1.0 What’s in the Box
StudioLive
RM32AI or RM16AI
USB Wi-Fi dongle
FireWire 800 cable
Ethernet cable
Power cable
Product registration and software authorization card
This Quick Start Guide
2
2.0 Register Your StudioLive RM-Series Mixer!
PreSonus
®
StudioLive
RM32AI/RM16AI
Visual Quick Start Guide
2.0 Register Your StudioLive RM-Series Mixer!
Before you do anything else, please register your StudioLive RM-series mixer online at
https://my.PreSonus.com so you can download and authorize the included software,
manuals, and video guides.
Your StudioLive RM-series mixer is more than a mixer; it’s a powerful suite of
integrated hardware and software solutions that take you from stage to studio to
fans. The following software is included with the StudioLive RM32AI and RM16AI.
UC-Surface battle-ready mix-control application
QMix
-AI personal monitor control
Capture
multitrack recording and virtual sound check
Studio One
®
Artist professional DAW
Nimbit
®
Free publishing and marketing account
3.0 Download UC-Surface for iPad® and QMix
-AI
PreSonus’ UC-Surface battle-ready mix-control app for iPad
®
and
QMix
-AI aux-mix control app for iPhone
®
/iPod touch
®
are free downloads from the
Apple App Store. You’ll need this software to control your StudioLive RM-series mixer,
so please download it now.
3
4.0 Meet the StudioLive RM32AI and RM16AI
PreSonus
®
StudioLive
RM32AI/RM16AI
Visual Quick Start Guide
4.0 Meet the StudioLive RM32AI and RM16AI
Front
LevelLevel
32312 323130292726252423222120191817
1 2 3 4 5 6 7 8 9 10 11 12 13 14 15 16
17 18 19 20 21 22 23 24 25 26 27 28 29 30 31 32
RightLeft
1 2 3 4 5 6 7 8 9 10 11 12 13 14 15 16
1 2 3 4 5 6 7 8 9 10 11 12 13 14 15 16
32 channel x 25 bus digital mix core
with 32 remote XMAX preamps
USB
STUDIOLIVE RM32
28
-80
+6
-80
+6
Cue
Mute
All
Meters
+48V
R
L
1
2
2
3
4
6 9 10 1211 13
7
85
1. Mix outputs
2. Microphone inputs
3. USB port (supports rmware updates and Wi-Fi dongle)
4. Power/status indicator
5. Input signal/clip/+48V indicators
6. +48V meters mode button
7. Mute All button
8. Headphone source selection buttons
9. Headphone level knob
10. Headphone output
11. Tape input
12. Main Mono output and trim knob
13. Main Left/Right outputs and trim knob
4
4.0 Meet the StudioLive RM32AI and RM16AI
PreSonus
®
StudioLive
RM32AI/RM16AI
Visual Quick Start Guide
Rear
POWER
100-230V , 50-60 Hz. 120W
MANUFACTURING DATE
SERIAL NUMBER
WARNING
:
TO RED UCE THE RIS K OF F IRE OR ELECTRIC
SHOCK, DO NOT EXPO SE THIS E QUIPMENT TO RAI N OR
MOISTU RE. DO NOT RE MOVE COVER . NO US ER SER VICEAB LE
PARTS IN SIDE. R EFER S ERVICING TO QUAL IFIED PERSON NEL.
AVIS
:
RISQUE DE CHO C ELECTRIQ UE — N E PAS OU VRIR
DESIGNE D AN D ENGIN EERED BY PR ESONUS • MANUFACT URED IN CH INA PAT ENTS PENDI NG
“PreSonus”,“ STUDIOLIV E” AND “ACTIVE INTEGR ATION” AR E REGISTE RED TRA DEMARKS OF PRESONUS AUDIO ELE CTRONICS
This device complies with Part 15 of the FCC Rules and ICES- 003 for Canada. Operation is subjected to th e
following two co nditions: (1) this device may not cause harmful inter ference, an d (2) th is device mu st
accept an y interference received, in cluding interference that m ay cause u ndesired operation.
WARNING:
Power down unit before removing option card
32 channel x 25 bus digital mix core
with 32 remote XMAX preamps
R
STUDIOLIVE RM32
S800S800
S800S800
S800S800
S/PDIF
Control Output
S800S800
S800S800
S800S800
IN OUT
14
15
16 17 18
14. Power switch
15. Power inlet
16. MIDI input and output
17. Digital option-card slot
18. Mix outputs (mirror of front panel mix outputs)
5.0 Wired Ethernet Control Setup
POWER
100-230V , 50-60 Hz. 120W
MANUFACTURING DATE
SERIAL NUMBER
WARNING
:
TO REDUCE TH E RISK O F FIRE OR ELE CTRIC
SHOCK, DO NOT E XPOSE THI S EQUIP MENT TO RAIN OR
MOISTURE. DO NOT REMOVE COV ER. NO USER SERVICE ABLE
PARTS INSIDE . REFE R SERVICIN G TO Q UALIFI ED PERS ONNEL.
AVIS
:
RISQUE DE CHOC E LECTRIQUE — NE PAS OUVRIR
DESIGNED AND ENG INEERED BY PRESONU S • MANU FACTURED IN CHINA PATENT S PE NDING
“PreSonus”,“STU DIOLIVE” A ND “ACT IVE INT EGRATION” ARE REGI STERED TRADEMARKS OF PRESO NUS AUD IO ELECTRON ICS
This device complies w ith Part 15 of the FCC Rules a nd ICES-003 for Canada. Operatio n is subjected t o the
following two conditions: (1) this device may not cause harmful interferen ce, and ( 2) this device must
accept any interf erence received, includ ing interference that may cause undesired operation .
WARNING:
Power down unit before removing option card
32 channel x 25 bus digital mix core
with 32 remote XMAX preamps
R
STUDIOLIVE RM32
S800S800
S800S800
S800S800
S/PDIF
Control Output
S800S800
S800S800
S800S800
IN OUT
WER
100-230V , 50-60 Hz. 120W
foll owing two c onditions: ( 1) this device may n ot cause ha rmful interference, a
accept any interference received, includi ng interference that may cause
WARNING:
Power down unit before removing option card
S800S800
S800S800
S800S800
S/PDIF
O
utput
S800S800
S800S800
S800S800
IN OUT
Ethernet cable
Control
Your StudioLive RM32AI and RM16AI can be set up for control with a wired Ethernet connection in seconds.
Simply connect the included Ethernet cable to the Ethernet control port on the back of the mixer and to a
network router that is also connected to your computer or iPad.
When you launch UC-Surface with the computer and StudioLive RM32AI or RM16AI connected to the same
network, the software should automatically see the mixer.
5
6.0 Wireless Control Setup
PreSonus
®
StudioLive
RM32AI/RM16AI
Visual Quick Start Guide
6.0 Wireless Control Setup
POWER
100-230V , 50-60 Hz. 120W
MANUFACTURING DATE
SERIAL NUMBER
WARNING
:
TO REDUCE TH E RISK O F FIRE OR ELE CTRIC
SHOCK, DO NOT E XPOSE THI S EQUIP MENT TO RAIN OR
MOISTURE. DO NOT REMOVE COV ER. NO USER SERVICE ABLE
PARTS INSIDE . REFE R SERVICIN G TO Q UALIFI ED PERS ONNEL.
AVIS
:
RISQUE DE CHOC E LECTRIQUE — NE PAS OUVRIR
DESIGNED AND ENG INEERED BY PRESONU S • MANU FACTURED IN CHINA PATENT S PE NDING
“PreSonus”,“STU DIOLIVE” A ND “ACT IVE INT EGRATION” ARE REGI STERED TRADEMARKS OF PRESO NUS AUD IO ELECTRON ICS
This device complies w ith Part 15 of the FCC Rules a nd ICES-003 for Canada. Operatio n is subjected t o the
following two conditions: (1) this device may not cause harmful interferen ce, and ( 2) this device must
accept any interf erence received, includ ing interference that may cause undesired operation .
WARNING:
Power down unit before removing option card
32 channel x 25 bus digital mix core
with 32 remote XMAX preamps
R
STUDIOLIVE RM32
S800S800
S800S800
S800S800
S/PDIF
Control Output
S800S800
S800S800
S800S800
IN OUT
LevelLevel
32312 3231302927262524232221
20191817
1 2 3 4 5 6 7 8 9 10 11 12 13 14 15 16
17 18 19 20 21 22 23 24 25 26 27 28 29 30 31 32
RightLeft
1 2 3 4
5 6 7 8 9 10 11 12 13 14 15 16
1 2 3 4 5 6 7 8 9 10 11 12 13 14 15 16
32 channel x 25 bus digital mix core
with 32 remote XMAX preamps
USB
STUDIOLIVE RM32
28
-80
+6
-80
+6
Cue
Mute
All
Meters
+48V
R
L
222120191817
1 2 3 4 5 6 7 8 9 10 11 12 13 14 1
17 18 19 20 21 22 23 24 25 26 27 28 29 30 31 3
1 2 3 4 5 6
1 2 3 4 5 6
32 channel x 25 bus digital mix core
with 32 remote XMAX preamps
USB
STUDIOLIVE RM32
POWER
100-230V , 50-60
StudioLive AI mixers do not support hot-swapping the Wi-Fi LAN Adapter so you
must have it plugged into the front-panel USB port prior to turning on your mixer.
By default, StudioLive mixers are congured to automatically connect to a wireless
network with the following name and password:
Wireless network name: StudioLive
Wireless network password: StudioLive
If you would like to connect to a custom wireless network, you rst need to
connect to the mixer with a wired connection and congure the wireless network
preferences.
1. Connect to a wired control network, as described in Wired Ethernet control setup.
2. Launch UC-Surface on a Mac or Windows computer or iPad that is connected to
the same network.
3. Open the Settings page.
4. At the top of the Settings page select the wireless connection icon.
5. Choose the wireless network you would like to use from the list shown.
6. If a password is required you will be prompted to enter it.
7. You are now congured to connect to the new wireless network for control.
8. Every time you turn on your StudioLive AI mixer, if there is no wired Ethernet
connection, and the USB Wi-Fi dongle is plugged in, the mixer will look for this
network and attempt to connect to it.
Note: StudioLive AI only supports WPA and WPA2 security. Please be sure that your
router is congured using one of these security protocols.
A
C
B
6
7.0 Computer Recording Setup
PreSonus
®
StudioLive
RM32AI/RM16AI
Visual Quick Start Guide
7.0 Computer Recording Setup
MANUFACTURING DATE
SERIAL NUMBER
DESIGNED AND ENG INEERED BY PRESONU S • MANU FACTURED IN CHINA PATENT S PE NDING
“PreSonus”,“STU DIOLIVE” A ND “ACT IVE INT EGRATION” ARE REGI STERED TRADEMARKS OF PRESO NUS AUD IO ELECTRON ICS
This device complies w ith Part 15 of the FCC Rules a nd ICES-003 for Canada. Operatio n is subjected to the
following two conditions: (1) this device may not cause harmful interferen ce, and (2 ) this device must
accept any interf erence received, inclu ding interference that may cause undesired operation.
WARNING:
Power down unit before removing option card
32 channel x 25 bus digital mix core
with 32 remote XMAX preamps
STUDIOLIVE RM32
S800S800
S800S800
S800S800
S/PDIF
Control Output
S800S800
S800S800
S800S800
IN OUT
S800S800
S800S800
S800S800
S800S800
S800S800
S800S800
MANUFACTURING DATE
SERIAL NUMBER
WARNING
:
TO REDUCE TH E RISK O F FIRE OR ELE CTRIC
SHOCK, DO NOT E XPOSE THI S EQUIP MENT TO RAIN OR
MOISTURE. DO NOT REMOVE COV ER. NO USER SERVICE ABLE
PARTS INSIDE . REFE R SERVICIN G TO Q UALIFI ED PERS ONNEL.
AVIS
:
RISQUE DE CHOC E LECTRIQUE — NE PAS OUVRIR
DESIGNED AND ENG INEERED BY PRESONU S • MANU FACTURED IN CHINA PATENT S PE NDING
“PreSonus”,“STU DIOLIVE” A ND “ACT IVE INT EGRATION” ARE REGI STERED TRADEMARKS OF PRESO NUS AUD IO ELECTRON ICS
This device complies w ith Part 15 of the FCC Rules a nd ICES-003 for Canada. Operatio n is subjected t o the
following two conditions: (1) this device may not cause harmful interferen ce, and ( 2) this device must
accept any interf erence received, includ ing interference that may cause undesired operation .
WARNING:
Power down unit before removing option card
32 channel x 25 bus digital mix core
with 32 remote XMAX preamps
R
STUDIOLIVE RM32
S800S800
S800S800
S800S800
S/PDIF
Control Output
S800S800
S800S800
S800S800
IN OUT
S800S800
S800S800
S800S800
S800S800
S800S800
S800S800
1
2
345
1
2
345
Network router
Ethernet
cable
Ethernet
cable
Touch screen
computer
FireWire
cable
Control
Control
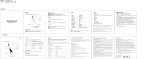
StudioLive RM32AI and RM16AI have been designed for tight integration with the included Capture and Studio
One Artist software. You can record a live show quickly and with condence to Capture, save the StudioLive AI
mixer scene with the Capture Session, and then open that recording, complete with mixer scene, in Studio One.
The Studio One mixer will be set to match your StudioLive AI mixer scene, including fader values, mutes, pan,
and eects-send mixes. Fat Channel settings will be loaded into Studio One’s new Fat Channel Native
Eects
plug-in.
You can also use the StudioLive AI mixer as an audio interface and monitor mixer for studio recording.
1. After registering your StudioLive AI mixer, download the Universal Control installer
for Mac or Windows from your My PreSonus account. This installer includes the
UC-Surface mix-control software and necessary drivers.
2. Launch the installer and follow the onscreen instructions. When the installer is
nished, reboot your computer to complete the installation.
3. When the installation is complete simply connect your StudioLive AI mixer to your
computer with the included FireWire cable.
4. For additional details and instruction on conguring your StudioLive AI as your
default sound input and output device, please refer to your manual and the video
guides in your My PreSonus account.
WARNING:
Power down unit before removing option card
32 channel x 25 bus digital mix core
with 32 remote XMAX preamps
R
STUDIOLIVE RM32
S800S800
S800S800
S800S800
S800S800
S800S800
S800S800
IN OUT
S800S800
S800S800
S800S800
S800S800
S800S800
S800S800
FireWire 800 cable
FireWire
cable
Network router
7
8.0 Getting Started with UC-Surface
PreSonus
®
StudioLive
RM32AI/RM16AI
Visual Quick Start Guide
8.0 Getting Started with UC-Surface
StudioLive RM32AI and RM16AI are controlled with the UC-Surface battle-ready mix-control application, which
is designed specically for live mixing. All primary mixing functionality is at your ngers without the need to
navigate complex views or deep menus.
1
2
3
4
65
7 8 9
1. Connected device tabs
2. Settings button
3. Fat Channel area
4. Presets button
5. Channel strip area
6. Flex channel strip
7. Mix selection area
8. Main output area
9. Input Meter Bridge and navigation
8
8.0 Getting Started with UC-Surface
PreSonus
®
StudioLive
RM32AI/RM16AI
Visual Quick Start Guide
Connected device tabs.
These tabs switch between dierent mixers available for control on the network.
Selecting a tab will open the associated mixer control.
Settings button.
Selecting this button will open the mixer settings screen. This is where you can
congure global mixer settings such as sampling rate, permissions, wireless network
settings, and more.
1 2 3 4
1. Aux Routing tab. This tab displays the routing options for the auxiliary digital
outputs on the installed option card.
2. Device Settings tab. This tab contains all device settings, such as Global Aux
Mute, Talkback Input Source, Headphone Cue Source, and Permissions.
3. Wireless connection. Selecting the wireless connection enables you to change
the network and password for wireless control of the mixer.
4. Sampling rate. Here you can change the sampling rate.
9
9.0 Fat Channel Area
PreSonus
®
StudioLive
RM32AI/RM16AI
Visual Quick Start Guide
9.0 Fat Channel Area
The information displayed in this area will change based on where you are in your workow.
Select any input channel, the Flex Master Channel, or a Main output to display the associated Fat Channel DSP.
Select the Flex Master Channel GEQ or FX Edit to display the associated graphic EQ or eects settings.
• Select Scenes/Mutes (main output area) to display the Quick Scenes and Mute Groups.
9.1 Parameter Box
In UC-Surface, we’ve replaced the traditional “knob graphics with a more informative
parameter box. This area displays the name of the parameter, text of the current
value, and a meter showing the value.
When working on a touchscreen, touching the parameter box will open an
adjustment meter under you nger. Move your nger along the meter to change
the value. Remove your nger when done, and the meter will snap back to show
the compact parameter box.
When working with a mouse, click on the parameter box to display the
adjustment meter or use the scroll wheel to adjust the value without opening the
adjustment meter.
10
9.0 Fat Channel Area
PreSonus
®
StudioLive
RM32AI/RM16AI
Visual Quick Start Guide
9.2 Channel Options
In the Fat Channel view, you can open the channel options to edit the channel name
and choose an input source, the channel type and icon, and stereo linking.
Channel types and icons provide a host of great benets to your workow. When
you select a channel type, it will name your channel, display the icon type, and tag
the channel type for contextual ltering of other channel options. For example,
when choosing a Fat Channel preset, if the selected channel is assigned to guitar,
the presets displayed will be ltered to only show you presets tagged for guitar,
making it easier to nd the preset you need. Choosing a channel type will also create
automatic Filter Groups for quicker navigation and enhanced mixing workows.
Learn more about Filter Groups in the section describing the Mix selection area or in
the user manual and video guides in your My PreSonus account.
10.0 Presets Button
This button brings up the Presets menu when working with the Fat Channel, graphic
EQ, or FX bus and calls up the Complete Scenes menu when working in the Scenes/
Mute Groups. For details on working with presets and scenes, please refer to the user
manual and video guides in your My PreSonus account.
11
11.0 Channel Strip Area
PreSonus
®
StudioLive
RM32AI/RM16AI
Visual Quick Start Guide
11.0 Channel Strip Area
This area displays the input channels and fader levels for the selected mix.
1. EQ micro view. Selects the associated channel and brings up the
Fat Channel.
2. Solo
3. Mute
4. Pan
5. Channel fader. Controls the channel level for the selected mix.
6. Input meter
7. Compressor gain-reduction meter
8. Gate gain-reduction meter
9. Channel number, name, and type icon. Selects the associated channel and
brings up the Fat Channel.
12.0 Flex Master Channel Strip
The Flex Master channel strip shows the master channel for the selected mix. For
example, when Mix 3 is selected, the Flex Master is the main output for Mix 3.
1. EQ micro view. Selects the associated Mix master and brings up the Fat Channel.
2. Solo
3. Mute
4. GEQ or FX Edit. Opens the associated graphic EQ or eects editor in the Fat
Channel area.
5. Mix fader
6. Output meter
7. Compressor gain-reduction meter
8. Gate gain-reduction meter
9. Mix number, name, and type icon. Selects the associated Mix master and
brings up the Fat Channel.
1
2
3
4
6
5
9
8
7
1
2
3
4
6
5
9
8
7
12
13.0 Mix Selection Area
PreSonus
®
StudioLive
RM32AI/RM16AI
Visual Quick Start Guide
13.0 Mix Selection Area
This is the primary navigation area for your mixer. Here you’ll select the mix thats
currently being controlled by the channel faders. This is also where you’ll nd the
settings for each mix.
2 3 41
1. Mix selection buttons
2. Main Mix Select button
3. FX Mix selection buttons
4. Mix settings and Filter Groups area
13.1 Mix Settings
1. Mix name. Select to rename.
2. Stereo Link. Select to link two adjacent mixes for stereo operation.
3. Copy/Paste. Copies the currently selected mix so you can paste into other mixes.
4. Mix Position. Selects routing position for the selected mix (Pre 1, Pre 2, Post).
5. Mix Delay. Adjusts the output delay for the selected mix, if available.
Note: when a delay is assigned to a mix, a delay settings box will be shown in
this area.
2
3
4
1
13
13.0 Mix Selection Area
PreSonus
®
StudioLive
RM32AI/RM16AI
Visual Quick Start Guide
13.2 FX Settings
When an FX mix is selected, this area provides quick access to all FX mutes and Tap
Tempo buttons for the delay eects.
14.0 Main Output Area
1.
1
2
4
5
3
EQ micro view. Selects the associated main mix and brings up the
Fat Channel.
2. Talkback. Turns Talkback on and o.
3. Scenes/Mutes. Displays the Quick Scenes and Mute Groups in the
Fat Channel area.
4. Main Mono/Center channel strip. Displays the fader and meter for the
Main Mono mix bus.
5. Main Left/Right channel strip. Displays the fader and meters for the Main
Left/Right mix bus.
14
15.0 Input Meter Bridge and Navigation
PreSonus
®
StudioLive
RM32AI/RM16AI
Visual Quick Start Guide
15.0 Input Meter Bridge and Navigation
The Meter Bridge along the bottom the application shows the input meters for all available channels. A
highlighted window shows the channels that are currently displayed in the input channel area. You can use the
Meter Bridge to navigate to a specic channel by selecting the channel to “jump the input channel view to that
area or drag the highlighted window to scroll to that area. You can also swipe the input channel area to scroll
through the available channel, and the highlighted window in the Meter Bridge will follow your location.
Theres a lot more you can do with the battle-ready UC-Surface control application. Please refer to the user
manual and video guides in your MyPreSonus account to learn more.
18011 Grand Bay Court • Baton Rouge
Louisiana 70809 USA • 1-225-216-7887
www.presonus.com
®
Part# 825-WLV0049-B
  • Page 1 1
  • Page 2 2
  • Page 3 3
  • Page 4 4
  • Page 5 5
  • Page 6 6
  • Page 7 7
  • Page 8 8
  • Page 9 9
  • Page 10 10
  • Page 11 11
  • Page 12 12
  • Page 13 13
  • Page 14 14
  • Page 15 15
  • Page 16 16

PRESONUS StudioLive RM16AI Quick start guide

Category
Audio equalizers
Type
Quick start guide
This manual is also suitable for

PRESONUS StudioLive RM16AI is a compact digital mixer with 16 microphone preamplifiers and a 32-channel digital mixer core that makes it easy to mix and record live performances or studio sessions. It features 25 mix buses, 4 subgroups, and 3 stereo FX processors, providing extensive routing and processing capabilities. With its built-in Wi-Fi connectivity and the free UC Surface control app, you can mix wirelessly from anywhere in the venue or studio.

Ask a question and I''ll find the answer in the document

Finding information in a document is now easier with AI