Page is loading ...

OWNER’S MANUAL
OWNER’S MANUAL
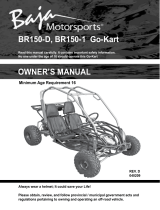
DUNE 150
DUNE 150
Minimum
Minimum
Recommended
Recommended
Operator
Operator
Age:
Age:
16
16
THIS VEHICLE IS SOLD FOR OFF-ROAD USE ONLY. BEFORE OPERATING THIS VEHICLE,
READ ALL THE INSTRUCTIONS FOR SAFE ASSEMBLY AND OPERATION AS WELL AS ALL
INSTRUCTION GOVERNING THE ENGINE AND OTHER PORTIONS OF THE VEHICLE.

LIMITED W
LIMITED W
ARRANTY
ARRANTY
This Limited Warranty applies to those cases where the new product is unloaded from its shipping con-
tainer, set-up as described in this manual, and under normal use and service is found to have defects in
parts or workmanship under the following terms and conditions:
This Limited Warranty covers the frame, suspension, steering, brakes, engine and engine related com-
ponents for a period of 90 days from the date of purchase on the sales receipt.
This Limited Warranty DOES NOT cover wear items like tires, batteries, belts, brake pads, chains, spark
plugs, fuses, clutch plates, sprockets, light bulbs, and other normal wear items.
This Limited Warranty DOES NOT apply to any part, which in the opinion of the seller was defective
because of improper maintenance, improper assembly, alterations, abuse, negligence, or accident.
What is not covered under this Limited Warranty
This Limited Warranty does not cover any product which has been subjected to:
1. Installation of non-original replacement parts.
2. Rental Use.
3. Disassembly, adjusting, or repairing of the product in any was so as to adversely affect its safety
and reliability.
4. Competition or racing.
This Limited Warranty does not cover loss of use of the product, loss of time, inconvenience, or other
consequential damage which includes, but is not limited to, loss or damage to persons or property or
any expense of returning any damaged / defective product to the manufacturer.
How do I get Replacement Parts and Service?
Please DO NOT TAKE THIS PRODUCT BACK TO THE RETAILER. For parts or service center loca-
tions, please call 888-863-2252. Many problems are easily repaired by the consumer. Our expert cus-
tomer service representatives can lead you through most problems with ease. We also have a nation-
wide network of Authorized Service Centers to assist with any repair or problem.
RECORD THE MODEL NUMBER AND SERIAL NUMBER OF YOUR PRODUCT IN THE SPACES
PROVIDED BELOW FOR REFERENCE WHEN ORDERING REPLACEMENT PARTS. IT IS ALSO
RECOMMENDED TO ATTACH YOU SALES RECEIPT TO THIS PAGE.
Model
No._______________________________________________Color_________________________
Serial
No._____________________________________________________________________________
(Located on the left rear frame member near the seat belt mount)
Engine
No.____________________________________________________________________________
(Located on top of engine)

FOREWORD
FOREWORD
Congratulations on your purchase of a Baja Motorsports Off-Road Machine. It represents more than 20
years of the pursuit of excellence in the off-road recreation industry. With the purchase of this product,
you will experience the thrill of off-road recreation like thousand of other consumers.
This Owner’s Manual contains important assembly, operational, safety, and maintenance information.
The manual provides information about special techniques and skills necessary to ride your machine.
Read it carefully BEFORE YOU OR ANYONE ELSE USES THIS PRODUCT. Failure to follow the
warnings contained in this manual can result in SEVERE INJURY OR DEATH.
Be sure to follow the recommended maintenance schedule and service your Baja Motorsports product
accordingly. Preventive maintenance is extremely important its longevity.
It is important that this manual remain with the product when you sell it as the next owner will need this
manual. If you should lose or damage this Owner’s Manual, please call 888-863-2252 for a replace-
ment.
SAFETY MESSA
GE:
READ THIS MANUAL CAREFULLY AND COMPLETELY BEFORE OPERATING YOUR
MACHINE. MAKE SURE YOU UNDERSTAND ALL INSTRUCTIONS.
PAY CLOSE ATTENTION TO ALL THE LABELS ON THE MACHINE.
IT IS NOT RECOMMENDED THAT THIS PRODUCT BE RIDDEN BY ANYONE UNDER 16
YEARS OF AGE.
Assumption of Risk
The Owner / Operator and any passengers assume all risks or incidents arising from
the use of this product.
Failure to follow, and comply with, all warnings may cause SERIOUS INJURY OR
DEATH.

CONTENTS
CONTENTS
Safety
Safety Labels
Vechicle Assembly
Specifications
Operation Controls
Pre-Operation Inspection
Before You Start the Engine
Driving Tips
Slope Guide
Periodic Maintenance
Touble Shooting
Wiring Diagram
California Emissions Warranty
Page 1 - 4
Page 5
Page 6 - 8
Page 9 - 10
Page 11 - 13
Page 14 - 15
Page 16 - 17
Page 18 - 19
Page 20
Page 21 - 30
Page 31
Page 32
Page 33

SAFETY
SAFETY
This off-road product IS NOT A TOY AND CAN BE HAZARDOUS TO OPERATE. This product handles
differently from other vehicles including ATV’s and motorcycles. A collision or rollover can occur quickly,
even during routine maneuvers such as turning and riding on hills or over obstacles.
To help you make informed decisions about safety, you will find provided in this manual operating proce-
dures and other safety procedures which must be followed. In addition to the safety information in this
manual, you will find safety labels on the product. FOLLOW ALL WARNINGS BOTH IN THIS MANUAL
AND ON THE PRODUCT.
Information which is particularly important is distinguished in this manual by the following notations:
IMPORTANT
RULES
FOR
SAFE
OPERATION
1. This vehicle is not licensable. IT IS NOT TO BE OPERATED ON ANY PUBLIC ROAD, STREET,
HIGHWAY, PARKING LOT, SIDEWALK, OR ALLEY. To do so would be in violation of local law.
This vehicle may be operated only on private property and upon areas approved by local law.
Avoid operating this vehicle in any area with stationary objects that the vehicle could travel
under. Do not ride in areas where other recreational vehicles are being operated. Be respectful
of landowners and the environment.
2. This vehicle should NEVER be operated indoors. The exhaust from the engine contains carbon
monoxide, which is a tasteless, odorless, and poisonous gas.
3. Unless otherwise specified in this manual, all screws, nuts, and bolts must be kept tight to ensure
that the vehicle is in safe operating condition. The engine must be kept free of all dirt and other
accumulations, paying particular attention to throttle linkage area.
FAILURE TO FOLLOW WARNING INSTRUCTIONS COULD RESULT
IN SEVERE INJURY OR DEATH TO THE OPERATOR OR PASSENGER (IF
DOUBLE SEAT PRODUCT), A BYSTANDER OR A PERSON INSPECTING
OR REPAIRING THE PRODUCT.
CA
UTION INSTRUCTIONS ARE PROCEDURES TO PREVENT DAM-
AGE TO THE VEHICLE OR INJURY TO THE OPERATOR OR PASSENGER
(IF DOUBLE SEAT PRODUCT), A BYSTANDER OR A PERSON INSPECT-
ING OR REPAIRING THE PRODUCT.
NOTE:
A NOTE provides key information to make procedures easier or clearer.
1

4. Prevailing-Torque-type locknuts lose their locking capability with repeated use and require
replacement. Ensure locknuts are functioning properly.
5. The tire pressure should be checked prior to each use. The recommended inflation pressure is
the maximum tire pressure as printed on the tire's sidewall. IMPROPER TIRE PRESSURE MAY
CAUSE INSTABILITY AND MAY PREVENT PROPER BRAKING OR STEERING.
6. Modification of this vehicle or removal of any original equipment or safety decal may render the
vehicle unsafe or illegal. NEVER REMOVE ANY PROTECTIVE GUARDS, BELT GUARD,
These covers are for operator/passenger's protection. If any guards are removed for maine-
nance or servicing of the vehicle, ensure that they are secured in place prior to operating the
vehicle.
7. THE VEHICLE SHOULD NEVER BE STARTED WITHOUT FIRST CHECKING TO SEE THAT
THE THROTTLE IS IN IDLE POSITION. Do not start engine without verifying proper function of
the throttle. Never attempt to start this vehicle without having the operator seated in the proper
position. When starting with the operator in the seat, the operator should have their left foot on
the brake.
8. This vehicle is not designed or intended for racing, any form of competition, or use on rental
tracks.
9. The operator's ability to operate this off-road vehicle safely is largely dependent upon the opera-
tor's ability to exercise proper judgment. An operator also must not be too small or too large for
controlled operation. The operator must be of sufficient age, understanding, mental capacity, and
physical capability to safely operate this vehicle. This vehicle should only be operated after
mature, supervised instruction and sufficient practice in decongested areas. Safe operation
includes responsibility for the safety of a passenger (if any).
10. A DOUBLE SEAT VEHICLE IS DESIGNED FOR ONE OPERATOR AND ONE PASSENGER.
No one should ever attempt to ride on this vehicle without being seated, with the seat belt prop
erly secured. For double seat vehicles ridden without a passenger, the passenger seat belt must
be secure to prevent it from getting caught up in operating components. Any passenger must be
of sufficient age, understanding, mental capacity, and physical capability to act to protect him
self/herself. ALWAYS FOLLOW THE RECOMMENDED AGE RESTRICTION OF 16 YEARS
FOR OPERATORS AND PASSENGERS.
11. The engine should be stopped when the vehicle is not in use.
12. The operator and passenger (if any) of this vehicle should always wear a helmet approved by
agencies such as the Department of Transportation (DOT), Safety Helmet Council of America
(SHCA), or Snell Memorial Foundation (SNELL). Most off-road vehicle accident fatalities are due
to head injuries. The operator should also wear face shields or goggles, boots or closed-toe
shoes, gloves, and other appropriate protective clothing.
SAFETY
SAFETY
2

SAFETY
SAFETY
13. LOOSE CLOTHING, LONG HAIR, OR ARTICLES WORN BY ANY OPERATOR OR PASSEN-
GER MUST BE FULLY CONTAINED, OR COVERED TO PREVENT THEM FROM POSSIBLY
BEING CAUGHT IN ROTATING PARTS OF THE VEHICLE OR THE SURROUNDING ENVI-
RONMENT WHILE RIDING. FAILURE TO OBEY COULD ENDANGER THE PERSONAL SAFE-
TY OF THE OPERATOR OR PASSENGER.
14. DO NOT PLACE HANDS, FEET, OR ANY OTHER PART OF THE BODY OR ANY CLOTHING
NEAR THE ENGINE, MUFFLER, WHEELS, CHAIN, AND OTHER ROTATING PARTS OF THE
VEHICLE WHILE RIDING OR RUNNING THE ENGINE. Caution must be used in performing
required maintenance on or near an operating engine. Special caution should be taken after the
engine has been running, since the engine and other drive components may be extremely hot.
15. Wet, slippery, rough, or steep terrain is potentially dangerous and may result in injury if proper
caution is not observed. Slow speeds are required to safely operate this vehicle under those con-
ditions. The operator must use mature judgment, skill, and experience to choose a speed suit
able for the terrain and riding conditions.
16. The governor settings for this vehicle's engine must not be tampered with, altered, or changed.
The governor is set by the engine manufacturer and limits the maximum speed of the engine
(and vehicle) and protects the engine from damage. Excessive speeds are potentially dangerous
to the operator / passenger, and the engine.
17. Each time before using this vehicle, the fuel supply should be checked. The fuel tank should
never be filled while the engine is running or while the engine is hot. Do not fill tank in a closed
area such as a garage, while smoking, or in the vicinity of an open flame. Do not overfill the
tank. There should not be any fuel in the filler neck. Replace cap tightly to prevent spillage of
fuel and potential fire hazard. After filling tank, move the vehicle at least 15 feet away from spot
of filling before starting.
18. If the vehicle should start making unusual noise or vibrating abnormally, the engine should be
stopped and the spark plug wire disconnected. The vehicle should then be checked for damage.
Excessive noise or vibration is generally a warning of loose or worn parts.
19. When making repairs or adjustments to the vehicle which do not involve adjustments to the
engine, the spark plug wire must be disconnected and kept away from the spark plug to prevent
accidental starting. When working on or around, or when restarting engine, use extreme caution
to avoid contact with the muffler, cylinder head, or any other potentially hot area on or around the
engine.
20. Always perform a Pre-Ride Inspection before starting the engine. See Pre-Ride Inspection sec-
tion in this manual.
21. The Bar Cage assembly provided with this vehicle is not designed as a "roll bar". Do not
operate this vehicle without the cage properly installed. Vehicles with light kits are for decorative
purposes and to assist others in seeing you. Only operate this vehicle during daylight.
3

SAFETY
SAFETY
22. When storing the vehicle, it must be kept in a place where gasoline fumes will not reach an open
flame or spark. For long period of storage, such as for winter, the fuel tank should be drained in
an open, cool area. The engine must be allowed to cool before storage in any enclosure. Read
and keep all printed material supplied with this vehicle. Timely and specific instructions and a
Operator's Manual revisions are included in supplements. If any printed material included is
unclear, contact the manufacturer.
23. NEVER OPERATE THIS VEHICLE WHILE UNDER THE INFLUENCE OF ALCOHOL, DRUGS,
OR MEDICATION OF ANY KIND. SUCH OPERATION COULD BE DANGEROUS TO YOUR
SELF AND/OR OTHERS.
24. Always slow down when turning. High speed turning may cause loss of control, possible turnover
of the vehicle, and/or possible injury to operator or passenger.
25. When turning, knobby tires may increase the risk of loss of control. ALWAYS SLOW DOWN! A
collision or rollover can occur quickly, even during routine maneuvers such as turning and riding
on hill or over obstacles, if you fail to take proper precautions.
26. DO NOT RACE, JUMP, PERFORM "STUNT" RIDING OR "SPINOUTS" WHEN OPERATING
THIS VEHICLE. THIS VEHICLE IS NOT DESIGNED OR INTENDED FOR SUCH OPERATION.
27. This manual, along with the other supplements provided with your vehicle, provide guidelines for
the assembly, maintenance, and operation of this vehicle and is not intended as a service manu-
al.
28. Assembly, maintenance, and/or repair of this vehicle should only be performed by persons of
sufficient mechanical skill, experience, and judgment (such as outdoor equipment dealers, motor-
cycle dealer/shops, or small engine dealers) so that no unsafe condition or modification is made.
29. Always use extreme caution when starting the engine. Avoid touching the engine, muffler, or
drive components. These areas could cause burns on contact.
30. The battery (if applicable) contains sulfuric acid and must not come in contact with skin, eyes, or
clothing since this will cause severe burns possibly causing disfigurement. Also, battery may
generate explosive gases and must not be exposed to sparks, flame, cigarettes, or anything
flammable or an explosion may result causing severe injury. Protective gloves and face protec-
tion must be worn when servicing the battery
31. ANY OPERATOR OR PASSENGER UNDER 18 YEARS OF AGE MUST ALWAYS BE APPRO-
PRIATELY SUPERVISED BY AN ADULT AT ALL TIMES WHILE OPERATING THE VEHICLE.
32. Operating this vehicle requires skills acquired through practice over a period of time. Take the
time to learn the basic techniques well before attempting to operate the vehicle.
33. Operate only on safe and familiar terrain. Avoid loose gravel and rocks. Be careful on wet sur-
faces and allow for extra braking distance.
4

SAFETY
SAFETY
LABELS
LABELS
Read and understand all of the labels on your vehicle. The labels con-
tain important information for safe and proper operation. The labels
should be considered as permanent parts of the vehicle. If a label
comes off or becomes hard to read, contact the manufacturer for
replacement labels.
The Engine Exhaust from this product contains chemicals known to the State
of California to cause cancer, birth defects, or other
reproductive harm.
5

VEHICLE
VEHICLE
ASSEMBL
ASSEMBL
Y
Y
Step 1
Installing the R
ear and Front Wheels
Place a common automobile jack under the rear axle. Using the automobile jack raise the rear
axle off the ground approximately 12”. Slide one of the 22” rear wheels over the splined rear
axle. Make sure the air stem valve is facing outward. Note the grooves in the rear wheel hub
must match the grooves in the axle and wheel must “seat properly”. Assemble the large wash-
er, smaller washer, axle nut and tighten the axle nut using a socket or adjustable wrench. See
fig 1.
THE NEXT STEP IS VERY IMPORTANT. INSERT THE COTTER PIN THROUGH THE GROOVES IN
THE NUT THE THEN THROUGH THE REAR AXLE. BEND THE OPEN END OF THE COTTER PIN
TO ENSURE THE REAR AXLE NUT DOES NOT LOOSEN DURING OPERATION.
Use the automobile jack to raise the front of the go-kart off the ground. Remove the nuts
which are placed on the front wheel hubs. Install one of the front wheels by lining up the bolts
on the front wheel hub with the holes in the front wheel rim. NOTE: THE VALVE STEM (AIR FILL
TUBE) MUST BE TO THE OUTSIDE to ensure the wheel has been installed properly.. Place the
nuts on the bolts. Using socket wrench, evenly tighten the nuts in diagonal pattern. Put the
rubber covers over the front hubs. See fig 2.
Figure 1
Figure 2
Step 2
Attaching the Gas Tank
Next attached the gas tank to the rack as shown in. Fig 3. Follow the bolt, spacer, and washer
order to insure the tank is securely fastened. See fig 4.
Attach the gas line to the gas on/off valve on the gas tank as shown in Fig 5. Turn the gas
on/off value to either on or res. In the res position, half of the gas in the tank will be used dur-
ing operation. Turn the value to res to use the remaining gas.
Figure 3
Figure 4
Figure 5
6

VEHICLE
VEHICLE
ASSEMBL
ASSEMBL
Y
Y
Step 2
Attac
hing the Bar Cage
Attach the Bar cage using the bolts and nuts provided. See Fig 6. Tighten
the nuts after the bar cage is seated. Attach the light as shown. See Fig 7.
Attach the foam padding as shown.
Figure 6
Figure 7
7

VEHICLE
VEHICLE
ASSEMBL
ASSEMBL
Y
Y
Step 3
Attach the Front Bumper
Attach the front bumper as shown
using the bolts provided. Note there
are four attaching points. Two on the
top and two on the bottom. Fig 8.
Attaching
Points
Step 4
Connect the Wiring for the Lights
Attach the wires from the Ignition to
the wires found on the right side of
the bar cage. Attach wires with cor-
responding colors. Fig 9
Step 5
Insert the headrest
Insert the headrest as shown. Fig 10.
Refer to the Periodic Maintenance Section of this Manual for Information
on Fuel, Oil, Battery Service, and other vital information.
Figure 8
Figure 9
Figure 10
8

SPECIFICA
SPECIFICA
TIONS
TIONS
DIMENSIONS
Overall Length ------------------------------------------------------------------------------86 in. (2184mm)
Overall Width -------------------------------------------------------------------------------54 in. (1371mm)
Overall Height ----------------------------------------------------------------------------55 in. (1397mm)
Wheelbase ---------------------------------------------------------------------------------71 in. (1803mm)
Ground Clearance Front ---------------------------------------------------------------6.5 in. (165mm)
Ground Clearance Rear ---------------------------------------------------------------- 10 in. (254mm)
ENGINE
Type ---------------------------------------------------------------------------Forced Air-Cooled 4-Stroke
Engine capacity ------------------------------------------------------------------------------------------150cc
Bore x Stroke ----------------------------------------------------------------------------57mm x 57.8mm
Displacement ------------------------------------------------------------------------------------------149.6cc
Corrected compression ratio --------------------------------------------------------------------------- 9.2:1
Carburetor ---------------------------------------------------------------------------------------Keihin VE49A
Output Power -------------------------------------------------------------------------9.2 hp @ 7500 RPM
Maximum Torque -------------------------------------------------------------------8.0 nm @ 4000-4500
Starting --------------------------------------------------------------------------------------------------- Electric
Ignition ----------------------------------------------------------------------------------------------------- C.D.I.
Lubrication ---------------------------------------------------------------------------- Pressure & Splash
Transmission ------------------------------------------------------------------- Automatic (C.V.T system)
Spark plug ------------------------------------------------------------------------------------- C7HSA(NGK)
Plug gap ---------------------------------------------------------------------------------------------0.6-0.7mm
Fuel Type ------------------------------------------------------------------------------------------- (Unleaded)
Lubricate oil ------------------------------------------------------------------------------------- SAE-10W/40
CAPACITIES
Maximum Load------------------------------------------------------------------------ Double Seats/400lbs
Fuel tank ------------------------------------------------------------------------------------------------1.85 Gal
Engine oil ------------------------------------------------------------------------------------------------- 30 Oz
Starting ---------------------------------------------------------------------------------------------------- 5 sec.
Battery ------------------------------------------------------------------------------------------------ 12V 10Ah
Head Light -------------------------------------------------------------------------------------------- 12V 15W
Tail Light ----------------------------------------------------------------------------------------- 12V 10W/5W
Fuse ----------------------------------------------------------------------------------------------------------- 10A
SPECIFICATIONS
Brake Track -------------------------------------------------------------------------------- < 7 m@20miles/h
Top speed ------------------------------------------------------------------------------------ 36 MPH Est.
9

SPECIFICA
SPECIFICA
TIONS
TIONS
CHASSIS
Front Brakes --------------------------------------------------- Dual Hydraulic Disc, Left Foot Control
Front tire ------------------------------------------------------------------------------------------------ 19 x 7-8
Rear tire --------------------------------------------------------------------------------------------- 22 x 10 -10
Front Suspension --------------------------------------------------------------- Independent Dual A-Arm
Rear Suspension -------------------------------------------- Swing Arm/Double Oil Damped Shock
Restraint System -------------------------------------------------------------------- Dual 4-point Harness
Final Drive Chain ------------------------------------------------------------------- (KMC) O-Ring Chain
TIRE PRESSURE
Front -------------------------------------------------------------------------------------------------------- 2.5 psi
Rear ------------------------------------------------------------------------------------------------------- 3.0 psi
WEIGHT
Net Weight ----------------------------------------------------------------------------------------------- 528 lbs
10

OPERA
OPERA
TION CONTROLS
TION CONTROLS
OOppeerraattiioonn
CCoonnttrroollss
WARNING
- Do not attempt to start or operate the engine until completely familiar with the
location and use of each control necessary to operate this vehicle and the operator is seated properly
in the vehicle. The operator must know how to stop this vehicle before operation.
A.
Throttle
The right foot pedal is the throttle that controls the Kart speed. As the engine speed is increased above
idle, the clutch automatically engages and moves the vehicle forward. To disengage the clutch at any
time, allow the throttle to return to the idle position. (See Fig. 1)
B.
Brake
The brake is located on the left side of the kart (See Fig.1). Applying pressure to the
brake pedal draws the brake caliper around the brake discs and slows or stops
the vehicle.
B.
Start
engine
Position then engine stop button in the run position.
Insert the key into key-switch, depress the brake pedal,
turn the key clockwise, release the key when the engine
starts. The engine will warm up within 5 minutes and the
engine choke will close automatically and operate at the
normal RPM (Warning: Don’t actuate starter more than 5
seconds at one time).
NOTE: THE BRAKE PEDAL MUST BE
DEPRESSED WHEN STARTING THE ENGINE.
THE ENGINE WILL NOT START WITHOUT THE
BRAKE BEING DEPRESSED
D. Engine stop button
Important-stop button test.
Before driving this vehicle, test the Engine Stop Button to assure that it is operating properly. With the
engine running, position the Engine Stop Button to the off position. The engine should stop.
Prior to starting the engine, check the throttle assembly to ensure that when the pedal
is pushed all the way forward the assembly is working smoothly and returns to idle
when released. Do not operate if pedal or engine throttle linkage fail to return to idle.
If you are unable to correct the problem through lubrication, adjustment or replace-
ment of worn parts , contact the manufacturer for assistance.
Engine Stop Button
Key Switch
Brake Pedal
Throttle Pedal
11

OPERA
OPERA
TION CONTROLS
TION CONTROLS
E. Reverse Operation
When the forward / reverse lever is in the "D" position the
vehicle will move forward when the throttle is pressed. When
the forward / reverse level is pulled back to “R” the vehicle will
move backward when the throttle is pressed. (See Fig.4)
When reverse lever is in the drive position, there need to be
1/2 inch of play in the reverse level. If the adjustment is not
correct, then loosen the lock nut #2, then adjust lock nut #1 to
the proper amount of play.
F. Parking Brake
See Fig 1. on page ?? for the location of the parking brake.
The to engage the parking brake pull back on the lever. THE
PARKING BRAKE SHOULD ONLY BE USED WHEN THE
VEHICLE IS NOT MOVING.
G. Passengers
The vehicle allows for two riders only. Combine maximum weight of driver and the passenger should
not exceed 180kg or 400lbs.
NOTE:
Insure the parking brake is not engaged when the vehicle is in operation. Operating
the vehicle with the parking brake engaged will wear the brake pads quickly and brak-
ing power could be lost.
Note: Push the throttle slowly
when the reverse in engaged.
12

OPERA
OPERA
TION CONTROLS
TION CONTROLS
H. Seat Adjustment
The seat must always be securely fastened in the
position which best affords the operator control of
the foot pedals, steering wheel, and the remote
stop button.
a. Pull seat adjustment handle upward to disengage
seat slide.
b. Move seat to desired position.
c. Be sure seat adjustment handle snaps back into
place and that seat is locked into position.
I. Seat Belts
This Vehicle is equipped with a seat belt for the operator and a seat belt
for the passenger of a double seat vehicle (if applicable). No one should
ever attempt to ride the Vehicle without being seated, with the seat belt
properly secured.
After being seated in the vehicle, place your arms through the shoulder
straps. Next, buckle the lap belt and adjust the tightness of the lap belt
by pulling the loose ends outward. The shoulder harness should then be
adjusted by pulling down on the loose ends.
Before attempting to adjust the seat, ensure that the vehicle engine is stopped.
Never operate this vehicle when the seat is not securely fastened. To do so could
result in the possibility of severe personal injury or loss of life. Before attempting to
adjust the seat, ensure the vehicle’s engine is stopped.
Operating the vehicle without the seat belt fastened properly could result in the
operator or passenger (if applicable) being ejected from the vehicle, and coming in
contact with the ground or the custom bar cage in case of collisions or rollover. This
could result in severe injury or death.
13

PRE-OPERA
PRE-OPERA
TION INSPECTION
TION INSPECTION
Before each drive, it is important to inspect your Kart and make sure any problems you find are
corrected. Apre-drive inspection is a must, not only for safety, but because having a breakdown, or even
a flat tire, can be a major inconvenience.
If your Kart has overturned or has been involved in a collision, do not drive it until your Kart has been
inspected by an authorized service center. There may be damages or other problems you cannot see.
Pre-drive Inspection
Check the following items before you operate the vehicle:
Engine Oil
Check the level and add oil if needed. Check for leaks. Refer to
the “Periodic Maintenance” section of this manual for the proper
amount of oil.
Fuel
Check the level and add fuel if needed. Also make sure the fuel fill cap is securely fastened.
Check for leaks. Refer to item number 17 in the “Safety” section of this manual for proper instructions
on filling the gas tank.
Tires
Use a gauge to check the air pressure. Adjust if needed. Also look for signs of damages or excessive
wear. Refer to the “Specifications” section of this manual for proper pressure measurements for each
tire.
Nuts & Bolts
Check the wheels to see that the axle nuts are tight. Use a wrench to make sure all accessible nuts,
bolts, and fasteners are tight.
Underbody & Exhaust System
Check for and remove any dirt, vegetation or other debris that could be a fire hazard or interfere with
the proper operation of the vehicle.
Operating the vehicle without the seat belt fastened properly could result in the
operator or passenger (if applicable) being ejected from the vehicle, and coming in
contact with the ground or the custom bar cage in case of collisions or rollover. This
could result in severe injury or death.
14

PRE-OPERA
PRE-OPERA
TION INSPECTION
TION INSPECTION
Air Cleaner Housing Drain Tube
Check for deposits in the drain tube. If necessary, clean the tube and check the air cleaner housing.
Refer to the “Periodic Maintenance” section of this manual for instructions on cleaning the air filter.
Leaks, Loose Parts
Walk around your Kart and look for anything that appears unusual, such as a leak or loose cable.
Lights
Make sure the headlight, brake light and taillight are working properly.
Throttle
Check the freeplay and adjust if needed. Press the throttle to make sure it moves smoothly without stick-
ing, and snaps back automatically when it is released.
Brakes
Press the rear brake pedal several times, check for proper brake pedal freeplay. Make sure there is no
brake fluid leakage. Check operation of the pedal. It should move smoothly and there should be a firm
feeling when the brake is applied.
PERFORM A BRAKE TEST: Have the operator sit in the seat, then push the vehicle from behind.
Once the vehicle is rolling, have the operator apply the brake pedal. The vehicle should come to a stop.
Test the brakes at slow speed after starting out to make sure they are working properly. If the brakes
do not provide proper braking performance, inspect the brakes for wear.
Engine Stop Button
While engine is running, press and hold the Engine Stop Button for two seconds. Make sure engine
stops.
Steering Wheel
Check that the wheels turn properly as you turn the steering wheel.
Cables
Check all cable housings for wear. Check the fittings for looseness. Replace or tighten as needed.
15

BEFORE
BEFORE
YOU ST
YOU ST
AR
AR
T
T
THE ENGINE
THE ENGINE
Before operating your vehicle, you need to make sure you and your vehicle are both ready for opera-
tion. To help get you prepared, this section discusses how to evaluate your driving readiness. You
should also complete a Pre-Operation inspection as described previously in this manual.
Before you drive your Kart for the first time, we urge you to:
• Read this owner's manual and the labels on your vehicle carefully.
• Make sure you understand all the safety messages.
• Know how to operate all the controls.
• Have adult present if under 18 years old.
Before each drive, be sure:
• You wear your seat belt at all times while driving your kart or as a passenger.
• You feel well and are in good physical and mental condition.
• You are wearing an approved motorcycle helmet (with chin strap tightened securely), eye protection,
and other protective clothing.
• You don't have any alcohol or drugs in your system.
Protective Apparel
For your safety, we strongly recommend that you always wear an approved motorcycle helmet, eye pro-
tection, boots, gloves, long pants, long-sleeved shirt or jacket, and closed toe shoes or boots whenev-
er you drive. Although complete protection is not possible, wearing proper gear can reduce the chance
of injury when you operate the vehicle.
The following suggestions will help you choose the proper driving gear.
Helmet and Eye Protection
Your helmet is your most important piece of driving gear because it offers the best protection against
head injuries. Ahelmet should fit your head comfortably and securely. An open-face helmet offers some
protection, but a full-face helmet offers more. Regardless of the style, look for a DOT (Department of
Transportation) sticker on any helmet you buy. Always wear a face shield or goggles to protect your eyes
and help your vision.
Operating this vehicle without wearing an approved motorcycle helmet, eye protec-
tion,and protective clothing could increase your chances of head and/or eye injury,
and the possibility of death in the event of a severe accident. Always wear an
approved motorcycle helmet that fits properly and wear eye protection
(goggles or face s held), gloves , boots , long-s leaved shirt or jacket, long pants,
and closed toe shoes or boots.
16
/