GREE Console GEH18TC Owner's manual
- Category
- Split-system air conditioners
- Type
- Owner's manual
This manual is also suitable for

Change for Life
Console Type
Air Conditioner
Owner's Manual
Residential Air Conditioners
Thank you for choosing Residential Air Conditioners,please read this owner’s
manual carefully before operation and retain it for future reference.
MODEL: GEH09AA-K3DNA1A
GEH12AA-K3DNA1A
GEH18AA-K3DNA1A

Contents
OPERATION INSTRUCTIONS
1. Part names and their functions ........................................................................................................... 1
2. How to use the remote control to operate the unit .............................................................................. 2
3. Maintenance ...................................................................................................................................... 7
4. Operating guide ................................................................................................................................. 10
5. Precautions ....................................................................................................................................... 12
6. Checking before contact the service man ........................................................................................ 13
INSTALLATION INSTRUCTIONS
7. Installation of indoor unit .................................................................................................................... 14
8. Outdoor unit installation ..................................................................................................................... 22
9. Pipe preparation...................................................................................................................................23
10. Refriger
ant piping work ..................................................................................................................... 24
11. Air purging and check or pipe leakage .............................................................................................. 25
12. Liquid pipe and drain pipe .................................................................................................................. 26
13. Routine check after installation ......................................................................................................... .27
The figures in this manual may be different with the material objects, please
refer to the material objects for reference.
This appliance is not intended for use by persons (including children) with
reduced physical , sensory or mental capabilities or lack of experience
and knowledge,unless they have been given supervision or instruction
concerning use of the appliance by a person responsible for their safety.
Children should be supervised to ensure that they do not play with the appliance.
External static pressures at the appliance was tested is 0 Pa
Fuse link: T250 V; 3.15 A
Thank you for selecting our products
One of the benefits awaiting you with our room air conditioner is not only
comfort of life but also good health. This operation instruction brings you the
many omfort and technological features your unit has to offer. In addition, it
provides you vital information about maintenance, service and economical
operating. Take the next few minutes to discover how to get your comfort and
economy of the operation from your new room air conditioner.

17
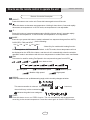
Air outlet selection switch
This setting blows air from
upper outlet only.
•
This setting automatically
decides a blow pattern
depending on mode and
conditions.
•
• The unit is shipped from the
factory with this setting.
• This setting is recommended.
16
1
18.Air inlet: (Back and side)
19.Refrigerant piping and inter-unit cable
20.Drain hose
21.Earth terminal:
•It is inside of this cover.
22.Air outlet
Appearance of the outdoor unit may
differ from some models.
Outdoor unit
wiring terminal
OUTDOOR UNIT
N(1)
2 3
BU BK BN
YELLOW/
GREEN
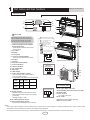
Part names and their functions
INDOOR UNIT
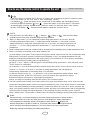
CAUTION
OPERATION INSTRUCTIONS
25℃
25℃
① If the supply cord is damaged, it must be replaced by the manufacturer or its service agent or a similarly qualified person in order to avoid a hazard.
③ An all-pole disconnection switch having a contact separation of at least 3mm in all poles should be connected in fixed wiring.
② The appliance shall be installed in accordance with national wiring regulations.
NOTE:
1. Titanium Apatite Photocatalytic
Air-Purifying Filter:
12. Run lamp
13. LED display
16.Air outlet selection switch
17.Room temperature sensor:
•It senses the air temperature around the unit.
15.Signal receiver:
• It receives signals from the remote controller.
• When the unit receives a signal, you will hear
a short beep.
•Settings changed.....beep
14. Indoor Unit ON/OFF switch:
• Push this switch once to start operation.
Push once again to stop it.
2. Air outlet
3. Display
4. Front panel
5. Louvers (vertical blades)
• The louvers are inside of the air outlet.
6. Air inlet
7. Air filter
8. Flap (horizontal blade)
9. Cool mode lamp
10. Heat mode lamp
11. Dry mode lamp
• These filters are attached to the inside
of the air filters.
• The operation mode refers to the following table.
• This switch is useful when the remote controller
is missing.
Model Mode
Temperature
setting
Air flow rate
AUTO
AUTO
COOL
AUTO
COOLING
ONLY
HEAT
PUMP
19
20
21
22
18
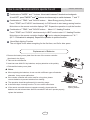
Opening the Front Panel
Indoor unit
wiring terminal
N(1) 2 3
BU BK BN
YELLOW/
GREEN
3
9
12
10
14
15
13
11
3
1 2
5
6
2
4
7
8
Before opening the front panel, be sure to
stop the operation and turn the breaker OFF.
Do not touch the metal parts on the inside
of the indoor unit, as it may result in injury.

2
T-ON T-OFF
1
7
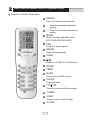
Press it to set HEALTH or AIR function.
8
I FEEL
/
4
3
2
5
6
11
13
12
16
10
14
9
15
Press it to start or stop operation.
ON/OFF
MODE
+
-
Press it to select operation mode
(AUTO/COOL/DRY/FAN/HEAT).
: Press it to increase temperature
setting.
: Press it to decrease temperature
setting.
FAN
Press it set swing angle.
QUIET
SWING
CLOCK
X-FAN
TEMP
TURBO
SLEEP
LIGHT
Press it to set fan speed.
Press it to set
Press it to set auto-off/auto-on timer.
Press it set clock.
3
15
5
4
14
7
16
13
12
9
8
11
10
2
1
6
Press it to turn on/off the light.
QUIET function.
Remote Controller Description
OPERATION INSTRUCTIONS
How to use the remote control to operate the unit

6
Press this button to set up &down swing angle, which circularly changes as below
:
OFF
This remote controller is universal . If any command , or is sent out,
the unit will carry out the command as
indicates the guide louver swings as:
Press this button to turn on I FEEL function. The unit automatically adjust temperature
according to the sensed temperature. Press this button again to cancel I FEEL function.
I FEEL:
SWING:
7
Remote Controller Description
ON/OFF :
MODE :
+ :
AUTO
COOL
DRY
FAN HEAT
*
*Note:Only for models with heating function.
After energization, AUTO mode is defaulted. In AUTO mode, the set temperature will not
be displayed on the LED of the indoor, and the unit will automatically select the suitable
operation mode in accordance with the room temperature to make indoor room comfortable.
3
This button is used for setting Fan Speed in the sequence that goes from AUTO,
to
then back to Auto.
,
, ,
,
FAN
:
1
4
3
2
5
Press this button to turn on the unit .Press this button again to turn off the unit.
Press this button to decrease set temperature. Holding it down above 2 seconds rapidly
decreases set temperature. In AUTO mode, set temperature is not adjustable.
Press this button to increase set temperature.Holding it down above 2 seconds rapidly
increases set temperature. In AUTO mode, set temperature is not adjustable.
Auto
Medium speedLow-Medium speedLow speed
High speedMedium-High speed
Each time you press this button,a mode is selected in a sequence that goes from AUTO,
COOL,DRY, FAN,and HEAT
*
, as the following:
How to use the remote control to operate the unit
OPERATION INSTRUCTIONS

Press this button, could select displaying the indoor setting temperature or indoor ambient
temperature.When the indoor unit firstly power on it will display the setting temperature,
if the temperature's displaying status is changed from other status to" ",displays the
ambient temperature, 5s later or within 5s, it receives other remote control signal that will
return to display the setting temperature. if the users haven't set up the temperature
displaying status,that will display the setting temperature.
SLEEP:
9
Press this button, can select Sleep 1 ( ), Sleep 2 ( ),Sleep 3 ( ) and cancel the Sleep,
circulate between these, after electrified, Sleep Cancel is defaulted.
Sleep 1 is Sleep mode 1, in Cool, Dehumidify modes: sleep status after run for one hour, the main
unit setting temperature will increase 1
10
TEMP:
4
How to use the remote control to operate the unit
OPERATION INSTRUCTIONS
Sleep 3- the sleep curve setting under Sleep mode by DIY:
(1) Under Sleep 3 mode, press "Turbo" button for a long time, remote control enters into user individuation sleep
setting status, at this time, the time of remote control will display "1 hour ", the setting temperature "88" will
(2) Adjust "+" and "-" button, could change the corresponding setting temperature, after adjusted, press
"Trubo "button for confirmation;
(3) At this time, 1 hour will be automatically increased at the timer postion on the remote control, (that are
(4) Repeat the above step (2)
~ (3) operation, until 8 hours temperature setting finished, sleep
curve setting finished, at this time, the remote control will resume the original timer display;
display the corresponding temperature of last setti
ng sleep curve and blink (The first entering will display
according to the initial curve setting value of original factory);
"2 hours " or "3 hours " or "8 hours "), the place of setting temperature "88" will display the
corresponding temperature of last setting sleep curve and blink;
temperature display will resume to original setting temperature.
●
●
Sleep3- the sleep curve setting under SLEEP mode by DIY could be inquired:
The user could accord to sleep curve setting method to inquire the presetting sleep curve, enter into user
individuation sleep setting status, but do not change the temperature, press "Turbo" button directly for confirmation.
Note: In the above presetting or enquiry procedure, if continuously within10s, there is no button pressed, the
sleep curve setting within10s, there is no button pressed, the sleep curve setting status will be automatically
quit and resume to display the original displaying. In the presetting or enquiry procedure, press "ON/OFF"
button, "Mod
e" button, "Timer"button or "Sleep" button, the sleep curve setting or enquiry status will quit similarly.
●
●
℃,setting temperature increased 2℃, the unit will run at this
setting temperature; In Heat mode: sleep status after run for one hour, the setting temperature will
decrease 1
℃, 2 hours, setting temperature will decrease 2
℃, then the unit will run at this setting
temperature.
●
Sleep 2 is sleep mode 2, that is air conditioner will run according to the presetting a group of sleep temperature curve.
P
ress this button to achieve the on and off of healthy and scavenging functions in operation status.
Press this button for the first time to start scavenging function;
LCD
displays“ ”. Press the button for the
second time to start healthy and scavenging functions
simultaneously; LCD displays“ ” and “ ” .
Press this button for the third time to quit healthy
and scavenging functions simultaneously. Press the button for the fourth time to start healthy
function; LCD display “ ”
. Press this button again to repeat the operation above.
/
8

T-ON T-OFF:
present time.Holding down either button above 2 seconds increases or decreases the
CLOCK :
time by 1 minute every 0.5 second and then by 10 minutes every 0.5 second. During
blinking after setting, press CLOCK button again to confirm the setting,and then
Press T-ON button to initiate the auto-ON timer. To cancel the auto-timer program, simply
press this button again.
After press of this button, disappears and "ON "blinks .0
0:00 is displayed for ON time
setting. Within 5 seconds, press + or - button to adjust the time value. Every press of either
button changes the time setting by 1 minute. Holding down either button rapidly changes the
time setting by 1 minute and then 10 minutes. Within 5 Seconds after setting, press TIMER
ON button to confirm.
12
will
be constantly displayed.
13
Press T-OFF button to initiate the auto-off timer. To cancel the auto-timer program, simply
press the button again.TIMER OFF setting is the same as TIMER ON.
5
How to use the rem ote cont rol to operate the unit
OPERATION INSTRUCTIONS
Press CLOCK button, blinking . Within 5 seconds,pressing +or - button adjusts the
LIGHT:
15
Press LIGHT button to turn on the display's light and press this button again to turn off
the display 's light. If the light is turned on , is displayed. If the light is turned off,
disappears.
TURBO:
14
X-FAN:
16
Pressing X-FAN button in COOL or DRY mode,the icon is displayed and the indoor
fan will continue operation for 10 minutes in order to dry the indoor unit even though you
have turned off the unit.
After energization, X-FAN OFF is defaulted. X-FAN is not available in AUTO,FAN or
HEAT mode.
Press this button to activate / deactivate the Turbo function which enables the unit to
reach the preset temperature in the shortest time. In COOL mode, the unit will blow strong
cooling air at super high fan speed. In HEAT mode, the unit will blow strong heating air
at super high fan speed.
Press "+ " and "-" buttons simultaneously
to lock or unlock the keypad. If the remote
controller is locked, is
displayed. In this case,
pressing any button, blinks
three times.
Combination of "+" and "-" buttons: About lock
17
QUIET:
11
Press this button, the Quiet status is under the Auto Quiet mode (display and "Auto"" " signal)
and Quiet mode (display " " singal) and Quiet OFF (there is no signal of " " displayed),
after powered on, the Quiet OFF is defaulted. Note: the Quiet function cannot be set up in Fan
and Dry mode;Under the Quiet mode (Display " " signal), the fan speed is not available.

6
How to use the remote control to operate the unit
OPERATION INSTRUCTIONS
★
●
●
●
●
●
1.Remove the battery cover plate from the rear of the remote controller.
(As shown in the figure)
2.Take out the old batteries.
3.Insert two new AAA1.5V dry batteries, and pay attention to the polarity.
4. Reinstall the battery cover plate.
When replacing the batteries, do not use old or different types of batteries,
If the remote controller will not be used for a long time, please
otherwise, it may cause malfunction.
remove batteries to prevent batteries from leaking.
The operation should be performed in its receiving range.
It should be kept 1m away from the TV set or stereo sound sets.
If the remote controller does not operate normally, please take the
batteries out and reinsert them after 30 seconds.If it still can't operate properly,
Notes:
replace the batteries.
Sketch map for
replacing batteries
Replacement of Batteries
At unit OFF, press "MODE "
and " - " buttons simultaneously to switch between and .
℃
℉
About Back-lighting Function
21
Combination of "MODE " and "-" buttons :
18
About switch between Fahrenheit and centigrade
Press
"
TEMP
"
and
"
CLOCK
"
simultaneously in COOL mode to start energy-saving function.
Nixie tube on the remote controller displays
"
SE
"
. Repeat the operation to quit the function.
Combination of " TEMP " and "CLOCK" buttons : About Energy-saving Function
19
Press "TEMP" and "CLOCK" simultaneously in HEAT mode to start
The unit lights for 4s when energizing for the first time, and 3s for later press.
8 Heating Function
.
Nixie tube on the remote controller displays
" " and a selected temperature of "
8"
(46 if Fahrenheit is adopted). Repeat the operation to quit the function.
Combination of " TEMP " and "CLOCK" buttons : About 8 Heating Function
20
℉

7
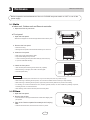
Maintenance
Before inspection and maintenance of the unit. PLEASE set power switch to “OFF” to cut off the
power supply.
3.1 Units
3.2 Filters
CAUTION
● Indoor unit, Outdoor unit and Remote controller
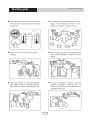
● Front panel
1. Wipe them with dry soft cloth.
1. Open the front panel.
1. Open the front panel.
2. Remove the air filter.
Slide the two stoppers on the left and right sides inward until they click.
2. Remove the front panel.
• Remove the string.
• Allowing the front panel to fall forward will enable you to remove it.
3. Clean the front panel.
• Wipe it with a soft cloth soaked in water.
• Only neutral detergent may be used.
• In case of washing the front panel with water,dry it with cloth, dry
it up in the shade after washing.
4. Attach the front panel.
• Insert the front panel into the grooves of the unit (3 places).
• Press the claws on the right and left of the air filter down slightly, then
pull upward.
3. Take off the Titanium Apatite Photocatalytic Air-Purifying
Filter.
• Hold the tabs of the frame, and remove the claws in 4 places.
• Don’t touch the metal parts of the indoor unit. If you touch those parts, this may cause an injury.
• When removing or attaching the front panel, use a robust and stable stool and watch your steps carefully.
• When removing or attaching the front panel, support the panel securely with hand to prevent it from falling.
• For cleaning, do not use hot water above 40°C, benzine, gasoline, thinner, nor other volatile oils, polishing compound,
scrubbing brushes, nor other hand stuff.
• After cleaning, make sure that the front panel is securely fixed.
• Attach the string to the right, inner-side of the front grille.
• Close the panel slowly.
String
Place front
panel in
grooves.
OPERATION INSTRUCTIONS
String

8
4. Clean or replace each filter.
6. Wash the air filters with water or clean them with vacuum
cleaner.
1. Vacuum dusts, and soak in warm water or water for about 10 to 15 minutes if dirt is heavy.
Remove the tabs on the filter frame and replace with a new filter.
2. Do not remove filter from frame when washing with water.
3. After washing, shake off remaining water and dry in the shade.
4. Since the material is made out of paper, do not wring out the filter when removing water from it.
See figure.
5. Set the air filter and Titanium Apatite Photocatalytic
Air-Purifying Filter as they were and close the front
panel.
• Operation without air filters may result in troubles as dust will accumulate
inside the indoor unit.
• If the dust does not come off easily, wash them with neutral detergent
thinned with lukewarm water, then dry them up in the shade.
• Dispose of the old filter as flammable waste.
• Dispose of the old filter as flammable waste.
• It is recommended to clean the air filters every week.
Air filter
Titanium Apatite
Photocatalytic
Air-Purifying
Filter
The Titanium Apatite Photocatalytic Air-Purifying Filter can be renewed by washing it with water
once every 6 months. We recommend replacing it once every 3 years.
3.3 Titanium Apatite Photocatalytic
Air-Purifying Filter
NOTE
● Maintenance
● Replacement
• Operation with dirty filters:
(1) cannot deodorize the air. (2) cannot clean the air.
(3) results in poor heating or cooling. (4) may cause odour.
OPERATION INSTRUCTIONS
Maintenance

9
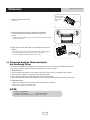
1. Operate the “FAN only” for several hours on a fine day to dry out the inside.
2. After operation stops, turn off the breaker for the room air conditioner.
3. Clean the air filters and set them again.
• When a multi outdoor unit is connected, make sure the heating operation is not used at the other room befure you use the fan
operation.
4. Take out batteries from the remote controller.
• Press “MODE” button and select “FAN” operation.
• Press “ON/OFF” button and start operation.
3.4 Before a long idle period
Check
NOTE
Check that the base, stand and other fittings of the outdoor unit are not decayed or corroded.
Check that nothing blocks the air inlets and the outlets of the indoor unit and the outdoor unit.
Check that the drain comes smoothly out of the drain hose during COOL or DRY operation.
• If no drain water is seen, water may be leaking from the indoor unit. Stop operation and consult
the service shop if this is the case.
OPERATION INSTRUCTIONS
Maintenance
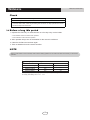
The operating temperature range (outdoor temperature) for cooling unit is 10℃
~
43℃;
for cooling and heating unit is -15℃
~
43℃.
Working temperature range
Maximum cooling
Minimum cooling
Maximum heating
Minimum heating
Indoor sideDB/WB(
o
C)
Outdoor sideDB/WB(
o
C)
32/23
21/15
27/---
20/---
43/-
10/-
24/18
-15/-

10
Operating guide
OPERATION INSTRUCTIONS
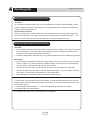
Working principle and special functions for cooling
Working principle and special functions for heating
Defrosting:
*
When outdoor temperature is low but high humidity, after a long while running, frost will
form on outdoor unit, that will effect the heating effect, at this time, the auto defrosting
function will act, the heat running will stop for 8-10mins.
*
During the auto defrosting, the fan motors of indoor unit and outdoor unit will stop.
*
During the defrosting, the indoor indicator flashes(or display “H1”), the outdoor unit may
emit vapor,
This is due to the defrosting, it isn't malfunction.
*
After defrosting finished,the heating will recover automatically.
The climate type of this unit is according to the nameplate.
Air conditioner absorbs heat in the room and transmit to outdoor and discharged, so that
indoor ambient temperature decreased, its cooling capacity will increase or decrease by
outdoor ambient temperature.
If the unit is running in COOL mode and in low temperature, there will be frost formed on
the heat exchanger, when indoor heat exchanger temperature decreased below 0 , the
indoor unit microcomputer will stop compressor running and protect the unit.
℃
Principle:
*
Air conditioner absorbs heat from outdoor and transmits to indoor, in this way to increase
room temperature. This is the heat pump heating principle, its heating capacity will be
reduced due to outdoor temperature decrease.
*
If outdoor temperature becomes very low, please operate with other heating equipments.
Anti-cool wind function:
In Heat mode, the following three kinds of status, if indoor heat exchanger hasn't achieve
certain temperature that indoor fan motor will not start, in this way to prevent blowing cool
wind (within 3mins):
1. Heat operation just startedup. 2. After Auto defrosting operation is finished.
3. Heating under low temperature.
Principle:
Anti-freezing function:

11
Operating guide
OPERATION INSTRUCTIONS

12
OPERATION INSTRUCTIONS
Precautions
5

13
OPERATION INSTRUCTIONS
CAUSESPROBLEM
Checking before contact the service man
6
-
 1
1
-
 2
2
-
 3
3
-
 4
4
-
 5
5
-
 6
6
-
 7
7
-
 8
8
-
 9
9
-
 10
10
-
 11
11
-
 12
12
-
 13
13
-
 14
14
-
 15
15


GREE Console GEH18TC Owner's manual
- Category
- Split-system air conditioners
- Type
- Owner's manual
- This manual is also suitable for
Ask a question and I''ll find the answer in the document
Finding information in a document is now easier with AI
Related papers
-
GREE Cozy Owner's manual
-
-
-
-
-
-
GREE Terra GWH09TB-D3DNA1A Owner's manual
-
-
-
Other documents
-
Sinclair ASP-18AI User manual
-
-
-
mundoclima MUCNR-H3M “MultiSplit Console type” Installation guide
-
Tosot TM09HEDI Multi Zone Mini Console Indoor Units
-
Inventor C1VI-18 Owner's manual
-
-
Trane ms-svu052a-en User manual
-
 Inventor A2VO-18 Owner's manual
-
CH CH-M12K6B Owner's manual
