
MS 3100
Owner’s manual and mounting instruction
Mode d’emploi et manuel d’installation
Bedienungs- und Einbauanleitung
Gebruiksaanwijzing en inbouwhandleiding
Istruzioni d’uso e d’installazione
Instrucciones de manejo y de montaje
Bruksanvisning och monteringsanvisning
Betjeningsvejledning og monteringsanvisning
www.vdodayton.com
3112 316 0888.1
0361608881
05/2000 ri
English
Français
Deutsch
Nederlands
ItalianoEspañol
Svenska
Dansk
USA
0
5
25
75
95
100
0
5
25
75
95
100
0
5
25
75
95
100
0
5
25
75
95
100

Attention!
Only use this system when it is safe to do so. It is more important to keep your eyes on
the road and your hands on the wheel.
Due to constantly changing traffic conditions, we unfortunately cannot guarantee
100 % precision under all circumstances.
Attention !
N’utilisez le système que si vous ne mettez pas en danger votre vie ou celle des autres
usagers de la route. Il est plus important de surveiller le trafic routier et d’avoir les
mains sur le volant que de lire les informations apparaissant sur l’écran.
Étant donné que le sens de circulation a pu être changé entre temps, nous ne pouvons
pas vous garantir une exactitude à 100 % des indications données.
Achtung!
Benutzen Sie das System nur, wenn die Sicherheit es zuläßt. Es ist wichtiger, auf den
Verkehr zu achten und die Hände am Lenkrad zu lassen.
Aufgrund sich ständig ändernder Verkehrsführungen kann leider keine 100 %ige
Genauigkeit unter allen Umständen gewährleistet werden.
Belangrijk!
Gebruik het systeem uitsluitend, als de veiligheid het toelaat. Het is belangrijker om
op het verkeer te letten en de handen aan het stuur te houden.
Op grond van voortdurend veranderende verkeerssituaties kan helaas geen 100 %
nauwkeurigheid onder alle omstandigheden worden gegarandeerd.
Attenzione!
Usare questo sistema solo se il traffico lo ammette. E´ importante tenere d´occhio la
strada e le mani sul volante.
A causa dei cambiamenti continui della viabilità non si può garantire una precisione
assoluta in tutte le circostanze.
¡Atención!
Utilice el sistema sólo si lo permite el nivel de seguridad. Es más importante atender al
tráfico y mantener las manos en el volante.
Debido a que las rutas cambian constantemente, lamentamos no poder garantizar un
100 % de exactitud en cualquier ocasión.
Observera!
Använd systemet bara när säkerheten tillåter. Det är viktigare att iaktta vad som
händer i trafiken och hålla händerna på ratten.
På grund av den ständigt förändrade trafiksituationen kan ingen garanti för 100%:ig
noggrannhet under alla omständigheter lämnas.
Vigtigt!
Brug systemet kun, når De ikke bringer andre eller sig selv i fare. Vær opmærksom på
trafikken, og hold hænderne på rattet.
Pga. løbende ændringer i vejnettet kan der ikke opnås 100% overensstemmelse
mellem det digitale vejkort og den aktuelle trafiksituation.
2
3
3112 316 0888.1 Neudruck
Donnerstag, 24. August 2000 10:53:56
Farbprofil: Deaktiviert
Komposit Standardbildschirm
Page is loading ...
Page is loading ...

5
Mode d’emploi Page 53
Illustrations Pages 3, 430 - 431
Instructions de montage Page 93
Garantie et service après-vente Page 419
Bedienungsanleitung Seite 99
Abbildungen Seiten 3, 430 - 431
Einbauanleitung Seite 139
Garantieleistung und Service Seite 419
Operating instructions Page 7
Illustrations Pages 3, 430 - 431
Mounting instructions Page 47
Guarantee and service Page 419
EnglishFrançais
Deutsch
Gebruiksaanwijzing Pagina 145
Afbeeldingen Pagina’s 3, 430 - 431
Inbouwaanwijzing Pagina 185
Garantie en service Pagina 419
Nederlands
Istruzioni d’uso Pagina 191
Figure Pagine 3, 430 - 431
Instruzioni per il montaggio Pagina 231
Garanzia e servizio Pagina 419
Italiano
Instrucciones de manejo Página 237
Ilustraciones Páginas 3, 430 - 431
Manual de instalación Página 277
Garantía y servicio técnico Página 419
Español
Bruksanvisning Sidan 283
Bilder Sidorna 3, 430 - 431
Monteringsanvisning Sidan 323
Garantiåtaganden och service Sidan 419
Svenska
Betjeningsvejledning Side 329
Illustrationer Sider 3, 430 - 431
Monteringsvejledning Side 369
Garanti og service Side 419
Dansk
Operating instructions Page 375
Illustrations Pages 3, 430 - 431
Mounting instructions Page 413
Warranty and service Page 419
USA
Page is loading ...

CONTENTS
7
English
System Overview . . . . . . . . . . . . . . . . . . . . . . . . . . . . . . . . . . . . . . 8
GENERAL INFORMATION . . . . . . . . . . . . . . . . . . . . . . . . . . . . . . . . . . . 9
Tips on the use of this manual . . . . . . . . . . . . . . . . . . . . . . . . . . . . . . 9
ATTENTION! Important notes for safe usage . . . . . . . . . . . . . . . . . . . . . . . 9
Registration . . . . . . . . . . . . . . . . . . . . . . . . . . . . . . . . . . . . . . . . 9
GENERAL INFORMATION . . . . . . . . . . . . . . . . . . . . . . . . . . . . . . . . . . 10
How does the navigation system work ? . . . . . . . . . . . . . . . . . . . . . . . . 10
The digital road map . . . . . . . . . . . . . . . . . . . . . . . . . . . . . . . . . . . 13
OPERATION . . . . . . . . . . . . . . . . . . . . . . . . . . . . . . . . . . . . . . . . . 14
Adjusting the LCD monitor. . . . . . . . . . . . . . . . . . . . . . . . . . . . . . . . 14
Remote control . . . . . . . . . . . . . . . . . . . . . . . . . . . . . . . . . . . . . . 14
Switching on / off . . . . . . . . . . . . . . . . . . . . . . . . . . . . . . . . . . . . . 15
Stand-by mode . . . . . . . . . . . . . . . . . . . . . . . . . . . . . . . . . . . . . . 15
Volume . . . . . . . . . . . . . . . . . . . . . . . . . . . . . . . . . . . . . . . . . . 15
Theft protection . . . . . . . . . . . . . . . . . . . . . . . . . . . . . . . . . . . . . 15
MENUS . . . . . . . . . . . . . . . . . . . . . . . . . . . . . . . . . . . . . . . . . . . . 16
Cursor . . . . . . . . . . . . . . . . . . . . . . . . . . . . . . . . . . . . . . . . . . . 16
Scroll bars . . . . . . . . . . . . . . . . . . . . . . . . . . . . . . . . . . . . . . . . . 16
Character input . . . . . . . . . . . . . . . . . . . . . . . . . . . . . . . . . . . . . . 16
Main control menu . . . . . . . . . . . . . . . . . . . . . . . . . . . . . . . . . . . . 18
DESTINATION INPUT . . . . . . . . . . . . . . . . . . . . . . . . . . . . . . . . . . . . 19
Destination input menu . . . . . . . . . . . . . . . . . . . . . . . . . . . . . . . . . 19
Entering a destination address. . . . . . . . . . . . . . . . . . . . . . . . . . . . . . 20
Special destinations. . . . . . . . . . . . . . . . . . . . . . . . . . . . . . . . . . . . 22
GUIDANCE . . . . . . . . . . . . . . . . . . . . . . . . . . . . . . . . . . . . . . . . . . 24
Guidance screen . . . . . . . . . . . . . . . . . . . . . . . . . . . . . . . . . . . . . 24
Guidance advice . . . . . . . . . . . . . . . . . . . . . . . . . . . . . . . . . . . . . 25
You ignored the last guidance advice? . . . . . . . . . . . . . . . . . . . . . . . . . 25
Guidance in partly digitized areas . . . . . . . . . . . . . . . . . . . . . . . . . . . . 26
Areas with limited road attributes. . . . . . . . . . . . . . . . . . . . . . . . . . . . 26
Display of the route list. . . . . . . . . . . . . . . . . . . . . . . . . . . . . . . . . . 27
Information screens. . . . . . . . . . . . . . . . . . . . . . . . . . . . . . . . . . . . 27
DYNAMIC GUIDANCE WITH TMC. . . . . . . . . . . . . . . . . . . . . . . . . . . . . . 30
TMC voice messages . . . . . . . . . . . . . . . . . . . . . . . . . . . . . . . . . . . 30
TMC traffic information in the guidance screen . . . . . . . . . . . . . . . . . . . . 30
Bypassing a traffic obstruction . . . . . . . . . . . . . . . . . . . . . . . . . . . . . . 31
Selecting the TMC information . . . . . . . . . . . . . . . . . . . . . . . . . . . . . 31
ALTERNATIVE ROUTE . . . . . . . . . . . . . . . . . . . . . . . . . . . . . . . . . . . . 32
Changing the distance . . . . . . . . . . . . . . . . . . . . . . . . . . . . . . . . . . 32
DESTINATION STORE . . . . . . . . . . . . . . . . . . . . . . . . . . . . . . . . . . . . 33
Contents of an address book entry . . . . . . . . . . . . . . . . . . . . . . . . . . . 34
Storing addresses in the personal address book . . . . . . . . . . . . . . . . . . . . 34
Loading addresses from the address book . . . . . . . . . . . . . . . . . . . . . . . 34
Loading one of the destinations last used. . . . . . . . . . . . . . . . . . . . . . . . 34
Storing the current location . . . . . . . . . . . . . . . . . . . . . . . . . . . . . . . 35
Deleting addresses . . . . . . . . . . . . . . . . . . . . . . . . . . . . . . . . . . . . 35
Deleting the list of destinations last used . . . . . . . . . . . . . . . . . . . . . . . . 35
3112 316 0888.1 Neudruck
Donnerstag, 24. August 2000 11:00:40
Farbprofil: Deaktiviert
Komposit Standardbildschirm

CONTENTS
8
SYSTEM SETTINGS . . . . . . . . . . . . . . . . . . . . . . . . . . . . . . . . . . . . . . 36
Display. . . . . . . . . . . . . . . . . . . . . . . . . . . . . . . . . . . . . . . . . . . 37
Volume . . . . . . . . . . . . . . . . . . . . . . . . . . . . . . . . . . . . . . . . . . 37
Route selection . . . . . . . . . . . . . . . . . . . . . . . . . . . . . . . . . . . . . . 37
Traffic info
(only with TMC extension connected) . . . . . . . . . . . . . . . . . . . . . 38
Language . . . . . . . . . . . . . . . . . . . . . . . . . . . . . . . . . . . . . . . . .38
Guidance screen . . . . . . . . . . . . . . . . . . . . . . . . . . . . . . . . . . . . . 38
Measuring units. . . . . . . . . . . . . . . . . . . . . . . . . . . . . . . . . . . . . . 39
Speed correction . . . . . . . . . . . . . . . . . . . . . . . . . . . . . . . . . . . . . 39
Date / Clock . . . . . . . . . . . . . . . . . . . . . . . . . . . . . . . . . . . . . . . . 39
SDVC Mode (Speed dependent volume control) . . . . . . . . . . . . . . . . . . . . 40
System information . . . . . . . . . . . . . . . . . . . . . . . . . . . . . . . . . . . . 40
Service . . . . . . . . . . . . . . . . . . . . . . . . . . . . . . . . . . . . . . . . . . . 40
Trip Computer . . . . . . . . . . . . . . . . . . . . . . . . . . . . . . . . . . . . . . 40
MAP CDs . . . . . . . . . . . . . . . . . . . . . . . . . . . . . . . . . . . . . . . . . . . 41
Changing the map CD . . . . . . . . . . . . . . . . . . . . . . . . . . . . . . . . . . 41
Map CDs with travel guide information . . . . . . . . . . . . . . . . . . . . . . . . . 42
MAINTENANCE & CARE . . . . . . . . . . . . . . . . . . . . . . . . . . . . . . . . . . . 43
Monitor . . . . . . . . . . . . . . . . . . . . . . . . . . . . . . . . . . . . . . . . . . 43
Replacing batteries of the remote control . . . . . . . . . . . . . . . . . . . . . . . 43
Cleaning of the remote control and the monitor . . . . . . . . . . . . . . . . . . . . 43
TROUBLESHOOTING. . . . . . . . . . . . . . . . . . . . . . . . . . . . . . . . . . . . . 44
MENU OVERVIEW . . . . . . . . . . . . . . . . . . . . . . . . . . . . . . . . . . . . . . 46
MOUNTING INSTRUCTIONS . . . . . . . . . . . . . . . . . . . . . . . . . . . . . . . . . 47
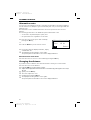
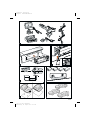
System Overview
On page 3 (fold-out page) you can find an overview over the system components.
1 Detachable LCD monitor.
Press release button on the back of the monitor support and gently pull upwards to
detach.
2 Monitor support, turnable and tiltable.
Press button on the support to tilt the monitor
3 Infrared remote control
4 Holder for remote control (wired to the navigation computer).
Press buttons on the left and right to release.
5 Eject CD. If ignition is switched off press key twice.
6 Security Module (theft protection)
Press on one side (left or right) to remove
3112 316 0888.1 Neudruck
Donnerstag, 24. August 2000 11:00:42
Farbprofil: Deaktiviert
Komposit Standardbildschirm

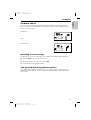
Tips on the use of this manual
To make reading this manual easier you are given the following aids:
☞
Prompts you to do something.
:
Shows you the reaction of the set.
–
Marks an enumeration.
A
This is a security or warning advice. It contains important information on the safe use
of your navigation system. In case of disregard of this advice the danger of material
damage, injury or even death may result. Please observe this advice carefully.
ATTENTION!
Important notes for safe usage
A
The usage of the navigation system does not exempt the driver from his
responsibilities. Pay attention to the local traffic regulations. Watching the road is more
important than watching the display!
A
If the current traffic situation and the advice of the navigation system are in
contradiction, traffic regulations always have priority over advice given by the system.
A
For driving safety data entries should only be made when the car is stationary.
A
In some areas it is possible that not all road information is covered. Restrictions
regarding entry into pedestrian precincts, driving direction of a one way street and turning
restrictions are not given. In these areas the navigation system gives a warning. Always
obey road signs and traffic regulations.
Registration
Please fill in the registration card supplied together with your VDO Dayton Navigation
System and send it to the address indicated.
GENERAL INFORMATION
9
English
3112 316 0888.1 Neudruck
Donnerstag, 24. August 2000 11:00:43
Farbprofil: Deaktiviert
Komposit Standardbildschirm

How does the navigation system work ?
With the VDO Dayton Navigation System you have purchased a powerful tool to assist
the driver in daily traffic. By automatic route planning and guidance you can
concentrate on the essential things in today’s growing traffic – especially in congested
areas. Complicated and time-consuming planning with conventional city and road
maps is no longer required. You simply enter the destination before driving off,
activate “Guidance” and the VDO Dayton Navigation System does the rest.
The VDO Dayton Navigation System offers you guidance advice in both an acoustical
and visual way. Few controls and a simple menu structure ensure ease of use.
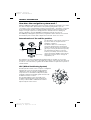
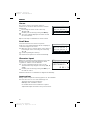
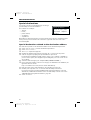
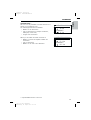
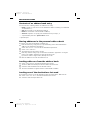
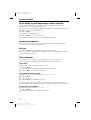
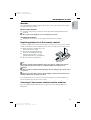
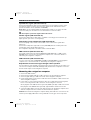
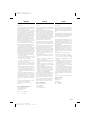
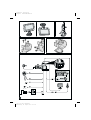
Determination of the vehicle position
The movement of the vehicle is measured
by sensors that are integrated in the
navigation computer.
The distance driven is recorded by an
electronic signal from the speedometer
and the rotary movements of bends by the
gyroscope (a rotary measurement system).
The information from these sensors is,
however, not always exact as the values
can be affected by skidding of the wheels,
varying tyre pressure due to changes in
temperature, etc.
By comparison of these signals with the digitized map it is possible to correct any
inaccuracies of the sensors and to determine the position of the vehicle quite precisely.
In order to correct the data, a signal from the GPS satellites is required for a period of
several minutes.
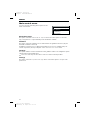
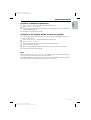
GPS (Global Positioning System)
The GPS System is based on the reception of navigation
signals from a total of currently 27 GPS satellites
orbiting the earth at a height of 21.000 km once
every 12 hours. To determine a 3D position (with
longitude, latitude and height), signals from at least
4 satellites must be received.
The integrated GPS receiver can handle up to
8 satellite signals simultaneously. This allows an
accuracy of about 30m to 100m which is further
improved by the other sensors.
GENERAL INFORMATION
10
GPS signal
Gyroscope
Speedometer
signal
Navigation
computer
Digital roadmap
0
20
40
60
80
100
120
140
160
054.346.3
3112 316 0888.1 Neudruck
Donnerstag, 24. August 2000 11:00:46
Farbprofil: Deaktiviert
Komposit Standardbildschirm

Important notes on the function of your Navigation
System
In general the navigation system is operational even with bad GPS reception (GPS =
Global Positioning System by satellites), but the accuracy of positioning may decrease
and errors in position evaluation may occur, resulting in the wrong position being
shown on the display.
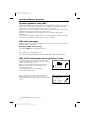
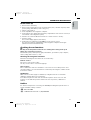
Start-up behaviour
When the vehicle is parked for a longer period of
time, the satellites move on during this period.
Therefore, when the ignition is turned on again
it can take a few minutes before the navigation
system can pick up enough satellites and evaluate
the received signals.
When starting up, the navigation system may tell you: “You are leaving the digitized
area”. The navigation system supposes the vehicle in an off-road position. If there are
other roads in this area, the system may send inappropriate messages. This means that
the navigation system supposes the vehicle is on one of the other roads.
When the vehicle has been at a standstill for a longer period of time, the navigation
function may be temporarily inhibited. The system will operate reliably again once the
GPS reception is available in sufficient quality.
Notes
After transporting the car by car train or ferry the navigation system may need a few
minutes for exact repositioning.
After the car battery has been disconnected, the system may need up to 15 minutes
for exact repositioning. The car has to be situated outdoors and the system has to be
switched on to receive data from the GPS satellites.
GENERAL INFORMATION
11
English
3112 316 0888.1 Neudruck
Donnerstag, 24. August 2000 11:00:47
Farbprofil: Deaktiviert
Komposit Standardbildschirm

Limited GPS Reception
Functional disturbance may also occur if GPS reception is interrupted or interference
occurs over a distance of several kilometres.
GPS reception may be interrupted or interference could occur:
–
In between high buildings.
–
In multi-storey car parks or garages, in tunnels and under bridges.
–
In forests or tree-lined avenues.
–
During heavy rain showers and thunderstorms.
–
Unfavourable satellite constellations in conjunction with the mounting position of
the GPS antenna (in this case GPS reception may be obstructed for a longer period).
–
In valleys and in mountainous regions.
However, the navigation system is able to compensate reception problems over a
period of a few minutes without functional interference.
If the GPS antenna has been properly installed, sufficient GPS reception should be
present about 95 % of the driving time. If interference in the reception occurs more
frequently, improper mounting of the GPS antenna may be the cause. In this case, we
recommend you to contact your VDO Dayton dealer.
To avoid faulty operation or interference of the system do not cover the GPS aerial
(GPS = Global Positioning System).
Stickers on the car windows or metallic window tinting within the area of the GPS aerial
may influence the GPS reception.
GENERAL INFORMATION
12
3112 316 0888.1 Neudruck
Donnerstag, 24. August 2000 11:00:48
Farbprofil: Deaktiviert
Komposit Standardbildschirm

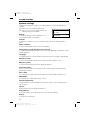
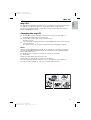
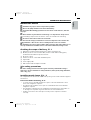
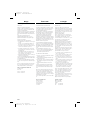
The digital road map
To plan a route to a destination address not only the current car position is needed by
the navigation system but also a digital road map is required where the destination
address itself as well as the roads leading to the destination address are stored. This
digital road map is located on the map CD you insert in your navigation computer.
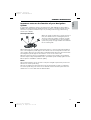
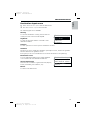
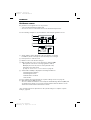
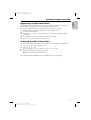
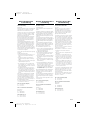
On the map CD the road network is stored as a line pattern, which means that even
extensive junctions have only one central point that all roads lead to.
That’s why the navigation system indicates the distance to the next turn as the
distance to the centre of the junction. Therefore the distance indications for motorway
exits given by the navigation system are different from those on the motorway signs.
The motorway signs refer to the distance to the beginning of the exit.
Areas with limited road attributes
In some areas not all attributes of a road are available on the map CD. For example
information on prohibited turning, one way streets or pedestrian areas are missing.
If you are entering this kind of area the navigation system will show you a warning.
The local traffic regulations always have priority over the advice given by the
navigation system. Always obey road signs and traffic regulations.
Latest map CDs
Approximately 10-15 % of the traffic network is changing each year. Due to these
constantly changing conditions (newly built roads, traffic restrictions, etc.), a 100 %
correspondence of the digital roadmap with reality cannot be achieved under all
circumstances. We recommend to always use the latest version of the map CD for
navigation.
GENERAL INFORMATION
13
English
Real road network Line pattern of digitized map
3112 316 0888.1 Neudruck
Donnerstag, 24. August 2000 11:00:57
Farbprofil: Deaktiviert
Komposit Standardbildschirm

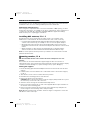
Adjusting the LCD monitor
If mounted on the supplied support, the monitor can be adjusted to your viewing
angle.
☞
Turn the monitor until the best angle of view is reached.
☞
Press the release button on the monitor support to tilt the monitor to its best
position.
Remote control
The VDO Dayton Navigation System is controlled by an infrared remote control.
☞
Press the release keys at both sides of the holder to remove the remote control.
A
Before driving off, slide the remote control back into the holder until it clicks into
position.
The keys on the remote control have the following functions:
ALT-R Plan an alternative route.
REP Repeat current acoustical guidance advice.
8 Cursor key upwards; select options.
4 Cursor key left; select options.
6 Cursor key right; select options.
2 Cursor key downwards; select options.
OK OK key; confirm a selection.
- Decrease voice volume of guidance advice.
+ Increase voice volume of guidance advice.
MENU Show main control menu.
If you use your remote control in its holder, the internal batteries are not used.
When the batteries are exhausted the navigation system may no longer react on key
presses.
☞
Slide the remote control into its holder to resume normal operation.
☞
Replace the batteries.
Keyboard illumination
The keyboard of the remote control is illuminated when you press one of the keys. The
illumination is switched off automatically after a while. When inserted in the holder
the keyboard is illuminated permanently as long as the ignition is switched on.
OPERATION
14
3112 316 0888.1 Neudruck
Donnerstag, 24. August 2000 11:00:58
Farbprofil: Deaktiviert
Komposit Standardbildschirm

Switching on / off
The navigation system is switched on / off together with the ignition.
☞
Switch on the ignition.
:
As soon as the navigation system is operable, an advice on the use of the system
appears on the display.
☞
Read and confirm this advice by pressing OK on the remote control.
:
The “Main control” menu appears.
After a few seconds the system is initialized and you can select the navigation
functions (options in highlighted letters).
Stand-by mode
If you do not wish to hear guidance advice, you can set the navigation system to its
stand-by mode.
☞
Select “Stand-by” from the main control menu.
:
The display is switched off and audible guidance advice is muted.
☞
Press one of the cursor keys 4, 6, 8, 2 or the OK key on the remote control to
resume normal operation.
If the navigation system was switched off in stand-by mode, it restarts in stand-by
mode when turning the ignition on again.
Volume
You can adjust the volume of the audible guidance advice as follows:
☞
Push the + key once or more than once to increase the volume of the voice
messages.
☞
Push the - key once or more than once to decrease the volume of the voice
messages.
:
The adjusted volume is announced.
Theft protection
The navigation system is equipped with a detachable security module. If the security
module is either inserted incorrectly or not inserted at all, the system is blocked and a
message appears on the display.
You can only select the “Stand-by” option, if the security module is not inserted.
A
Always insert the security module before driving and before switching on the ignition.
Removing the security module
☞
Press on the left or right side of the module to remove.
A
Never remove the security module while driving or during operation!
Inserting the security module
☞
Slide the security module to one edge of the front recess.
☞
Push on the module until it clicks into place on both sides.
OPERATION
15
English
3112 316 0888.1 Neudruck
Donnerstag, 24. August 2000 11:01:00
Farbprofil: Deaktiviert
Komposit Standardbildschirm

Cursor
The cursor is used to select menu options or
characters. It is shown as white characters on black
background.
☞
For moving the cursor use the cursor keys
8, 2, 4 or 6.
☞
Confirm your selection by pressing the OK key.
:
The cursor is briefly displayed as a frame around
the selected field.
Options currently not available are shown in faint.
Scroll bars
Several menus have more than four options.
In this case a scroll bar with black arrows is displayed
on the left margin of the screen.
☞
Move the cursor to a menu option on the upper or
lower margin of the screen using the cursor keys
8 or 2.
☞
Continue pushing the same key.
:
Further menu options are shown automatically.
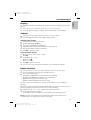
Character input
Names are entered by selecting characters from a list.
This kind of character entry will simply be called
“typewriter” further on in the manual.
☞
To select a character place the cursor on the
desired character by using the cursor keys 4, 6, 8
and 2.
☞
Confirm your selection by pressing the OK key on
the remote control.
Characters which are not available are skipped automatically.
Input options
During character input the following options are also available.
☞
Place the cursor on one of the following icons:
¡: Delete the last entered character.
¢: Display a list of database entries.
OK: Confirm the last entered character sequence.
£: Quit data input and return to the previous menu.
MENUS
16
Menu title
Active option 2
Active option 3
Active option 4
Active option 5
Menu title
Active option 1
Active option 2
Active option 3
Inactive option
City:_
OK¡¢ £
ABCDEFGHIJKLM O
PQRSTUVWXYZ—
N
3112 316 0888.1 Neudruck
Donnerstag, 24. August 2000 11:01:02
Farbprofil: Deaktiviert
Komposit Standardbildschirm

Intelligent “Typewriter”
When entering names for a city, road or special facilities the system compares the
character sequence already entered with that of the database on the map CD.
If you have already entered one character you will note, that only certain letters are
still selectable. The navigation system automatically fills in the missing characters if
there is only one possible entry left.
Example: You already entered the sequence “OAK” when specifying the city name.
Now you can only select between “R” and “D”. If you select the “R” the system
automatically completes the sequence to “OAKRIDGE” and places the cursor on “OK”.
If the name of a city, road or special destination is not unique in the data base, the
navigation system shows a list of all entries with this name distinguished by additional
information.
If for example the road name you entered exists several times in the specified city, a
list of all village names is presented where these roads are situated.
Different ways of data entry
When entering city or road names with more than one word the database allows you
to start your entry with any part of the name.
If for example you want to enter “MARKET RASEN” you can start data entry with
either “MARKET” or “RASEN”.
Entering special characters
On the “typewriter” you have access to different country specific characters
depending on the language you selected.
Delete invalid entry
What can you do, if you selected and confirmed an incorrect character?
☞
Place the cursor on the ¡ icon.
☞
Confirm your selection.
:
The character last entered is deleted.
If the system added characters automatically when entering the last character, all
these characters are erased when deleting the last entered character.
MENUS
17
English
3112 316 0888.1 Neudruck
Donnerstag, 24. August 2000 11:01:03
Farbprofil: Deaktiviert
Komposit Standardbildschirm

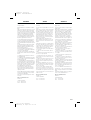
Main control menu
You can select the following menu options in the
main control menu:
Destination input
This option enters the “Destination Input” menu. Select this option to enter the
city, road, junction or a special facility as the destination address.
Guidance
This option enters the guidance screen and activates the guidance function (only if a
destination address is entered).
In addition you have access to different information screens, for example with your
current car position, the trip computer or the “Alternative route” menu.
Stand-by
This option switches off the visual and acoustic guidance advice. The navigation system
remains active in the background.
☞
Press one of the keys on the remote control to resume normal operation.
Settings
This option enters the “System Settings” menu. Select this option to set your own
preferences.
MENUS
18
Main control
Destination input
Stand-by
Settings
Guidance
3112 316 0888.1 Neudruck
Donnerstag, 24. August 2000 11:01:03
Farbprofil: Deaktiviert
Komposit Standardbildschirm

Destination input menu
☞
Select “Destination input” from the main menu.
:
The “Destination input” menu is shown.
The following options are available:
Country
To select the destination country, if more than one
country is stored on the inserted map CD.
City/Road
To enter the city name and the road name of the
destination address.
Junction
To enter a junction for a more precise destination selection.
Guidance
Selecting “Guidance” makes the navigation system plan a route, activate the guidance
function and enter the guidance screen.
It also gives you access to information screens and to alternative route planning.
Destination store
To store destination addresses in a private database
or to recall the last used destination addresses.
Special destination
To show a list of facilities of general interest (airports,
hotels, restaurants, petrol stations, etc.).
Return
To return to the main menu.
DESTINATION INPUT
19
English
Destination input
Country
Junction
Guidance
City/Road
Destination input
Guidance
Destination store
Return
Special dest.
3112 316 0888.1 Neudruck
Donnerstag, 24. August 2000 11:01:04
Farbprofil: Deaktiviert
Komposit Standardbildschirm

Entering a destination address
You can enter a destination address in various different ways:
–
entering city, road and junction letter-by-letter by means of the ”typewriter“;
–
loading an address from the personal address book;
–
selecting a special facility (for example hotel, petrol station, railway station) from
the database stored on the map CD;
–
loading one of the 10 destination addresses last used.
Entering city and road
☞
Select “Destination input” in the main menu.
:
The “Destination input” menu is displayed.
☞
Select “Country” if you first want to change the destination country.
This option is only available, if more than one country is stored on the currently
inserted map CD.
☞
Select “City/Road”.
:
The display shows “City:” and the typewriter
menu.
☞
Enter the city name using the “typewriter”
or:
☞
Select the ¢ icon and choose one of the database
entries.
If more than one entry with the same name is stored in the database, the cursor is
automatically placed on the ¢ icon. In this case select the desired entry from the list.
If the number of possible entries is large, it can take some seconds until the list is
displayed.
☞
Confirm your entry by selecting “OK” or select an entry from the list.
:
The “Road:” input menu appears.
If less than 5 roads are available in the specified city, town or village the list of
roads is shown automatically.
☞
Enter the road name using the “typewriter” or select the ¢ icon and choose one of
the database entries.
DESTINATION INPUT
20
City:WET_
OK¡¢ £
A...E.G I.KLM..
P.RST.....Z_
H
3112 316 0888.1 Neudruck
Donnerstag, 24. August 2000 11:01:06
Farbprofil: Deaktiviert
Komposit Standardbildschirm

Entering house numbers
To locate your destination more precisely you can enter house numbers with the
“typewriter” when specifying the road name in many cities.
In the database there are sections of house numbers digitized, the house number you
require will be contained in one of these sections.
In this case the navigation system guides you to the section where the specified house
number is situated.
Entering a junction
You can specify your destination address more precisely by entering a junction:
☞
Select “Junction” from the destination input menu.
:
The “Junction:” input menu appears.
☞
Enter the junction name using the “typewriter” or select the ¢ icon and choose one
of the database entries.
If the number of available junctions is small (usually for small cities, towns and
villages), the list of junctions is shown automatically.
Entering the city only
If you want to be guided to the city boundaries proceed as follows:
☞
Enter the city name as described before.
:
The “Road:” input menu appears.
☞
Select the £ icon from the road input menu.
You will be guided to the city boundaries of the specified destination.
Activating guidance
☞
Select “Guidance” in the destination input menu or in the main menu.
:
The guidance screen appears and the navigation system starts route planning.
As soon as a route is planned the navigation system gives you audible and visual
guidance advice.
For detailed information on guidance see chapter “GUIDANCE” on page 24.
DESTINATION INPUT
21
English
3112 316 0888.1 Neudruck
Donnerstag, 24. August 2000 11:01:07
Farbprofil: Deaktiviert
Komposit Standardbildschirm

Special destinations
You can also specify your destination by selecting a
special facility stored in the database.
This could be for example:
–
airports,
–
hotels,
–
petrol stations,
–
car garages,
–
car parks etc.
Depending on which information you have already entered in the destination input
menu you are presented with a list of facilities of general interest stored on the
inserted map CD.
Special destinations related to the destination address
☞
Enter the city name of the destination address in the destination input menu.
☞
Select “Special dest.” from the destination input menu.
☞
Select “Info on dest.”.
:
The “City:” input menu appears.
☞
Confirm the displayed city name by selecting “OK” or enter a new city name.
:
A list of categories specifying the special facilities is presented.
For small cities and villages usually only the option “CITY CENTRE” is available. If
you choose this option, the navigation system will guide you to the centre of the
city or village.
☞
Select the desired category (for example HOTEL, PETROL STATION ...)
:
If more than five facilities of the chosen category are available in the database, the
typewriter menu is shown.
If up to 5 facilities are stored, the list is shown immediately.
☞
Enter the name of the desired facility or select the ¢ icon for the list.
☞
Confirm your entry with “OK” or select the desired facility from the list.
If you have inserted a special map CD with travel guide information on special
destinations, additional information on the selected facility is shown. See section
“Map CDs with travel guide information”, page 42.
☞
Select “Guidance”.
DESTINATION INPUT
22
Special dest.
Info on dest.
Info on car pos.
National import.
Return
3112 316 0888.1 Neudruck
Donnerstag, 24. August 2000 11:01:08
Farbprofil: Deaktiviert
Komposit Standardbildschirm

Facilities of national importance
☞
Select “Special dest.” from the destination input menu.
☞
Select “Nation. importance”.
:
A list of categories specifying the facilities of national importance is presented (for
example Airport, Ferry...).
☞
Continue as described on page 20.
Facilities in the vicinity of the current car position
You can also specify a destination address by selecting a special facility in vicinity of
the current car position.
☞
Select “Special dest.” from the destination input menu.
☞
Select “Info on car pos.”.
:
A list of categories specifying the special facilities is presented.
☞
Select the desired category.
:
A list of special facilities situated around the current car position is presented.
☞
Continue as described on page 20.
Note:
A list of facilities from “Info on car pos.” is always shown, even if no facility of the
chosen category is located directly at the car position.
The displayed facilities are presented in order related to the distance from the current
car position. The nearest facility is placed on the top of the list.
DESTINATION INPUT
23
English
3112 316 0888.1 Neudruck
Donnerstag, 24. August 2000 11:01:08
Farbprofil: Deaktiviert
Komposit Standardbildschirm
Page is loading ...
Page is loading ...
Page is loading ...
Page is loading ...
Page is loading ...
Page is loading ...
Page is loading ...
Page is loading ...
Page is loading ...
Page is loading ...
Page is loading ...
Page is loading ...
Page is loading ...
Page is loading ...
Page is loading ...
Page is loading ...
Page is loading ...
Page is loading ...
Page is loading ...
Page is loading ...
Page is loading ...
Page is loading ...
Page is loading ...
Page is loading ...
Page is loading ...
Page is loading ...
Page is loading ...
Page is loading ...
Page is loading ...
Page is loading ...
Page is loading ...
Page is loading ...
Page is loading ...
Page is loading ...
Page is loading ...
Page is loading ...
Page is loading ...
Page is loading ...
Page is loading ...
-
 1
1
-
 2
2
-
 3
3
-
 4
4
-
 5
5
-
 6
6
-
 7
7
-
 8
8
-
 9
9
-
 10
10
-
 11
11
-
 12
12
-
 13
13
-
 14
14
-
 15
15
-
 16
16
-
 17
17
-
 18
18
-
 19
19
-
 20
20
-
 21
21
-
 22
22
-
 23
23
-
 24
24
-
 25
25
-
 26
26
-
 27
27
-
 28
28
-
 29
29
-
 30
30
-
 31
31
-
 32
32
-
 33
33
-
 34
34
-
 35
35
-
 36
36
-
 37
37
-
 38
38
-
 39
39
-
 40
40
-
 41
41
-
 42
42
-
 43
43
-
 44
44
-
 45
45
-
 46
46
-
 47
47
-
 48
48
-
 49
49
-
 50
50
-
 51
51
-
 52
52
-
 53
53
-
 54
54
-
 55
55
-
 56
56
-
 57
57
-
 58
58
-
 59
59
-
 60
60
-
 61
61
-
 62
62


Ask a question and I''ll find the answer in the document
Finding information in a document is now easier with AI
Related papers
Other documents
-
Audiovox NPC5000 User manual
-
VDO Dayton MS 4200 RS Owner's manual
-
Bosch SPU40E02SK/08 User manual
-
Technicolor - Thomson TV/DVD User manual
-
Philips DVD Video Player ProDVD Wired Controller User manual
-
-
 One For All WM6471 User manual
-
 One For All WM 6652 User manual
-
 One For All UE-WM6251 User manual
-
Tele Atlas 1030081 Datasheet


