
Epson Stylus CX3800 Series
Quick Guide
Basic Copying, Printing, and Scanning
Maintaining Your Epson Stylus CX3800 Series
Solving Problems
®

2 Contents
Contents
Loading Paper . . . . . . . . . . . . . . . . . . . . . . . . . . . . . . . . . . . . . . . . . 5
Copying a Photo or Document . . . . . . . . . . . . . . . . . . . . . . . . . . 7
Placing the Original on the Glass . . . . . . . . . . . . . . . . . . . . . . . . . . . . . . . 7
Copying . . . . . . . . . . . . . . . . . . . . . . . . . . . . . . . . . . . . . . . . . . . . . . . . 8
Copying a Letter-size Document . . . . . . . . . . . . . . . . . . . . . . . . . . . . 8
Copying a Photo . . . . . . . . . . . . . . . . . . . . . . . . . . . . . . . . . . . . . . . 8
Speeding Up Printing . . . . . . . . . . . . . . . . . . . . . . . . . . . . . . . . . . . . 9
Printing From Your Computer . . . . . . . . . . . . . . . . . . . . . . . . . . 10
Printing in Windows . . . . . . . . . . . . . . . . . . . . . . . . . . . . . . . . . . . . . . 10
Using Special Papers . . . . . . . . . . . . . . . . . . . . . . . . . . . . . . . . . . . . . . . 13
Scanning a Photo or Document . . . . . . . . . . . . . . . . . . . . . . . . 14
Basic Scanning . . . . . . . . . . . . . . . . . . . . . . . . . . . . . . . . . . . . . . . . . . . 15
Restoring Color in Faded Photos . . . . . . . . . . . . . . . . . . . . . . . . . . . . . . 17
Maintaining Your Epson Stylus CX3800 Series. . . . . . . . . . . 18
Checking the Print Head Nozzles and Ink . . . . . . . . . . . . . . . . . . . . . . . . 18
Cleaning the Print Head . . . . . . . . . . . . . . . . . . . . . . . . . . . . . . . . . . . . 19
Replacing Ink Cartridges . . . . . . . . . . . . . . . . . . . . . . . . . . . . . . . . . . . . 20
Solving Problems . . . . . . . . . . . . . . . . . . . . . . . . . . . . . . . . . . . . . 25
Error Indicators . . . . . . . . . . . . . . . . . . . . . . . . . . . . . . . . . . . . . . . . . . 25
Problems and Solutions . . . . . . . . . . . . . . . . . . . . . . . . . . . . . . . . . . . . . 26
Copying Problems . . . . . . . . . . . . . . . . . . . . . . . . . . . . . . . . . . . . . 26
Paper Feeding Problems . . . . . . . . . . . . . . . . . . . . . . . . . . . . . . . . . 26
Print Quality Problems . . . . . . . . . . . . . . . . . . . . . . . . . . . . . . . . . . 27
Where To Get Help . . . . . . . . . . . . . . . . . . . . . . . . . . . . . . . . . . . . . . . 28

Contents 3
Notices. . . . . . . . . . . . . . . . . . . . . . . . . . . . . . . . . . . . . . . . . . . . . . . 29
Important Safety Instructions . . . . . . . . . . . . . . . . . . . . . . . . . . . . . . . . . 29
Ink Cartridge Safety Instructions . . . . . . . . . . . . . . . . . . . . . . . . . . . 30
ENERGY STAR Compliance . . . . . . . . . . . . . . . . . . . . . . . . . . . . . . . . 31
FCC Compliance Statement . . . . . . . . . . . . . . . . . . . . . . . . . . . . . . . . . 31
Declaration of Conformity . . . . . . . . . . . . . . . . . . . . . . . . . . . . . . . . . . 32
Epson America, Inc., Limited Warranty . . . . . . . . . . . . . . . . . . . . . . . . . 33
Copyright Notice . . . . . . . . . . . . . . . . . . . . . . . . . . . . . . . . . . . . . . . . . 35

4 Introduction
Introduction
After you have set up your Epson Stylus
®
CX3800 Series all-in-one as described
on the Start Here sheet, turn here to:
■ Load paper
■ Make a quick copy of a document or photo
■ Get the basic steps for printing from your computer
■ Start scanning a document or photo
■ Perform routine maintenance
■ Solve simple problems
This book tells you how to do most of these things without ever turning on your
computer! Of course your Epson Stylus CX can do lots more when you connect it
to your Windows
®
computer—such as improving the color and quality of your
prints and scanned images, or producing double-sided documents.
For complete instructions on everything your Epson Stylus CX can do, see the on-
screen User’s Guide. An icon for the manual was automatically placed on your
desktop when you installed the software.
Please follow these guidelines as you read your Epson Stylus CX3800 Series
instructions:
Warning:
Warnings must be followed carefully to avoid bodily injury.
Caution:
Cautions must be observed to avoid damage to your equipment.
Note:
Notes contain important information about your Epson Stylus CX.
Tip:
Tips contain hints for better copying, scanning, and printing.

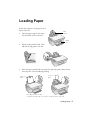
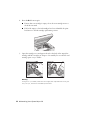
Loading Paper 5
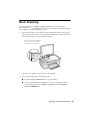
Loading Paper
Follow the steps here to load paper in your
Epson Stylus CX.
1. Open the paper support and output
tray, then slide out the extensions.
2. Flip the feeder guard forward. Then
slide the left edge guide to the left.
3. Insert the paper, printable side up, against the right edge guide. Always load it
short edge first, even for landscape printing.
Paper
support
Output
tray
Place paper beneath the tabs.
The paper’s printable side is often whiter or brighter than the other side.
4 × 6, 5 × 7
paper
Letter-size
paper

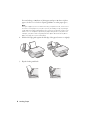
6 Loading Paper
You can load up to 100 sheets of plain paper and up to 20 sheets of photo
paper. (See the User’s Guide for capacity guidelines on other paper types.)
Note:
The type of paper you choose affects the way your printout looks, so be sure to
select the correct paper for your job. If you are just making a copy or printing a
rough draft of an image, plain paper is fine. However, for the best results, you’ll
want to use one of Epson’s special ink jet papers designed for your printer. For
example, your photos will look great printed on Epson Premium Glossy Photo
Paper. See page 13 for more information.
4. Slide the left edge guide against the left edge of the paper (but not too tightly).
5. Flip the feeder guard back.

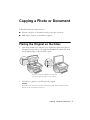
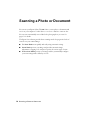
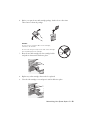
Copying a Photo or Document 7
Copying a Photo or Document
Follow the instructions in this section to:
■ Position your photo or document correctly on the glass (see below)
■ Make copies of a photo or document (on page 8)
Placing the Original on the Glass
1. Open the document cover and place your original face-down on the glass, in
the upper left corner. Move your original about 0.04 inch (1 mm) away from
the top and left edges so all of it will be copied.
2. Close the cover gently so you don’t move the original.
Caution:
Never open the document cover beyond where it stops and do not place heavy
objects on top of the Epson Stylus CX.
Move the original about 0.04 inch (1 mm) away
from the top and left edges to avoid cropping

8 Copying a Photo or Document
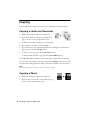
Copying
You can make copies using letter-size (8.5× 11-inch) paper as described below.
Copying a Letter-size Document
1. Make sure the Epson Stylus CX is turned on.
2. Place the document on the glass as described on
page 7. Be sure to close the document cover.
3. Load letter-size paper. (See page 5 for instructions.)
4. Press the paper size button to select
Letter.
5. If you want your copies automatically reduced or enlarged to fit the loaded
paper size, press the
Fit to Page button.
6. To make a color copy, press the x
Start Color button.
To make a black and white copy, press the x
Start B&W button.
The P
On light flashes and after a moment the Epson Stylus CX starts printing.
If you need to stop copying at any time, just press the y
Stop button. Do not pull
out paper that is being printed; it will be ejected automatically to the output tray.
Note:
The copies may not be exactly the same size as the original.
Copying a Photo
1. Make sure the Epson Stylus CX is turned on.
2. Place the photo on the glass as described on page 7.
Be sure to close the document cover.

Copying a Photo or Document 9
3. Load up to 20 sheets of 4 × 6-inch or letter-size
(8.5 × 11-inch) photo paper. (See page 5 if you
need instructions.)
4. Press the paper size button to select
4”x
6” or
Letter.
5. If you want your photos printed without a white
border, press the
Fit to Page button. (Otherwise,
they are printed with a 0.06-inch [1.5 mm]
margin.)
6. To make a color copy, press the x
Start Color
button.
To make a black and white copy, press the
x
Start B&W button.
The P
On light flashes and after a moment the Epson
Stylus CX starts printing.
If you need to stop copying at any time, just press the y
Stop button. Do not pull
out paper that is being printed; it will be ejected automatically to the output tray.
Note:
The copies may not be exactly the same size as the original.
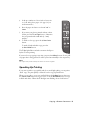
Speeding Up Printing
If you want to make a copy quickly and do not need high quality, you can print a
“draft” copy. The print quality is reduced, but the copy is printed faster.
When you are ready to copy, press and hold down the y
Stop button, then press
the x
Start Color button (to copy in color) or the x Start B&W button (to copy
in black and white). When the P
On light starts flashing, release both buttons.

10 Printing From Your Computer
Printing From Your Computer
This section describes the basic steps for printing a photo or document stored on
your Windows computer.
Note:
For detailed instructions on printing, see the on-screen User’s Guide.
Before you start, make sure you’ve installed your printer software and connected
the Epson Stylus CX3800 Series to your computer as described on the Start Here
sheet. Also be sure to use the right paper and select the correct paper type setting
in the printer driver. (See page 13 for more information.)
Follow the instructions in these sections:
■ “Printing in Windows” (below)
■ “Using Special Papers” on page 13
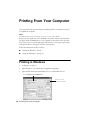
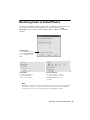
Printing in Windows
1. Load paper (see page 5).
2. Open the photo or document in your application program.
3. Open the File menu and select
Print. You see a window like this one:
Click here to open
your printer software
Select EPSON Stylus CX3800 Series

Printing From Your Computer 11
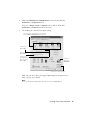
4. Make sure
EPSON Stylus CX3800 Series is selected, then click the
Preferences or Properties button.
(If you see a
Setup, Printer, or Options button, click it. Then click
Preferences or Properties on the next screen.)
5. On the Main tab, select the basic print settings:
Make sure you choose the correct paper
Type setting for the paper you are
using. See page 13 for details.
Note:
For more information about print settings, click the ? or Help button.
Select the type of document you’re printing
(choose Photo or Best Photo for pictures)
Select your
document
Orientation
Select your
paper Size
Select your
paper Type
Click here for more options
Click here for
borderless photos,
after choosing
paper Type

12 Printing From Your Computer
6. For more printing options, click the Advanced button. Then select the
following settings as necessary:
Note:
For more information about advanced settings, or instructions on saving them as a
group so you can reuse them later, click ? or Help.
7. If you want to change the layout settings, click the Page Layout tab and
select settings as necessary.
8. Click
OK to save your settings, then click OK or Print to start printing. This
window appears and shows the progress of your print job.
Select a color management method
(To choose No Color Adjustment, click ICM first)
Click here to select
Photo RPM
for the
best print quality on
certain paper types
Select Print Options
as necessary
Select Paper & Quality
Options as necessary
Click here if you want to see this Advanced screen each time you access your print settings
Cancel printing
Pause or resume
printing
Check remaining ink levels

Printing From Your Computer 13
Using Special Papers
You can purchase genuine Epson ink and paper from an authorized Epson reseller.
To find the nearest reseller, please call 800-GO-EPSON (800-463-7766). To
purchase online, visit www.epsonstore.com (U.S. sales only). In Canada, please
call (800) 463-7766 for reseller referral.
Be sure to select the correct
Type or Media Type setting in your printer software:
Paper name Size Part number
Epson Ultra Premium Glossy Photo Paper Borderless 4 × 6 inches S041934
Letter (8.5 × 11 inches) S041935
Epson Premium Glossy Photo Paper Borderless 4 × 6 inches S041808/S041727
Borderless 5 × 7 inches S041464
Borderless 8 × 10 inches S041465
Letter (8.5 × 11 inches) S041286/S041667
Epson Premium Semigloss Photo Paper Letter (8.5 × 11 inches) S041331
Epson Glossy Photo Paper Borderless 4 × 6 inches S041809
Letter (8.5 × 11 inches) S041141/S041649/
S041272/S041271
Epson Photo Quality Ink Jet Paper Letter (8.5 x 11 inches) S041062
Legal (8.5 x 14 inches) S041067
A4 (8.3 x 11.7 inches) S041061
Epson Premium Bright White Paper Letter (8.5 × 11 inches) S041586
Epson Matte Paper Heavyweight Borderless 8 × 10 inches S041467
Letter (8.5 × 11 inches) S041257
Epson Double-Sided Matte Paper Letter (8.5 × 11 inches) S041568
For this paper Select this setting
Epson Ultra Premium Glossy Photo Paper Ultra Premium Glossy Photo Paper
Epson Premium Glossy Photo Paper Premium Glossy Photo Paper
Epson Premium Semigloss Photo Paper Premium Semigloss Photo Paper
Epson Glossy Photo Paper Glossy Photo Paper
Epson Matte Paper Heavyweight
Epson Double-Sided Matte Paper
Epson Photo Quality Ink Jet Paper
Matte Paper - Heavyweight
Plain paper
Epson Premium Bright White Paper
Plain Paper/Bright White Paper
Envelopes Envelope

14 Scanning a Photo or Document
Scanning a Photo or Document
You can use your Epson Stylus CX3800 Series to scan a photo or document and
save it on your computer or other device, or to fax or e-mail it to someone else.
You can even automatically restore faded color photographs as you scan. See
page 17 for details.
The Epson Scan software provides three scanning modes for progressive levels of
control over your scanned image:
■ Full Auto Mode scans quickly and easily using automatic settings.
■ Home Mode previews your image and provides automatic image
adjustments, cropping tools, and preset options for various types of scans.
■ Professional Mode previews your image and lets you manually configure
your scan settings with a full array of tools.

Scanning a Photo or Document 15
Basic Scanning
You can scan from any TWAIN-compliant application—such as ArcSoft
PhotoImpression
™
—using Epson Scan. Or you can start Epson Scan directly from
your computer and save your image to a file.
1. Open the document cover and place your original face-down on the glass, in
the upper left corner. Move your original about 0.04 inch (1 mm) away from
the top and left edges so all of it will be scanned.
2. Close the cover gently so you don’t move the original.
3. Do one of the following to start Epson Scan:
■ Double-click the Epson Scan icon on your desktop.
■ If you are scanning from an application, start your application. Then
open the File menu, choose
Import or Acquire, and select EPSON
Stylus CX3800 Series
.
Move the original about 0.04 inch
(1 mm) away from the top and
left edges to avoid cropping

16 Scanning a Photo or Document
You see the Epson Scan standby
window:
4. If the Mode setting in the upper right
corner is set to
Full Auto Mode, click
the
Scan button.
Note:
If you want to automatically restore a
color photo as you scan, click the
Customize button and see page 17 for
instructions.
(If you are in Home or Professional
Mode, you see a different Epson Scan
settings window. You can change the
mode using the Mode selector in the
upper right corner. For details, see the
on-screen User’s Guide.)
5. You see the File Save Settings window:
Choose the location where you want
to save your scanned file and type a
name for it in the Prefix box. Select a
file format in the Image Format box.
6. Click
OK. The image is scanned and
you see its icon in an open folder.

Scanning a Photo or Document 17
Restoring Color in Faded Photos
You can automatically transform an old, faded, or badly exposed color photo into
one with true-to-life color and sharpness as you scan. Look for the
Color
Restoration
option in Epson Scan’s Full Auto, Home, and Professional Mode
windows:
Note:
For details on using Home or Professional Mode, or for more information about Full
Auto Mode settings, see the on-screen User’s Guide. You can also click Help on
the Epson Scan screen for information about all the available settings.
Home Mode
Preview your image, click
the Color Restoration
button, and click Scan.
Professional Mode
Preview your image, scroll down
to the Adjustments area, click the
Color Restoration button, and
click Scan.
Full Auto Mode
Click the Customize button,
click the Color Restoration
button, click OK, and click
Scan.

18 Maintaining Your Epson Stylus CX
Maintaining Your Epson
Stylus CX
If you notice a decline in print quality, follow the instructions in this chapter for:
■ “Checking the Print Head Nozzles and Ink” (below)
■ “Cleaning the Print Head” on page 19
■ “Replacing Ink Cartridges” on page 20
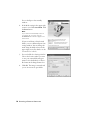
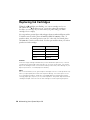
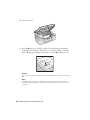
Checking the Print Head Nozzles and Ink
If your printouts are faint or have gaps in them, some of the nozzles in the print
head may be clogged or ink may be running low in one or more of the ink
cartridges. Follow the steps below to check the print head nozzles and remaining
ink levels using the control panel.
1. Turn off the Epson Stylus CX all-in-one.
2. Load letter-size paper in the sheet feeder.
3. Press the
B ink and P On buttons together and hold them down for about
3 seconds. The Epson Stylus CX turns on and prints a test pattern. It also
shows the percentage of ink left in each cartridge:
If the pattern does not look good, try cleaning the print head as described on the
next page.
Note:
You can also check the ink level using Status Monitor 3; see the on-screen
User’s Guide.
Print head does not need to
be cleaned yet
Print head needs
to be cleaned

Maintaining Your Epson Stylus CX 19
Cleaning the Print Head
If your printouts are unexpectedly light or faint, or you notice light or dark bands
across your printout, you may need to clean the print head. This unclogs the
nozzles so they can deliver ink properly. Run a nozzle check as described on
page 18 to see if the print head needs cleaning.
Note:
Print head cleaning uses ink, so clean it only if quality declines and the nozzle check
indicates that the print head needs to be cleaned.
If the red
B ink light comes on or flashes, you cannot clean the print head. In this case,
replace the appropriate ink cartridge first; see page 20.
1. Make sure the Epson Stylus CX is on and the B ink light is off.
2. Hold down the
B ink button for 3 seconds until the P On light starts
flashing. The Epson Stylus CX runs a head cleaning cycle and the P
On light
flashes.
Caution:
Never turn off the Epson Stylus CX while head cleaning is in progress. You may
damage it.
3. When the P On light stops flashing, run a nozzle check (as described on
page 18) to verify that the print head is clean.
4. If there are still gaps or lines, or the test patterns are faint, run another
cleaning cycle and check the nozzles again.
Note:
If you don’t see any improvement after cleaning the print head four or five times,
turn off the Epson Stylus CX and wait overnight. This lets any dried ink soften.
Then try cleaning the print head again. If quality still does not improve, one of the
ink cartridges may be old or damaged and needs to be replaced; see page 20.
Tip:
If you do not use your Epson Stylus CX often, it is a good idea to print a few pages at
least once a month to maintain good print quality.

20 Maintaining Your Epson Stylus CX
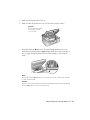
Replacing Ink Cartridges
When the red B ink light starts flashing, one or more cartridges are low on
ink. When the red
B ink light stays on, you need to replace the cartridge(s).
You’ll also see a message on your screen when you print, telling you which
cartridge is low or empty.
You can purchase genuine Epson ink and paper from an authorized Epson reseller.
To find the nearest reseller, please call 800-GO-EPSON (800-463-7766). To
purchase online, visit www.epsonstore.com (U.S. sales only). In Canada, please
call (800) 463-7766 for reseller referral. Use these part numbers when you order or
purchase new ink cartridges.
Caution:
Leave the empty cartridge installed until you have obtained a replacement, or the ink
remaining in the print head nozzles may dry out. To ensure good results, use genuine
Epson ink cartridges and do not refill them. Other products may cause damage to your
Epson Stylus CX not covered by Epson’s warranty.
Note:
We recommend that you use genuine Epson cartridges. The use of other products may
affect your print quality and could result in printer damage. See www.epson.com for
more cartridge information. Yields vary considerably based on images printed, print
settings, paper type, frequency of use, and temperature. The printer ships with full ink
cartridges and part of the ink from the first cartridges is used for priming the printer.
Color Part number
Black T060120
Cyan T060220
Magenta T060320
Yellow T060420
Page is loading ...
Page is loading ...
Page is loading ...
Page is loading ...
Page is loading ...
Page is loading ...
Page is loading ...
Page is loading ...
Page is loading ...
Page is loading ...
Page is loading ...
Page is loading ...
Page is loading ...
Page is loading ...
Page is loading ...
Page is loading ...
-
 1
1
-
 2
2
-
 3
3
-
 4
4
-
 5
5
-
 6
6
-
 7
7
-
 8
8
-
 9
9
-
 10
10
-
 11
11
-
 12
12
-
 13
13
-
 14
14
-
 15
15
-
 16
16
-
 17
17
-
 18
18
-
 19
19
-
 20
20
-
 21
21
-
 22
22
-
 23
23
-
 24
24
-
 25
25
-
 26
26
-
 27
27
-
 28
28
-
 29
29
-
 30
30
-
 31
31
-
 32
32
-
 33
33
-
 34
34
-
 35
35
-
 36
36


Ask a question and I''ll find the answer in the document
Finding information in a document is now easier with AI
Related papers
-
Epson CX5400 Warranty
-
Epson Stylus Photo 820 Ink Jet Printer Warranty
-
Epson CX3200 Warranty
-
-
-
-
-
-
-
