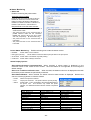
Toshiba BDRV-WBX8-Z31 Version 7.2.4 M-3 User manual
- Category
- Label printers
- Type
- User manual

TOSHIBA Bar Code Printer
Printer Driver
Operating Manual
8th Edition: March 5, 2012

Table of Contents
Introduction ................................................................................................................................................ 1
1. General Description ............................................................................................................................... 2
1.1 Features..................................................................................................................................................... 2
1.2 Applicable printers ..................................................................................................................................... 2
1.3 Notation...................................................................................................................................................... 3
1.4 Screens Used in This Document ............................................................................................................... 3
1.5 Trademark and Copyright .......................................................................................................................... 3
1.6 Operational Conditions .............................................................................................................................. 4
1.6.1 Operation System .............................................................................................................................. 4
1.6.2 Hardware............................................................................................................................................ 4
1.7 Cautions for Installation (IMPORTANT) ..................................................................................................... 4
2. Installation Procedure.......................................................................................................................... 14
Preparatory Procedure Common to All Models ................................................................................................ 14
2.1 Preparation for Installation....................................................................................................................... 16
2.2 Installation under Windows XP/Server2003 ............................................................................................ 18
2.3 Installation under Windows Vista/Server2008/7/Server2008R2 .................................................................... 25
2.4 Installation under Windows 2000 (USB with Plug & Play Enabled) ........................................................ 34
2.5 Installation under Windows XP/Server2003 (USB with Plug & Play enabled) ........................................ 37
2.6 Installation under Windows Vista/Server 2008/7/Server2008R2 (USB with Plug & Play Enabled) ........ 39
2.7 Installation under Windows 2000 (Parallel interface with Plug & Play Enabled) ..................................... 40
2.8 Installation under Windows XP/Server2003 (Parallel interface with Plug & Play Enabled) .................... 43
2.9 Installation under Windows Vista/Server2008/7/Server2008R2
(Parallel Interface with Plug & Play Enabled) .......................................................................................... 45
2.10 Uninstalling the Printer Driver .................................................................................................................. 46
2.10.1 To delete the printer drivers except for V6.5 Build75 and V6.5 Build77 .......................................... 46
2.10.2 To delete the V6.5 Build75 or V6.5 Build77 ..................................................................................... 49
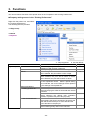
3. Functions............................................................................................................................................ 50
3.1 Page Setup Tab ....................................................................................................................................... 56
3.1.1 Registering a new stock or editing the existing stock ...................................................................... 57
3.1.2 Preset ............................................................................................................................................... 59
3.1.3 Advanced Options............................................................................................................................ 60
3.2 Graphics Tab ........................................................................................................................................... 63
3.3 Stock Tab................................................................................................................................................. 64
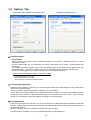
3.4 Options Tab.............................................................................................................................................. 67
3.4.1 Multiple Part Print Area Settings (B-419 and B-EV4-G only) ........................................................... 68
3.4.2 Ribbon Adjustments ......................................................................................................................... 70
3.5 Fonts Tab ................................................................................................................................................. 71
3.5.1 Bar Code Font.................................................................................................................................. 75
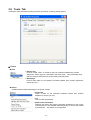
3.6 Tools Tab.................................................................................................................................................. 77
3.7 Designation of Printer Font ...................................................................................................................... 85
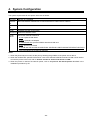
4. System Configuration .......................................................................................................................... 89
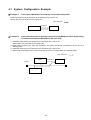
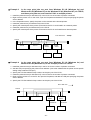
4.1 System Configuration Example ............................................................................................................... 90
5. Addition/Deletion of Standard TCP/IP Port......................................................................................... 92
5.1 Addition .................................................................................................................................................... 93
5.2 Deletion.................................................................................................................................................... 96
6. Appendix ............................................................................................................................................... 97
6.1 How to Enable Bi-directional Communication Support............................................................................ 97
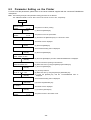
6.2 Parameter Setting on the Printer ............................................................................................................. 98
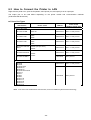
6.3 How to Connect the Printer to LAN.......................................................................................................... 99
Copyright © 2012
by TOSHIBA TEC CORPORATION
A
ll Rights Reserved
570 Ohito,Izunokuni-shi,Shizuoka-ken,JAPAN

- 1 -
Introduction
Thank you for purchasing the TOSHIBA bar code printer.
This document gives you a general description of the installation, operation, and functions of the TPCL*-enabled
printer driver (BDRV-WBX8-Z31 Version 7.2.4 M-3).
The latest printer driver can be downloaded from TOSHIBA TEC bar code system website at the following URL:
http://www.toshibatec-ris.com/download_overseas/printer/printer_driver/
* TPCL: Abbreviation of TEC Printer Control Language

- 2 -
1. General Description
1.1 Features
This product is a printer driver designed for TOSHIBA bar code printer and used under Windows 2000, Windows
XP, Windows Server 2003, Windows Vista, Windows Server 2008, Windows 7 or Windows Server 2008 R2.
Note: Windows 2000 is not supported though installation of this product is possible.
Enables easy printing from Windows applications.
Enables a use of the bar code printer just like an office-use laser or ink jet printer, even if you do not know
bar code printer specific commands.
Enables easy setup of the label size, sensors, cut operation, and other functions unique to the bar code
printer.
The host PC is connectable to the printer with RS-232C, Parallel, USB or LAN.
Note: Usable interface type varies depending on the printer models. For details, please refer to the Owner’s Manual
of the printer. Bluetooth and IrDA are not supported.
The bar code printer’s built-in fonts can be used as well as Windows TrueType fonts.
Bar codes and 2D codes can be printed only by registering a desired code as a font in the printer driver.
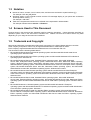
1.2 Applicable printers
B-372 B-372-QP B-EP2DL-G B-EP2DL-GH20/GH30/GH40-QM-R
B-415 B-415-GH24/25-QM B-EP4DL-G B-EP4DL-GH20/GH30/GH40-QM-R
B-419 B-419-GS10-QQ,
B-419-GS12-QP,
B-419-GS12-CN
B-EV4-G B-EV4D-G, B-EV4T-G
B-431 B-431-QP/CN B-EV4-T B-EV4D-T, B-EV4T-T
B-452 B-452-TS10-QQ/QQ-US,
B-452-TS11-QQ-PAC,
B-452-TS12-QP/QP-PAC/CN
B-SA4G B-SA4TM-GS12-QM-R,
B-SA4TP-GS12-QM-R
B-452-R B-452-TS-R B-SA4G-CN B-SA4TM-GS12-CN-R,
B-SA4TP-GS12-CN-R
B-452H B-452-HS12-QQ/QQ-US/QP/CN B-SA4T B-SA4TM-TS12-QM-R,
B-SA4TP-TS12-QM-R
B-472 B-472-QQ/QQ-US/QP,
B-472-GH12-QQ
B-SA4T-CN B-SA4TM-TS12-CN, B-SA4TP-TS12-CN
B-472-CN B-472-GH12-CN,
B-472-GH14-CN
B-SP2D B-SP2D-GH20/GH30/GH40-QM/QM-R
B-482 B-482-TS10-QQ/QQ-US/QP B-SV4 B-SV4D-QM/QM-R/CGE/CGE-R/CN/QQ-US
B-SV4T-QM-R
B-492 B-492L/R-TH10-QQ/QP B-SX4 B-SX4T-GS10-QQ/QQ-US/QP,
B-SX4T-GS20-QQ/QQ-US/QP/QM-R
B-572 B-572-QQ/QQ-US/QP B-SX4-CN B-SX4T-GS10-CN, B-SX4T-GS20-CN/CN-R
B-672 B-672-QQ/QQ-US/QP B-SX5 B-SX5T-TS12-QQ/QQ-US/QP,
B-SX5T-TS22-QQ/QQ-US/QP/QM-R
B-682 B-682-TS10-QQ/QQ-US/QP B-SX5-CN B-SX5-TS12-CN, B-SX5T-TS22-CN/CN-R
B-852 B-852-TS12-QQ/QQ-US/QP B-SX6T-R B-SX6T-TS12-QM-R
B-852-R B-852-TS22-QQ/QP-R B-SX8T-R B-SX8T-TS12-QM-R
B-872 B-872-QQ/QQ-US/QP CB-416-T3 CB-416-T3-QQ/QQ-US/QP
B-882 B-882-TS10-QQ/QQ-US/QP CB-426-T3 CB-426-T3-QQ/QQ-US/QP
B-EX4T1-G B-EX4T1-GS12-QM/CN-R B-EX4T1-T B-EX4T1-TS12-QM/CN-R
B-EX4T2-G B-EX4T2-GS12-QM/CN-R B-EX4T2-T B-EX4T2-TS12-QM/CN-R
B-EX4T2-H B-EX4T2-HS12-QM/CN-R

- 3 -
1.3 Notation
Names of menus, screens, icons, buttons, tabs, and items are enclosed in square brackets ([ ]).
For example: Click the [OK] button.
Wordings shown on the computer monitor and the LCD message display of your printer are enclosed in
double quotation marks (“ “).
For example: “ON LINE”.
Titles of the chapters and sections to be referred to are expressed in bold and Italic.
For example: Please refer to Section 1.1 Features.
1.4 Screens Used in This Document
Screens shown in this document are examples used for explaining operations. Unless otherwise specified, an
operation system used in this document is Windows XP. Please note that the screens shown may differ
depending on your usage environment and conditions.
1.5 Trademark and Copyright
Microsoft and Windows are trademarks of Microsoft Corporation in the United States and other countries.
Other company and product names may be registered trademarks or trademarks of others.
Each company’s registered trademarks and trademarks are not marked with TM or ®.
This document uses the following abbreviations.
• Microsoft® Windows® 2000 Professional operating system and Microsoft® Windows® 2000 Server
operating system: Windows 2000
• Microsoft® Windows® XP Home Edition operating system and Microsoft® Windows® XP Professional
operating system: Windows XP
• Microsoft® Windows® Server 2003, Standard Edition operating system, Microsoft® Windows®
Server 2003, Enterprise Edition operating system, Windows® Server 2003, Datacenter Edition operating
system, Windows® Server 2003, Web Edition operating system, Microsoft® Windows® Server 2003 R2,
Standard Edition operating system, Microsoft® Windows® Server 2003 R2, Enterprise Edition operating
system, Microsoft® Windows® Server 2003 R2, Datacenter Edition operating system, and Microsoft®
Windows® Server 2003 R2, Web Edition operating system: Windows Server 2003
• Microsoft® Windows® Vista Ultimate operating system and Microsoft® Windows® Vista Enterprise
operating system and Microsoft® Windows® Vista Business operating system and Microsoft® Windows®
Vista Home Premium operating system and Microsoft® Windows® Vista Home Basic operating system:
Windows Vista
• Microsoft® Windows® Server 2008, Standard Edition operating system, Microsoft® Windows®
Server 2008, Enterprise Edition operating system, Microsoft® Windows® Server 2008, Datacenter Edition
operating system and Microsoft® Windows® Web Server 2008 Edition operating system: Windows Server
2008
• Microsoft® Windows® 7 Ultimate operating system and Microsoft® Windows® 7 Enterprise
operating system and Microsoft® Windows® 7 Professional operating system and Microsoft® Windows® 7
Home Premium operating system: Windows 7
• Microsoft® Windows® Server 2008 R2, Standard Edition operating system, Microsoft® Windows®
Server 2008 R2, Enterprise Edition operating system, Microsoft® Windows® Server 2008 R2, Datacenter
Edition operating system and Microsoft® Windows® Web Server 2008 R2 Edition operating system:
Windows Server 2008 R2

- 4 -
1.6 Operational Conditions
This product can be used under the following system requirements.
1.6.1 Operation System
Windows 2000, Windows XP, Windows Server 2003, Windows Vista, Windows Server 2008, Windows 7
(32 bit/64 bit) or Windows Server 2008 R2
Notes: 1. 64-bit operating systems except Windows 7 and Windows Server 2008 R2 are not applicable.
2. Windows 2000 is not supported though installation of this product is possible.
1.6.2 Hardware
A DOS/V (IBM AT compatible) machine running the above Windows operation system must be used along
with the following mandatory or recommended requirements.
Requirement Recommendation
CPU Intel® Pentium® II 400MHz or greater Intel® Pentium® III 1GHz or greater
Memory 64MB or more 256MB or more
HDD 10MB or more free size
1.7 Cautions for Installation (IMPORTANT)
Please be sure to read the following cautions before using this product.
When you are going to install an upgraded version of the TEC printer driver, you must first uninstall the
older version in advance. For how to uninstall the printer driver, refer to Section 2.10 Uninstalling the
Printer Driver.
Failure to do so may cause unstable printing operations due to the influences of the files and registry
related to the old version remaining in the system. Follow the procedure in Section 2.10 Uninstalling
the Printer Driver, and the files and registry related to the printer driver will be deleted from the system.
Note: • This printer driver uses common program for the all applicable printer models.
• Even if the printer model is different, TPCL printer driver of different version cannot be used on the same PC.
• When installing TPCL printer driver for a new model on the PC in which the TPCL printer driver of different
version for another printer model has been already installed, the existing printer driver needs to be deleted.
When you are asked to select “Network” or “Local” in the Add Printer Wizard during the installation of the
printer driver, be sure to choose “Local”. Even when the printer will be used as a network printer, first
install the printer driver as a local printer, then specify a network path for the printer port later.

- 5 -
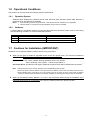
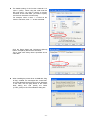
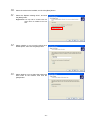
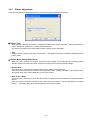
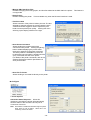
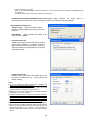
Specifying a network path for the printer port
1. Right-click the printer icon and select the [Properties].
Select the [Ports] tab in the Properties screen and click
the [Add Port] button.
2. Select the “Local Port” and click the [New Port]
button.
3. Enter a port name.
Port name: \\Printer server name\<shared name>.
Note: The “printer server name” is a computer name to
which the shared printer is connected.
The “shared name” is the name of the shared
printer
.

- 6 -
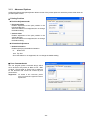
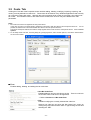
Be sure to set the [Printer Status Monitoring] as shown in the table below. The status monitor has been
disabled as default. Wrong setting disables proper printing.
Configuration for the Status Monitor
When the [Printer Status Monitoring] is set to other than “Disabled”, it is possible to monitor the printer status
from the host computer. When this feature is not supported or is unnecessary, choose the “Disabled” for the
[Printer Status Monitoring]. Doing so reduces the load on the printer driver and increases the print efficiency.
: Any setting X: Disabled
Interface
RS-232C
*1
(Serial interface
cable)
Parallel (Printer cable)
*2
Conforming to IEEE1284
(Compatible/ECP mode)
USB
LAN/WLAN
10BASE-T/100BASE-TX
Conditions
Printer model
―
Other than the right
column
CENTRO. MODE = ECP
PLUG & PLAY = ON
Ver1.1/2.0
Standard TCP/IP
Port(RAW)
Other Port
B-SX6T-R
B-SX8T-R
X Not supported
X
B-EX4T1-G
B-EX4T1-T
X Not supported
X
B-EX4T2-G
B-EX4T2-T
B-EX4T2-H
X Not supported
X
B-EV4-G X X Not supported X X X
B-EV4-T X X Not supported X X X
B-EP2DL-G
Not supported Not supported
X
B-EP4DL-G Not supported Not supported Not supported
X
B-452-R
X Not supported
X
B-852-R
X Not supported
X
B-SA4G, B-SA4G-CN,
B-SA4T, B-SA4T-CN
X Not supported
X
B-SX4, B-SX4-CN
B-SX5, B-SX5-CN
X ○
X
B-SV4
X Not supported
Not supported
Not
supported
B-372 X X Not supported
Not
supported
X X
B-472
B-472-CN
X X Not supported
Not
supported
X X
B-572 X X Not supported
Not
supported
Not supported
Not
supported
B-672
B-872
X X Not supported
Not
supported
X X
B-682
B-882
X X Not supported
Not
supported
X X
B-415 X Not supported Not supported
Not
supported
Not supported
Not
supported
B-419 X Not supported Not supported X Not supported
Not
supported
B-431 X Not supported Not supported
Not
supported
Not supported
Not
supported
B-452, B-452H X X Not supported
Not
supported
X X
B-482 X X Not supported
Not
supported
X X
B-492 X X Not supported
Not
supported
X X
B-852 X X Not supported
Not
supported
X X
B-SP2D X Not supported Not supported
Not
supported
X X
CB-416-T3
CB-426-T3
X X Not supported
Not
supported
Not supported
Not
supported
Notes:
1. When RS-232C (Serial interface) is used for connection, it will take time until printing starts. It is recommended to
use other interfaces as far as possible.

- 7 -
2. Whenever the “CENTRO. MODE” is set to “ECP” in the printer system mode, be sure to set the “PLUG & PLAY” to
ON. And, whenever the “CENTRO. MODE” is set to “SPP”, be sure to set the “PLUG & PLAY” to OFF. (The
“CENTRO. MODE” and “PLUG & PLAY” have been set to “SPP” and “OFF” as the factory default settings,
respectively.
To enable the bi-directional communication, be sure to set the “CENTRO. MODE” to “ECP” and “PLUG & PLAY” to
“ON”.
For details of the printer parameter setting, refer to Section 6.2 Parameter Setting on the Printer.
If printing is performed with the status monitor enabled though this feature is not available or not necessary,
delete the print job and disable the [Printer Status Monitoring].
If you start the status monitor by mistake, close the status monitor and disable the [Printer Status
Monitoring].
When the status monitor is used to monitor the printer statuses, do not install more than one printer driver
specifying the same output port in one host PC. When more than one printer driver is installed in a PC,
disable the [Printer Status Monitoring]. Also, when multiple computers connect to the same printer,
specify that printer as the shared printer or disable the [Printer Status Monitoring.
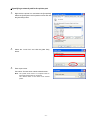
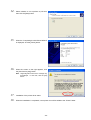
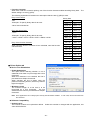
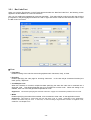
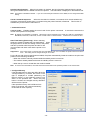
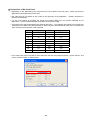
When using this product for the B-419 printer, select the
standard COM port for the output port. Also, place the
B-419 printer in the “high speed graphic mode” and
configure the port settings as shown below. For how to
set the printer mode, refer to the Owner’s Manual of the
printer.
Bits/sec.: 38400
Data bit: 8
Parity: Even
Stop bit: 1
Flow control: XON/XOFF
When Kanji characters are used as bar code font data,
click the [Tool] tab – [Configure] button – [Printer
Options], and select the “ESC/LF/NUL” for the “Control
Codes” of the “Command Protocol”.
Bar code font types that accept Kanji data:
PDF417, MicroPDF417, Data Matrix, Maxicode,
QR code
The default setting of the “Control Codes” is
“Standard”. Be sure to change this setting
when you print Kanji characters as bar code
data, otherwise an error results.

- 8 -
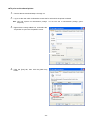
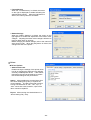
The default setting of the function character is a
caret “^” (5EH). When using bar code fonts like
QR code and if you want to specify a function
character as bar code data, you need to specify
two function characters consecutively.
For example, when a caret “^” is used as the
function character, enter “^ ^” as bar code data.
Click the [Page Setup] tab, [Advanced Options]
button, and specify the Function Character.
This is used when binary data is specified as bar
code data.
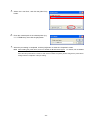
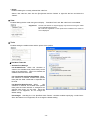
When installing the printer driver via USB with “Plug
& Play” enabled, the messages like “Insert Disk”
and “Files Needed” dialog boxes may be displayed.
In this case, click the [OK] button in the “Insert
Disk” dialog box, and specify the folder
(C:\TEC_DRV) for the “Files Needed” dialog box.

- 9 -
When using this product for the B-SP2D, B-EP2DL-G or B-EP4DL-G, set the printer mode to “TPCL-LE”,
“TPCL-LE1”, “TPCL”, or “TPCL1” by using the Printer Setting Tool or the keys on the printer. For the key
operations, refer to the B-EP Series Key Operation Specification.
When a device font is used, the actual print result looks different from the print preview. Print the label
format, and check and adjust the label format.
RFID fonts are not supported.
The stock sizes, A4, A5, and A6, shown in this product do not define the paper size in DEVMODE
(DMPAPER_A4, DMPAPER_A5, and DMPAPER_A6). They are the stock IDs unique to this product.
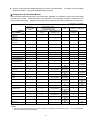
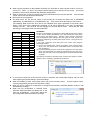
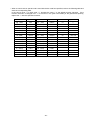
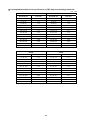
The following table shows the stock IDs for the standard stock types registered to the printer driver.
When a new stock type is additionally registered, an ID will be assigned in the order of registration,
starting from 257. The stock ID can be changed on the Edit Stock screen. Use these IDs when
specifying or checking a stock size of dmPaperSize.
Stock ID
Stock name
Current Old
USER 256 256
2x4 32000 257
4x4 32001 258
4x6 32002 259
200x85 32004 260
A4 32005 261
A5 32006 262
A6 32007 263
JAMA L 32010 267
JAMA M 32011 268
JAMA S 32012 269
Form-F 32009 270
Form-A 32008 271
185x85 32003 272
6x4 32013 ---
2x2 32014 ---
In the case an export file of the previous version is imported, the preset paper settings may be reset.
After importing the preset settings, check the settings.
When Access2007 is used, some paper names may not be correctly shown. To set the paper names,
click the [Page Setup] and open the “Edit Stock” dialog.
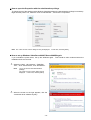
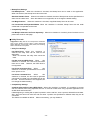
When the LPT or COM port configuration is changed under Windows Vista/Server2008, conduct it with
administrative privilege.
When the port configuration is changed under
Windows Vista/Server2008, the dialog box on the
right may be displayed. In this case, change the
port configuration with administrative privilege.
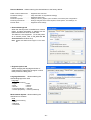
ATTENTION:
The IDs for the standard stock types have been totally changed from Version
7.2 M-2, which causes mismatching in the IDs between the older printe
r
driver and the new printer driver. Therefore, when printing is performed
from the application which manages the stock types for Excel, Access, etc.
by their IDs assigned by the older printer driver version, a wrong stock ma
y
be selected.
In this case, change the stock IDs back to the former ones using the
following procedure.
(1) For the user-added stocks, import the settings of the previous printe
r
driver to the new printer driver. (User-added stocks are imported with
their original IDs.)
(2) For the standard stock types, the stock IDs registered to the new printe
r
driver are unchangeable. So, select the standard stock type, click on the
[New], and save it as a new stock assigning the former ID listed the table
on the left.
The stock list is sorted by ascending order of stock name (Symbol, number,
alphabet, Kana, and Kanji), regardless of the stock ID.

- 10 -
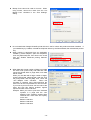
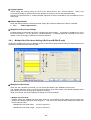
Bitmap fonts cannot be used for Access. When
using Access, remove the check from the “List
Bitmap Font” checkbox in the “Font Settings”
dialog.
Do not install other Seagull Scientific printer drivers in the PC where this product has been installed. If
you installed any by mistake, uninstall the all printer drivers by the DriverWizard, then reinstall this product
only.
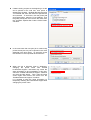
When printing is performed from an application
created by Active Reports, open the Properties,
click the [Advanced] tab, and remove the check
from the “Enable advanced printing features”
checkbox.
When data with a large number of digits is encoded
into a bar code (or 2D code), and if that bar code
cannot be printed within a page width, such data
will be invalid.
When you use data with a large number of digits,
click the [Fonts] tab, select the bar code font, click
the [Font] button and the [Edit], then, check the
“Join Multiple Lines” checkbox. When this
checkbox is checked, every data specifying the
same font will be incorporated into one bar code.
If you want to print more than one bar code of the
same font with this feature enabled, register
required number of bar code fonts.
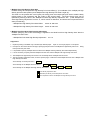
Example: When you want to print three Code128
symbols in a page with the “Join
Multiple Lines” enabled, register three
Code128 bar code fonts and specify
one to one:
Barfont Code128-1
Barfont Code128-2
Barfont Code128-3

- 11 -
If data including a space at the beginning or at the
end is printed in bar code font, such space is
deleted from the data. Multiple data with the same
Y-coordinate and same bar code font specified are
all connected. To avoid this, click the [Fonts] tab
and [Tools] button, select the “Font Settings”, click
the [Utility Fonts] tab, then remove the check from
the “Combine Adjacent Bar Code & RFID Fields”
checkbox.
In the case more than one print job is continuously
printed, these jobs may not be printed in the order
displayed in the print queue. To avoid this, check
the checkbox of “Print spooled documents first.”
When the OS is Windows Vista or Windows7,
changing the printer name with “Enable
bi-directional support” unchecked may cause the
setup information to be non-editable. In this case,
check the “Enable bidirectional support” checkbox
and click the [OK] button. Then, open the same
screen again and remove the check from the
“Enable bidirectional support” checkbox.
It is possible to save the setup information by
temporarily enabling the bi-directional support after
changing the printer name.

- 12 -
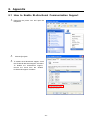
How to open the Properties with the administrative privilege
To change some of the settings under Windows Vista/Server2008, the administrative privilege is necessary.
Right-click the printer icon, select the “Run as administrator “, and click the “Properties”.
Note: The “User account control” dialog box may be displayed. In that case, click the [Allow].
How to set up Windows Vista/Server2008/7/Server2008R2 again
If you uninstall the printer driver, set up the Windows again. This should be also conducted when the
installation does not succeed.
1. Select the “Start”, “All programs”, “TOSHIBA
TEC”, “TPCL Printer Driver”, and “TECDRVIN”.
Note: Log on as the user with administrative
privilege.
The “User account control” dialog may be
displayed. In that case, click the [Allow].
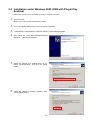
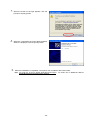
2. When the screen on the right appears, click the
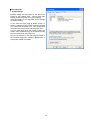
“Install this driver software anyway”.

- 13 -
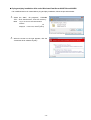
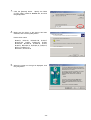
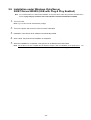
If plug-and-play installation fails under Windows Vista/Server2008/7/Server2008R2
If an undefined device is created after a plug-and-play installation, follow the procedure below.
1. Select the “Start”, “All programs”, “TOSHIBA
TEC”, “TPCL Printer Driver”, and “PnP recovery”.
Note: Log on as the user with administrative
privilege.
The “User account control” dialog may be
displayed. In that case, click the [Allow].
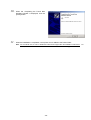
2. When the screen on the right appears, click the
“Install this driver software anyway”.

- 14 -
2. Installation Procedure
The installation procedure of this printer driver differs depending on the printer models and the connection
methods. Follow the procedure for the appropriate condition to install the printer driver.
If the older version of this printer driver has been already installed, be sure to uninstall it first, restart the printer,
and install the latest printer driver.
Section 2.10 Uninstalling the Printer Driver.
Preparatory Procedure Common to All Models
Before installing the printer driver, refer to Section 2.1 Preparation for Installation and follow the instructions.
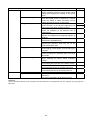
Printer driver installation method
: Connectable X: Not connectable
Connection method
Plug and Play is not used. Plug and Play is used.
Printer model
RS232C LAN Parallel USB Parallel
B-372
X X
B-472, B-472-CN
X X
B-572
X X
B-672/B-682
X X
B-872/B-882
X X
B-415
X X X X
B-419
X X
X
B-431
X X
B-452
X X
B-452H
X X
B-482
X X
B-492
X X
B-852
X X
B-SX8T-R
B-SX6T-R
B-SV4
X
B-EV4-G, B-EV4-T
X
B-SP2D
X X X
B-EP2DL-G
X
X
B-EP4DL-G
X
X
B-452-R
B-852-R
B-SA4G, B-SA4G-CN,
B-SA4T, B-SA4T-CN
B-SX4, B-SX4-CN
B-SX5, B-SX5-CN
B-EX4T1-G, B-EX4T1-T
B-EX4T2-GS12/TS12/HS12
CB-416-T3
X
X X
CB-426-T3
X
X X
Note: The above table does not show the all interface types that each printer supports.
Check that your actual connection method is (connectable), refer to the Installation method by operating
systems on the following page, and follow the appropriate installation procedure.

- 15 -
Installation method by operating systems
Connection method
Plug and Play is not used. Plug and Play is used.
OS
RS-232C LAN Parallel USB Parallel (*1)
Windows 2000 Section 2.4 Install under
Windows 2000 (USB
interface with plug and
play enabled)
Section 2.7 Install under
Windows 2000 (Parallel
interface with plug and
play enabled)
Windows XP
Windows Server 2003
Section 2.2 Install under
Windows 2000/XP/Server2003
Section 2.5 Install under
Windows XP/Server2003
(USB interface with plug
and play enabled.)
Section 2.8 Install under
Windows XP/Server2003
(Parallel interface with
plug and play enabled)
Windows Vista
Windows Server 2008
Windows 7
Windows Server 2008
R2
Section 2.3 Install under
Windows Vista/Server2008/7
Section 2.6 Install under
Windows
Vista/Server2008/7 (USB
connection with plug and
play enabled)
Section 2.9 Install under
Windows
Vista/Server2008/7
(Parallel interface with
plug and play enabled)
*1: If you choose the parallel interface with plug and play enabled, you need to change some parameter settings on the
printer. The “plug and play” feature has been disabled as default for the parallel interface connection. See the
following.
In the case installing a shared printer, follow the procedure described in “To print on the shared printer” in
Section 2.2 Installation under Windows 2000/XP/Server2003 and Section 2.3 Installation under Windows
Vista/Server2008/7/Server2008R2. When you want to use Plug and Play, follow the above procedure.
Printer parameter settings when installing the printer driver via parallel interface with plug and play enabled:
B-SX4, B-SX4-CN, B-SX5, and B-SX5-CN
Start the printer in the system mode, enter the <2>PARAMETER SET menu, and set the following parameters
as below:
CENTRO. MODE: ....................................... ECP (Default: SPP) Enables an installation of the printer driver
with plug and play
PLUG & PLAY: ON (Default: OFF) .......... Enables monitoring the printer status. ( Status Window
Preferences in Section 3.6 Tools Tab.)
When you use the bi-directional communication, set the CENTRO. MODE to ECP and PLUG & PLAY to ON,
respectively. The parameter setting procedure is provided in Section 6.2 Parameter Setting on the Printer.
B-SA4G, B-SA4G-CN, B-SA4T, B-SA4T-CN, B-852-R, B-452-R, B-SX6T-R, and B-SX8T-R
Start the printer in the system mode, enter <2>PARAMETER SET menu, and set the following parameter:
PLUG & PLAY: ON (Default: OFF)........... Enables an installation of the printer driver with plug and play
Since the printer status monitor cannot be used, disable the “Bi-directional support” in the Properties of the
printer driver.

- 16 -
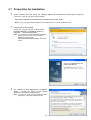
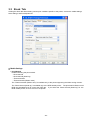
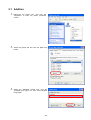
2.1 Preparation for Installation
1. Access Toshiba TEC web site at the following address and download the printer driver install file
“TPCL-drv_7.2.4_M-3_E.exe” to the local disc.
http://www.toshibatec-ris.com/download_overseas/printer/printer_driver/
Note: If you do not agree with the Software License Agreement, you cannot download the file.
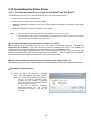
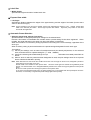
2. Double-click the downloaded
“TPCL-drv_7.2.4_M-3_E.exe”, and the “TPCL
PRINTER DRIVER – Installshield Wizard” is
displayed. Click the [Next] button.
Note: Log on as the user with administrative privilege.
When the User Account Control screen is
displayed under Windows
Vista/Server2008/7/Server2008R2, click on the
“Allow”.
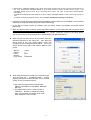
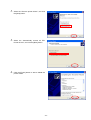
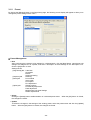
3. The “Software License Agreement” is displayed.
Select “I accept the terms of the license
agreement” and click the [Next] button.
Note: If you do not agree with the Software License
Agreement, you cannot download the file.

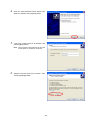
- 17 -
4. When you click the [Install] button, the printer
driver install file is created in “C:\TEC_DRV”.
Note: The folder name cannot be changed from
“C:\TEC_DRV”.
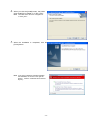
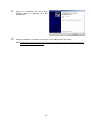
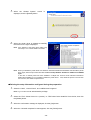
5. When the installation is completed, click the
[Finish] button.
Note: In the case of Windows Vista/Server2008/7/
Server2008R2, the screen on the right will
appear. Click the “Install this driver software
anyway”.

- 18 -
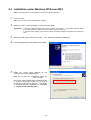
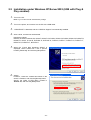
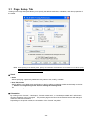
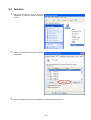
2.2 Installation under Windows XP/Server2003
Note: Proper operation is not guaranteed on the PC running Windows 2000.
1. Turn on the PC.
Note: Log on as the user with administrative privilege.
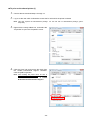
2. Select the “Start”, “Printer and FAX” to show the printer folder.
Supplement: In the case of Windows 2000, select “Start”, “Setting”, and “Printer”. If the “Printer and FAX” folder
is not found, click the “Control Panel” and select the “Printer and FAX”.
In the case of the category view, click the “Printer and Other Hardware” and select the “Printer and
FAX”.
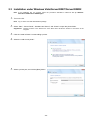
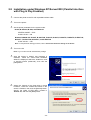
3. Select the “Add printer” from the File menu. The “Add Printer Wizard” is displayed.
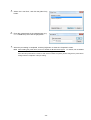
4. Click the [Next] button in the “Add Printer Wizard”.
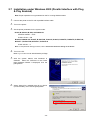
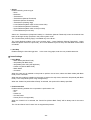
5. Select the “Local printer attached to this
computer” and click the [Next] button.
Note: Do not check the “Automatically detect and
install my Plug and Play printer” checkbox.
Even in the case of specifying the network printer
or a printer connected to other PC, be sure to
choose the local printer in this step. This setting
is changed after the installation is completed.
(
To print on the shared printer.)
Page is loading ...
Page is loading ...
Page is loading ...
Page is loading ...
Page is loading ...
Page is loading ...
Page is loading ...
Page is loading ...
Page is loading ...
Page is loading ...
Page is loading ...
Page is loading ...
Page is loading ...
Page is loading ...
Page is loading ...
Page is loading ...
Page is loading ...
Page is loading ...
Page is loading ...
Page is loading ...
Page is loading ...
Page is loading ...
Page is loading ...
Page is loading ...
Page is loading ...
Page is loading ...
Page is loading ...
Page is loading ...
Page is loading ...
Page is loading ...
Page is loading ...
Page is loading ...
Page is loading ...
Page is loading ...
Page is loading ...
Page is loading ...
Page is loading ...
Page is loading ...
Page is loading ...
Page is loading ...
Page is loading ...
Page is loading ...
Page is loading ...
Page is loading ...
Page is loading ...
Page is loading ...
Page is loading ...
Page is loading ...
Page is loading ...
Page is loading ...
Page is loading ...
Page is loading ...
Page is loading ...
Page is loading ...
Page is loading ...
Page is loading ...
Page is loading ...
Page is loading ...
Page is loading ...
Page is loading ...
Page is loading ...
Page is loading ...
Page is loading ...
Page is loading ...
Page is loading ...
Page is loading ...
Page is loading ...
Page is loading ...
Page is loading ...
Page is loading ...
Page is loading ...
Page is loading ...
Page is loading ...
Page is loading ...
Page is loading ...
Page is loading ...
Page is loading ...
Page is loading ...
Page is loading ...
Page is loading ...
Page is loading ...
Page is loading ...
-
 1
1
-
 2
2
-
 3
3
-
 4
4
-
 5
5
-
 6
6
-
 7
7
-
 8
8
-
 9
9
-
 10
10
-
 11
11
-
 12
12
-
 13
13
-
 14
14
-
 15
15
-
 16
16
-
 17
17
-
 18
18
-
 19
19
-
 20
20
-
 21
21
-
 22
22
-
 23
23
-
 24
24
-
 25
25
-
 26
26
-
 27
27
-
 28
28
-
 29
29
-
 30
30
-
 31
31
-
 32
32
-
 33
33
-
 34
34
-
 35
35
-
 36
36
-
 37
37
-
 38
38
-
 39
39
-
 40
40
-
 41
41
-
 42
42
-
 43
43
-
 44
44
-
 45
45
-
 46
46
-
 47
47
-
 48
48
-
 49
49
-
 50
50
-
 51
51
-
 52
52
-
 53
53
-
 54
54
-
 55
55
-
 56
56
-
 57
57
-
 58
58
-
 59
59
-
 60
60
-
 61
61
-
 62
62
-
 63
63
-
 64
64
-
 65
65
-
 66
66
-
 67
67
-
 68
68
-
 69
69
-
 70
70
-
 71
71
-
 72
72
-
 73
73
-
 74
74
-
 75
75
-
 76
76
-
 77
77
-
 78
78
-
 79
79
-
 80
80
-
 81
81
-
 82
82
-
 83
83
-
 84
84
-
 85
85
-
 86
86
-
 87
87
-
 88
88
-
 89
89
-
 90
90
-
 91
91
-
 92
92
-
 93
93
-
 94
94
-
 95
95
-
 96
96
-
 97
97
-
 98
98
-
 99
99
-
 100
100
-
 101
101
-
 102
102


Toshiba BDRV-WBX8-Z31 Version 7.2.4 M-3 User manual
- Category
- Label printers
- Type
- User manual
Ask a question and I''ll find the answer in the document
Finding information in a document is now easier with AI
Related papers
-
Toshiba B-EX User manual
-
-
-
-
-
-
-
-
-
Other documents
-
Xerox 7655/7665/7675 Installation guide
-
OKI LE850Ts User manual
-
-
-
 Smooth Fitness SX4 User manual
-
Banner SX5 User manual
-
Telular CDMA SX5T-500C User manual
-
-
Extech Instruments TH10 User manual
-
KitchenAid KECC548BSS Installation guide
