Epson Equity LT User manual
- Category
- Label printers
- Type
- User manual
This manual is also suitable for

EQUlTY™LT
User’s Guide
Y16499100301

IMPORTANT SAFETY INSTRUCTIONS
1. Read all of these instructions and save them for later
reference.
2. Follow all warnings and instructions marked on the product.
3. Unplug this product from the wall outlet before cleaning.
Do not use liquid cleaners or aerosol cleaners. Use a damp
cloth for cleaning.
4. Do not use this product near water.
5. Do not place this product on an unstable cart, stand, or
table. The product may fall, causing serious damage to the
product.
6. Slots and openings in the cabinet and the back or bottom
are provided for ventilation; to ensure reliable operation of
the product and to protect it from overheating, these
openings must not be blocked or covered. The openings
should never be blocked by placing the product on a bed,
sofa, rug, or other similar surface. This product should never
be placed near or over a radiator or heat register. This
product should not be placed in a built-in installation unless
proper ventilation is provided.
7. This product should be operated from the type of power
source indicated on the marking label. If you are not sure of
the type of power available, consult your dealer or local
power company.
8. This product is equipped with a 3-wire grounding type plug,
a plug having a third (grounding) pin. This plug will only fit
into a grounding-type power outlet. This is a safety feature.
If you are unable to insert the plug into the outlet, contact
your electrician to replace your obsolete outlet. Do not
defeat the purpose of the grounding-type plug.
9. Do not locate this product where the cord will be walked
on.
Y 16499100400

10. If an extension cord is used with this product, make sure
that the total of the ampere ratings on the products plugged
into the extension cord do not exceed the extension cord
ampere rating. Also, make sure that the total of all products
plugged into the wall outlet does not exceed 15 amperes.
11. Never push objects of any kind into this product through
cabinet slots as they may touch dangerous voltage points or
short out parts that could result in a risk of fire or electric
shock. Never spill liquid of any kind on the product.
12. Except as specifically explained in the User’s Manual, do not
attempt to service this product yourself. Opening or
removing those covers that are marked “Do Not Remove"
may expose you to dangerous voltage points or other risks.
Refer all servicing in those compartments to service
personnel.
13. Unplug this product from the wall outlet and refer servicing
to qualified service personnel under the following conditions:
A. When the power cord or plug is damaged or frayed.
B. If liquid has been spilled into the product.
C. If the product has been exposed to rain or water.
D. If the product does not operate normally when the
operating instructions are followed. Adjust only those
controls that are covered by the operating instructions
since improper adjustment of other controls may result
in damage and will often require extensive work by a
qualified technician to restore the product to normal
operation.
E. If the product has been dropped or the cabinet has been
damaged.
F.
If the product exhibits a distinct change in performance,
indicating a need for service.

EPSON
®
Equity™ LT
User’s
Guide

IMPORTANT NOTICE
DISCLAIMER OF WARRANTY
Seiko Epson Corporation makes no representations or warranties, either express or
implied, by or with respect to anything in this manual, and shall not be liable for
any implied warranties of merchantability and fitness for a particular purpose or for
any indirect, special, or consequential damages. Some states do not allow the exclu-
sion of incidental or consequential damages, so this exclusion may not apply to you.
COPYRIGHT NOTICE
All rights reserved. No part of this publication may be reproduced, stored in a retrieval
system, or transmitted, in any form or by any means, electronic, mechanical, pho-
tocopying, recording, or otherwise, without the prior written permission of Seiko Ep-
son Corporation, No patent liability is assumed with respect to the use of information
contained herein. While every precaution has been taken in the preparation of this
publication, Seiko Epson Corporation assumes no responsibility for errors or omis-
sions. Nor is any liability assumed for damages resulting from the use of the informa-
tion contained herein. Further, this publication and features described herein are subject
to change without notice.
TRADEMARKS
Epson is a registered trademark of Seiko Epson Corporation.
Equity is a trademark of Epson America, Inc.
Centronics is a registered trademark of Centronics Data Computer Corp.
IBM is a registered trademark and AT and XT are trademarks of International
Business Machines Corp.
Microsoft, MS-DOS, and GW-BASIC are registered trademarks of Microsoft Corp.
Hayes is a registered trademark of Hayes Microcomputer Products Inc.
V30 is a trademark of NEC Corporation.
Copyright 1987 by Seiko Epson Corporation
Nagano, Japan
Y16499100301
ii
User’s Guide

FCC COMPLIANCE STATEMENT
FOR AMERICAN USERS
This equipment generates and uses radio frequency energy and if not installed
and used properly, that is, in strict accordance with the manufacturer’s instruc-
tions, may cause interference to radio and television reception. It has been type
tested and found to comply with the limits for a Class B computing device in
accordance with the specifications in Subpart J of Part 15 of FCC rules, which
are designed to provide reasonable protection against such interference in a residen-
tial installation. However, there is no guarantee that interference will not occur
in a particular installation. If this equipment does cause interference to radio or
television reception, which can be determined by turning the equipment off and
on, the user is encouraged to try to correct the interference by one or more of
the following measures:
l Reorient the receiving antenna
l Relocate the computer with respect to the receiver
l Move the computer away from the receiver
l Plug the computer into a different outlet so that the computer and
receiver are on different branch circuits.
If necessary, the user should consult the dealer or an experienced radio/televi-
sion technician for additional suggestions. The user may find the following book-
let prepared by the Federal Communications Commission helpful:
“Television Interference Handbook”
This booklet is available from the U.S. Government Printing Office, Washing-
ton DC 20402. Stock No. 0044-000-00450-7.
Note: If the interference stops, it was probably caused by the computer or its
peripheral devices. To further isolate the problem:
Disconnect the peripheral devices and their input/output cables one at
a time. If the interference stops, it is caused by either the peripheral device
or its I/O cable. These devices usually require shielded I/O cables. For
Epson peripheral devices, you can obtain the proper shielded cable from
your dealer. For non-Epson peripheral devices contact the manufacturer
or dealer for assistance.
WARNING
This
equipment has been certified to comply with the limits for
a Class B computing device, pursuant to Subpart J of Part 15 of
FCC Rules. Only peripherals (computer input/output devices, ter-
minals, printers, etc.) certified to comply with the Class B limits
may be attached to this computer. Operation with non-certified
peripherals is likely to result in interference to radio and TV
reception.
The connection of a non-shielded equipment interface cable to this
equipment will invalidate the FCC Certification of this device and
may cause interference levels which exceed the limits established
by the FCC for this equipment.
User’s Guide

User’s Guide

Contents
Introduction.
...........................
1
How to Use This Manual
..................
2
1
Setting Up Your System
......................
1-1
1
Unpacking.
.................................
1-1
2
Connecting the Screen
.......................
1-2
3
Connecting the AC Adapter.
.................
1-5
4
Charging the Battery.
........................
1-6
5
Connecting a Printer.
........................
1-6
Parallel interface
.........................
1-7
Serial interface
...........................
1-9
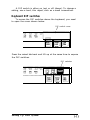
6
Setting the DIP Switches
.....................
1-10
Keyboard DIP switches.
...................
1-11
Back panel DIP switches
..................
1-13
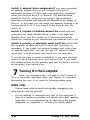
7
Turning On the Computer
...................
1-14
Safety rules.
.............................
1-14
Turning on the power
....................
1-15
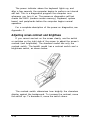
Adjusting screen contrast and brightness
....
1-16
Initial screen display
......................
1-17
8
Loading MS-DOS
...........................
1-17
9
Copying System Diskettes
....................
1-19
Copying with two diskette drives.
..........
1-19
Copying with one diskette drive
...........
1-20
10 Running the Setup Program
..................
1-22
Setting the real-time clock.
................
1-23
Changing the backlight period)
............
1-24
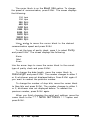
Changing the serial port (RS-232C) settings . 1-25
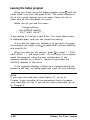
Leaving the Setup program.
...............
1-28
2
Preparing a Hard Disk for Use.
........
Creating the MS-DOS Partition
............
Formatting the MS-DOS Partition
..........
Copying the Reference Files to the Hard Disk
Booting From the Hard Disk
...............
Drive Assignments
........................
Hard Disk Power Switch
...................
. .
. .
. .
. . .
. . .
. . .
. . .
.
2-1
.
2-2
.
2-3
.
2-5
.
2-5
.
2-6
.
2-6
Contents
V

3
Using the Equity LT
.........................
3-1
Using the AC Adapter
..........................
3-1
Using the Battery
...............................
3-1
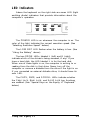
LED Indicators
.................................
3-3
Opening and Closing the Screen.
.................
3-4
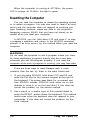
Using the Handle
...............................
3-5
Selecting Execution Speed.
.......................
3-5
Resetting the Computer.
.........................
3-6
Caring for the Backlit Screen.
....................
3-7
Special Keys on the Equity LT Keyboard
..........
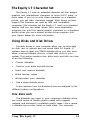
3-7
The Equity LT Character Set
....................
3-9
Using Disks and Disk Drives
.....................
3-9
How disks work
.............................
3-9
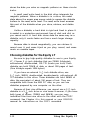
Choosing diskettes for the Equity LT
..........
3-10
Caring for disks and disk drives
...............
3-11
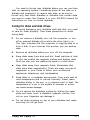
Inserting and removing diskettes.
..............
3-12
Making backup copies.
.......................
3-13
Write-protecting diskettes
.....................
3-13
Using a single diskette drive
..................
3-14
Turning Off the Computer
.......................
3-15
4
Using MS-DOS With the Equity LT
.........
4-1
Starting and Exiting MS-DOS
....................
4-2
Entering MS-DOS Commands.
...................
4-3
Storing Data
...................................
4-4
Changing the Default Drive
......................
4-5
Formatting Diskettes
............................
4-6
Formatting with two diskette drives
............
4-6
Formatting with one diskette drive.
............
4-7
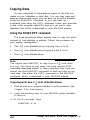
Copying Data
..................................
4-8
Using the DISKCOPY command
..............
4-8
Copying with two 3
f
-inch diskette drives.
.....
4-8
Copying with one 3 + -inch diskette drive
......
4-9
Copying with one 5
$
-inch diskette drive
......
4-11
Using the COPY command
...................
4-12
Listing the Contents of a Diskette
................
4-14
vi
Contents

Creating and Using Subdirectories
................
4-14
Creating subdirectories
.......................
4-15
Changing directories
.........................
4-16
Using pathnames
............................
4-17
Copying from one subdirectory to another
.....
4-18
Starting an Application Program.
.................
4-18
MS-DOS Commands and the Equity LT
..........
4-19
Using the backlit screen with memory
resident programs
............................
4-19
Appendixes
A
Options and Maintenance
.................... A-1
Connecting a Color Monitor
.....................
A-1
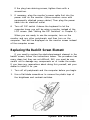
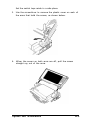
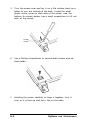
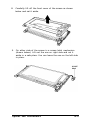
Replacing the Backlit Screen Element.
............. A-2
Turning Off the Hard Disk
...................... A-9
Turning off the hard disk first
................
A-9
Turning off the hard disk later
................
A-9
B Troubleshooting
..............................
B-1
Error Messages
.................................
B-1
The Computer Fails to Start Up
..................
B-1
The LCD Screen is Blank.
.......................
B-2
The Monitor Screen is Blank
.....................
B-2
The Computer Does Not Respond
................
B-3
Low Battery Problems
............................
B-3
Diskette Problems
...............................
B-4
Hard Disk Problems
.............................
B-5
Software Problems
..............................
B-5
Printer Problems
................................
B-6
C
Power-on Diagnostics.
........................
C-1
System Device Check.
...........................
C-1
Clock and CMOS RAM Check
..................
C-2
RAM Check
...................................
C-2
Keyboard Controller and Keyboard Check.
........
C-3
Floppy Disk Drive Seek Check
...................
C-3
Hard Disk Controller and Hard Disk Check
.......
C-4
Con tents
vii

D
Performing System Diagnostics
...............
Starting System Diagnostics
......................
Selecting a Test.
................................
Resuming From an Error
........................
System Board Check
............................
Memory Check .................................
Keyboard Check ................................
Video Adapter and Display Check.
...............
Video adapter check
.........................
Attribute check
.............................
Character set check
..........................
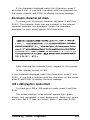
40-column character set check.
................
320 x 200 graphics mode check
................
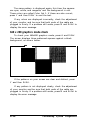
640 x 200 graphics mode check
................
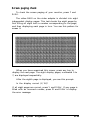
Screen paging check
.........................
Color video check
...........................
Synccheck .................................
Run all above checks
........................
Floppy Disk Drives and Controller Check
.........
Formatting a diskette
........................
Starting the floppy disk drive check.
...........
Sequential seek check
........................
Random seek check.
.........................
Write, read check.
...........................
Speed check
................................
Run all above checks
........................
Parallel Port (Printer Interface) Check
.............
Serial Port (RS-232C) Check
.....................
D-1
D-1
D-2
D-3
D-4
D-4
D-5
D-6
D-7
D-8
D-8
D-9
D-9
D-10
D-11
D-12
D-12
D-12
D-13
D-13
D-14
D-15
D-15
D-15
D-16
D-17
D-17
D-17
Alternate Serial Port Check
............
. . . . . . . . . D-19
Dot-matrix Printer Check
..............
. . . . . . . . .
D-19
Hard Disk Drive and Controller Check. .
. . . . . . . . .
D-20
Seek check
........................
. . . . . . . . . D-21
Write, read check.
.................
. . . . . . . . .
D-21
Error detection and correction check.
. . . . . . . . .
D-22
Read, verify check
.................
. . . . . . . . . D-22
Run all above checks
..............
. . . . . . . . .
D-23
Exiting System Diagnostics
.............
. . . . . . . . . D-23
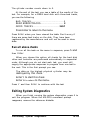
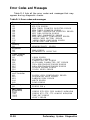
Error Codes and Messages
.............
. . . . . . . . .
D-24
Contents

E
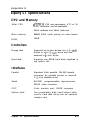
Equity LT Specifications
.....................
CPU and Memory
..............................
Controllers
.....................................
Interfaces
......................................
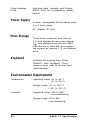
Power Supply.
..................................
Mass Storage
...................................
Keyboard ......................................
Environmental Requirements
.....................
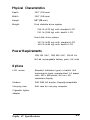
Physical Characteristics
..........................
Power Requirements.
............................
Options ........................................
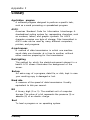
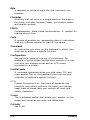
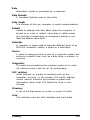
F Glossary
......................................
Index
.........................................
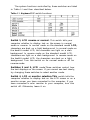
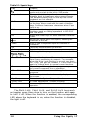
Tables
1-1
Keyboard DIP switch functions.
..............
1-12
1-2
Back panel DIP switch functions
.............
1-13
3-1
Special keys.
...............................
3-8
D-1 Error codes and messages. . . . . . . . . . . . . . . . . . . . D-24
E-1
E-1
E-1
E-1
E-2
E-2
E-2
E-2
E-3
E-3
E-3
F-1
I-1
Contents
ix

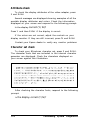
Introduction
Your Epson® Equity™
LT portable computer is a compact
high-performance system you can use just about anywhere: at
the office, at home, or on the road. Its rechargeable battery lets
you use it in remote locations when you don’t have access to
an electrical outlet. With the AC adapter connected, you can
use the computer as long as you like, and recharge the battery
in the process.
There are two Equity LT models:
l Dual diskette drive system, with two 3 + -inch diskette
drives
l Hard disk drive system, with one 3
f
-inch diskette drive
and one 20MB (megabyte) internal hard disk drive.
You probably also chose either the standard or backlit
model LCD (liquid crystal display) screen. The backlit model
features an electroluminescent element that illuminates the
background of the screen.
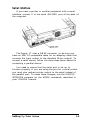
The Equity LT includes 640KB (kilobytes) of internal
memory and comes with built-in serial and parallel interfaces.
These interfaces let you connect an Epson printer or almost
any other peripheral device you choose.
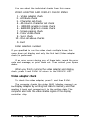
If you have a color monitor, you can connect it to the
Equity LT to take advantage of the color and the larger
display. If you have the hard disk drive system, you can also
connect an external 5
t
-inch diskette drive to the
computer; this enables
you to use 360KB diskettes from a
computer that has a 5
7
-inch drive.
Epson offers a 300/1200 baud auto-dial modem which you
can install inside the Equity LT to communicate over the
phone lines with other computers. You can also buy a soft case
for carrying your computer and a cigarette lighter adapter for
an alternate power source. Ask your Epson dealer for
information.
Introduction
1

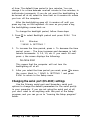
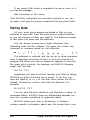
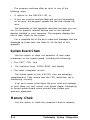
The Equity LT comes with the MS-DOS operating system
and the GW-BASIC programming language. If you have used
MS-DOS before on another computer, you’ll find that it works
the same on the Equity LT. The main commands are explained
in this manual and full information, including descriptions of
the special utility programs added by Epson, is in your
MS-DOS manual.
You can use almost all application programs designed for
the IBM PC, PC XT and PC AT on your Equity LT.
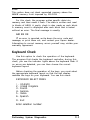
How to Use This Manual
This user’s guide explains how to set up and care for your
Equity LT. It also describes how to use your computer and run
diagnostics checks. You do not need to read everything in this
book; some sections may describe a particular option you do
not have. In fact, if you are familiar with computers, you may
need to read only Chapters 1 and 3, and Chapter 2 if you
have the hard disk model.
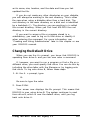
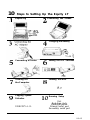
Complete the 10 steps in Chapter 1 to set up your
computer and prepare it for use.
If you have the hard disk model, you must follow the
instructions in Chapter 2 to prepare the hard disk before you
try to use it. If you have the dual diskette drive model, skip
Chapter 2.
Chapter 3 describes general operating procedures and
explains how to use and care for your disks and disk drives.
Chapter 4 provides basic instructions for using MS-DOS
with the Equity LT.
If you need to connect a color monitor or replace the
backlit screen element, see Appendix A.
If you encounter any problems while using your Equity LT,
check the troubleshooting guidelines in Appendix B.
2
Introduction

Appendix C provides information on the power-on
diagnostics in case your computer has trouble powering up.
Appendix D outlines the system diagnostic checks you can
perform on your computer. If you are having trouble with any
part of the hardware, you may want to run some or all of
these diagnostic checks.
Appendix E presents the Equity LT hardware specifications,
and Appendix F is a glossary of computer terms used in this
manual. Check the glossary whenever you come across an
unfamiliar word.
Introduction
3

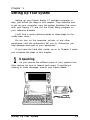
Chapter 1
Setting Up Your System
Setting up your Epson Equity LT portable computer is
easy. Just follow the steps in this chapter. They describe how
to set up your computer, copy the system diskettes that come
with your Equity LT, and run the initial Setup program on
your reference diskette.
You’ll find a quick reference guide to these steps on the
inside back cover.
Do not turn on the computer, printer, or any other
peripherals until the instructions tell you to. Otherwise, you
may damage some part of your equipment.
If you have the hard disk model, go on to Chapter 2 when
you complete the steps in this chapter.
1
Unpacking
As you remove the different parts of your system from
their cartons, be sure to inspect each piece. If anything is
missing or looks damaged, consult your Epson dealer.
Setting Up Your System
1-1

Besides this manual, you should have the following items:
l The computer
l AC adapter and power cord
l An MS-DOS operating system diskette (version 3.20),
which also contains the GW-BASIC programming language
l A reference diskette
l
An MS-DOS manual and a GW-BASIC manual.
You should also have either the standard or backlit LCD
screen or a color monitor to use with your computer.
You’ll find a registration card with the computer. Fill this
card out now and mail it to Epson. With your registration card
on file, Epson can send you update information.
Be sure to keep your packing materials. They provide the
best protection for your computer if you need to ship it later.
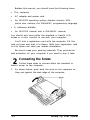
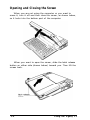
2
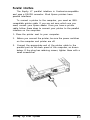
Connecting the Screen
Follow these steps to connect either the standard or
backlit screen to the computer:
1.
As shown below, push back the arms on the computer so
they rest against the back edge of the computer.
1-2
Setting Up Your System

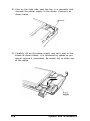
2.
Use a flat blade screwdriver to lift off the plastic cover
the front of each arm, as shown below. Set the covers
aside.
on
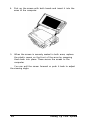
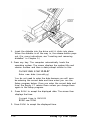
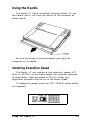
3.
There is a plastic insert cap inside each of the arms; lift it
out as shown below. You may want to keep these caps in
case you need to store or ship your computer later.
Setting Up Your System
1-3

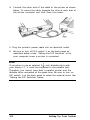
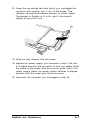
4.
Pick up the screen with both hands and insert it into the
arms of the computer.
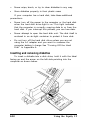
5.
When the screen is securely seated in both arms, replace
the plastic covers on the front of the arms by snapping
them back into place. These secure the screen to the
computer.
You can pull the screen forward or push it back to adjust
the viewing angle.
1-4
Setting Up Your System

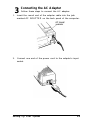
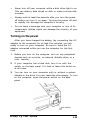
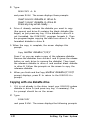
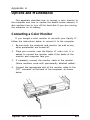
3
Connecting the AC Adapter
Follow these steps to connect the AC adapter:
1.
Insert the round end of the adapter cable into the jack
marked AC ADAPTER on the back panel of the computer.
2.
Connect one end of the power cord to the adapter’s input
socket.
Setting Up Your System
1-5
Page is loading ...
Page is loading ...
Page is loading ...
Page is loading ...
Page is loading ...
Page is loading ...
Page is loading ...
Page is loading ...
Page is loading ...
Page is loading ...
Page is loading ...
Page is loading ...
Page is loading ...
Page is loading ...
Page is loading ...
Page is loading ...
Page is loading ...
Page is loading ...
Page is loading ...
Page is loading ...
Page is loading ...
Page is loading ...
Page is loading ...
Page is loading ...
Page is loading ...
Page is loading ...
Page is loading ...
Page is loading ...
Page is loading ...
Page is loading ...
Page is loading ...
Page is loading ...
Page is loading ...
Page is loading ...
Page is loading ...
Page is loading ...
Page is loading ...
Page is loading ...
Page is loading ...
Page is loading ...
Page is loading ...
Page is loading ...
Page is loading ...
Page is loading ...
Page is loading ...
Page is loading ...
Page is loading ...
Page is loading ...
Page is loading ...
Page is loading ...
Page is loading ...
Page is loading ...
Page is loading ...
Page is loading ...
Page is loading ...
Page is loading ...
Page is loading ...
Page is loading ...
Page is loading ...
Page is loading ...
Page is loading ...
Page is loading ...
Page is loading ...
Page is loading ...
Page is loading ...
Page is loading ...
Page is loading ...
Page is loading ...
Page is loading ...
Page is loading ...
Page is loading ...
Page is loading ...
Page is loading ...
Page is loading ...
Page is loading ...
Page is loading ...
Page is loading ...
Page is loading ...
Page is loading ...
Page is loading ...
Page is loading ...
Page is loading ...
Page is loading ...
Page is loading ...
Page is loading ...
Page is loading ...
Page is loading ...
Page is loading ...
Page is loading ...
Page is loading ...
Page is loading ...
Page is loading ...
Page is loading ...
Page is loading ...
Page is loading ...
Page is loading ...
Page is loading ...
Page is loading ...
Page is loading ...
Page is loading ...
Page is loading ...
Page is loading ...
Page is loading ...
Page is loading ...
Page is loading ...
Page is loading ...
Page is loading ...
Page is loading ...
Page is loading ...
Page is loading ...
Page is loading ...
Page is loading ...
Page is loading ...
Page is loading ...
Page is loading ...
Page is loading ...
Page is loading ...
Page is loading ...
Page is loading ...
Page is loading ...
Page is loading ...
Page is loading ...
Page is loading ...
Page is loading ...
Page is loading ...
Page is loading ...
Page is loading ...
Page is loading ...
Page is loading ...
Page is loading ...
Page is loading ...
-
 1
1
-
 2
2
-
 3
3
-
 4
4
-
 5
5
-
 6
6
-
 7
7
-
 8
8
-
 9
9
-
 10
10
-
 11
11
-
 12
12
-
 13
13
-
 14
14
-
 15
15
-
 16
16
-
 17
17
-
 18
18
-
 19
19
-
 20
20
-
 21
21
-
 22
22
-
 23
23
-
 24
24
-
 25
25
-
 26
26
-
 27
27
-
 28
28
-
 29
29
-
 30
30
-
 31
31
-
 32
32
-
 33
33
-
 34
34
-
 35
35
-
 36
36
-
 37
37
-
 38
38
-
 39
39
-
 40
40
-
 41
41
-
 42
42
-
 43
43
-
 44
44
-
 45
45
-
 46
46
-
 47
47
-
 48
48
-
 49
49
-
 50
50
-
 51
51
-
 52
52
-
 53
53
-
 54
54
-
 55
55
-
 56
56
-
 57
57
-
 58
58
-
 59
59
-
 60
60
-
 61
61
-
 62
62
-
 63
63
-
 64
64
-
 65
65
-
 66
66
-
 67
67
-
 68
68
-
 69
69
-
 70
70
-
 71
71
-
 72
72
-
 73
73
-
 74
74
-
 75
75
-
 76
76
-
 77
77
-
 78
78
-
 79
79
-
 80
80
-
 81
81
-
 82
82
-
 83
83
-
 84
84
-
 85
85
-
 86
86
-
 87
87
-
 88
88
-
 89
89
-
 90
90
-
 91
91
-
 92
92
-
 93
93
-
 94
94
-
 95
95
-
 96
96
-
 97
97
-
 98
98
-
 99
99
-
 100
100
-
 101
101
-
 102
102
-
 103
103
-
 104
104
-
 105
105
-
 106
106
-
 107
107
-
 108
108
-
 109
109
-
 110
110
-
 111
111
-
 112
112
-
 113
113
-
 114
114
-
 115
115
-
 116
116
-
 117
117
-
 118
118
-
 119
119
-
 120
120
-
 121
121
-
 122
122
-
 123
123
-
 124
124
-
 125
125
-
 126
126
-
 127
127
-
 128
128
-
 129
129
-
 130
130
-
 131
131
-
 132
132
-
 133
133
-
 134
134
-
 135
135
-
 136
136
-
 137
137
-
 138
138
-
 139
139
-
 140
140
-
 141
141
-
 142
142
-
 143
143
-
 144
144
-
 145
145
-
 146
146
-
 147
147
-
 148
148
-
 149
149
-
 150
150
-
 151
151


Epson Equity LT User manual
- Category
- Label printers
- Type
- User manual
- This manual is also suitable for
Ask a question and I''ll find the answer in the document
Finding information in a document is now easier with AI
Related papers
-
Epson LT-286 User manual
-
-
-
-
-
-
-
-
-
Other documents
-
Tandy 1200 HD User manual
-
-
Zenith Z-170 Owner's manual
-
Interlogix Transport-PC rev4.00 Installation guide
-
Atari Mini-Speedy 1050 Reference guide
-
 Winbook SLC User manual
-
Commodore vic-1540 User manual
-
-
IBM 7070 General Information Manual
-
