Sanyo MCD-Z8F (AU) User manual
- Category
- Cassette players
- Type
- User manual

S*
o
INSTRUCTION MANUAL
MCD-Z8F
CD Portable Stereo Radio
Cassette Recorder

CAUTION
USE OF CONTROLS OR ADJUSTMENTS OR PERFORMANCE OF PROCEDURES
OTHER THAN THOSE SPECIFIED IN THE OPERATING INSTRUCTIONS MAY RE-
SULT IN HAZARDOUS RADIATION EXPOSURE.
THE COMPACT DISC PLAYER SHOULD NOT BE ADJUSTED OR REPAIRED BY
ANYONE EXCEPT PROPERLY QUALIFIED PERSONNEL.
CAUTION INVISIBLE LASER RADIATION WHEN OPEN AND INTER
LOCKS DEFEATED AVOID EXPOSURE TO BEAM
CLASS , LASER PRODUCT
LUOKAN 1 LASERLAITE
ADVARSEL USYNL(G LASER STRALING VED ABNING NAR
KLASS , LASERAPPARAT
SIKKERHEDSAFBRYDERE ER UDE AF FUN KTION, uNDGA
UDS ~~ELSE FOR STRALING
VARNING OSYNLIG LASER STRALNING NAR DENNA DEL AR
OPPNAD OCH SPARR AR URKOPPLAD STRALEN AR FARLIG
vORSICHT UN SICHTBARE LASERSTRAHLUMG TRITT AUS,
WENN DECKEL GEOFFNET UND WENN SICHERHEITSVER
RIEGELUNG UBERBRUCKT 1ST NICHT, DEM STRAHL AuS
5ETZEN
VARO, Auat,essa ,, s“o,,luk$tu, oh,lettaes,a olet altt,,na
nakymattcmdle Iawsate,lylle Ale kmo sateeseen
I
—
—
—
—
—
—
FOR SAFE AND EFFICIENT OPERATION
I
The apparatus shall not be exposed to dripping or splashing.
Do not damage the mains lead.
When not in use, disconnect the mains Ieadfrom the outlet. Grasp the plug, not the lead, when
disconnecting the unit.
If water should enter the unit, electrical shockora malfunction may result. Use in an area where
there is low humidity and little dust.
Do not disassemble or alter the unit in any way.
Do not use the unit in areas where extremes in temperature occur (below 5°C or exceeding
35°C), or where it may be exposed to direct sunlight.
Because of the CD player’s extremely low noise and wide dynamic range, there is a tendency
to turn the volume on the amplifier higher than necessary, Doing so may produce an
excessively high output from the amplifier which can cause damage to your speakers. Please
be careful in this regard.
Sudden changes in the surrounding temperature can cause dewto form on the optical pickup
lens inside the unit. Under this condition the unit may be unable to operate properly. If this
should occur, remove the disc and allow the player to adjust to the surrounding temperature.
-1-

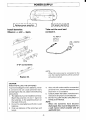
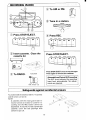
POWER SUPPLY
:::;:~—J I (c::=:..
E
——.——
Battery power operation
1
AC power operation
——— ——— —
——— ——
Install batteries.
Take out the cord and
Observe + and — signs.
connect it.
8 “D” size batteries
Replace lid.
CAUTION:
WHEN INSTALLING THE BATTERIES
To prevent leakage from the batteries, which
is corrosive and can cause personal injury
anddamageto theunit, observe the following
precautions:
1. The batteries must be installed correctly.
Match the polarities (+ and – signs) On
the batteries, to the polarities shown on
the back of the unit.
2. Donotmix new batteries with oldor used
batteries.
3. Only use batteries of the same type and
brand.
AC INPUT
NOTE:
When the mains lead is connected to the
unit, the irrsta//ed batteries wi// be automati-
cally disconnected.
4. If the unit will not be used for an extended
period of time, remove the batteries and
store them in a cool place.
5. Carefully follow the battery manufacturer’s
instructions for proper use and disposal.
6. DO NOT ALLOW YOUNG CHILDREN TO
HANDLE BATTERIES.
NOTE:
When the batteries have become
discharged, they must be disposed of in
a safe manner which complies with all
applicable laws.

I
COMPACT DISC OPERATION
I
-3

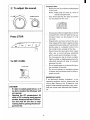
@To adjust the sound.
.
Q o
VOLUW
BASSXPANDER
BASS M?,
Q .“o~
\
/
/
MIN. XPAND
M,. .
. . . .
Press STOP.
To OFF (TAPE)
I
FUNCTION
m—
m
0
+1+
TAPE RADIO CD
CAUTION!
- If a disc is loaded upside down, or if
no disc is loaded, the CD pla yer will
not operate.
- Opening the CD compartment lid
while a CD is playing could scratch
the disc. Always prass the STOP Lwt-
ton and wait for the disc to stop
rotating befora opaning the CD com-
partment lid.
Compact discs
- Both 8cmand 12cmdiscscan be played
in this unit.
NOTE: Place only one disc at a time in
the CD compartment.
- Only discs bearing the logo as shown
can be played in this unit.
dill%
DIGITAL AUDIO
- Always place thecompact discinthe CD
compartment with the label facing up.
Compact discs can be played on only
one side.
– Fingerprints and dust should be care-
fully wiped off the disc’s signal surface
(opposite the label side) with a soft cloth,
Gently wipe in a straight motion from
the inside to the outside of the disc.
– Discs should be returned to their cases
after use to avoid serious scratches
which could cause the player to skip.
- Do not expose a disc to direct sunlight,
high humidity, orhigh temperatures for
extended periods of time to prevent
warping the disc.
- Do not apply paper or write anything on
the surfaces of the disc.
- Do not use cleaners or antistatic sprays
on discs, such as those used for phono-
graph records.
IMPORTANT NOTE
If an abnormal display indication, or an
operating problem occurs, disconnect the
mains lead. Remove the D batteries (see
page 2). Wait atleast 5seconds, then recon-
nect the mains lead. Reinstall the D batter-
ies.
-4-

PAUSE MODE
1. Press the PLAY/PAUSE button to tempo-
rarily stop play. The CD PLAY indicator
v “’ash”
2. Press it again to continue. The CD PLAY
Indicator will stop flashing.
TRACK SEARCH
1. In the play mode, press and hold the
l<< or P-1 SKIP/SEARCH button to lower
thevolume level and advance or returnto
v ::::::::
any part of the disc, The CD TRACK NO.
2. Release the14<or>H SKl P/SEARCH but-
ton to return the volume level to normal
NOTE:
Press and hold down during playback
If the l<< or ➤>1 SKIP/SEARCH button is
pressed during the PAUSE mode, no
sound will beheard, andthe PAUSE mode
will continue when the button is released.
TRACK SKIP
1. Press and release the 144 or FM SKIP/
SEARCH button during play to advance or
return tothe beginning of anytrackonthe
? :.
2. The CD TRACK NO. display will show the
number of the selected track. Play will
continue from the beginning of the new
NOTE:
Press and release repeatedly
/f the M< or ➤F1 SKIP/SEARCH button is
pressed while the unit is in the PAUSE
mode, the unit will remain in the PAUSE
mode when the button is released.
Using Headphones
r=
—.— —.— ——. —
1
\
-.
Q
I
I
PHONES
I
““’”””@ I
L
-5-
Stereo headphone (not supplied) J
——— ——— ——— —

I
RADIO OPERATION
I
)
Dial pointer
MHz
‘~ ‘Hz
~
Th;unit wi!tautoma~ka~ly switch
to stereo when an FM stereo
broadcast is received.
FUNCTION
TAPE RADIO CD
@To AM or FM.
BAND
m
I
@ To adjust the sound.
I To OFF (TAPE).
I
@ Tune in a station.
TUNING
T
FUNCTION
m—
IJ!3
II ““
TAPE R~DIO-CD
To improve reception
I
FM - Extend and change position.
\.
..
eE33
AM - Rotate unit.
—.
@
/
[
\
\’
I
\
/
\
\_
/
-6-

9
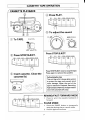
CASSETTE TAPE OPERATION
‘CASSETTE PLAYBACK
@To TAPE. ‘“”’”””
@3—
m
0
+1+
TAPE RADIO CD
@ Press STOP/EJECT.
REC PLAY
REW FFWD STOPIEJECT PAUSE
=Q2xl
@) Insert cassette. Close the
cassette lid.
t i
@ Press PLAY.
REC PLAY REW
FFWD STOPIEJECT PAUSE
●
b 44 ● k e II
\
(?
@To adjust the sound.
Q Q
VOLUME “
BASSXPANDER
w ‘Ass” ‘; \
\
1
M(N’
/
XPAND
MIh .
. MM
Press STOP/EJECT.
REC PLAY REW
FFWD STOPIEJEC1 PAUSE
-
Press STOP/EJECT once to stop the tape.
Press again to remove the cassette.
Full automatic stop
This unit has a full-release stop system
to protect the tape and prevent pinch
roller damage. When the end of the
tape is reached in Piayback, Recording,
Fast forward or f?ewind, the tape macha-
nism will automatically stop.
/
—
REWIND/FAST FORWARD MODE
REC PLAY RE\
t
FFW J STOP/EJECT PAUSE
1. Press to wind the cassette backward or
forward.
PAUSE MODE
1.
Press the PAUSE button to temporarily
stop play during play or record mode.
2. Press it again to continue.
-7-

RECORDING (RADIO)
\
Safeguards against accidentalerasure
To protect side A, break out tab (1), To protect
side B, break out tab (2).
NOTE:
A cassette with the erase guard tabs re-
moved cannot be erased or used for re-
cording and the REC button cannot be
depressed. To record or erase a protected
cassette, cover the tab openings with
adhesive tape (3).
-8-

@
@
Press STOP/EJECT.
REC
PLAY REW
FFWD STOP/EJECT PAUSE
Qzx12
Insert cassette.
cassette lid.
Close the
kke
---
@To CD.
FUNCTION
m—
IJIil!
I
TAPE RiDIO-CD
WARNING
Synchronous recording
(CD-to-TAPE SYNCHRO DUBBING)
This recording system starts disc play and
cassette recording atthe sometime.
When the RECbutton is pressed, recording
will start at the beginning of track number
1 of the disc.
To begin play from a different track press
the ➤W SKIP/SEARCH button to select the
desired track number, then press the REC
button.
@
Insert CD.
‘,
~>
(---
\\
\“
J ‘L,,
@ Press SKIP/SEARCH to
select track to record.
@ Press REC.
REC
PLAY REW
FFWD STOP/EJECT PAUSE
* F 44
bk * II
Recording copyright material without permission of the copyright owners is usually an
infringement. If you wish to re-record copyright material, permission from the copyright
owner is necessary. SANYO does not approve of, and cannot be held responsible for, any
unlawful use of this machine.
-9-

I
MAINTENANCE
I
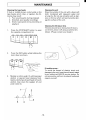
Cleaning the tape heads
If dust or reddish-brown oxide builds on the
tape heads, pinch roller, or capstan, the fol-
lowing may result:
1. Poor sound quality during playback
2. Distorted, poor quality recordings
3. Erratic tape speed during recording or
playback
1,
2,
3.
Press the STOP/EJECT button to open
the cassette compartment lid.
Cleaning the unit
Wipe the outside of the unit with a clean soft
cloth, moistened with lukewarm water and
wrung dry. Do not use solvents such as ben-
zene or thinner which will permanently dam-
age the surface of the unit.
Cleaning the CD player lens
The lens should never be touched. If dust is
on the lens, blow it off using a camera lens
blower. (Please consult your dealer. )
REC PLAY REW
FFWD STOPEJECT PAUSE
-
Press the REC button while holding the
lever down as shown.
Moisten a cotton swab (1) with Isopropyl
alcohol or special head cleaning fluid.
Gently rubtheface of each head (4,5) with
alcohol. Also clean the capstan (2) and
pinch roller (3).
1
54
If trouble occurs...
To avoid the hazard of electric shock and
damage to the unit, have the unit bench tested
by an authorized SANYO service station. Do
not remove the unit from itscabinet to attempt
repairs yourself,
-10

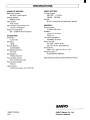
SPECIFICATIONS
I
(CASSETTE SECTION)
Recording system:
AC bias, 4-track stereo
Erasing system:
Magnet erase
Tape speed:
4,75 cmlsec.
Fast forward and rewind time:
110 sec. (C-60 tape)
Frequency response:
80-12,000 Hz (Normal tape)
(CDSECTION)
Channels:
2 channels
S/N ratio:
70 dB
Wow & Flutter:
undetectable
Sampling frequency:
44.1 kHz
Quantization:
16 bits linear/ch
Pick up light source:
Semi-conductor laser
Pick up wave length:
790 nm
Laser output:
Continuous wave max. 0.6 mW
(RADIO SECTION)
Tuning ranges:
AM: 525-1,710 kHz
FM: 88-108 MHz
Aerials:
Built-in ferrite bar and telescopic aerials
(GENERAL)
Output power:
4.0 W/ch (DC max. )
Speaker:
12cmx2,40hms
PIEZO
X 2
Terminal impedance:
PHONES: 32 ohms
Power source:
AC: 230-240 V, 50 Hz
DC: 12 V (8 “D” size batteries)
Dimensions:
556x 170x 220mm(Wx HxD)
Weight (approx.):
3.3 kg without batteries
Specifications subjecttochange without notice.
IAD6PIPO188-B
(AU)
SANYO Electric Co., Ltd.
Printed in Malaysia
-
 1
1
-
 2
2
-
 3
3
-
 4
4
-
 5
5
-
 6
6
-
 7
7
-
 8
8
-
 9
9
-
 10
10
-
 11
11
-
 12
12


Sanyo MCD-Z8F (AU) User manual
- Category
- Cassette players
- Type
- User manual
Ask a question and I''ll find the answer in the document
Finding information in a document is now easier with AI
Related papers
Other documents
-
COBY electronic CX-CD109 - CX CD Player User manual
-
COBY electronic CX-CD331 User manual
-
Lenco CD-214 Owner's manual
-
The Singing Machine SMG SMG-301 User manual
-
Radio Shack SMG - 299 User manual
-
RCA RP-7948 User manual
-
Hamilton CD 563 Owner's manual
-
jWIN JX-43000D User manual
-
COBY electronic CD332 - CD Player / Radio User manual
-
 Unisound TC-30 Operating instructions
