Ergotron 45-361-026 User guide
- Category
- Flat panel wall mounts
- Type
- User guide
This manual is also suitable for
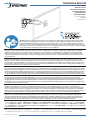
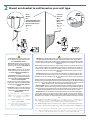
The Ergotron 45-361-026, a reliable interactive arm, provides a flexible and ergonomic workspace solution. It offers smooth, effortless movement, allowing you to position your screen exactly where you need it. The arm's sturdy construction ensures stability, holding screens up to 25 lbs (11.3 kg) and 42 inches in size.
The Ergotron 45-361-026, a reliable interactive arm, provides a flexible and ergonomic workspace solution. It offers smooth, effortless movement, allowing you to position your screen exactly where you need it. The arm's sturdy construction ensures stability, holding screens up to 25 lbs (11.3 kg) and 42 inches in size.


-
 1
1
-
 2
2
-
 3
3
-
 4
4
-
 5
5
-
 6
6
-
 7
7
-
 8
8
-
 9
9
-
 10
10
-
 11
11
-
 12
12
-
 13
13
-
 14
14
-
 15
15
-
 16
16
-
 17
17
-
 18
18


Ergotron 45-361-026 User guide
- Category
- Flat panel wall mounts
- Type
- User guide
- This manual is also suitable for
The Ergotron 45-361-026, a reliable interactive arm, provides a flexible and ergonomic workspace solution. It offers smooth, effortless movement, allowing you to position your screen exactly where you need it. The arm's sturdy construction ensures stability, holding screens up to 25 lbs (11.3 kg) and 42 inches in size.
Ask a question and I''ll find the answer in the document
Finding information in a document is now easier with AI
in other languages
- italiano: Ergotron 45-361-026 Guida utente
- français: Ergotron 45-361-026 Mode d'emploi
- Nederlands: Ergotron 45-361-026 Gebruikershandleiding
Related papers
-
Ergotron LX Sit-Stand Wall Mount Keyboard Arm User guide
-
-
Ergotron 200 Series Dual Monitor Arm User guide
-
-
Ergotron 200 Series Combo Arm User guide
-
-
-
-
-
Ergotron 200 Series Wall Mount Arm, 2 Extensions User guide
Other documents
-
OmniMount PLAY25 User guide
-
-
HUANUO Monitor Desk Mount User manual
-
OmniMount LIFT30 User guide
-
 Ergear EGDS3 User manual
-
 Barkan Mounting Systems 20B User manual
-
Atdec AWMS-DW Installation guide
-
Apple MJ4M2ZM/A Datasheet
-
-
Chief iCSPTM1T02 Specification

