Siemens TK76K573 User manual

Category
Coffee makers
Type
User manual

This manual is also suitable for

31
deen
Congratulations ...
��� on purchasing this product� With this de-
ployable fully automatic espresso machine
you have acquired a high-quality modern
kitchen appliance of innovative design
which combines a multitude of functions
with easy operation�
It will enable you to prepare a variety of
delicious hot drinks quickly and simply –
whether you’re in the mood for a traditional
cup of coffee, a smooth milk coffee or latte
macchiato, a creamy cappuccino or an
invigorating espresso� At the same time the
appliance offers you a wide range of op-
tions for adapting it to your individual taste�
To ensure that you can use this fully auto-
matic espresso machine with all its func-
tions and features reliably and safely, we
would like you to familiarize yourself with
its components, functions, displays and
controls� These instructions are designed
to help you� So please take the time to read
them before you switch on the appliance�
How to use these instructions
If you unfold the front cover of these in-
structions you will nd illustrations of the
appliance with numbered parts� These
numbers are referred to throughout the text�
Example: Water tank (12)
If you leave the cover page un-
folded, you can always refer back
to it quickly, wherever you are in
the instructions�
Displays and lettering on buttons are al-
ways shown in a different font from the text
of the instructions so that you can easily
recognize what is displayed or printed on
the appliance�
Example: Espresso
Frequently used controls are shown as
symbols�
Rotary knob
Button
The appliance comes with a quick refer-
ence guide on which you can nd the most
important functions at a glance� It can be
stored in the outer compartment on the
right of the appliance�
32
deen
Contents
33 Safety instructions
35 Included in delivery
35 The appliance and its parts
36 Controls and display
36 Power switch O/I
36 Menu and display
37 Display messages
38 Deployment system
38 Accessories
38 Operation
38 General
39 Setting up the appliance
40 Preparing drinks
40 Drink selection
41 AromaDouble Shot
41 Example
41 Preparation using pre-ground coffee
42 Preparation using milk
43 Two cups at once
43 My coffee
44 Preparing milk froth and warm milk
44 Dispensing hot water
45 Information and settings
45 Displaying information
45 Displaying settings
46 Set per-cup quantity
47 Adjusting the grinding unit
47 Checking the water hardness
47 Tips on energy saving
48 Daily maintenance
and cleaning
48 Daily maintenance
48 Cleaning the milk system
49 Cleaning the brewing unit
51 Service programmes
51 Descaling
52 Cleaning
53 Calc‘n‘Clean
54 Accessories, storage,
disposal, guarantee
54 Accessories
54 Storage
55 Disposal
55 Guarantee
55 Technical data
56 Simple troubleshooting
33
deen
Safety instructions
Please read and follow the operating instructions carefully and
keep them for later reference. Enclose these instructions when
you give this appliance to someone else. This appliance is
designed for the preparation of normal household quantities in
the home, or in household-like, non-commercial environments.
Household-like environments include staff kitchens in shops,
of ces, agricultural and other small businesses or for use by
guests at bed-and-breakfast establishments, small hotels and
similar residential facilities.
¡ Danger of electric shock!
Connect and operate the appliance only according to the type plate
speci cations. To avoid potential hazards, repairs such as replacing
a damaged cable must only be carried out by our customer service
personnel�
This appliance may be used by children aged 8 years and older and
by persons with reduced physical, sensory or mental capabilities
or who lack experience and/or knowledge if they are supervised or
have been given instruction in the safe use of the appliance and
have understood the dangers involved� Keep children under 8 years
of age away from the appliance and connecting cable and do not
allow them to use the appliance� Children shall not play with the
appliance� Cleaning and user maintenance shall not be made by
children unless they are older than 8 years and supervised�
Never immerse the appliance or mains cable in water� Use only if
power cord and appliance show no signs of damage� Should a fault
occur, pull the plug or disconnect from the mains immediately
34
deen
¡ Risk of suffocation!
Do not allow children to play with packaging material�
¡ Risk of injury!
Do not reach into the grinding unit�
Be careful when pulling the appliance out of the built-in unit and
pushing it back in, so that ngers are not trapped.
¡ Risk of scalding!
The milk frother for milk and hot water gets very hot�
After use, allow to cool down rst before touching.
35
deen
Included in delivery
(See the illustration at the beginning of this
instruction manual)
1 Fully automatic espresso machine
TK76K573
2 Instruction manual
3 Filter instructions
4 Installation instructions
5 Measuring spoon
6 Milk tube
7 Quick reference guide
8 Milk container
9 Water lter
: Water hardness testing strip
; Milk frother
The appliance and its
parts
(See illustration on the fold-out front cover
of these instructions)
1 Power switch O/I
2 on off button
3 Selection buttons < >
4 Rotary knob
for settings on the display
5 Display
6 Deployment button
7 i button (information / settings)
8 start stop button
9 Coffee outlet (height-adjustable)
10 Milk frother, removable
(for milk / hot water)
11 Cover of coffee outlet / milk frother
12 Removable water tank
13 Milk tube
14 Measuring spoon
15 Bean container with aroma cover
16 Selector for adjusting the grind
17 Drawer
(for ground coffee / cleaning tablet)
18 Door to brewing unit
19 Door opener
20 Drip tray unit
21 Quick reference guide
22 Holder for milk frother
23 Brewing unit
a) Lock for brewing unit
b) Button for brewing unit
24 Grate
25 Drip tray
26 Coffee grounds container
27 Drip tray panel
28 Milk container (insulated)
36
deen
Controls and display
Power switch O/I
The power on/off switch O/I (1) is used to
switch the appliance on, or to switch it off
fully (power supply off)�
1
Important: Do not press the
power switch while the appliance
is operating� First press the on off
button to rinse the appliance�
The power switch switches auto-
matically to O
Menu and display
The appliance features user-friendly menu
navigation to ensure that operation is as
easy as possible while at the same time
offering a wide range of functions� It allows
you to select from a multitude of options in
only a few steps once you know how� The
display shows which programme you have
selected and lets you know when you need
to top up the appliance with water or coffee,
or run one of the service programmes�
Basic menu operation is described in the
following pages�
...
2 6 3 4 3 7 8
5
-
+
-
+
1x1x
Coffee
on off (2): To switch on (power
switch must be at I), press the on off
button� The appliance will rinse auto-
matically unless it is still warm from the
last use�
The appliance is ready for use when
the drink selection menu is shown in the
display (5)�
To switch off, press the on off button
again and the power switch will auto-
matically change to O� The appliance
will rinse automatically unless no coffee
was dispensed before�
< > (3): These buttons are used
to navigate left and right in the display
(5)� The currently active menu item is
highlighted in white�
Rotary knob (4): This is turned to
select and change settings in the dis-
play (e�g� coffee strength or per-cup
quantity)�
37
deen
Display (5): The display uses symbols
and texts to indicate settings, ongoing
processes and messages�
Use (6) to deploy the appliance
automatically out of the built-in unit (see
“Deployment system”)�
i (7): If you press i (7), informa-
tion is shown on the display (see “Dis-
playing information”)� If you keep i
(7) pressed for longer than 3 seconds,
you open the settings menu (see “Dis-
playing settings”)�
Press start stop (8) to start
drink preparation or to start a service
programme�
Press start stop (8) again during
drink preparation to stop the dispensing
process�
Display messages
The display shows not only the current
operating status, but also various mes-
sages that give you status information or
let you know when you need to take action�
As soon as you have taken the necessary
action, the message disappears and the
menu for drink selection is displayed again�
Information:
Display message Meaning
Water tank
almost empty
Water tank must be
relled soon
Bean container
almost empty
Bean container must
be relled soon
Please wait...
Appliance is working;
please wait a moment
Drink is ready.
You can now remove
your drink
Prompts:
Display message What you need to do
Refill water
tank
Rell water tank
Display message What you need to do
Replace water
tank
Replace water tank
Check water
tank
Remove water tank
and replace correctly
Replace drip
tray
Replace drip tray
Empty drip tray
Empty drip tray and
clean
Refill bean
container
Rell bean container
Set up milk
frother
Set up milk frother
Replace brewing
unit
Close door
Replace brewing unit
and close door
Clean
brewing unit
Clean brewing unit
Service -
change filter
Change water lter
Service -
descale
Run “Descaling”
service programme
Service -
clean
Run “Cleaning”
service programme
Service -
Calc‘n‘Clean
Run “Calc‘n‘Clean”
service programme
Short rinse
for milk system
» Start
Rinse milk system
38
deen
Deployment system
The appliance can be pulled out of the built-
in unit automatically� To do this,
press (6) (appliance must be
switched on for this) or
remove grate and pull on the handle
underneath which is now accessible:
The appliance now moves automatically
into deployment position 1� In this position
it can be lled with water, coffee beans,
ground coffee and cleaning / descaling
tablets, and the accessories on the right of
the appliance can be removed�
To pull the appliance out fully,
press
(6) again and pull the appli-
ance out by hand into position 2 or
pull the appliance out fully by the
handle�
In deployment position 2 the brewing unit
can be removed and the grinding unit
adjusted�
Deployment Deployment
position 1 position 2
Then push the appliance back fully into the
built-in unit�
During the brewing process,
automatic deployment is
prevented�
Accessories
The fully automatic espresso machine has
special compartments for storing the acces-
sories and quick reference guide (21) with
the appliance� These are located on the
right side (13, 14) and are accessible when
the appliance is pulled out into deployment
position 1�
Operation
General
Fill the water tank with fresh, uncarbonated
water only, and preferably use only beans
for fully automatic coffee and espresso ma-
chines� Do not use coffee beans that have
been glazed, caramelised or treated with
other additives containing sugar, since they
will block the brewing unit�
If the appliance is being used for the rst
time or has not been operated for a long
period, the rst cup of coffee will not have
the full aroma� When using the espresso
machine for the rst time, you will achieve a
suitably thick and stable “crema” only after
the rst few cups have been dispensed.
The factory settings of the fully auto-
matic espresso machine are programmed
for optimal performance� After approx�
30 minutes, the appliance will switch off
automatically This setting, like many
others, can be changed (see “Auto off after”
under “Displaying settings”)�
Important: Only use the appli-
ance in frost-free rooms� If the
appliance has been transported
or stored at temperatures below
0 °C, wait at least 3 hours before
operation�
39
deen
Important: If the drip tray is not
in place, the appliance cannot be
switched on and no water ows
out of the coffee outlet� The mes-
sage Replace drip tray appears�
Do not press the power switch
while the appliance is operating�
First press the on off button to
rinse the appliance� The power
switch switches automatically
to O
Setting up the appliance
1� Set the power switch to l and press the
on off button�
1
2� The language selection is shown in the
display:
Sprache:
Deutsch
Start drücken
3� Press the retracted rotary knob (4)
and turn it to select the language in
which you want the display texts to
appear� The following languages can be
selected:
Deutsch Português
English Dansk
Pycckий Norsk
Nederlands Suomi
Français Česky
Italiano Türkçe
Svenska Magyar
Español Ελληνικά
Polski Български
4� Press start stop (8)� The language
you selected is saved and the appliance
is in “energy saving mode”�
You can change the language setting at
any time (see “Displaying settings”)�
5� Deploy the appliance (see “Deployment
system”)�
6� Remove the water tank (12) by pulling
it upward, rinse and ll it with fresh cold
water. Do not ll above the “max” mark.
12
15
7� Replace the water tank and push it
rmly downward into place.
Fill the water tank with fresh water
every day� The tank should always
contain sufcient water for operat-
ing the appliance�
8� Fill the bean container (15) with coffee
beans (for preparation using ground
coffee, see page 41)�
9� Push the appliance back into the built-in
unit�
40
deen
10� Press on off (2)� The company logo
lights up in the display� The appliance
now heats up and rinses� Some water
will run out of the coffee outlet� The
menu for drink selection is shown in the
display:
1x *
1x +
Coffee
11� Set the water hardness
(see “Displaying settings”)�
Preparing drinks
Drink selection
In the menu for drink selection, which ap-
pears in the display after setup or after
you have switched on the appliance and
pressed on off (2), you can turn the
rotary knob (4) to select one of the fol-
lowing in the section of the display that is
highlighted in white:
1x *
1x +
Espresso
Espresso
Coffee
Latte Macchiato
equal quantities of espresso and milk froth;
topped up with milk; best served in a tall
glass
Cappuccino
1/3 espresso + 1/3 milk + 1/3 milk froth;
best served in a cup
White coffee
1/2 coffee + 1/2 milk; best served in a wide
cup
My coffee
Milk froth
Warm milk
Hot water
Short rinse for milk system
For every type of drink you can use <
and > (3) to select further options, e�g�
coffee strength and per-cup quantity� The
available options are always shown on the
right next to the type of drink� Among the
options you have selected with < and
> (3) (highlighted in white) you can
change other settings with the rotary knob
(4)� Under coffee preparation you have
the following options:
Strength:
1x *
1x *
2x *
2x *
1x *
AromaDouble Shot
strong
AromaDouble Shot
regular
strong
regular
mild
Size:
2x +
1x +
1x+
1x+
1x+
2x+
2x+
2x+
large
medium
small
large
medium
small
41
deen
AromaDouble Shot
The longer the coffee is brewed, the more
bitter substances and undesired aromas
are released� This has a negative effect on
the taste and makes the coffee less easily
digestible� So for extra strong coffee the
TK76 has a special AromaDouble Shot
function� When half the quantity has been
prepared, coffee is ground and brewed
again so that only the pleasant, aromatic
scents are released�
The AromaDouble Shot function is available
for the following drinks:
Coffee (1 cup)
Cappuccino (1 cup)
Latte Macchiato (1 cup)
White coffee (1 cup)
My coffee (1 cup)
Espresso (1 cup, medium and large)
Example
Let’s assume you would like a large cup of
mild coffee made from coffee beans�
1� Place the cup under the coffee outlet (9):
9
2� Turn the rotary knob (4) until Coffee
appears on the left of the display:
1x *
1x +
Coffee
3� Press > (3) once to get to the
strength setting� The strength setting is
now highlighted in white:
1x *
1x+
Coffee
4� Turn the rotary knob (4) to the left
until only the box on the left is shown in
black (“mild” setting):
1x *
1x+
Coffee
5� Press > (3) again to get to the per-
cup quantity setting� The per-cup quan-
tity setting is now highlighted in white:
1x *
1x+
Coffee
6� Turn the rotary knob (4) to the right
until all three boxes are shown in black
(“large” cup setting):
1x *
1x +
Coffee
7� Press start stop (8)�
The coffee you have selected is prepared�
Proceed in the same way to prepare other
types of coffee in different strengths and
per-cup quantities�
Preparation using pre-ground
coffee
This fully automatic espresso machine
also offers the option of making coffee with
pre-ground coffee� A measuring spoon is
included with the appliance�
1� Deploy the appliance and remove the
measuring spoon�
2� Open the drawer (17)�
17
3� Pour in no more than two level spoons
of ground coffee�
42
deen
Do not use whole beans or instant
coffee�
4� Close the drawer again�
5� Push the appliance back in�
6� Set the required drink and per-cup
quantity with the rotary knob (4):
+
Espresso
Coffee powder
7� Place a cup under the coffee outlet (9)�
9
8� Press start stop (8)�
The coffee is brewed and then dispensed
into the cup�
For another cup of coffee, pour in more
ground coffee and repeat the procedure� If
no coffee is taken within 90 seconds, the
brewing chamber empties automatically to
avoid overlling. The appliance rinses.
Preparation using milk
For optimal milk froth, use cold
milk with a fat content of at least
1�5 % if possible�
1� Lower the cover of the milk frother (11);
the milk frother (10) is now accessible:
11
10
2� Deploy the appliance
(see “Deployment system”)�
3� Take the milk tube supplied with the ap-
pliance and connect it to the attachment
point on the milk frother (10)� Close the
cover again�
13
10
13
13
10
13
4� Push the appliance back in�
5� Place the container with milk next to
the milk frother� Introduce the milk tube
into the container� The notched end of
the tube should be fully immersed in the
milk�
6� Place a cup or glass under the coffee
outlet�
7� Turn the rotary knob (4) to select
Latte Macchiato, Cappuccino,
White coffee or My coffee (your own
special coffee/milk mix)� The display
shows the selected drink along with the
setting for coffee strength and per-cup
quantity for this drink:
1x *
1x +
Cappuccino
8� Choose your settings for strength and
per-cup quantity
9� Press start stop (8)�
First milk is drawn in, prepared and
dispensed into the cup or glass�
43
deen
Immediately after that the coffee is brewed
and then runs into the cup or glass�
In the case of the strength settings
2x
* (AromaDouble Shot), the
appliance brews twice in succes-
sion� Wait until the procedure is
fully completed�
Dried milk residue is difcult to
remove, so clean the milk system
immediately after use (see
“Cleaning the milk system”)�
Two cups at once
1� Place two cups under the two coffee
outlets left and right:
2� Select Espresso or Coffee with the
rotary knob
(4)� Press > (3) and
turn the rotary knob
(4) to set the
required strength�
3� Press > (3) to switch to the per-cup
quantity selection� In the per-cup quan-
tity selection, keep turning the rotary
knob (4) to the right until the display
shows 2 x in front of the cup symbol:
*
2x+
Coffee
4� Set the required quantity for the two
cups by turning the rotary knob (4)
(small, medium, large)�
5� Press
start stop (8)�
Coffee is dispensed into the two cups�
The appliance brews twice in
succession; wait for the complete
process to nish.
My coffee
The My coffee setting allows you to dene
the exact mix of coffee and frothed milk that
suits your own individual taste�
1� Connect the milk tube to the milk frother
(see “Preparation using milk”)�
2� Place container with milk on the grate�
Introduce the milk tube into the contain-
er� The notched end of the tube should
be fully immersed in the milk:
3� Place a cup under the coffee outlet (9)�
4� Select My coffee with the rotary knob
(4)�
1x
*
My coffee
5� Press > (3) to switch to the coffee
strength selection� Set the required
strength with the rotary knob (4)�
1x *
My coffee
6� Press > (3) to go on to the per-cup
quantity selection� Set the required per-
cup quantity with the rotary knob (4):
1x *
+
44
deen
7� Press > (3) to switch to selection of
the coffee/milk ratio� Set the required
mix by turning the rotary knob (4) in
20% steps:
1x +
Espresso Milk
8� Press start stop (8)�
The drink is prepared in the required
coffee / milk ratio�
The changes you have made
are saved automatically� It is
not necessary to conrm them
additionally
Preparing milk froth and warm
milk
Risk of burns!
The milk frother (10) gets very
hot. After use, allow to cool
down rst before touching.
For optimal milk froth quality, use
cold milk with a fat content of at
least 1�5 % if possible�
1� Take the milk tube and connect it to
the milk frother (see “Preparation using
milk”)�
2� Place a cup or glass under the outlet of
the milk frother (10)�
3� Select the required Milk froth or
Warm milk setting by turning the rotary
knob (4):
Milk froth
4� Press start stop (8)�
Milk froth or warm milk runs out of the milk
frother outlet (takes about 40 or 60 seconds
respectively)�
Press start stop (8) again to cut the
process short�
The appliance may make a
whistling noise when warm milk is
being prepared� This is caused by
the milk frother (10) for technical
reasons�
Dried milk residue is difcult to
remove, so clean the milk frother
immediately after use�
(see “Cleaning the milk system”)
Dispensing hot water
Risk of burns!
The milk frother (10), from
which the hot water ows,
gets very hot. After use, allow to cool
down rst before touching.
The appliance can also be used to dis-
pense hot water, e�g� for tea�
1� Place a cup or glass under the coffee
outlet�
2� Select Hot water with the
rotary knob (4):
Hot water
3� Press > (3) to switch to the tem-
perature selection� Set the required
temperature with the rotary knob (4):
Hot water
4� Press start stop (8)�
Hot water runs out of the milk frother outlet
for about 40 seconds�
Press start stop (8) again to cut the
process short�
Warm up cups before use,
especially small, thick espresso
cups, with the hot water
45
deen
Information and settings
Use i (7) to display information (press
briey) and adjust settings (hold down for at
least three seconds)�
Displaying information
In the Info menu (press i (7) briey) you
can call up the following information:
when it is necessary to descale the
appliance
when it is necessary to clean the
appliance
when it is necessary to change the lter
how much coffee has been dispensed
since the appliance was rst put into
operation
how many milk drinks have been
dispensed
how much hot water has been prepared
....................................................................................
Information / Service
Descale after
100 cups
Displaying settings
Hold down i (7) for at least 3 seconds;
the different setting options are then
displayed:
Language:
English
Per-cup quantities
Default settings
Use < and > (3) to switch between
the different setting options� The currently
active setting is always highlighted in white�
You can change the setting that is currently
displayed by turning the rotary knob (4)�
To exit the menu, press i (7) again�
The changes you have made
are saved automatically� It is
not necessary to conrm them
additionally
The following setting options are available
to you:
> Language: Turn the knob (4) to
select the display language�
> Per-cup quantities: The per-cup
quantity can be set separately for each
type of drink and each cup size (see “Set
per-cup quantity” on page 46)�
> Water hardness: Turn the knob
(4) to select the required water hardness
(1, 2, 3 or 4) (refer also to “Checking and
setting the water hardness”)�
> Coffee temperature: Turn the knob
(4) to set the coffee temperature�
> Auto off after: Turn the knob
(4) to enter the time span after which the
appliance should automatically switch off
following the last drink preparation� A time
between 5 minutes and 8 hours can be set�
The default time is 30 minutes, but this can
be shortened to save energy
> Contrast: The display contrast can
be set from –20 to +20 with the rotary knob
(4)� The default setting is 0�
> Illumination: The lighting can be
set to Off, On or Off after 5 min. (factory
setting: On)�
> Water filter: Each time a new water
lter is inserted in the water tank (12), it
must be rinsed:
1� Place the water lter in the water tank
(12) and ll the tank with water up to the
“max” mark�
2� Turn the rotary knob (4) to select
Press start and press start stop
(8)�
3� Place a container with a capacity of
0�5 litres under the milk frother (10)�
4� Press start stop (8)� Water will now
run rst through the lter to rinse it and
then into the container
46
deen
Empty the container� The appliance is
ready to use once more�
Rinsing the lter simultaneously activates
the setting for the
Service - change filter
display
The lter is no longer effective when the
Service - change filter display appears,
or at the latest after two months� It needs to
be replaced for reasons of hygiene and so
that there is no build-up of limescale (this
could damage the appliance)� Replacement
lters can be obtained from retailers or cus-
tomer service (see “Accessories”)�
After every lter change the lter must rst
be rinsed� Proceed as described at the be-
ginning of this section�
If no new lter is used, turn the water lter
setting to Off
You can nd detailed information about the
water lter in the enclosed lter instructions.
If the appliance has not been used
for a prolonged period (e�g� during
your vacation) the lter should
be rinsed before the appliance
is used again� To do this, simply
dispense a cup of hot water
Further entries in the Settings menu:
> Descaling program: If you want
to descale the appliance, press start
stop (8) and run the descaling programme
(see “Descaling”)�
> Cleaning program: If you want
to clean the appliance, press start
stop (8) and run the cleaning programme
(see “Cleaning”)�
> Calc‘n‘Clean: If you want to
descale and clean the appliance at the
same time, press start stop (8)
and run the Calc‘n‘Clean programme
(see “Calc‘n‘Clean“)�
> Factory settings: You can cancel
your own settings and reset the factory set-
tings� To activate the factory settings, press
start stop (8)�
The appliance can also be reset to
the factory settings as follows:
1� Switch the appliance off fully at the
power switch O/I (1)�
2� Press < and > (3) at the same
time, hold them down, and switch the
appliance on again at the power switch
O/I (1)�
The factory settings are reactivated�
Set per-cup quantity
The per-cup quantity can be adjusted
individually to suit your cups� It can be set
separately for each type of drink and each
cup size�
1� To call up the default settings, keep
i (7) depressed for at least
3 seconds�
2� Select Per-cup quantities with >
3� Press start stop (8)�
4� Select the type of drink with the rotary
knob (4)�
5� Press >
6� Select the cup size with the rotary knob
(4)�
7� Press >
8� Set the per-cup quantity with the rotary
knob (4)�
< returns you to cup size and drink
selection� To quit the default settings, press
i (7)� The settings are stored�
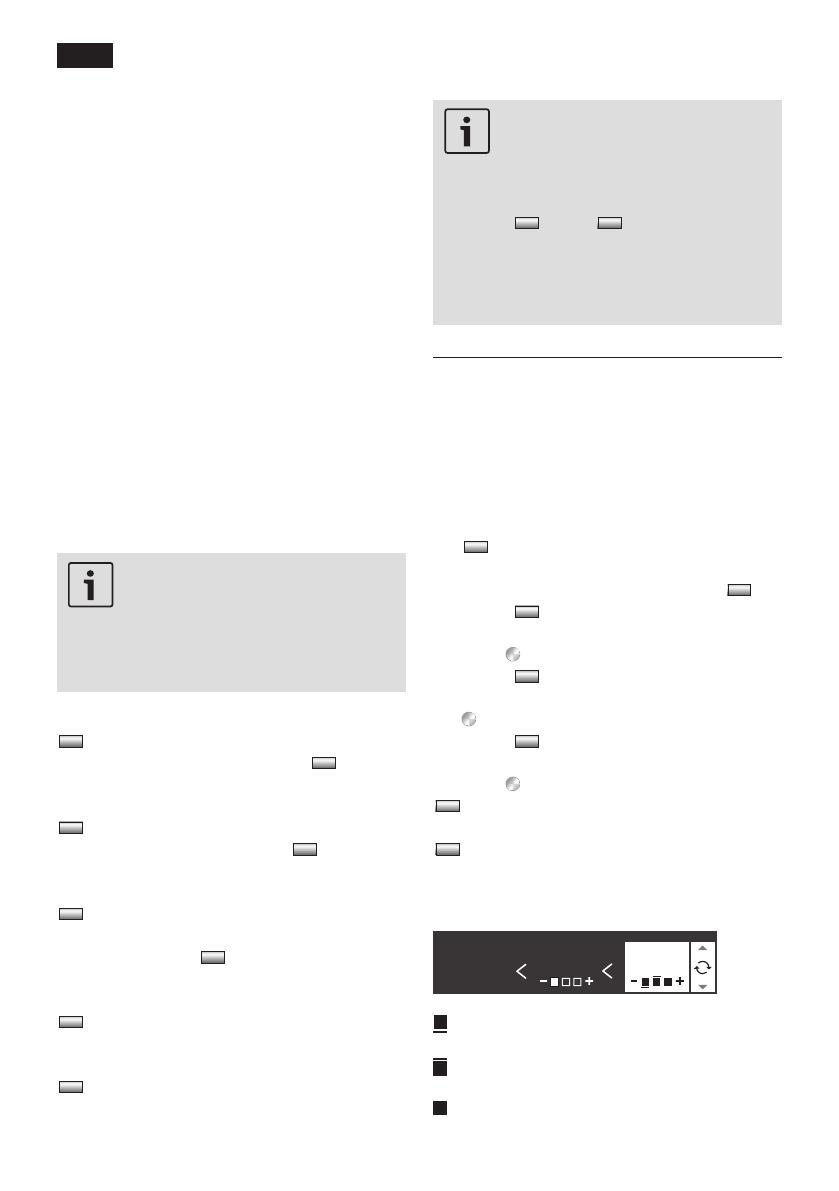
When the cup size is selected, the changed
per-cup quantity is shown graphically:
1x *
1x +
Coffee
Per-cup quantity reduced compared
with standard setting
Per-cup quantity increased compared
with standard setting
Standard
47
deen
Important: The selected amount
in ml is an approximate value and
can vary signicantly as a result of
crema forming, the grind setting or
the type of milk used, etc�
Adjusting the grinding unit
The rotary selector (16) on the top of the
appliance adjusts the degree of grinding
from coarse to ne as required.
16
Warning:
Adjust the grinding unit only
while it is running� Otherwise the
appliance may be damaged�
1� Deploy the appliance fully
(see “Deployment system”)�
2� In the drink selection menu, select
Espresso
3� Press start stop (8)�
4� While the grinding unit is running, adjust
the rotary selector (16) from ne to
coarse or back as required�
The new setting will not become
apparent until after the second
cup of coffee�
For dark roast coffee beans,
choose a ner grind, for lighter
beans a coarser grind�
Checking the water hardness
The water hardness setting can be adjusted
on this appliance� It is important to set the
water hardness correctly, so that the appli-
ance indicates accurately when the descal-
ing programme should be run� The factory
setting for the water hardness is 4�
You can check the water hardness using
the enclosed test strip or by asking your
local water supplier. Dip the test strip briey
in water, gently shake off any drips, and
check the result after one minute�
Water hardness levels and settings:
Level Water hardness
German (°dH) French (°fH)
1
2
3
4
1-7
8-14
15-21
22-30
1-13
14-25
26-38
39-54
Tips on energy saving
After approx� 30 minutes (factory
setting), the appliance will switch off
automatically and will not require any
more energy
The default time can be shortened
(see “Auto off after” under “Displaying
settings”)�
If the appliance is not in use, switch it
off with the on off button�
If possible, do not interrupt coffee
or milk froth dispensing� Stopping a
process prematurely results in higher
energy consumption and the drip tray
lls up more quickly.
Always descale the appliance when
Service - descale is displayed (see
“Descaling”) to avoid a build-up of
limescale� Limescale residue results in
higher energy consumption�
48
deen
Daily maintenance
and cleaning
Risk of electric shock!
Before cleaning the appliance,
switch it off at the power switch.
Do not use a steam cleaner.
Daily maintenance
1� Wipe the outside of the appliance with
a soft, damp cloth� Do not use abrasive
cloths or cleaning agents�
2� Do not use alcohol-based or spirit-
based cleaning agents on the high-
gloss surfaces�
3� Always remove any limescale,
coffee, milk or descaling uid residue
immediately� Such residue can cause
corrosion�
4� Rinse out the water tank (12) with water
only
5� Take off the grate (24)� Pull out the drip
tray (25)� Take off the drip tray panel
(27)� Empty out any water and coffee
grinds (26)� Clean the drip tray or put it
in the dishwasher� Do not put the grate
(24) or the drip tray panel (27) in the
dish washer
24
20
2627 25
6� The lid and the insulating cover of the
milk container should only be wiped
gently with a damp cloth� Do not put
them in the dish washer
7� Wipe out the inside of the tray holders�
8� Clean the milk frother (procedure
described below)�
9� Replace all the parts again�
Important: Drip tray for coffee
outlet (25) and coffee grounds
container (26) should be emptied
and cleaned daily to prevent
mould from developing�
If the appliance is cold when
switched on with on off (2),
or if it is switched off after dis-
pensing coffee with the on off
button, it rinses automatically In
other words the pipework inside
the appliance is cleaned by the
machine itself�
Important: If the appliance has
not been used for a prolonged
period of time (e�g� after a vaca-
tion), clean the entire appliance
thoroughly, including the milk
system and brewing unit�
Cleaning the milk system
Risk of burns!
The milk frother (10) gets very
hot. After use, allow to cool
down rst before touching.
The message Short rinse for milk
system » Start appears
if cleaning has not been performed after
use
If this message appears, start with Step 2
under “Short rinse for milk system”�
Clean the milk system immediately after
use�
49
deen
Short rinse for milk system:
1� In the menu for drink selection, select
Short rinse for milk system
2� Press start stop (8)�
3� Place a cup under the milk frother (10)
and the end of the milk tube in the cup�
4� Press start stop (8)� The appliance
now lls the cup automatically with
water and draws it in again through the
milk tube for rinsing� The rinse proce-
dure takes about 1 minute�
5� Empty the cup and clean the milk tube�
All the parts can also be put in the
dishwasher
Cleaning the milk system:
1� Dismantle the milk frother for cleaning�
To do this, lower the cover (11), grasp
the milk frother (10) and pull it out
forward�
10a
10b
10
11
22
2� Clean the holder of the milk frother (22)
with a soft cloth�
3� Turn the upper part (10a) in an anti-
clockwise direction and remove from the
lower part (10b)�
4� Clean individual parts with detergent
solution and a soft cloth or put them into
the dishwasher (cutlery basket)�
5� Put all the parts back together, making
sure the markings are overlapping� The
milk frother can then be clicked back
into place in the appliance�
Cleaning the brewing unit
In addition to the automatic cleaning
programme, the brewing unit should be
removed regularly for cleaning�
Warning: Clean the brewing unit
without detergent and do not put it
in the dishwasher
1� Deploy the appliance fully (see “Deploy-
ment system”)�
2� Press the on off button to switch it
off� After rinsing, the power switch
automatically switches to O
3� Grasp the door opener (19) and open
the door (18) to the brewing unit (23):
18
19
50
deen
4� Slide the red lock (23a) on the brewing
unit completely forward:
23a
5� Press the red button (23b), grasp the
brewing unit (23) by the recessed grips
and remove carefully
23a 23b
23
6� Rinse the brewing unit (23) thoroughly
under running water
7� Hold the brewing unit sieve under the
running water
8� Wipe out the inside of the appliance
thoroughly with a damp cloth and re-
move any coffee residues�
9� Allow the brewing unit and the inside of
the appliance to dry
10� Reinsert the brewing unit (23) fully into
the appliance� Slide the red lock (23a)
back fully and close the door (18)�
23
23a
18
  • Page 1 1
  • Page 2 2
  • Page 3 3
  • Page 4 4
  • Page 5 5
  • Page 6 6
  • Page 7 7
  • Page 8 8
  • Page 9 9
  • Page 10 10
  • Page 11 11
  • Page 12 12
  • Page 13 13
  • Page 14 14
  • Page 15 15
  • Page 16 16
  • Page 17 17
  • Page 18 18
  • Page 19 19
  • Page 20 20
  • Page 21 21
  • Page 22 22
  • Page 23 23
  • Page 24 24
  • Page 25 25
  • Page 26 26
  • Page 27 27
  • Page 28 28
  • Page 29 29
  • Page 30 30
  • Page 31 31
  • Page 32 32
  • Page 33 33
  • Page 34 34
  • Page 35 35
  • Page 36 36
  • Page 37 37
  • Page 38 38
  • Page 39 39
  • Page 40 40
  • Page 41 41
  • Page 42 42
  • Page 43 43
  • Page 44 44
  • Page 45 45
  • Page 46 46
  • Page 47 47
  • Page 48 48
  • Page 49 49
  • Page 50 50
  • Page 51 51
  • Page 52 52
  • Page 53 53
  • Page 54 54
  • Page 55 55
  • Page 56 56
  • Page 57 57
  • Page 58 58
  • Page 59 59
  • Page 60 60
  • Page 61 61
  • Page 62 62
  • Page 63 63
  • Page 64 64
  • Page 65 65
  • Page 66 66
  • Page 67 67
  • Page 68 68
  • Page 69 69
  • Page 70 70
  • Page 71 71
  • Page 72 72
  • Page 73 73
  • Page 74 74
  • Page 75 75
  • Page 76 76
  • Page 77 77
  • Page 78 78
  • Page 79 79
  • Page 80 80
  • Page 81 81
  • Page 82 82
  • Page 83 83
  • Page 84 84
  • Page 85 85
  • Page 86 86
  • Page 87 87
  • Page 88 88
  • Page 89 89
  • Page 90 90
  • Page 91 91
  • Page 92 92
  • Page 93 93
  • Page 94 94
  • Page 95 95
  • Page 96 96
  • Page 97 97
  • Page 98 98
  • Page 99 99
  • Page 100 100
  • Page 101 101
  • Page 102 102
  • Page 103 103
  • Page 104 104
  • Page 105 105
  • Page 106 106
  • Page 107 107
  • Page 108 108
  • Page 109 109
  • Page 110 110
  • Page 111 111
  • Page 112 112
  • Page 113 113
  • Page 114 114
  • Page 115 115
  • Page 116 116
  • Page 117 117
  • Page 118 118
  • Page 119 119
  • Page 120 120
  • Page 121 121
  • Page 122 122
  • Page 123 123
  • Page 124 124
  • Page 125 125
  • Page 126 126
  • Page 127 127
  • Page 128 128
  • Page 129 129
  • Page 130 130
  • Page 131 131
  • Page 132 132
  • Page 133 133
  • Page 134 134
  • Page 135 135
  • Page 136 136
  • Page 137 137
  • Page 138 138
  • Page 139 139
  • Page 140 140
  • Page 141 141
  • Page 142 142
  • Page 143 143
  • Page 144 144
  • Page 145 145
  • Page 146 146
  • Page 147 147
  • Page 148 148
  • Page 149 149
  • Page 150 150
  • Page 151 151
  • Page 152 152
  • Page 153 153
  • Page 154 154
  • Page 155 155
  • Page 156 156
  • Page 157 157
  • Page 158 158
  • Page 159 159
  • Page 160 160
  • Page 161 161
  • Page 162 162
  • Page 163 163
  • Page 164 164
  • Page 165 165
  • Page 166 166
  • Page 167 167
  • Page 168 168
  • Page 169 169
  • Page 170 170
  • Page 171 171
  • Page 172 172
  • Page 173 173
  • Page 174 174
  • Page 175 175
  • Page 176 176
  • Page 177 177
  • Page 178 178
  • Page 179 179
  • Page 180 180
  • Page 181 181
  • Page 182 182

Siemens TK76K573 User manual

Category
Coffee makers
Type
User manual
This manual is also suitable for

Ask a question and I''ll find the answer in the document

Finding information in a document is now easier with AI