Page is loading ...

ON / OFF
1
2
A B/ EDIT
INSTANT REV
FLANGER
ECHO
FILTER
4%
8%
16%
OFF
MEMORY
3
RE LOO P
CUE
SEAMLESS LOOP
FWD
REV
CUE
<<
SEARC H
<<
SI NGL E
MOTOR
<< TR AC K SKIP >>
HO T START
KEY
50%
PITC H BEN D
+
EFX
>
Pro Hybrid TurntableCDT-05
RE CALL CUE
TIME
CDT-05
Professional hybrid turntable
PROFESSIONELLER HYBRID PLATTENSPIELER
GIRADISCOS/CD HIBRIDO PROFESIONAL
ELECTROPHONE HYBRID PROFESSIONELLE
In the USA: If you experience problems with this unit, please go to http://www.geminidj.com/support.html or call 1-732-738-9003 for Gemini Customer Service. Do not attempt to return this equipment to your deal-
er. Gemini stands behind their products with a 1 year limited warranty on all audio products. For larger images & detailed specs visit our website @ http://www.geminidj.com. WE ARE NOT RESPONSIBLE FOR TYPO-
GRAPHICAL ERRORS OR OMISSIONS. WE RESERVE THE RIGHT TO CHANGE WITHOUT NOTICE. Parts of the design of this product may be protected by worldwide patents. Information in this manual is subject to
change without notice and does not represent a commitment on the part of the vendor. Gemini Sound Products Corp. shall not be liable for any loss or damage whatsoever arising from the use of information or any
error contained in this manual. No part of this manual may be reproduced, stored in a retrieval system or transmitted, in any form or by any means, electronic, electrical, mechanical, optical, chemical, including pho-
tocopying and recording, for any purpose without the express written permission of Gemini Sound Products Corp. It is recommended that all maintenance and service on this product is performed by Gemini Sound
Products Corp. or its authorized agents. Gemini Sound Products Corp. will not accept liability for loss or damage caused by maintenance or repair performed by unauthorized personnel.
USA:
Gemini Sound Products Corp.
Worldwide Headquarters
120 Clover Place
Edison, New Jersey 08837
Ph: 732.738.9003
Fax: 732.738.9006
Germany:
Gemini Sound
Products GmbH
Liebigstrasse 16
85757 Karlsfeld
Ph: + 49 8131 39171-0
Fax: + 49 8131 39171-8
Spain:
Gemini Sound Products S.A.
Rosellon 516 local
08026 Barcelona
Ph: + 34 93 436 37 00
Fax: + 34 93 347 69 61
UK:
Gemini Sound Products LTD
Unit C4 Hazleton
Industrial Estate,
Waterlooville P08 9JU
Ph: +44 (0)87 087 00880
Fax: +44 (0)87 087 00990
France:
GSL France
1, Allée d' Effiat,
Parc de l'événement
F-91160 Longjumeau
Ph: + 33 1 69 79 97 70
Fax: + 33 1 69 79 97 80
Worldwide Offices

<2>
CAUTION: This product satisfies FCC regulations when shielded cables
and connectors are used to connect the unit to other equipment. To pre-
vent electromagnetic interference with electric appliances such as radios
and televisions, use shielded cables and connectors for connections.
The exclamation point within an equilateral triangle is intended to alert
the user to the presence of important operating and maintenance (servic-
ing) instructions in the literature accompanying the appliance.
The lightning flash with arrowhead symbol, within an equilateral triangle,
is intended to alert the user to the presence of uninsulated "dangerous
voltage" within the product's enclosure that may be of sufficient magnitude
to constitute a risk of electric shock to persons.
READ INSTRUCTIONS: All the safety and operating instructions should be
read before the product is operated.
RETAIN INSTRUCTIONS: The safety and operating instructions should be
retained for future reference.
HEED WARNINGS: All warnings on the product and in the operating
instructions should be adhered to.
FOLLOW INSTRUCTIONS: All operating and use instructions should be
followed.
CLEANING: The product should be cleaned only with a polishing cloth or
a soft dry cloth. Never clean with furniture wax, benzine, insecticides or
other volatile liquids since they may corrode the cabinet.
ATTACHMENTS: Do not use attachments not recommended by the prod-
uct manufacturer as they may cause hazards.
WATER & MOISTURE: Do not use this product near water, for example,
near a bathtub, wash bowl, kitchen sink, or laundry tub; in a wet basement;
or near a swimming pool; and the like.
ACCESSORIES: Do not place this product on an unstable cart, stand, tri-
pod, bracket, or table. The product may fall, causing serious injury to a
child or adult, and serious damage to the product. Use only with a cart,
stand, tripod, bracket, or table recommended by the manufacturer, or sold
with the product. Any mounting of the product should follow the manufac-
turer's instructions, and should use a mounting accessory recommended
by the manufacturer.
CART: A product and cart combination should be moved with care. Quick
stops, excessive force, and uneven surfaces may cause the product and cart
combination to overturn. S
EE FIGURE A.
VENTILATION: Slots and openings in the cabinet are provided for ventila-
tion and to ensure reliable operation of the product and to protect it from
overheating, and these openings must not be blocked or covered. The
openings should never be blocked by placing the product on a bed, sofa,
rug, or other similar surface. This product should not be placed in a built-
in installation such as a bookcase or rack unless proper ventilation is pro-
vided or the manufacturer's instructions have been adhered to.
POWER SOURCES: This product should be operated only from the type of
power source indicated on the marking label. If you are not sure of the type
of power supply to your home, consult your product dealer or local power
company.
LOCATION: The appliance should be installed in a stable location.
NON-USE PERIODS: The power cord of the appliance should be
unplugged from the outlet when left unused for a long period of time.
GROUNDING OR POLARIZATION:
- If this product is equipped with a polarized alternating current line plug
(a plug having one blade wider than the other), it will fit into the outlet
only one way. This is a safety feature. If you are unable to insert the plug
fully into the outlet, try reversing the plug. If the plug should still fail to fit,
contact your electrician to replace your obsolete outlet. Do not defeat the
safety purpose of the polarized plug.
- If this product is equipped with a three-wire grounding type plug, a plug
having a third (grounding) pin, it will only fit into a grounding type power
outlet. This is a safety feature. If you are unable to insert the plug into the
outlet, contact your electrician to replace your obsolete outlet. Do not
defeat the safety purpose of the grounding type plug.
POWER-CORD PROTECTION: Power-supply cords should be routed so
that they are not likely to be walked on or pinched by items placed upon
or against them, paying particular attention to cords at plugs, convenience
receptacles, and the point where they exit from the product.
OUTDOOR ANTENNA GROUNDING: If an outside antenna or cable sys-
tem is connected to the product, be sure the antenna or cable system is
grounded so as to provide some protection against voltage surges and
built-up static charges. Article 810 of the National Electrical Code,
ANSI/NFPA 70, provides information with regard to proper grounding of
the mast and supporting structure, grounding of the lead-in wire to an
antenna discharge unit, size of grounding conductors, location of antenna-
discharge unit, connection to grounding electrodes, and requirements for
the grounding electrode. S
EE FIGURE B.
LIGHTNING: For added protection for this product during a lightning
storm, or when it is left unattended and unused for long periods of time,
unplug it from the wall outlet and disconnect the antenna or cable system.
This will prevent damage to the product due to lightning and power-line
surges.
POWER LINES: An outside antenna system should not be located in the
vicinity of overhead power lines or other electric light or power circuits, or
where it can fall into such power lines or circuits. When installing an out-
side antenna system, extreme care should be taken to keep from touching
such power lines or circuits as contact with them might be fatal.
OVERLOADING: Do not overload wall outlets, extension cords, or integral
convenience receptacles as this can result in a risk of fire or electric shock.
OBJECT & LIQUID ENTRY: Never push objects of any kind into this prod-
uct through openings as they may touch dangerous voltage points or short-
out parts that could result in a fire or electric shock. Never spill liquid of
any kind on the product.
SERVICING: Do not attempt to service this product yourself as opening or
removing covers may expose you to dangerous voltage or other hazards.
Refer all servicing to qualified service personnel.
DAMAGE REQUIRING SERVICE: Unplug this product from the wall out-
let and refer servicing to qualified service personnel under the following
conditions:
- When the power-supply cord or plug is damaged.
- If liquid has been spilled, or objects have fallen into the product.
- If the product has been exposed to rain or water.
- If the product does not operate normally by following the operating
instructions. Adjust only those controls that are covered by the operating
instructions as an improper adjustment of other controls may result in
damage and will often require extensive work by a qualified technician to
restore the product to its normal operation.
- If the product has been dropped or damaged in any way.
- When the product exhibits a distinct change in performance, this indi-
cates a need for service.
REPLACEMENT PARTS: When replacement parts are required, be sure the
service technician has used replacement parts specified by the manufactur-
er or have the same characteristics as the original part. Unauthorized sub-
stitutions may result in fire, electric shock, or other hazards.
SAFETY CHECK: Upon completion of any service or repairs to this prod-
uct, ask the service technician to perform safety checks to determine that
the product is in proper operating condition.
WALL OR CEILING MOUNTING: The product should not be mounted to
a wall or ceiling.
HEAT: The product should be situated away from heat sources such as
radiators, heat registers, stoves, or other products (including amplifiers)
that produce heat.
DISPOSAL: This product shall not be treated as household waste. Instead
it shall be handed over to the applicable collection point for the recycling
of electrical and electronic equipment. By ensuring this product is dis-
posed of correctly, you will help prevent potential negative consequences
for the environment and human health, which could otherwise be caused
by inappropriate waste handling of this product. The recycling of materials
will help to conserve natural resources. For more detailed information
about recycling of this product, please contact your local city office, your
household waste disposal service or the shop where you purchased the
product.
CAUTION
PLEASE READ BEFORE USING APPLIANCE,
IMPORTANT WARNING & SAFETY INSTRUCTIONS!
RISK OF ELECTRICAL SHOCK DO NOT OPEN!

<3>
Parts Checklist:
CDT-05 Unit
Headshell
Counterweight
Platter
Scratch Control Vinyl Plate
Slipmat
AC Power Cable
RCA Line Cable
Phono Cable w/Ground Spade
Relay Start Cable
Fader Start Cable
Manual with Warranty Info
4 x Low Profile Rubber Feet
4 x Standard Round Feet
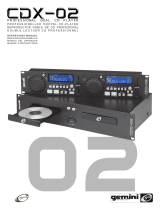
1. LCD Display
2. Platter
3. Scratch Control Vinyl Plate
4. Scratch Anchor w/Marker
5. Tonearm
6. Removable Tonearm Base
7. Headshell
8. Counterweight
9. Pitch Control
10. Pitch Bend Buttons
11. Pitch Range Select
12. Key Lock Function
13. Echo DSP Effect
14. Filter DSP Effect
15. Flanger DSP Effect
16. Play/Pause Button
17. Master Cue Button
18. Hot Start Cue Function
19. Track Search Buttons
20. Single/Continuous Modes
21. Motor On/Off
22. Track Skip & DSP Parameter
23. Memo Button
24. Hot Startable Cue Points
25. Time Mode/Recall Cue
26. Reverse Switch
27. Instant Reverse Modes
28. Loop in A
29. Loop out B/Edit
30. Reloop
ON / OFF
ON / OFF
1
2
A B/ LOOP
INSTANT REV
FLAN GE
GE
R
EC H O
FI
FI
LTE
TE
R
4%
8%
16%
OFF
MEMORY
3
RE LOO P
CUE
SEAMLESS LOOP
FWD
REV
CUE
<<
SEARC H
<<
SI NGL E
MOTOR
<< TR AC K SKIP >>
HO T S TA R T
KEY
50%
PITC H BEN D
+
EFX
>
Pro Hybrid TurntableCDT-05
RE CALL CU E
TIME
1
2
3
10
11
12
13
14
15
16
17
18
19
20
21
25
26
27
28
29
30
22
23
24
5
7
6
8
9
4

PHONO OU T
CD OUT
DIGI TAL
OUT
RE LAY
ON
OFF
P ro Hybrid Turntabl eCDT-05
FADER
CD TT
33
45
78
MIX
Rear
Front
Rear Panel:
31. AC Inlet
32. Voltage Selector Switch
33. Power On/Off Switch
35. Relay Start Jack
36. Digital Output
37. CD Audio RCA Outputs
38. Phono RCA Outputs
Front Panel:
40. Slot-Loading CD Mechanism
41. Stop/Eject Button
42. Platter Speed Control
43. Platter Speed LED indicators
44. Operation Mode Switch
Other:
45. Low Profile or Standard Feet
31
32
33
40
41
42
43
44
45 45
36
38
37
35
<4>

<5>
CDT-05 PROFESSIONAL HYBRID TURNTABLE
INTRODUCTION:
Congratulations on your purchase of a Gemini CDT-05 Professional
Hybrid Turntable. The CDT-05 is the latest advancement in DJ technolo-
gy, combining the control of a fully functional high torque turntable with
the versatility and convenience of Compact Discs. In addition, the CDT-05
has the ability to play both Vinyl records and Compact Discs simultaneous-
ly, for an endless array of performance possibilities. With the proper maine-
nance, the CDT-05 will provide years of reliable and solid performance.
FEATURES:
- Audio CD, CD-R, CD-RW, and MP3 compatible
- Removable, virtually unskippable straight tone arm system
- High-Torque Direct Driven platter (3.6 kg/cm) provides full control over
CD playback
- Independent audio outputs for turntable and CD sections
- 3-position CD/TT mode switch allows simultaneous playback of both CD
and vinyl
- 3 DSP effects: Filter, Echo, and Phase with variable parameters
- Reverse switch
- Motor ON/OFF switch
- 3 Hot-Startable cue points with easy to operate memo button
- Master cue w/ hot-start feature
- Key Lock (Master Tempo)
- Anti-Shock Protection using RAM buffer memory
- Slot Loading mechanism with LED illumination
- Single auto-cue/continuous play modes
- Seamless looping with reloop/stutter & loop editing
- Pitch bend via platter or buttons
- Three mode time selection
- Frame accurate search & cue
- Large 4-line backlit dot matrix display
- Sturdy aluminum platter with finger grooves
- Variable Pitch control with ranges of 4%, 8% , 16%, and 50%
- Soft touch buttons with bright LEDs
CAUTIONS:
1. All operating instructions should be read before using this equipment.
2. To reduce the risk of electrical shock, do not open the unit. There are
NO USER REPLACEABLE PARTS INSIDE. Please refer servicing to a qual-
ified Gemini Sound Products service technician. In the USA: If you experi-
ence problems with this unit, please call 1 (732) 738-9003 for Gemini
Customer Service. Do not attempt to return this equipment to your dealer.
3. Do not expose this unit to direct sunlight or to a heat source such as a
radiator or stove. When operating, ensure that the unit has adequate ven-
tilation.
4. This unit should be cleaned only with a damp cloth. Avoid solvents or
other cleaning detergents.
5. When moving this equipment, it should be placed in its original carton
and packaging. This will reduce the risk of damage during transit.
6. DO NOT EXPOSE THIS UNIT TO RAIN OR MOISTURE.
7. DO NOT USE ANY SPRAY CLEANER OR LUBRICANT ON ANY CON-
TROLS OR SWITCHES.
CDT-05 QUICK START INSTRUCTIONS:
1. Set up the unit according to the Connections/Setup and Tonearm Setup
section. Make sure to first review all of the warnings and cautions before
proceeding.
2. To play a CD, first insert a disc into the CD transport located on the front
right hand side of the unit, and switch the O
PERATION MODE SWITCH
(44) to
‘CD.’ Make sure the MOTOR ON/OFF (21) button is lit, and press the
PLAY/PAUSE BUTTON (16) to begin playback. You will have full access to
manipulating the music via the SCRATCH CONTROL VINYL PLATE (3), in the
same fashion as a turntable. You will also be able to apply digital effects to
the CD portion of the unit, including cue points, DSP effects, pitch,
reverse, etc. For detailed instructions on how each feature applies to CD
playback, see the Functions section.
3. To play a Vinyl record, place the specialized Slipmat on top of the
S
CRATCH CONTROL VINYL PLATE (3), so that the mat is flush with the SCRATCH
A
NCHOR
(4). Place a record on top of the Slipmat, and switch the O
PERATION
MODE SWITCH (44) to ‘TT.’ Make sure the MOTOR ON/OFF (21) button is lit,
and press the PLAY/PAUSE BUTTON (16) to begin playback. This might seem
unconventional at first, but you will find the performance to be flawless.
While in TT Mode, any manipulation of the vinyl record (or the platter)
will not be applied to the CD. In order to preserve vinyl’s unique sound
qualities as much as possible, the audio from the Turntable portion is not
sent through the DSP effects section.
4. In order to play both CD and Vinyl simultaneously, you must switch the
O
PERATION MODE SWITCH (44) to ‘MIX.’ In Mix Mode, the SCRATCH CONTROL
VINYL PLATE (3) will not control the CD. The purpose of this is so that a DJ
may play a beat off of CD, while scratching over it with a Vinyl record. Use
the MOTOR
ON/OFF
(21) button to start and stop the platter for Vinyl play-
back, and use the P
LAY/PAUSE BUTTON (16) to start and stop playback of the
CD portion. Note that the independent audio outputs on the back of the
CDT-05 allow you to connect the CD and Vinyl portion of the unit to sep-
arate channels of your audio mixer. In Mix Mode, the P
ITCH CONTROL (9)
will control the pitch of the Turntable portion, and the P
ITCH BEND BUTTONS
(10) will control the pitch of the CD portion. Because the unit shares many
functions between CD, Turntable, and Mix, it is best to read over the
Functions section to get a grasp of how each function behaves in each
mode.
5. Read the rest of the manual! Everyone (even the author of this manu-
al) wants to start playing right away, and that is understandable - especial-
ly with such an exciting and innovative product as the CDT-05. However,
the function of it does differ from conventional products, and this manual
is written to address those differences and put them into the perspective
and context of a performing DJ. You might even discover functions you
never knew existed! We know that you want to dive right in and get start-
ed, but keep the manual at an arm’s length, just in case you get stuck or
need clarification.
CONNECTIONS / SETUP:
1. P
OWER
SWITCH: The P
OWER
SWITCH
(33) turns the unit ON or
O
FF. Make sure the switch is in the ‘OFF’ position prior to mak-
ing any connections.
2. AC I
NLET
: The AC I
NLET (31), located on the rear of the
unit, is the connector which accepts the P
OWER C
ORD
(sup-
plied) used to power the unit.
3. V
OLTAGE
SELECTOR SWITCH
: The VOLTAGE
SELECTOR
SWITCH (32) allows the unit to operate on either 115 or
230 volt configurations, for worldwide operation. Prior
to using the unit, make sure that this switch reflects the voltage supplied in
your locality.
4. CD A
UDIO RCA OUTPUTS
(37): This set of outputs carries the
audio signal from the CD player portion of the unit and should be
connected to an appropriate line-level input on your audio mixer.
5. P
HONO RCA O
UTPUTS
(38): This set of outputs carries the audio
signal from the turntable portion of the unit and should be con-
nected to an appropriate phono-level input on your audio mixer.
6. G
ROUND TERMINAL: As you may notice, the CDT-05 does not have a tradi-
tional ground terminal, as most turntables have. The reason for this is that
the CDT-05’s turntable section is grounded internally and does not require
the use of a ground wire. If you are experiencing any type of ground hum
from the turntable section, verify that your CDT-05 is powered using the
same outlet as your mixer and the rest of your audio equipment.
7. D
IGITAL OUTPUT (36): This output carries audio from the CD
player portion of the unit in IEC-958 (S/PDIF) format, and can be
connectd to any device with the appropriate S/PDIF input, such as
a digital mixer, computer, or outboard D/A converter. Using this
particular output requires specialized equipment and may not apply to
your setup.
8. R
ELAY START JACK (35): This jack makes it possible to connect
two CDT-05s together, so that when one unit finishes playing, the
opposite unit automatically starts playback. For normal use, leave
this jack disconnected.
9. L
OW PROFILE OR STANDARD FEET (45): The
feet may be changed depending on the height
you wish to achieve. With the LOW PROFILE
ON
OFF
DIGI TAL
OUT
RE LAY

feet, the unit should be virtually flush with most mixers. With the STANDARD
FEET, the unit will sit higher, but the Turntable portion might resist more
vibration.
TONEARM SETUP:
1. Attach the H
EADSHELL (7) or integrated cartridge to the tonearm by
twisting the fastening screw counterclockwise. Be careful not to
overtighten the fastening screw. If you have an overhead mount car-
tridge, consult the cartridge manual for instructions on how to
mount it to a headshell.
2. Attach the C
OUNTERWEIGHT (8) to the back of the tonearm, with
the number scale facing forwards, by turning the weight counter-
clockwise.
3. Adjust the C
OUNTERWEIGHT (8) until the tonearm floats
freely when placed above the platter. The cartridge should
not sit on the vinyl, nor should it be leaning backwards.
This is the Zero Point, at which no weight is applied to the
cartridge whatsoever.
4. Set just the number scale to ‘0’ to reflect that the tonearm is balanced,
and at the Zero Point.
5. Turn the complete C
OUNTERWEIGHT (8) counterclockwise until the appro-
priate weight (in grams) is reflected on the number scale. The appropriate
weight will be furnished by the cartridge manufacturer.
6. To adjust the tonearm height, use a Philips-head
screwdriver to remove the T
ONEARM BASE (6) from the
upper right hand corner of the unit. There are 3
screws which must be completely removed. Once the
T
ONEARM BASE (6) is removed, adjust each of the
spring-loaded height modules to reflect the necessary
height required, as per the specifications of your preferred phono car-
tridge. All 3 of the spring-loaded height modules should be set to the same
height, to ensure that the stylus tip meets the vinyl at the appropriate angle
and position.
FUNCTIONS:
1. LCD D
ISPLAY: The LCD DISPLAY (1) is used to visu-
ally show all parameters relating to the function of
the unit. This includes track titles (on applicable
MP3 files), pitch values, mode of operation, transport functions, time, beats
per minute, and a visual graph relating to the position of the playing track.
2. O
PERATION MODE SWITCH (44): This switch has 3 posi-
tions: CD, TT, and MIX. CD Mode allows for full manipu-
lation of audio via the S
CRATCH CONTROL VINYL PLATE (3), TT
mode allows for the playback, and MIX Mode allows for a
CD to be played with limited tactile control, while also playing a Vinyl
record simultaneously.
3. S
CRATCH CONTROL VINYL PLATE (3) and SCRATCH
ANCHOR (4): These work in conjunction with the
platter to provide realtime control to both the CD
and Vinyl playback functions of the CDT. Upon using
the unit for the first time, make sure that the SCRATCH
ANCHOR (4) is firmly seated within the SCRATCH
CONTROL VINYL PLATE (3).
4. P
ITCH
CONTROL
(9): The pitch control, along with PITCH
RANGE
SELECTION (11), allows you to manipulate the speed and tempo of the
music being played. PITCH
RANGE SELECTION
(11) allows for more dra-
matic manipulation, whereas the higher the percentage selected, the
more dramatic the effect is. Smaller percentages mean less dramatic
manipulation, but more precise control.
5. P
ITCH
BEND BUTTONS
(10): These allow the DJ to make tem-
porary changes to the speed and tempo of the music being
played and are primarily used for fine adjustment during beat-
mixing. In M
IX M
ODE
, the PITCH
BEND BUTTONS
(10) function as
a pitch control for the CD portion of the unit.
6. K
EY LOCK
FUNCTION
(12): Key Lock allows the speed of the
music to be changed without changing the musical key. This
function is available strictly on the CD portion of the unit,
and is meant to be used in conjunction with the P
ITCH CONTROL (9) section.
Bear in mind that Key Lock may cause flanging or artifacts on certain musi-
cal programs, especially at higher percentages.
7. DSP E
FFECTS (13, 14, 15): The DSP EFFECTS (13,
14, 15) section allows for tonal, phase and delay-
based manipulation of the CD section of the CDT.
To engage an effect, simply select and press the button of the effect you
desire, and use the T
RACK S
KIP/DSP PARAMETER
(22) knob to tweak the
parameter to your liking. By pressing and holding the knob for 1 second,
the unit will switch to Dry/Wet mode, and you will be able to set the
amount of audio that is sent through the DSP, for varying the intensity of
the effect. Note that when an effect is not engaged, the T
RACK SKIP/DSP
P
ARAMETER (22) knob will advance through tracks.
8. P
LAY/PAUSE BUTTON (16): In CD or Turntable (TT) Mode,
the P
LAY BUTTON
(16) starts and stops playback. In Mix Mode,
the PLAY BUTTON (16) controls CD only, and the MOTOR
ON/OFF (21) starts and stops the platter for vinyl playback.
9. M
ASTER CUE BUTTON (17): In CD Mode, the MASTER CUE
BUTTON (17) returns the unit to the position of the set Cue
Point, once it has been set. After advancing to the set Cue
Point, the unit will remain paused until the P
LAY BUTTON (16)
is pressed. Pressing and holding the MASTER CUE BUTTON (17) will allow
you to preview the cue point. For step-by-step information on the CUE
functions of the CDT-05, see the section entitled ‘Setting Cue Points and
Loops’.
10. H
OT START CUE FUNCTION
(18): This function allows you
to start from the specified Cue Point, once it has been set,
without interrupting playback.
11. T
RACK SEARCH BUTTONS (19): Pressing these but-
tons allows you to momentarily advance through a
CD track, for as long as each button is held down.
12. S
INGLE/CONTINUOUS MODES (20): This button will deter-
mine how the unit will behave at the end of each track.
When the unit is in Single Auto-Cue mode, the LCD display will show the
word ‘Single,’ and the unit will automatically cue to the first frame of audio
on the specified track. When the unit is completed playing that track, it will
stop and cue automatically to the first frame of audio on the subsequent
track. In Continuous mode, the LCD display will show the word
‘Continue,’ and the disc will play all tracks without interruption, indefinite-
ly repeating the disc until it is stopped manually. When the display says nei-
ther ‘Single’ nor ‘Continue,’ the unit will play all tracks without interrup-
tion, but will then stop after playing the last track on the disc.
13. M
OTOR ON
/OFF
(21): This button allows you to start or
stop the rotation of the platter. In TT or CD Mode, this
requires that the unit is in Play mode. In Mix Mode, the
MOTOR ON/OFF (21) button controls the platter for vinyl playback, where
the P
LAY BUTTON (16) controls the playback of the CD player portion.
14. T
RACK SKIP & DSP PARAMETER (23): This knob, during
CD playback, allows you to advance through track num-
bers on the CD portion of the unit. By pressing the knob
downwards and turning in either direction, the unit will
advance through track numbers in increments of 10. When there is a DSP
effect engaged, the T
RACK SKIP & DSP PARAMETER (23) knob controls the
parameter associated with the selected effect. By pressing the knob down-
wards and holding for 1 second, the context of the display will change,
and you will be able to set the Dry/Wet control for the selected effect. This
will determine the intensity of the effect. As effects are highly dependent
on preference, it is advisable to take some time to experiment and find
the settings that are to your liking.
15. M
EMO BUTTON (23) and HOT STARTABLE CUE POINTS (24):
By using this function, it is possible to set up to 3 specific
points at which you can advance to, without interruption.
The M
EMO BUTTON
(23) allows you to set Cue Points on the
fly, simply by pressing the MEMO BUTTON (23) first and then
pressing the desired H
OT STARTABLE CUE POINT
(24) that you
wish to set. The M
EMO BUTTON (23) also allows you to save
the MASTER
CUE POINT
, once it has been assigned, on CD
Audio tracks (not available on MP3 discs). To save the MASTER CUE POINT,
hold the MEMO BUTTON (23) down for 3 seconds. For step-by-step infor-
mation on the CUE functions of the CDT-05, see the section entitled
‘Setting Cue Points and Loops’.
16. T
IME MODE/RECALL CUE (25): With each button press, while in
CD or Mix Mode, the time display will change from Time
Elapsed, to Total Time Remaining, and to Song Time
Remaining. When the unit is in Play Mode, the time mode will change as
well as the visual graph relating to the position of the playing track. When
the unit is in Stop Mode, the LCD display will instead show ‘Elapsed,’ ‘T.
Remain,’ or ‘S. Remain,’ depending on your time selection. If you have
saved the M
ASTER CUE POINT on a CD Audio (not MP3) track, you can
<6>
CD TT
MIX
ON / OFF
1
2
FLAN
GER
ECHO
FILTER
3
+
ON / OFF
1
2
FLAN
GER
ECHO
FILTER
3
+
ON / OFF
1
2
FLAN
GER
ECHO
FILTER
3
+
ON / OFF
1
2
FLAN
GER
ECHO
FILTER
3
+
>
ON / OFF
1
2
FLAN
GER
ECHO
FILTER
4%
8%
16%
OFF
3
50%
+
ON / OFF
1
2
FLAN
GER
ECHO
FILTER
3
PITC H BEN D
+
ON / OFF
1
2
FLAN
GER
ECHO
FILTER
3
KEY
+
ON / OFF
1
2
FLAN
GER
ECHO
FILTER
3
HO T STA RT
+
ON / OFF
1
2
FLAN
GER
ECHO
FILTER
3
SI NGL E
+
ON / OFF
ON / OFF
1
2
FLAN
GER
ECHO
FILTER
3
MOTOR
+
ON / OFF
1
2
FLAN
GER
ECHO
FILTER
3
<< TR AC K SKIP >>
+
ON / OFF
1
2
FLANGER
ECHO
FILTER
MEMORY
3
CUE
+
ON / OFF
1
2
FLAN
GER
ECHO
FILTER
3
EV
+
RE CALL CU E
TIME
ON / OFF
1
2
FLAN
GER
ECHO
FILTER
3
<<
SEARC H
<<
+
ON / OFF
1
2
FLAN
GER
ECHO
FILTER
3
+
ON / OFF
1
2
FLAN
GER
ECHO
FILTER
3
CUE
+
ON / OFF
1
2
FLAN GE
GE
R
EC HO
FI
FI
LTE
TE
R
3
+
EFX
ON / OFF
1
2
FLAN
GER
ECHO
FILTER
3
+

recall it by holding the TIME MODE/RECALL CUE (25) down for 3
seconds,until the LCD display shows the word ‘LOAD’ along with the
time of the MASTER CUE POINT. Then press the MASTER CUE BUTTON (17) to
assign the recalled Cue Point.
17. R
EVERSE SWITCH (26): During playback, flipping the
reverse switch will play the audio program backwards from
the current time displayed. In CD Mode, the R
EVERSE
SWITCH (26) will affect CD playback. In TT Mode, the
REVERSE SWITCH (26) affects the playback of Vinyl only. In Mix Mode, the
REVERSE SWITCH (26) again affects the playback of Vinyl only, even if there
is a CD playing simultaneously.
18. I
NSTANT
REVERSE MODES
(27): There are 3 Reverse Modes
found on the CDT-05, which can apply to different performance
scenarios. Here is a brief explanation of each mode, and an
example of how it may be applied:
N
OT E
NGAGED - When the I
NSTANT
REVERSE MODES
(27) LED is completely
unlit, and the switch is flipped to ‘REV,’ the platter will turn counterclock-
wise, and the music program will play backwards. When the switch is
flipped to ‘FWD,’ the platter will turn clockwise, and the music will
resume playing forwards from the time point at which the switch was
flipped back to ‘FWD.’ This is effectively the same exact implementation
of the Reverse feature on a vinyl turntable.
I
NSTANT REVERSE MODE #1 - This mode is engaged by pressing the INSTANT
REVERSE MODES (27) button momentarily, which will solidly illuminate the
INSTANT REVERSE MODES (27) LED. When the switch is flipped to ‘REV,’ the
platter will turn counterclockwise, and the music program will play back-
wards, but you will not hear the sound of the motor slowing down as the
platter in order to turn in the opposite direction. When the switch is
flipped to ‘FWD,’ the platter will turn clockwise, and the music will
resume playing, without slowdown effect, forwards from the time that
would read on the display had you never engaged the Reverse feature to
begin with. This allows you to reverse at any time, even while beatmixing
with another device, as the music will stay completely in time and the
musical structure will never be altered. This is very useful for DJs that play
electronic music and rely on beatmatching for a large part of their per-
formance.
I
NSTANT REVERSE MODE #2 - This mode is engaged by pressing and hold-
ing the I
NSTANT REVERSE MODES
(27) button for 2 seconds, which will flash
the INSTANT REVERSE MODES (27) LED. When the switch is flipped to ‘REV,’
the platter will turn counterclockwise, and the music program will play
backwards, but you will not hear the sound of the motor slowing down as
the platter in order to turn in the opposite direction. When the switch is
flipped to ‘FWD,’ the platter will turn clockwise, and the music will
resume playing, without slowdown effect, forwards from the time point at
which the switch was flipped back to ‘FWD.’
19. S
TOP/EJECT BUTTON (41): During CD playback, this button
stops the audio and disengages the laser from reading the disc.
Once the unit has stopped, pressing the S
TOP/EJECT BUTTON
(41) will eject the disc from the CD transport.
20. P
LATTER SPEED CONTROL (42): This button allows to you
to change the speed of the platter to 33, 45, or 78rpm.
Although this is the same concept as a conventional
turntable, the functionality has been extended to control a
few different areas of the unit:
C
HANGING DEFAULT CD CONTROL SPEED: Since some DJs are accustomed to
spinning records at one platter speed, the default “normal” speed can be
altered to provide the feel necessary according to preference. This can be
done while the unit is in Stop Mode (not in Pause mode) by pressing the
P
LATTER
SPEED CONTROL
(42) momentarily to toggle between 33 and
45rpm (78rpm is not supported for CD control). If the unit is in Play
Mode, press the S
TOP
/EJECT BUTTON
(41) once before changing the setting.
THE P
LATTER SPEED LED INDICATORS
(43) will reflect what speed has been
selected.
C
HANGING
PLAYBACK SPEED
: If you wish to change the actual playback speed
of a CD during playback, simply press the PLATTER
SPEED CONTROL
(42)
momentarily while in Play or Pause Mode to toggle between 33 and 45rpm
(78rpm is not supported for CD playback). You will hear an audible change
in the tempo and key of the music, as you are effectively playing the record-
ing at a speed much slower or faster than it was intended.
C
HANGING
PLAYBACK SPEED FOR VINYL
: If you wish to change the actual play-
back speed of a Vinyl record during playback, simply press the P
LATTER
SPEED CONTROL (42) momentarily, while in Mix or TT Mode, to toggle
between 33 and 45rpm. 78rpm is engaged by holding down the PLATTER
SPEED CONTROL (42) for 3 seconds.
21. L
OOP SECTION (28), (29), (30): Using the
L
OOP SECTION
allows you to seamlessly repeat a
segment of audio from the CD section. The
L
OOP IN A (28) sets the starting point of the seg-
ment. The L
OOP OUT B/EDIT (29) sets the end point of the segment. RELOOP
(30) restarts the loop from the beginning once it has been engaged. Loop
points can be set on the fly during playback or can be set in Pause Mode.
To end looping, when it is engaged, press the L
OOP OUT B/E
DIT
(29) button.
To edit the loop points, press the LOOP OUT B/EDIT (29) button, find the
point you wish you replace, then press either The LOOP IN A (28) or LOOP
OUT B/EDIT (29) to set the point you wish you replace. For step-by-step
information on the Loop functions of the CDT-05, see the section entitled
‘Setting Cue Points and Loops’.
SETTING CUE POINTS AND LOOPS:
1. SETTING THE MASTER CUE POINT:
a. During the playback of a CD, find the point at which you want to set the
M
ASTER CUE POINT.
b. Pause the playback by pressing the P
LAY/PAUSE BUTTON (16). The platter
will stop.
c. Using the S
CRATCH CONTROL VINYL PLATE (3), make any necessary adjust-
ments to the MASTER CUE POINT. Using the SCRATCH CONTROL VINYL PLATE (3)
to make adjustments is limited to CD Mode.
d. To memorize the M
ASTER CUE POINT, press the PLAY/PAUSE BUTTON (16)
again. The platter will start again, and the music will resume playback.
e. To advance to the M
ASTER CUE POINT, press the MASTER CUE BUTTON (17).
You may now press the P
LAY/PAUSE BUTTON (16) to begin playback from the
set M
ASTER CUE POINT
f. To preview the MASTER CUE POINT, first press the MASTER CUE BUTTON (17)
to advance to the MASTER CUE P
OINT, then press and hold down the M
ASTER
CUE BUTTON (17) for as long as needed to preview. When the MASTER CUE
BUTTON (17) is released, the unit will advance back to the MASTER
CUE
POINT.
g. To advance and begin playing from the set M
ASTER CUE POINT without
interruption, press the HOT
START CUE FUNCTION
(18) button.
h. To permanently save the M
ASTER
CUE POINT
to the memory of the CDT-
05 (for CD Audio discs only, not MP3 discs), hold the MEMO
BUTTON
(23)
down for 3 seconds. When the MASTER CUE POINT has been saved to mem-
ory, the bottom line of the LCD D
ISPLAY (1) will read ‘SAVE’ along with the
track number and time of the MASTER CUE POINT. Whenever you load an
Audio CD that you have stored MASTER CUE POINT information for, the bot-
tom left portion of the LCD D
ISPLAY (1) will flash the word ‘CUE.’
i. To recall the M
ASTER CUE POINT that has been saved, hold down the TIME
MODE/RECALL
CUE
(25) button for 3 seconds, until the bottom line of the
LCD D
ISPLAY
(1) reads ‘LOAD’ along with the track number and time of the
MASTER CUE POINT. Press the MASTER CUE BUTTON (17) to confirm the
assignment of the saved cue point to the MASTER CUE. Now you are free to
use the loaded M
ASTER CUE POINT as normal.
j. When the track is advanced using the T
RACK SKIP & DSP PARAMETER (22)
knob, the M
ASTER CUE POINT
will be cleared from temporary memory. You
may choose to set a new MASTER CUE POINT or use the RECALL CUE function
to load a saved point.
2. SETTING HOT CUE POINTS:
a. During the playback of a CD, find the point at which you want to set a
H
OT CUE P
OINT. If you want to set a H
OT CUE P
OINT
on the fly, proceed to
step B. Otherwise, while in CD Mode only, you may pause the playback by
pressing the P
LAY/P
AUSE BUTTON
(16), and adjust the position by using the
SCRATCH CONTROL VINYL PLATE (3), then proceed to step B.
b. To memorize a H
OT CUE POINT, first press the MEMO BUTTON (23)
momentarily, until the light inside of the button becomes illuminated.
c. At the point of which you wish to set the H
OT CUE POINT, press the
desired HOT STARTABLE CUE POINT (24) button which corresponds to the
bank of which you wish the point to be saved.
d. Repeat the process for up to a total of 3 H
OT STARTABLE CUE POINTS.
e. To advance to a saved H
OT STARTABLE CUE POINT, simply press the desired
HOT STARTABLE CUE POINT (24) button which corresponds to the bank of
which you wish to play. The unit will advance to this point (and the corre-
sponding track from which the point was set) without interruption, regard-
less of which track is currently playing.
f. To reset a H
OT STARTABLE CUE POINT, simply repeat the process and over-
write the HOT STARTABLE CUE POINT (24) which corresponds to the bank of
which you wish to overwrite.
<7>
ON / OFF
1
2
FLAN
GER
ECHO
FILTER
3
FWD
REV
+
ON / OFF
1
2
INSTANT REV
FLANGER
ECHO
FILTER
3
+
33
45
78
ON / OFF
1
2
AB/LOOP
FLANGER
ECHO
FILTER
3
RE LOO P
SEAMLESS LOOP
+

3. SETTING A SEAMLESS LOOP:
a. During the playback of a CD, find the point at which you want to set the
beginning of the S
EAMLESS LOOP (LOOP IN A). If you want to set a SEAMLESS
L
OOP
on the fly, proceed to step B. Otherwise, while in CD Mode only, you
may pause the playback by pressing the PLAY/PAUSE
BUTTON
(16), and adjust
the L
OOP IN A position by using the SCRATCH CONTROL VINYL PLATE (3), then
proceed to step B.
b. At the point of which you wish to set the L
OOP IN A position, press the
LOOP IN A (28) button. This may be done while in either Play Mode or
Pause Mode.
c. At the point of which you wish to set the L
OOP
OUT B position, press the
L
OOP O
UT B/EDIT
(29) button. This may be done while in either Play Mode
or Pause Mode.
d. Once both the L
OOP
IN A and L
OOP
OUT B position have been set, the
loop will begin to play indefinitely, without any interruption. To restart the
loop from the beginning, or to stutter the loop, press the RELOOP (30) but-
ton.
e. To edit the L
OOP OUT B point, press the LOOP OUT B/EDIT (29) button.
The loop will disengage, and you will be free to replace the LOOP O
UT B
position, simply by pressing the L
OOP OUT B/EDIT (29) button again when
you have reached the at which you wish to set the L
OOP OUT B position.
f. To edit the L
OOP IN A point, simply press the LOOP IN A (28) button dur-
ing loop playback at the time you wish to set the new L
OOP IN
A point. Note
that you will only be able to move the L
OOP IN A point to a time already
within the loop that was originally set.
g. To exit the S
EAMLESS LOOP
and resume normal playback, press the L
OOP
OUT B/EDIT (29) button. If necessary, you can set a brand new SEAMLESS
LOOP (return to step A), or restart the previously playing loop by pressing
the R
ELOOP (30) button.
SPECIFICATIONS
TURNTABLE SECTION:
Type................................................................Direct Drive Manual Turntable
Drive Method...........................Super High Torque (3.6 kgf/cm) Direct Drive
Motor..............................................................................................DC Motor
Speed................................................................................33 1/3, 45, 78 RPM
Variable Pitch.............+/- 4, 8, 16, 50% Slider with Range Selection Buttons
Wow and Flutter.......................................................Less than 0.25% WRMS*
*This rating refers to the turntable and platter assembly only and
excludes the effects of records, cartridges, or tonearms.
TONEARM SECTION:
Type......................................................Statically Balanced Straight Tonearm
Headshell Weight....................................................................................5.6 g
COMPACT DISC SECTION:
Quantization...........................................1 Bit Linear/Channel, 3 Beam Laser
Oversampling Rate.............................................................................8 Times
Sampling Frequency.........................................................................44.1 kHz
Frequency Response.............................................................20 Hz to 20 kHz
Total Harmonic Distortion....................................................Less Than 0.05%
Signal to Noise Ratio.............................................................................86 dB
Dynamic Range......................................................................................90 dB
Digital Output......................................................................IEC958 (S/PDIF)
Channel Separation..................................................................86 dB (1 KHz)
Output Level....................................................................2.0 +/- 0.2V R.M.S.
Power Supply.............................................................AC 115/230V, 60/50 Hz
Time Display...........................Track Elapsed, Song Remain, or Total Remain
Instant Start....................................................................Within 0.03 Seconds
Variable Pitch.............+/- 4, 8, 16, 50% Slider with Range Selection Buttons
WEIGHTS AND DIMENSIONS:
Dimensions: 17.75 x 14.65 x 6.3” (450 x 372 x 160.5 mm)
Unit Weight: 20.2 lbs (9.1 kg)
Specifications and design are subject to change without notice for purpose
of improvement.
*The stated warranty does not affect statutory local warranties
OPTIONAL ACCESSORIES:
DJX-05 Professional Monitoring Headphones
GX-450 Powered ABS Loudspeakers
CS-02 Professional 5-Channel Stereo Mixer
For more information on new and exciting Gemini products, visit our
website at http://www
.geminidj.com!
DJX-05
GX-450
CS-02
NOTES:
____________________________________________________
____________________________________________________
____________________________________________________
____________________________________________________
____________________________________________________
____________________________________________________
____________________________________________________
____________________________________________________
____________________________________________________
____________________________________________________
____________________________________________________
____________________________________________________
____________________________________________________
____________________________________________________
____________________________________________________
____________________________________________________
____________________________________________________
____________________________________________________
____________________________________________________
<8>

<10>
Lieferumfang:
CDT-05
Headshell
Tonarmgewicht
Plattenteller
Scratch-Control Vinyl Platte
Slipmat
Netzkabel
Cinch-Line-Kabel
Phono-Kabel mit Erdungsgabel
Relay-Start-Kabel
Fader-Start-Kabel
Bedienungsanleitung mit Garantie-
informationen
4 x niedrige Gummifüße
4 x runde Standardfüße
1. LCD-Anzeige
2. Plattenteller
3. Scratch-Control-Vinyl-Platte
4. Scratch-Anker mit Markierung
5. Tonarm
6. Abnehmbare Tonarmplatte
7. Headshell
8. Tonarmgewicht
9. Pitch-Fader
10. Pitch-Bend-Tasten
11. Pitch-Range-Wahltasten
12. Key-Lock-Funktion
13. Echo DSP-Effekt
14. Filter DSP-Effekt
15. Flanger DSP-Effekt
16. Play-/Pause-Taste
17. Master-Cue-Taste
18. Hot-Start/Cue-Funktion
19. Titelsuch-Tasten
20. Single-/Continuous-Modus
21. Motor Ein/Aus
22. Track-Skip & DSP-Parameter
23. Memo-Taste
24. Cue-Punkte mit Hot-Start
25. Zeitmodus/Recall Cue
26. Reverse-Schalter
27. Instant-Reverse-Modi
28. Loop in A
29. Loop out B/Edit
30. Reloop
ON / OFF
ON / OFF
1
2
A B/ LOOP
INSTANT REV
FLAN GE
GE
R
EC H O
FI
FI
LTE
TE
R
4%
8%
16%
OFF
MEMORY
3
RE LOO P
CUE
SEAMLESS LOOP
FWD
REV
CUE
<<
SEARC H
<<
SI NGL E
MOTOR
<< TR AC K SKIP >>
HO T S TA R T
KEY
50%
PITC H BEN D
+
EFX
>
Pro Hybrid TurntableCDT-05
RE CALL CU E
TIME
1
2
3
10
11
12
13
14
15
16
17
18
19
20
21
25
26
27
28
29
30
22
23
24
5
7
6
8
9
4

<24>
Liste des Pièces:
Platine CDT-05
Porte-cellule
Contrepoids
Plateau
Plateau de Scratch Vinyle
Feutrine de Lecture
Cordon d’Alimentation AC
Cordon Ligne RCA
Cordon Phono avec Terre Spade
Cordon Relay Start
Cordon Fader Start
Manuel d’Utilisation avec
Conditions de Garantie
4 x Pied Bas en Caoutchouc
4 x Pied Standard
1. Ecran LCD
2. Plateau
3. Plateau de Scratch Vinyle
4. Repère de Scratch
5. Bras de Lecture
6. Embase Amovible du Bras de
Lecture
7. Porte-cellule
8. Contrepoids
9. Réglage de Vitesse
10. Touches de Ratttrapage
11. Sélection Réglage de Vitesse
12. Master Tempo
13. Effet Echo DSP
14. Effet Filtre DSP
15. Effet Flanger DSP
16. Touche Play/Pause
17. Touche Master Cue
18. Touche Hot Start Cue
19. Touches de Recherche de Plages
20. Mode Lecture Simple/Continue
21. Moteur On/Off
22. Recherche de Plages &
Paramétrage des effets DSP
23. Touche Memo
24. Points Cue Hot Startable
25. Touche Mode Temps/Recall Cue
26. Commutateur Reverse
27. Modes Reverse Instantanés
28. Loop in A
29. Loop out B/Edit
30. Reloop
ON / OFF
ON / OFF
1
2
A B/ LOOP
INSTANT REV
FLAN GE
GE
R
EC H O
FI
FI
LTE
TE
R
4%
8%
16%
OFF
MEMORY
3
RE LOO P
CUE
SEAMLESS LOOP
FWD
REV
CUE
<<
SEARC H
<<
SI NGL E
MOTOR
<< TR AC K SKIP >>
HO T S TA R T
KEY
50%
PITC H BEN D
+
EFX
>
Pro Hybrid TurntableCDT-05
RE CALL CU E
TIME
1
2
3
10
11
12
13
14
15
16
17
18
19
20
21
25
26
27
28
29
30
22
23
24
5
7
6
8
9
4

WARRANT Y AND REPAIR:
All Gemini products are designed and manufactured to the highest
standards in the industry. With proper care and maintenance, your product will
provide years of reliable service.
LIMITED WARRANT Y
A. Gemini warrants its products to be free from defects in materials and work-
manship for One (1) year from the original purchase date.
Exceptions: Laser assemblies on CD Players, cartridges, and crossfaders
are covered for 90 days.
B. This limited warranty does not cover damage or failure caused by abuse, mis-
use, abnormal use, faulty installation, improper maintenance or any repairs
other than those provided by an authorized Gemini Service Center.
C. There are no obligations of liability on the part of Gemini for consequential
damages arising out of or in connection with the use or performance of the
product or other indirect damages with respect to loss of property, revenues, of
profit, or costs of removal, installation, or reinstallation. All implied warranties
for Gemini, including implied warranties for fitness, are limited in duration to
One (1) year from the original date of purchase, unless otherwise mandated
by local statutes.
RETURN/REPAIR
A. In the U.S.A., please call our helpful Customer Service Representatives at
(732)738-9003, and they will be happy to give you a Return Authorization
Number (RA#) and the address of an authorized service center closest to you.
B. After receiving an RA#, include a copy of the original sales receipt, with
defective product and a description of the defect. Send by insured freight to:
Gemini Sound Products Corp, and use the address provided by your customer
service representative. Your RA# must be written on the outside of the
package, or processing will be delayed indefinitely!
C. Service covered under warranty will be paid for by Gemini and returned to
you. For non-warrantied products, Gemini will repair your unit after payment is
received. Repair charges do not include return freight. Freight charges will be
added to the repair charges.
D. On warranty service, you pay for shipping to Gemini, we pay for return
shipping within the Continental United States. Alaska, Hawaii, Puerto Rico,
Canada, Bahamas, and the Virgin Islands will be charged for fr
eight.
E. Please allow 2-4 weeks for return of your product. Under normal circum-
stances your product will spend no more than 10 working days at Gemini. We
are not responsible for shipping times.
E-mail Address: ___________________________________________________________________________________________________________________________________________________________________________________________________________________________________________________
Phone #:
Initial:
State:
or
First Name:
Last Name:
Province:
Address: (Number and Street)
City:
Apt #:
Country:
Postal Code:
Model Number:
(Example: CDT-05)
Serial Number: (Located on back of most units)
Serial Number: (Located on back of most units)
Month Day Year
Date of Purchase:
Month Day Year
Date of Purchase:
Purchase Price:
.00
$
(E
XCLUDING
TAX)
Dealer:
Zip Code:
Age:
City:
or
Month Day Year
Date of Birth
Model Number:
(Example: CDT-05)
Save postage and register your product online
at www
.geminidj.com
and automatically be
registered for great prize giveaways!
If you do not have internet access, fill out the form below and mail to the appropriate
address listed at the right side of this page.
USA
GEMINI SOUND PRODUCTS
Worldwide Headquarters
120 Clover Place
Edison, NJ 08837 USA
Tel: (732) 738-9003
Fax: (732) 738-9006
SPAIN
GEMINI SOUND PRODUCTS S.A.
Rosello, 516,
08026 Barcelona, Spain
Tel: 3493-436 37 00
Fax: 3493-347-6961
FRANCE
GEMINI FRANCE (GSL)
1, Allee d’Effiat,
Parc de l’evénement, 91160
Longjumeau, France
Tél: + 33 1 69 79 97 70
Fax: + 33 1 69 79 97 80
GERMANY
GEMINI SOUND PRODUCTS GMBH
Liebigstr. 16,
Haus B – 3. OG,
85757 Karlsfeld
Germany
Tel: 08131 – 39171 – 0
Fax: 08131 – 39171 – 8
UK
GEMINI SOUND PRODUCTS
Unit C4
Hazleton Industrial Estate, P08 9JU
Waterlooville, UK
Tel: 087 087 00880
Fax: 087 087 00990
IN SPAIN
En caso de mal funcionamiento de
esta unidad, por favor contacte con el
Servicio de Atención al Cliente en el
teléfono 93 436 37 00 que le aseso-
rará sobre el procedimiento correcto
para solucionarlo. En caso de ser
necesario enviar la unidad para su
reparación, el Servicio de Atención al
Cliente le proveerá de un número de
incidencia, así como de la dirección
del Servicio de Asistencia Técnica más
cercano a su residencia.
IN THE
UNITED KINGDOM
In the event that you need service on
your Gemini product under warranty,
simply write a letter describing the
problem, along with your contact
information. Make sure to enclose a
copy of your receipt for proof of war-
ranty information. A return number is
not required. You will be responsible
for shipping charges to Gemini UK,
and Gemini UK will pay to return the
unit to you if it is considered under
warranty.
IN
GERMANY
Die allgemeinen gesetzlichen
Gewährleistungen bleiben von den
Herstellergarantien unberührt. Der
Garantieanspruch erlischt bei
Eingriffen
durch den Käufer oder durch Dritte
sowie bei unsachgemässer
Behandlung.
Gewährleistungsansprüche sind auss-
chließlich gegenüber
Ihrem Fachhändler geltend zu
machen.
IN
FRANCE
En cas de panne, merci de contacter
votre revendeur. Tout appareil en
panne doit y être retourné, accompag-
né de sa facture d'achat, de son
emballage d'origine et d'un descriptif
de panne. L'appareil sera ensuite
expédié au SAV de GSL France. Tout
produit reçu sans facture sera réparé
hors garantie. GSL France ré-
expédiera l'appareil au revendeur
après intervention.
Cut along this line & keep the rest of this page for your records.
For your records
<30>
/