Kohler K-14226-TC-0 Installation guide

Category
Sanitary ware
Type
Installation guide
Tools and Materials
Thank You For Choosing Kohler Company
We appreciate your commitment to Kohler quality. Please take a few
minutes to review this manual before you start installation. If you
encounter any installation or performance problems, please don’t
hesitate to contact us. Our phone numbers and website are listed on
the back cover. Thanks again for choosing Kohler Company.
Before You Begin
CAUTION: Risk of personal injury. This pedestal lavatory is
heavy. Do not attempt to lift or install the pedestal lavatory
without assistance.
Observe all local plumbing and building codes.
Prior to installation, unpack the new lavatory and inspect it for
damage. Return the lavatory to its protective carton until you are
ready to install it.
These instructions are for installing the lavatory to wood frame
construction. For other installations, supply suitable bracing and
fastening devices of sufficient size and strength.
The lavatory must be supported by the pedestal.
The walls and the floor must be square, plumb, and level.
Fixture dimensions are nominal and conform to tolerances in
ASME Standard A112.19.2.
Combination
Wrenches
Safety
Glasses
Pipe
Wrench
Level
Pencil
• Common Woodworking
Tools and Materials
• Assorted Drill Bits
• Assorted Screwdrivers
Plus:
Drill
Square
Tape
Measure
1020735-2-C 2 Kohler Co.
Roughing-In
K-2344-8
K-2344-4
3/8" Hot
3/8" Cold
1-1/4" OD
Finished Wall
Finished Wall
9" (22.9 cm)
4" (10.2 cm)
8-3/4"
(22.2 cm)
4" (10.2 cm)
2-5/8"
(6.7 cm)
20-1/2"
(52.1 cm)
1/2" (1.3 cm) D.
Mounting Hole
in Pedestal
8-5/8"
(21.9 cm)
3-1/2"
(8.9 cm)
Finished Floor
1/2" (1.3 cm) D.
Anchor Holes in
Lavatory
14-1/4"
(36.2 cm)
10"
(25.4 cm)
K-2344-1
2-5/8"
(6.7 cm)
8-1/2"
(21.6 cm)
Mounting
Hole
4" (10.2 cm)
2-5/8"
(6.7 cm)
24-1/2"
(62.2 cm)
3-1/16"
(7.8 cm)
4" (10.2 cm)
2-3/8"
(6 cm)
2-3/8"
(6 cm)
4" (10.2 cm)
2-3/8" (6 cm)
K-2238-1
K-2238-8
K-2238-4
Finished Wall
8"
(20.3 cm)
19-3/4"
(50.2 cm)
7-13/16"
(19.8 cm)
19-1/8"
(48.6 cm)
24" (61 cm)
13-5/8"
(34.6 cm)
1/2" (1.3 cm) D.
Mounting Hole
in Pedestal
3/8" Hot
3/8" Cold
1-1/4" OD
4" (10.2 cm)
1/2" (1.3 cm) D.
Anchor Holes in
Lavatory
10"
(25.4 cm)
8-1/16"
(20.5 cm)
Mounting
Hole
34-3/8" (87.3 cm)
34-3/4" (88.3 cm)
Finished Floor
2-3/4" (7 cm)
2" (5.1 cm)
Kohler Co. 3 1020735-2-C
1. Prepare the Site
NOTE: The open position of the supply stop handles must not touch
the pedestal when the pedestal is put into place. Refer to the
roughing-in illustration to determine proper placement of the supply
stop handles.
Install the 3/8 water supply lines and 1-1/4 drain piping
according to the roughing-in information.
Install wood backing behind the finished wall to provide a secure
material for the anchoring devices. The combined thickness of the
wood backing and the finished wall material must be a minimum
of 1-1/2 (3.8 cm).
Complete the finished wall.
1020735-2-C 4 Kohler Co.
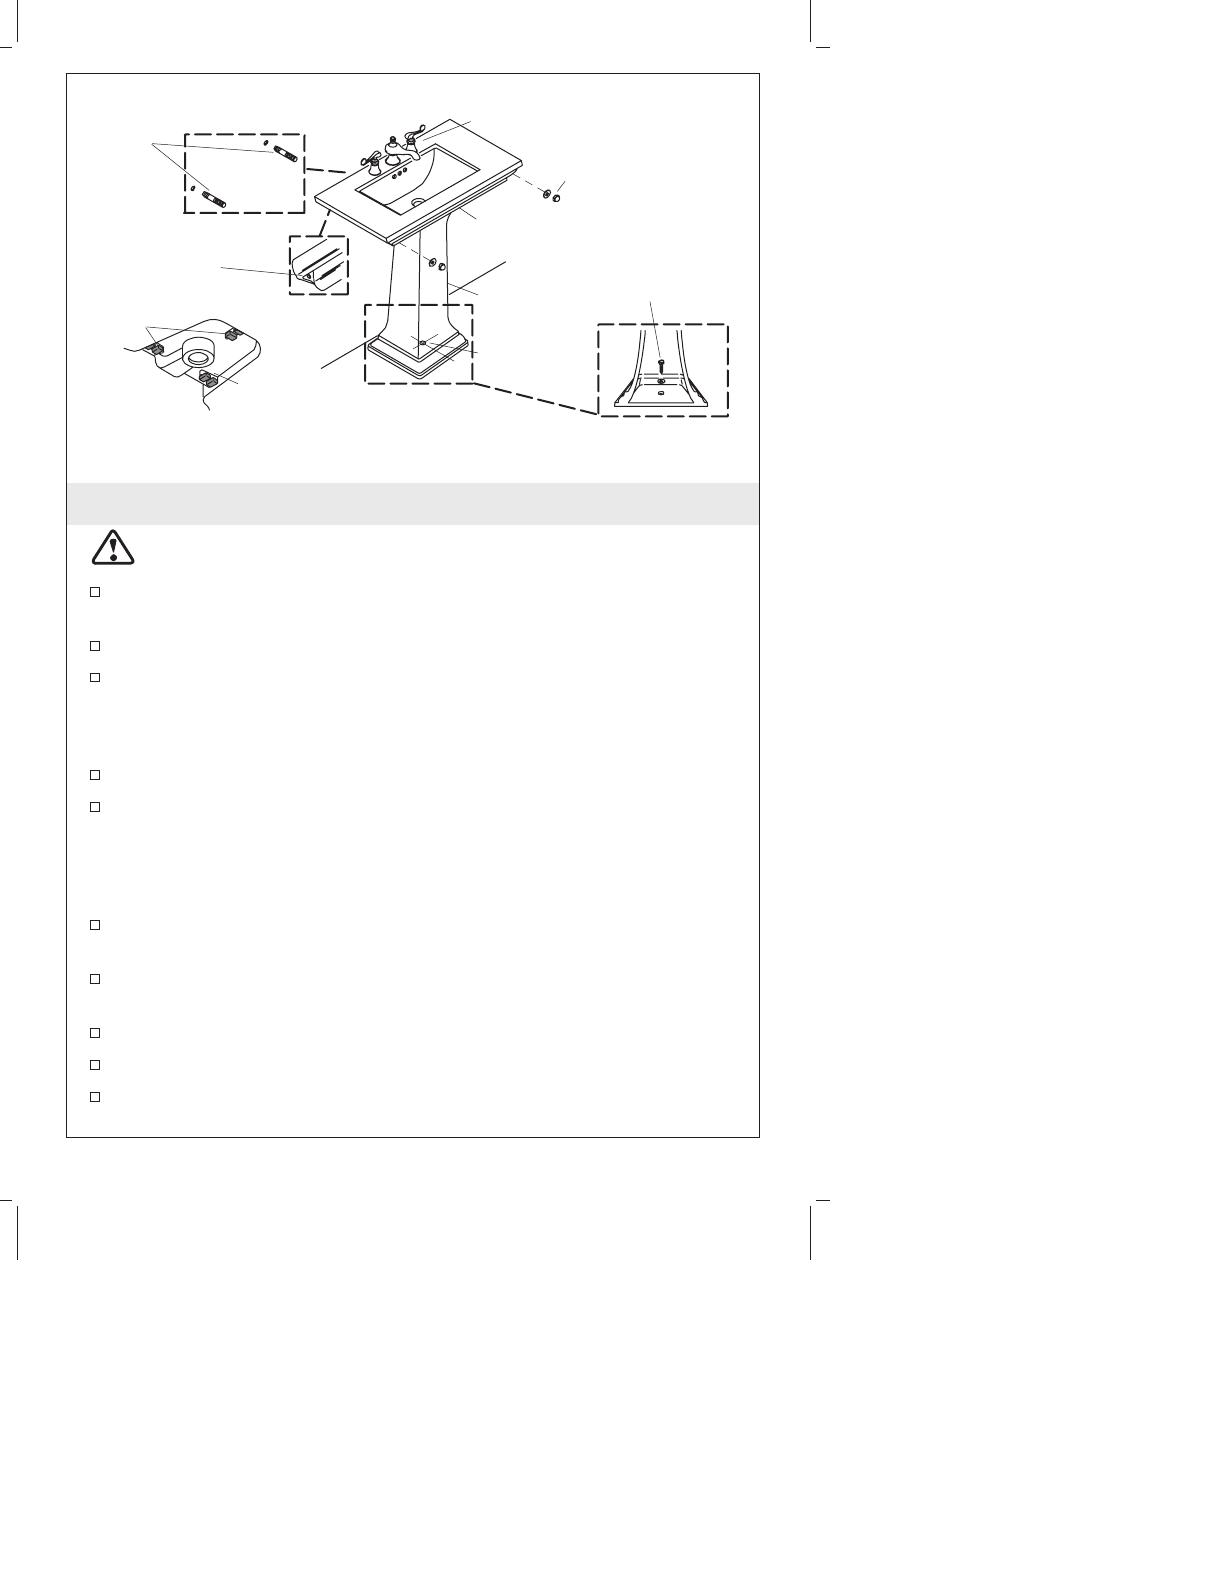
2. Install the Pedestal and Lavatory
CAUTION: Risk of personal injury. Vitreous china is heavy. Do
not attempt to lift or install this product without assistance.
Apply two self-adhesive pads to each of the three ribs on the
underside of the lavatory basin.
Mark the centerline of the pedestal on the floor with a pencil.
Align the center of the pedestal on the marked centerline. The
base of the pedestal must be 3-1/16 (7.8 cm) away from the
finished wall for K-2238 models or 3-1/2 (8.9 cm) for K-2344
models.
Place the lavatory onto the pedestal.
Verify the lavatory is level and flush against the finished wall.
Adjust or add self-adhesive pads as needed.
NOTE: If the bottom of the lavatory contacts the pedestal, reposition
the self-adhesive pads.
Mark the two lavatory anchoring hole locations on the finished
wall with a pencil.
Mark the pedestal anchoring hole on the floor through the hole in
the pedestal bottom.
Remove the lavatory from the pedestal. Set the lavatory aside.
Set the pedestal aside.
Drill 1/4 mounting holes at the marked locations on the finished
wall and the floor.
Mount hanger
bolts.
Finished Wall
Mark anchor
holes.
Mark floor
here.
Ridge
Lavatory
Pedestal
Install faucet and drain.
Install cap nuts
and washers.
Apply self-adhesive
pads.
Secure pedestal
with wood screws
and washers.
Bottom View
of Lavatory
Pedestal and Lavatory Placement
Kohler Co. 5 1020735-2-C
Install the Pedestal and Lavatory (cont.)
Install the hanger bolts to the wood backing. The hanger bolts
must extend 1-1/4 (3.2 cm) beyond the finished wall.
Install the faucet and drain to the lavatory according to the
manufacturer’s instructions.
CAUTION: Risk of product damage. Do not overtighten the
wood screw. Overtightening may damage the product.
Move the pedestal over the drilled hole in the floor. Secure the
pedestal to the floor by carefully tightening the wood screw and
washer.
Carefully set the lavatory on the pedestal so the hanger bolts
extend through the lavatory anchoring holes.
CAUTION: Risk of product damage. Do not overtighten the cap
nuts. Overtightening may damage the product.
Install the cap nuts and washers to the hanger bolts. Level the
lavatory, then carefully tighten the cap nuts until snug.
Connect and tighten the trap to the drain.
Complete the water supply connections to the faucet according to
the instructions packed with the faucet.
1020735-2-C 6 Kohler Co.
  • Page 1 1
  • Page 2 2
  • Page 3 3
  • Page 4 4
  • Page 5 5
  • Page 6 6
  • Page 7 7
  • Page 8 8
  • Page 9 9
  • Page 10 10
  • Page 11 11
  • Page 12 12
  • Page 13 13
  • Page 14 14
  • Page 15 15
  • Page 16 16
  • Page 17 17
  • Page 18 18
  • Page 19 19
  • Page 20 20

Kohler K-14226-TC-0 Installation guide

Category
Sanitary ware
Type
Installation guide

Ask a question and I''ll find the answer in the document

Finding information in a document is now easier with AI