
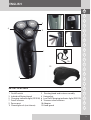
PR1250
PR1270
Rotary Shaver

2
Thank you for buying your new Remington® product. Please read these
instructions carefully and keep them safe. Remove all packaging before use.
F IMPORTANT SAFETY INSTRUCTIONS
WARNING – TO REDUCE THE RISK OF BURNS, ELECTROCUTION, FIRE, OR
INJURY TO PERSONS:
1 This appliance can be used by children aged from 8 years and above and
persons with reduced physical, sensory or mental capabilities or lack of
experience and knowledge if they have been supervised/instructed and
understand the hazards involved. Children shall not play with the appliance.
Cleaning and user maintenance shall not be done by children unless they
are older than 8 and supervised. Keep the appliance and cable out of reach
of children under 8 years.
2 Use this appliance only for its intended use as described in this manual. Do
not use attachments not recommended by Remington®.
3 Do not use this product if it is not working correctly, if it has been dropped
or damaged, or dropped in water.
4 An appliance should never be left unattended when plugged into a power
outlet, except when charging.
5 Keep the power plug and cord away from heated surfaces.
6 Make sure the power plug and cord do not get wet.
7 Do not plug or unplug the appliance with wet hands.
8 Do not use the product with a damaged cord. A replacement can be
obtained via our International Service Centres.
9 Do not twist or kink the cable, or wrap it round the appliance.
10 Store the product at a temperature between 15°C and 35°C.
11 Do not use attachments other than those we supply.
12 The appliance, including its cord, must not be used, played with, cleaned or
maintained by persons under eight years old and should at all times be kept
out of their reach.
13 Do not immerse the appliance in liquid; do not use it near water in
a bath-tub, basin or other vessel; and don’t use it outdoors.
14 Never operate this shaver if it has a damaged cord or plug, if it is
not working correctly, if it has been dropped or damaged, or
dropped into water. If the supply cord or plug of this shaver is damaged it
must be replaced by the manufacturer, its service agent or similarly
qualied persons in order to avoid a hazard. It cannot be repaired.
15 For use on facial hair only. Not intended for shaving the hair on your head.
16 Keep the appliance dry.
17 For household use only.
ENGLISH

3
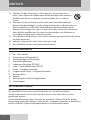
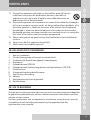
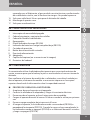
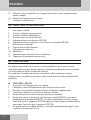
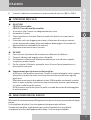
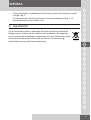
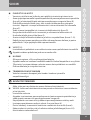
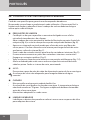
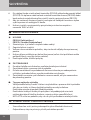
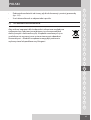
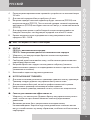
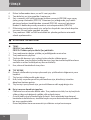
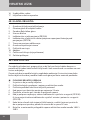
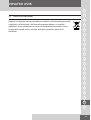
C KEY FEATURES
1 On/o switch 2 Pivoting head and cutter assembly
3 Individual exing heads 4 Hairpocket
5 Charging indicator light (PR1250) 6 Low/Full/Charging indicator light (PR1270)
7 Detail trimmer 8 Trimmer release button
9 Power port 10 Adaptor
11 Cleaning brush (not shown) 12 Head guard
GBDNLFEIDKSFINPSKCZ
HUN
PLRUTRROGRSLAE
HR
ENGLISH
5
7
12
8
6
1
9
4
2
3
10

4
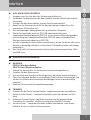
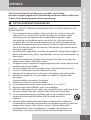
C GETTING STARTED
It is recommended that you use your new shaver daily for up to four weeks
to allow time for your beard and skin to become accustomed to the new
shaving system.
To conrm the model number of your shaver, please refer to the packaging
or open the trimmer where the model is printed in the upper right
corner of the rating information.
, CHARGING YOUR SHAVER
1 Ensure the appliance is turned o.
2 Connect the shaver to the adaptor and then to the mains.
3 Press the power switch to turn the product on.
4 Charge for at least 24 hours when using for the rst time.
5 Allow 4 hours for a full charge generally.
6 When charging, the green indicator light will show (PR1250) or slowly ash
(PR1270). When fully charged, the green indicator light will turn o (PR1250)
or the green indictor light will show for 5 minutes and then turn o (PR1270).
7 To preserve the life of your batteries, let them run out every 6 months then
recharge for 24 hours.
8 The shaver automatically adjusts to a mains voltage between 100V and
240V.
F INSTRUCTIONS FOR USE
, SHAVING
• PR1250: Rechargeable
• PR1270: Mains/Rechargeable
1 Make sure your shaver is properly charged.
2 Switch the shaver on.
3 Stretch the skin with your free hand so the hairs stand upright.
4 Only apply light pressure on the shaving head while shaving (pressing too
hard can damage the heads and make them vulnerable to breakage).
5 Use short, circular strokes.
, TRIMMING
6 Slide the trimmer button to release the detail trimmer.
7 Hold the trimmer at a right angle to your skin.
8 Place the trimmer at desired trim line for a quick, easy, professional trim.
9 To retract the trimmer, push down until it locks into position.
ENGLISH

5
GBDNLFEIDKSFINPSKCZ
HUN
PLRUTRROGRSLAE
HR
ENGLISH
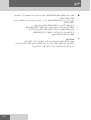
E Tips for best results
• Ensureyourskinisdry.Alwaysholdtheshaveratrightanglestotheskinso
that all three heads are touching the skin with equal pressure.
• Usemoderatetoslowstrokingmovements.Theuseofshortcircular
motions in stubborn areas may obtain a closer shave, especially along the
neck and chin line.
• DONOTpresshardagainsttheskininordertoavoiddamagetotherotary
heads.
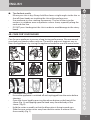
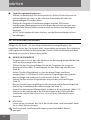
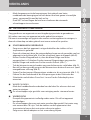
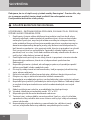
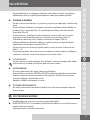
C CARE FOR YOUR SHAVER
Care for your appliance to ensure a long lasting performance. We recommend
you clean your product after each use. The easiest and most hygienic way to
clean the appliance is by rinsing the appliance head after use with warm water.
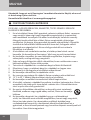
, CLEANING CAUTIONS
• Ensuretheapplianceisswitchedoandunpluggedfromthemainsbefore
cleaning.
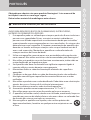
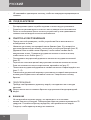
• Opentheshaverheadbypressingthereleasebuttononthefrontofthe
shaver (Fig. A) and ipping open the head away from the body of the
shaver (Fig. B).
• Holdthecutterassemblysothatthebluecutterisfacingtowardsyou.
Slide the inner cutter carrier away from the blue cutter to release it from
the assembly (Fig. C).
A
B
D
E
F
H
I J
K

6
• Pulltheinnercuttercarrierawayfromtheinnercutters(Fig.D).
• Thoroughlybrushhairsfromtheinnerandoutercutters.Rinseout
remaining debris (Fig. E).
• Placetheinnercuttercarrierbackintopositionandlockintoplace
(Fig. F-G).
• Alignthespringhingeintotheslotatthebackofthehairpocketandpress
into place. Snap the head assembly closed.
, WARNING:
Detatch the hand-held part from the supply cord before cleaning in water.
Shaver heads suitable for cleaning under an open water tap.
, CAUTION
• Donotsubmergeinwaterasdamagewilloccur.
• Shaverheadscanberinsedwithwater.Thewatertemperatureshould
not exceed 70 degrees. Unplug the shaver before cleaning with water.
• Keeptheadaptorandcabledry.
, CLEANING THE TRIMMER
• Lubricatetheteethofthetrimmereverysixmonthswithadropofsewing
machine oil.
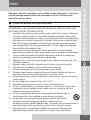
BATTERY REMOVAL
• Thebatterymustberemovedfromtheappliancebeforeitisscrapped.
, DANGER: Once the shaver has been dismantled for disposal, do not attempt
to reassemble and/or use.
• Unplugtheshaver.
• Removetheheadfromtheshaver(Pressreleasebuttonandpullhead
straight away from the shaver body).
• Usingasmallscrewdriver,pryfrontcoverfromtheshaver.
• Removethe4screwslocatedonthefrontoftheshaver(Fig.H).
• Removerearcoverfrominnerhousingtoexposebatteries(Fig.I).
• Prybatteriesfreefromcircuitboardandcutwires(Fig.J–K).
• Disposeofbatteryproperly.
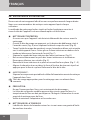
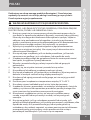
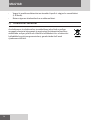
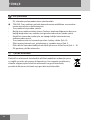
H ENVIRONMENTAL PROTECTION
To avoid environmental and health problems due to hazardous substances
in electrical and electronic goods, appliances marked with this symbol must
not be disposed of with unsorted municipal waste, but recovered, reused or
recycled.
ENGLISH
Page is loading ...
Page is loading ...
Page is loading ...
Page is loading ...
Page is loading ...
Page is loading ...
Page is loading ...
Page is loading ...
Page is loading ...
Page is loading ...
Page is loading ...
Page is loading ...
Page is loading ...
Page is loading ...
Page is loading ...
Page is loading ...
Page is loading ...
Page is loading ...
Page is loading ...
Page is loading ...
Page is loading ...
Page is loading ...
Page is loading ...
Page is loading ...
Page is loading ...
Page is loading ...
Page is loading ...
Page is loading ...
Page is loading ...
Page is loading ...
Page is loading ...
Page is loading ...
Page is loading ...
Page is loading ...
Page is loading ...
Page is loading ...
Page is loading ...
Page is loading ...
Page is loading ...
Page is loading ...
Page is loading ...
Page is loading ...
Page is loading ...
Page is loading ...
Page is loading ...
Page is loading ...
Page is loading ...
Page is loading ...
Page is loading ...
Page is loading ...
Page is loading ...
Page is loading ...
Page is loading ...
Page is loading ...
Page is loading ...
Page is loading ...
Page is loading ...
Page is loading ...
Page is loading ...
Page is loading ...
Page is loading ...
Page is loading ...
Page is loading ...
Page is loading ...
Page is loading ...
Page is loading ...
Page is loading ...
Page is loading ...
Page is loading ...
Page is loading ...
Page is loading ...
Page is loading ...
Page is loading ...
Page is loading ...
Page is loading ...
Page is loading ...
Page is loading ...
Page is loading ...
Page is loading ...
Page is loading ...
Page is loading ...
Page is loading ...
Page is loading ...
Page is loading ...
Page is loading ...
Page is loading ...
Page is loading ...
Page is loading ...
Page is loading ...
Page is loading ...
Page is loading ...
Page is loading ...
Page is loading ...
Page is loading ...
Page is loading ...
Page is loading ...
Page is loading ...
Page is loading ...
-
 1
1
-
 2
2
-
 3
3
-
 4
4
-
 5
5
-
 6
6
-
 7
7
-
 8
8
-
 9
9
-
 10
10
-
 11
11
-
 12
12
-
 13
13
-
 14
14
-
 15
15
-
 16
16
-
 17
17
-
 18
18
-
 19
19
-
 20
20
-
 21
21
-
 22
22
-
 23
23
-
 24
24
-
 25
25
-
 26
26
-
 27
27
-
 28
28
-
 29
29
-
 30
30
-
 31
31
-
 32
32
-
 33
33
-
 34
34
-
 35
35
-
 36
36
-
 37
37
-
 38
38
-
 39
39
-
 40
40
-
 41
41
-
 42
42
-
 43
43
-
 44
44
-
 45
45
-
 46
46
-
 47
47
-
 48
48
-
 49
49
-
 50
50
-
 51
51
-
 52
52
-
 53
53
-
 54
54
-
 55
55
-
 56
56
-
 57
57
-
 58
58
-
 59
59
-
 60
60
-
 61
61
-
 62
62
-
 63
63
-
 64
64
-
 65
65
-
 66
66
-
 67
67
-
 68
68
-
 69
69
-
 70
70
-
 71
71
-
 72
72
-
 73
73
-
 74
74
-
 75
75
-
 76
76
-
 77
77
-
 78
78
-
 79
79
-
 80
80
-
 81
81
-
 82
82
-
 83
83
-
 84
84
-
 85
85
-
 86
86
-
 87
87
-
 88
88
-
 89
89
-
 90
90
-
 91
91
-
 92
92
-
 93
93
-
 94
94
-
 95
95
-
 96
96
-
 97
97
-
 98
98
-
 99
99
-
 100
100
-
 101
101
-
 102
102
-
 103
103
-
 104
104


Remington PF7400 COMFORT SERIES PLUS Owner's manual
- Category
- Men's shavers
- Type
- Owner's manual
Ask a question and I''ll find the answer in the document
Finding information in a document is now easier with AI
in other languages
- italiano: Remington PF7400 COMFORT SERIES PLUS Manuale del proprietario
- français: Remington PF7400 COMFORT SERIES PLUS Le manuel du propriétaire
- español: Remington PF7400 COMFORT SERIES PLUS El manual del propietario
- Deutsch: Remington PF7400 COMFORT SERIES PLUS Bedienungsanleitung
- русский: Remington PF7400 COMFORT SERIES PLUS Инструкция по применению
- Nederlands: Remington PF7400 COMFORT SERIES PLUS de handleiding
- português: Remington PF7400 COMFORT SERIES PLUS Manual do proprietário
- slovenčina: Remington PF7400 COMFORT SERIES PLUS Návod na obsluhu
- dansk: Remington PF7400 COMFORT SERIES PLUS Brugervejledning
- polski: Remington PF7400 COMFORT SERIES PLUS Instrukcja obsługi
- čeština: Remington PF7400 COMFORT SERIES PLUS Návod k obsluze
- Türkçe: Remington PF7400 COMFORT SERIES PLUS El kitabı
- svenska: Remington PF7400 COMFORT SERIES PLUS Bruksanvisning
- suomi: Remington PF7400 COMFORT SERIES PLUS Omistajan opas
- română: Remington PF7400 COMFORT SERIES PLUS Manualul proprietarului
Related papers
-
Remington R8 Owner's manual
-
Remington style series Owner's manual
-
-
-
Remington AQ7 User manual
-
-
-
Remington PF7400 Owner's manual
-
-
Remington PF7200 COMFORT SERIES Owner's manual