
FR MANUEL D’INSTRUCTION
EN INSTRUCTION MANUAL
Four compact 40L
Compact oven 40L
FC405MH
Page is loading ...
Page is loading ...
Page is loading ...
Page is loading ...
Page is loading ...
Page is loading ...
Page is loading ...
Page is loading ...
Page is loading ...
Page is loading ...
Page is loading ...
Page is loading ...
Page is loading ...

15
Dear Customer,
You have just purchased a BRANDT compact oven and we would like to thank you.
We have placed in this appliance all our passion and know-how in order to meet at best your
need. Innovative and efficient: we designed it to be always easy to use.
In the BRANDT products line, you will also find a wide range of small domestic appliances
that can be coordinated to your new BRANDT compact oven.
Of course, in a permanent wish to satisfy as best as possible your expectations toward our
products, our after-sales service is at your disposal and at your listening to answer to all your
questions and suggestions.
You can also visit our website
www.brandt.com
where you will find all our products, as well
as additional and useful information.
BRANDT
As part of our commitment to constantly improve our products, we reserve the right to make
technical, functional or esthetical properties modifications linked to their technological
development.
Caution: Before installing and using your appliance, please read
carefully this installation and user’s guide to quickly familiarise yourself
with its functioning.

16
TABLE OF CONTENTS
1. INFORMATION FOR THE USER ................................................................ 17
A.
Safety recommendations ........................................................................ 17
B.
Technical data ....................................................................................... 20
C.
Protecting the environment..................................................................... 20
2.
SETTING UP YOUR APPLIANCE ............................................................... 21
A.
Installing your oven in complete safety.................................................... 21
B.
Electrical connection............................................................................... 22
C.
Description of your appliance.................................................................. 22
3.
USE OF YOUR APPLIANCE........................................................................ 23
A.
Before using your appliance for the first time........................................... 23
B.
Temperature control............................................................................... 23
C.
Cooking time setting .............................................................................. 23
D.
Cooking function selection ...................................................................... 24
E.
Use recommandations ............................................................................ 26
4.
MAINTENANCE OF YOUR APPLIANCE ..................................................... 26
A.
Cleaning instructions .............................................................................. 26
B.
Changing the interior light bulb............................................................... 26
C.
Storage instructions ............................................................................... 27
D.
Warranty and after-sales service ............................................................. 27

17
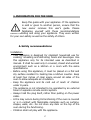
1. INFORMATION FOR THE USER
Keep this guide with your appliance. If the appliance
is sold or given to another person, ensure that the
new owner receives this user’s guide. Please
familiarise yourself with these recommendations
before installing and using your appliance. They were written
for your own safety as well as the safety of others.
A. Safety recommendations
Installation
•
Your appliance is designed for standard household use for
cooking, reheating and defrosting foods and beverages. Use
this appliance only for its intended uses as described in
manual. It shall be used only in covered, closed and warmed
environment such as a kitchen or a room with the same
specifications.
•
Before using this appliance, it must be placed on a flat and
dry surface resistant to heating like a kitchen counter. Keep
at least four inches of clear space around all sides of the
oven to allow adequate air circulation.
•
Keep the appliance and its cord out of reach of children
under 8 years.
•
The appliance is not intended to be operated by an external
timer or separate remote-control system.
•
Always hold the plug itself, rather than pulling on the power
cable.
•
A fire may occurs during its functioning if the oven is covered
or is in contact with flammable materials such as curtains,
drapes, walls, etc.. Do not store any item on the top of the
oven during the functioning.
•
Children shall not play with the appliance.

18
Use
• This appliance can be used by children aged from 8 years old
and above and persons with reduced physical, sensory or
mental capabilities or lack of experience and knowledge if
they have been given supervision or instruction concerning
use of the appliance in a safe way and understand the
hazards involved.
• The temperature of accessible surfaces may be high when
the appliance is operating.
• Children under 8 years old shall be kept away unless
continuously supervised.
• Care should be taken to avoid touching heating elements
during the use.
• Do not store any item on top of the oven during operation.
• Do not cover any part of the oven with metal foil. This may
cause overheating of the oven. A fear or some dysfunctions
may occur.
• Keep cord away from heated surface and do not cover any
events on the oven.
• Do not place any of the following materials in the oven;
cardboard, plastic, paper or other similar materials.
• Large food items and metal utensils must not be placed in
the oven as they may lead to a fire or create a risk of electric
shock. Keep away utensils and food items from heated
surfaces.
• Your appliance is designed for standard household use for
cooking, reheating and defrosting foods and beverages. The
drying of food or linen and the heating of heating pillows,
slippers, sponges, wet linen and other similar goods could
bring risks of wounds, inflammation or fire.
• The use of accessory attachments not recommended by the
appliance’s manufacturer may cause hazard or injury.

19
Maintenance
• Cleaning and user maintenance shall not be made by children
unless they are older than 8 and supervised.
• Unplug the appliance when not in use or before cleaning.
Allow the appliance to cool down before adding or removing
any parts and before cleaning.
• To protect against electric shock, do not place any part of
this oven in water or other liquid.
• Do not use harsh abrasive cleaners or sharp metal scrapers
to clean the oven door glass since they can scratch the
surface, which may result in shattering of the glass.
• The supply cord cannot be replaced. If the cord is damaged
the appliance should be scrapped.
However, this product is covered by a 2-year warranty. For
more details, please refer to the warranty conditions supplied
by your retailor.
• This appliance has been tempered, safety glass door.
Tempered glass does not split but break in pieces will not
have sharp edges. Avoid scratching the door surface or
nicking edges. Call the service Center before any use.
• The light is only for the oven. Do not use it to enlighten
rooms.
• For cleaning surfaces in contact with food, please refer
“Cleaning instructions” section.
Improper use
• The appliance is intended for domestic use only in private
housing. The use of thiss appliance in common or
professional’s area such as a room for a break for work, a
premise in a campsite or hotel are not a proper use as
defined by the manufacturer.
• The manufacturer accepts no responsibility in case of
improper use.
• Use this appliance only for its intended uses as described in
manual.

20
• Please become familiar with these recommendations before
installing and using your appliance.
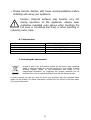
Caution: External surfaces may become very hot
during operation of the appliance. Always wear
protective insulated oven gloves when touching the
hot oven or hot dishes and food, or when inserting or
removing racks, pans…
B. Technical data
Model no FC405MHB / FC405MHW / FC405MHS
Power supply 220-240 V~50/60Hz
Energy consumption 2100W
Dimensions (HxLxD) 373 x 578 x 435 mm
Net weight 12,5 kg
C. Protecting the environment
Arrived in end of life, this product should not be thrown with household
waste. It must be brought in a recycling center or to your retailer. It allows
avoiding negative effects on the environment and health of the
inappropriate elimination. By respecting this process, materials can be
recycled with a view to realise significant resources and energy savings.
A symbol reminds you that you must not throw your appliance with the household waste
appars on the product. For further information, contact your city council or the shop where
you bought the product.

21
2. SETTING UP YOUR APPLIANCE
A. Installing your oven in complete safety
If the oven is positioned too close to a wall, this wall can be burned or
discoloured. Ensure that curtains, etc. are not in contact with the oven.
Do not put anything between the base of the oven and the surface on which
it is set. Any object placed under the oven may be burned. Do not put
anything on the top of the oven when it is in use because the heat can
deform, crack or otherwise damage the item.
Do not heat food directly in the bottle or tin because the container may
break and the content can burn the user.
Always use the handle when inserting or removing the tray. Touching the
tray may cause severe burns.
Never pour water on the oven door when it is hot, the glass can shatter.
When unplugging the oven, always take hold of the plug itself. Never pull
on the cord; this could break the wires inside the cord.
During the use, do not position the oven near a gas burner or any other
heat source. Doing this could affect the temperature control.
Do not touch the power cable or unit with wet hands. Always unplug the
cord after use and whenever the unit is left unattended. A malfunction
while the plug is inserted into the mains could cause a fire.
When cooking fat-spitting dishes such as roast chicken, it is recommended to use 2 sheets of
aluminium foil in order to reduce face spitting. Place one sheet on the tray and the other
over the food. The oil will drip into the gap between the sheets of foil.
Caution :
Ensure that your appliance had not suffered any damage during
transportation (deformed seal or door, etc.). If you see any kind of damage,
contact your retailer before doing anything further with the appliance.

22
B. Electrical connection
The oven must be connected to a property wired outlet. Insert the plug into
the socket. If it is not properly connected, it could overheat. Do not use an
electric light outlet. Never connect multiple plugs to the same power outlet.
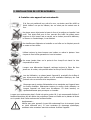
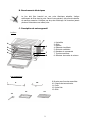
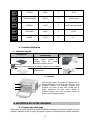
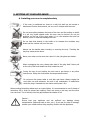
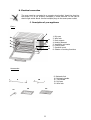
C. Description of your appliance
Oven :
1. Drip pan
2. Wire rack
3. Rack support
4. Heating element
5. Ventilation air intake
6. Control panel
7. Sensitive touch
8. Selector of cooking functions
Accessories :
9. Rotisserie fork
10. Rotisserie handle
11. Tray handle
12. Drip pan
13. Wire rack
1
2
3
4
5
7
8
6
9
10
11
12
13

23
3. USE OF YOUR APPLIANCE
A. Before using your appliance for the first time
•
Unpack your appliance and check that all elements and accessories are present and
undamaged.
•
Check that all wrap elements (plastic, cardboard box, polystyrene) have been
removed.
•
Clean all the parts according to the instructions given in the “Maintenance of your
appliance” section.
•
Dry all parts thoroughly and assemble them, the oven is now ready to use.
Heat the empty oven:
•
Insert the tray and wire track.
•
Set the cooking function on
and
set the temperature control knob to « 250°C »
then heat the empty oven for about 10 minutes.
•
Then, let it cool down, remove the plug from the power socket and clean all the
detached parts again.
Note:
There may be some smoke and a burning smell during the first use, however it is normal.
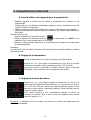
B. Temperature control
Adjust the temperature depending on the dish you will cook.
Press on «+/-» to adjust the temperature 10 by 10°C according to the dish
you want to cook (temperature between 70°C and 250°C). After having
adjusted the thermostat, the cooking starts after 5 seconds of inactivity. Then,
the screen will show the temperature of cooking.
C. Cooking time setting
Press on «+/-» to adjust the time from 0 to 120 min. Time can be
increased/decreased 1 by 1 until 20 min; 5 by 5 increase/decrease above 20
min to 90 min. After having adjusted the cooking time, the oven starts the
cooking after 5 seconds of inactivity. Then, the screen will show the
remaining time of cooking.
The oven can be turned off manually during cooking by turning the timer
anti-clockwise to the “0” position.
Note: If the inside of the oven is dirty, cooking may take slightly longer than usual.

24
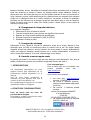
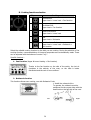
Left
D. Cooking function selection
Select the suitable cooking function for the dish you are cooking. During the selection of the
cooking function, recommendations of time and temperature are automatically made. These
can be adjusted with the buttons of control “+/-”.
Specific functions :
1. Fan Function (Upper & Lower Heating + Fan function)
Thanks to the fan function on the side of the cavity, the hot air
circulates in the entirety of the oven, so the heat is better
distributed and the cook is more uniform.
2. Rotisserie function
This function allows even cooking, use with Rotisserie Forks.
1. Install the rotisserie forks
Séquences Cooking mode
Multifunction
Upper heat + Lower heat + Fan function
Ventilated Grill
Upper heat + Fan function
Natural convection
Upper heat + Lower heat
Grill
Upper heat + Rotisserie
Multifunction + Rotisserie :
Upper heat + Lower heat + Rotisserie +
Fan function
Right
To operate, the rotisserie must be
positioned on the correct side: with the
small
hook on the left side of the oven

25
2. Install the rotisserie forks 3. Remove the rotisserie forks Rotisserie handle
Fit the rotisserie forks in the
rotisserie holes and then
install the drip pan under the
rotisserie
Use the rotisserie handle to remove
the rotisserie forks from the rotisserie
tray and then remove it from the
rotisserie hole
To avoid the possibility of
a burn, always use the
rotisserie handle to remove
the rotisserie from the
oven
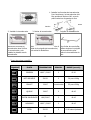
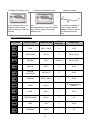
Recommended baking time :
SEQUENCE TYPE OF FOOD TEMPERATURE
RACK
SUPPORT
TIMER (min)
FISH 180°C / 200°C 2 15-20
ROAST BEEF 230°C* 2 30 for 1000g
CHICKEN 220°C Rotisserie 55 for 1000g
QUICHE 200°C 2 40-45
GRATIN
DAUPHINOIS
180°/200°C 2 40-45
LASAGNA 180°C / 200°C 2 40-45
PIZZA 220°C* 2
15-20 depending on
thickness
PIES 200°C 2 30-35
TOASTED BREAD 180°C* 4 5-8
CAKE 170°C 2 45-55
CUPCAKES 160°C 2 25

26
SHORTBREAD
BISCUIT
170°C* 3 10
* preheat the oven
E. Use recommandations
1. Drip pan and Wire Rack :
Accessories Food (for reference only) How to use Tray handle ?
Drip pan Roast chicken wings,
hamburgers, gratin, cakes and
most other oven-cooked foods
Note :
We recommand you to use it as a crumb tray.
Wire rack
Baked potatoes, dry food
2. Rack support :
There are 3 different positions for the tray which can
adjust according to the dish you are cooking. For
example, when you are cooking a gratin and you
want to have the top part cooked the most, use the
third position. To roast a chicken, use the first or the
second position.
3. MAINTENANCE OF YOUR APPLIANCE
A. Cleaning instructions
Always unplug and allow the oven to cool completely before cleaning or moving.
Clean the grill pan, the wire rack, the handle and the drip pan after each use.
Clean the interior of your oven and all removable parts with a mild non-abrasive cleaning
product and a plastic scouring pad after each use.
Rinse and dry thoroughly. Do not rub too hard the interior surfaces of the oven as this could
scratch the finish. Clean the glass oven door exterior with glass cleaner or a mild detergent
and a damp cloth or plastic scouring pad. Do not use abrasive cleaning products or pads as
they might scratch the glass of the appliance.
Rinse and dry thoroughly with a clean cloth. Allow to dry before closing the glass door.
B. Changing the interior light bulb
To replace the light :
1. Unplug the oven and allow the oven to cool completely
3
2
1

27
2. To move the porthole, turn it counter clockwise
3. Clean with hot water and detergent
4. Converse the light and change it (25W E14/25x17)
5. Then, put the porthole back on
C. Storage instructions
Unplug the appliance, allow it to cool and clean it before storing. Store the oven in its
original box in a clean and dry place. Never store the appliance while it is hot or still plugged
in. Never wrap the power cable tightly around the appliance. Do not put any stress on the
cable where it joins the appliance, as this could cause the cable to fray and break.
D. Warranty and after-sales service
This product is covered by a 2-year warranty by your retailer. For more details, please refer
to the warranty conditions supplied by your retailer.
• SERVICE CALLS
Any repairs that are made to your
appliance must be handled by a qualified
professional authorised to work on the
brand.
When you call, mention your appliance’s
“Service” reference, as well as its serial
number “Nr”.
This information appears on the
manufacturer’s nameplate which can be
found stuck behind the machine.
• CUSTOMER RELATIONS
To find out more about all the brand’s
products you can visit our website:
www.brandt.com
To communicate:
You may visit our website
www.brandt.com and go to the
“CONTACT” section
You may e-mail us:
relations.consommateurs@groupeb
randt.com
You may write us at the following
address:
Service Consommateurs BRANDT
5 av des Béthunes,
CS 69 526
95 060 CERGY PONTOISE CEDEX
Or phone us from Monday to
Friday from 8:30 am to 6:00 pm :
BRANDT FRANCE – SAS with a capital of 1.000.000 euros –
89 bd Franklin Roosevelt – 92500 Rueil-Malmaison
-
 1
1
-
 2
2
-
 3
3
-
 4
4
-
 5
5
-
 6
6
-
 7
7
-
 8
8
-
 9
9
-
 10
10
-
 11
11
-
 12
12
-
 13
13
-
 14
14
-
 15
15
-
 16
16
-
 17
17
-
 18
18
-
 19
19
-
 20
20
-
 21
21
-
 22
22
-
 23
23
-
 24
24
-
 25
25
-
 26
26
-
 27
27


Ask a question and I''ll find the answer in the document
Finding information in a document is now easier with AI
in other languages
- français: Brandt FC405MHW Manuel utilisateur
Related papers
-
Brandt FC265MB Important information
-
Brandt FC405MB Owner's manual
-
Groupe Brandt FC405MB Owner's manual
-
-
-
Brandt FC320MW-01 Owner's manual
-
-
-
-
Other documents
-
Whirlpool ACM 406/1 User guide
-
Indesit EI5VMC5A(W)/FR User guide
-
Whirlpool IW5VMC1A(X) FR User guide
-
Whirlpool ACM 9414 V/IX �� User guide
-
Indesit IW5VMC1A(X) FR User guide
-
Telefunken MO21-SFE 44L CTL Owner's manual
-
CONTINENTAL EDISON CEMF70B User manual
-
Zanussi ZOB592NQ User manual
-
ROSIERES RFT 5577 Owner's manual
-