Page is loading ...

USER MANUAL - BEDIENUNGSANLEITUNG
CE2.0 Crosstrainer
MODELNUMBER MODELNUMMER: CE2.0
MAX USER WEIGHT - MAX. BENUTZERGEWICHT: 135kg (300 lbs.)
SERVICENUMMER: + 49 (911) 8105924
SERVICEPHONE. 0800 0972100
SERIENNUMMER- SERIALNUMBER (on the frame):

2
CE2.0 Crosstrainer
INDEX – INHALTSVERZEICHNIS
1. English P. 3
2. Deutsch P.23

3
CE2.0 Crosstrainer
www.smoothfitness.co.uk
PRECAUTIONS
Warning: Before starting any exercise program, it is recommended that you consult your physician, especially for
persons with pre-existing health problems. Before using the new equipment, please review this manual to learn about
the features, functions, and safety operations. It is the responsibility of the owner to ensure that all users of this
equipment are adequately informed of all warnings and precautions. Should you experience any irregular physical
conditions such as dizziness, severe muscle or joint pain, pain in your chest or should any other symptoms appear:
STOP EXERCISING
and consult with your physician immediately.
• Use the crosstrainer only as described in this manual.
• Place on a level surface. To protect the floor or carpet from damage, place a mat under the crosstrainer.
• When choosing a location for the crosstrainer make sure that the location and position permit access to a plug.
• Keep the crosstrainer indoors, away from moisture and dust. Do not put the crosstrainer in a garage or covered
patio, or near water.
• Do not operate the crosstrainer where aerosol products are used or where oxygen is being administered.
• Keep children under the age of 12 and pets away from the crosstrainer at all times.
• The crosstrainer should not be used by persons weighing more than 300 lbs (135kg)
• Never allow more than one person on the crosstrainer at a time. Wear appropriate exercise clothing when using
the crosstrainer. Do not wear loose clothing that could become caught in the crosstrainer. Athletic support
clothes are recommended for both men and women. Always wear athletic shoes. Never use the crosstrainer
with bare feet, wearing only stockings, or in sandals.
• When connecting the power cord, plug the power cord into a grounded circuit. No other appliance should be on
the same circuit.
• Always examine your crosstrainer before using to ensure all parts are in working order.
• Never insert any object or body parts into any opening.
• Keep the power cord away from moving handle bars and do not run the power cord underneath your
crosstrainer. Do not operate the crosstrainer with a damaged or frayed power cord.
Always unplug the crosstrainer before cleaning and/or servicing. Service to your exercise bike should only be performed
by an authorized service representative, unless authorized and/or instructed by the manufacturer. Failure to follow these
instructions
will void the crosstrainer warranty.

4
CE2.0 Crosstrainer
www.smoothfitness.co.uk
PREASSEMBLY
Open the boxes:
You are now ready to open the boxes of your new equipment. Make sure to inventory all of the parts that are included in
the boxes. Check the Hardware Comparison Chart for a full count of the number of parts included for this product to be
assembled properly. If you are missing any parts or have any assembly questions call the manufacturer.
Gather your tools:
Before starting the assembly of your unit, make sure that you have gathered all the necessary tools you may require to
assemble the unit properly. Having all of the necessary equipment at hand will save time and make the assembly quick
and hassle-free.
Clear your work area:
Make sure that you have cleared away a large enough space to properly assemble the unit. Make sure the space is free
from anything that may cause injury during assembly. After the unit is fully assembled, make sure there is a comfortable
amount of free area around the unit for unobstructed operation.
Invite a friend:
Some of the assembly steps may require heavy lifting. It is recommended that you obtain the assistance of another
person when assembling this product.
User Weight Limitation:
Please note that there is a weight limitation for this product. If you weigh more than 135kg (300lbs) it is not
recommended that you use this product. Serious injury may occur if the user’s weight exceeds the limit shown
here. This product is not intended to support users whose weight exceeds this limit
.

5
CE2.0 Crosstrainer
www.smoothfitness.co.uk
PARTS LIST

6
CE2.0 Crosstrainer
www.smoothfitness.co.uk
PARTS LIST
NO. DESCRIPTION QTY NO. DESCRIPTION QTY
A1 MAIN FRAME 1 B1 CENTRAL SUPPORT TUBE 1
A2 MAGNETIC FLYWHEEL 1 B3 WATER BOTTLE 1
A3 FLAT WASHER 2 B5 COMPUTERCABLE; UPPER 1
A4 NUT 2 B6 HAND PULSE SENSOR WIRE 1
A5 TENSION PULLEY 1 B7 BOLT 2
A6 PIPE 3 B8 BUSHING 2
A7 FLAT WASHER 3 B9 SHAFT 1
A8 SCREW 3 B10 BEARING 4
A9 BEARING 4 B11 BUSHING 4
A10 E CLIP 3 B12 CONNECT TUBE 2
A11 MAGNETIC HOUSING 1 B13 FLAT WASHER 6
A12 NUT 1 B14 SPRING WASHER 8
A13 SCREW 1 B15 SCREW 2
A14 SPRING 1 B16 BOTTLE HOUSING 1
A15 COMPUTERCABLE; LOWER 1 B17 SCREW 1
A16 SPRING WASHER 2 B18/19 DECORATION BOTTLE HOUSING 2
A17 SPRING FIXING HOUSING 1 B20 SCREW 4
A18 SCREW 1 B21 SCREW 6
A19 FIXING HOUSING 1 B22 FLAT WASHER 2
A20 SCREW 2
A21 SPRING 1 C1 REAR STABILIZER 1
A22 BELT 1 C2 END CAP 2
A23 BELT PULLEY 1 C3 END CAP COVER 3
A24 PULLEY AXLE 1 C4/D7 BOLT 4
A25 SCREW 4 C5/D8 FLAT WASHER 4
A26 PLANE 1 C6/D9 SPRING WASHER 4
A27 NUT 5 C7/D10 NUT 4
A28 MAGNET 1 D1 FRONT STABILIZER 1
A29 TURNING PLATE 2 D2 END CAP 2
A30 SCREW 2 D3 END CAP COVER 2
A31 DECORATION COVER 2 D4 TRANSMIT WHEEL HOUSING 2
A32 PIPE 2 D5 SCREW 4
A33 BEARING 4 D6 TRANSPORTATION WHEEL 2
A34 FLAT WASHER 2 E1 MONITOR 1
A35 SCREW COVER 2 E2 SCREW 4
A36 SCREW 2 E3 ADAPTOR 1
A37 PEDAL TUBE (RIGHT) 1 F1 FRONT HANDLE BAR (LEFT-RIGHT) 2
A38 PEDAL TUBE (LEFT) 1 F2 HANDLE BAR CLIP 1
A39 SCREW 2 F3 SCREW 2
A40 FLAT WASHER 2 F4 FOAM GRIP 2
A41 FLAT WASHER 2 F5 SENSOR 2
A42 SCREW 2 F6 SCREW 2
A43 CONNECT PIPE 2 G1 SIDE HANDLE BAR 2
A44 SCREW 1 G2 FOAM GRIP 2

7
CE2.0 Crosstrainer
www.smoothfitness.co.uk
PARTS LIST
NO. DESCRIPTION QTY NO. DESCRIPTION QTY
A45 SENSOR WIRE 1 G3 END CAP 2
A46 FIXING HOUSING 1 G4 SCREW 4
A47 RIGHT COVER 1 H1/H2 DECORATION COVER 1
A48 DECORATION COVER 1 H3/H4 PEDAL JOINT COVER 1
A49 LEFT COVER 1 H5/H6 PEDAL 1
A50 DECORATION COVER 1 J1 KNOB 2
A51 SCREW COVER 8 J2 SCREW 4
A52 SCREW 8 J3 SCREW 4
A53 SCREW 3 J4 FLAT WASHER 4
A54 TAPPING SCREW 6 J5 SPRING WASHER 4
A55 POWER CORD SENSOR 1 J6 STARKNOB 4
A56 SCREW 4
A57 TENSION CABLE 1
A58 CLIP 1
A59 SCREW 2
A60 CLIP 2
A61 BUSHING 4
A62 WASHER 4
A63 BOLT 2
A64 NUT 2

8
CE2.0 Crosstrainer
www.smoothfitness.co.uk
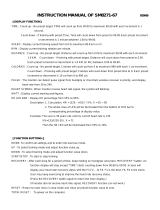
EXPLODED DIAGRAM

9
CE2.0 Crosstrainer
www.smoothfitness.co.uk
ASSEMBLY INSTRUCTIONS
First, remove the bolts (C4), washers (C5) and nuts (C6) from rear stabilizer (C). Insert two bolts (C4) through
the rear stabilizer (C) to attach it to the bracket at the back of the main frame (A). Then secure it with washers
(C5), spring washers (C6) and nuts (C7).
A. First remove the bolts (D7), washers (D8) and (D9) as well as nuts (D10) from the front stabilizer (D).
Insert two bolts (D7) through the front stabilizer (D) to attach to the bracket at the front of the main
frame (A). Then secure with washers (D8), spring washers (D9) and nuts (D10)
B. After you complete figure 1 & figure 2, if the machine does not sit level, you can adjust the end caps
(C2) to compensate for uneven floors.

10
CE2.0 Crosstrainer
www.smoothfitness.co.uk
ASSEMBLY INSTRUCTIONS
First remove the bolts (B21), spring washers
(B14) and washers (B13) from the central
support tube (B)
Step 1 Connect the cable (B5) & (A15)
Step 2 Assemble the central support tube (B)
onto the main frame (A) with bolts (B21), spring
washers (B14) and washers (B13)
Attention:
When pushing the tubes together make sure
not to pinch cables.
Remove the screws (E4) from the back of the
monitor (E). Connect the sensor wire (B5 & B6)
with monitor wires and put the monitor on the
fixing plate.

11
CE2.0 Crosstrainer
www.smoothfitness.co.uk
ASSEMBLY INSTRUCTIONS
Pull up right or left connect tube (A43) and
adjust the suitable position which 4 holes are
available when loosing the pop – pin the
middle tube (B) and lower tube (A43) will be
fixed securely
First move the bolts (G4), from the side
handlebar (G). Then slide the side handlebar
(G) over central support tube (B). Secure with
bolts (G4). During handlebar assembly you
have to use the holes as pictured in close up
view. Repeat step 1 and 2 on left connect tube
(A43)
Connect right side handlebar joint covers (H1
& H2) onto side handlebar (G) and secure with
screws (J3). Repeat step 1 on left side
handlebar joint covers

12
CE2.0 Crosstrainer
www.smoothfitness.co.uk
ASSEMBLY INSTRUCTIONS
First, remove the bolts (B7) from the central
support tube (B) and remove the screw (F3)
from the handlebar (F). Connect cables (F5)
to sensor wires (B6). Connect the front
handlebars (F). Connect cables (F5) to
sensor wires (B6). Connect the front
handlebars (F) to central support tube (B)
and twist the bars together. Secure them
with two bolts (B7) and one screw (F3)
Connect right side pedal tube joint covers
(H3 & H4) onto pedal joints and secure with
screws (J2). Repeat again on left side pedal
tube joint covers. Assemble the right pedal
(H6) with washers (J4), spring washers (J5)
and star knobs (J6). There are 3 positions
for moving track. Repeat again on left pedal

13
CE2.0 Crosstrainer
www.smoothfitness.co.uk
ASSEMBLY INSTRUCTIONS
The machine can be operated using the electricity adaptor.
The front stabilizer has built-in transport wheels. To move the machine, stand at the front and lift it up until the
weight of the machine is transferred to the transport wheels. You can now easily move the machine to a new
location.

14
CE2.0 Crosstrainer
www.smoothfitness.co.uk
COMPUTER INTSTURCTIONS
Functions:
TIME: Count up – No reset target, Time will count up from 00:00 to maximum 99:59 in one second
increments.
Count down – If training with preset time, Time will count down from preset to 00:00. Each preset
increment or decrement is 1 minute between 1:00 to 99:00.
SPEED: Display current training speed from 0.0 to maximum 99.9 km or ml.
RPM: Display current training rotation per minute.
DISTANCE: Count up- no preset target, Distance will count up from 0.00 to maximum 99.90 in 0.1 KM
increments.
Count down – if training with preset target, Distance will count down from preset to 0.00. Each preset
increment or decrement is 0.1 KM (or ML) between 0.00 to 99.90
CALORIES: Count up – No preset target, Calories will count up from 0 to maximum 990 in 1 calorie increments.
Count down – If training with preset target, Calories will count down from preset value to 0. Each
preset increment or decrement is 10 cal from 0 to 990.
PULSE: To display your current heart beat figures as soon as the pulse sensor has been touched. The
monitor will detect your heart beat best though handgrip sensors once you hold on with both hands.
RECOVERY: After exercising for a period of time, keep holding on handgrips and press “RECOVERY” button. All
functions display will stop except “TIME” starts counting down form 00:60 to 00:00. Screen will
display your heart rate recovery status with the F1, F2 ... to F6. F1 is the best, F6 the worst. User
may keep exercising to improve the heart rate recovery status. (Press the RECOVERY button again
to return to the main display).
TEMPERATURE: Screen will display room temperature in sleep mode.
CALENDER: Screen will display year/month/day in sleep mode.
CLOCK: Screen will display time in sleep mode.

15
CE2.0 Crosstrainer
www.smoothfitness.co.uk
BUTTON FUNCTIONS
1. Power on, LCD will display segment for 2 seconds with long beep sound. Use UP or DOWN buttons to
select U1 (user 1) to U9 (user 9) as the users identification, then input personal data: sex, age, height,
weight. You may use UP or DOWN to select and adjust the data, then press MODE/ENTER.
2. Pres ENTER UP DOWN buttons to set year / month / day / clock; screen will enter standby mode.
3. Manual is blinking in the sleep mode, you may turn UP and DOWN to select training mode MANUAL /
PROGRAM / USER PROGRAM / H.R.C / WATT and press ENTER / MODE for confirmation. The monitor
will enter MANUAL mode for training without selection.
Training in PROGRAM mode:
1. In the PROGRAM mode, you may turn UP/DOWN button to select program. P01, P02, P03... P12, the
selected program will be shown on the screen for 2 seconds then the program profile will appear
accordingly.
2. 2 LOAD 1 (preset value) is blinking after training program is selected, you may turn UP/DOWN button to
select level from 1 to 16 and ENTER/MODE button for confirmation. Load level can be adjusted during
training.

16
CE2.0 Crosstrainer
www.smoothfitness.co.uk

17
CE2.0 Crosstrainer
www.smoothfitness.co.uk
Training in MANUAL mode
1. In the MANUAL mode, you may turn UP/DOWN button to select load level from 1 to 16, the preset level is
1.
2. After load level is selected, you may preset functions values for TIME, DISTANCE, CALORIES and
PULSE by turning the UP/DOWN button and press ENTER to confirm.
3. Pressing the START starts the training program.
Training in USER PROGRAM
After USER Program selected, you may set preferred program profile by turning UP, DOWN and ENTER
button for each flashing column. There are 20 segments to set up. If you want to discontinue the setting
process, you may hold the ENTER button for 2 seconds. The previous setting profile will be saved for
unfinished segment.

18
CE2.0 Crosstrainer
www.smoothfitness.co.uk
Training in HRC mode:
Age 25 is flashing after HRC mode is entered, you may set your age by turning UP/DOWN/ENTER button.
The monitor will calculate preset heart rate value automatically according to your age setting. Screen will
show heart rate percentage 55%, 75%, 90% and TARGET. You may select heart rate percentage with
UP/DOWN/ENTER button for training.

19
CE2.0 Crosstrainer
www.smoothfitness.co.uk
Training in WATT mode:
The preset value 120 is flashing on screen in WATT setting mode, select UP/DOWN/ENTER to set target
value from 10 to 350. Pressing
Training in BODY FAT mode:
You may test and have the BODY FAT advice when the computer is in STOP mode. Please follow the
steps as below:
Step I – Make sure the personal data has been input properly
Step II – Press BODY FAT button and hold on handgrip to start body fat testing.
Step III – The symbol “-------“ will appear on the display during the testing period of 8 seconds. After 8
seconds you will see the BADY FAT advice in percentage (*1) and BMI (*2) and the fat advice in
a different symbol. It is possible that another indicator appears if the following situation occurs
a. “ E1” – When you see this indication, it means you did not put your thumb properly on the
sensor. Please try again.
b. “E2” – When you see this indication, it means the BADY FAT advice is exceeded the
available area which is fixed in the program.
After BODY FAT testing, press the BODY FAT button. The computer will continue from the previous data before
testing. The BODY FAT advice figure and BMI will disappear. The computer will allow other users to test BODY
FAT when in the STOP mode. The user can press RESET button for 4 seconds to select new user identification
and input new personal data. Then follow each step as above to do the new testing.

20
CE2.0 Crosstrainer
www.smoothfitness.co.uk
* 1 BODY FAT This is a figure that is calculated from all the personal data you input and the signal transferred
by putting your thumb on the sensor. The computer will use the signal and your personal data to
figure out the fat percentage of your body.
* 2 BMI Body Mass Index: This value is calculated from your weight and height and indicates if you are
overweight.
All the BMI & BODY FAT advice figures are supposed to be a basic guide to help you lead a healthy lifestyle, they
are not for intended for medical purposes.
Note
1. When the computer does not receive a signal for 4 minutes, the LCD display will shut off automatically
and all previous training data will be stored. You may press any button to restart the computer.
2. The monitor can store 4 user’s (U1-U4) preset function data. When the monitor is turned on it will show the
previous (before the power was turned off) user’s identification. If previous user is U1, U2, U3 or U4, the
previous settings for Time, Distance, Calories, Watt (if training in manual mode), or Pulse values, if
previous user is U5 to U9, the LCD will display user’s identification only.
3. The monitor will display the same information as mention prior in point 2 if you press and hold the RESET
button for 4 seconds.
4. If the LCD display is incorrect, please remove the batteries and reinstall.
5. The monitor can be turned on with AC adaptor input.
6. Body fat advice and symbol indication table
/