Xtant XTANT6.1 User manual
- Category
- Car audio amplifiers
- Type
- User manual

Xtant3.1/Xtant6.1
Amplifier
Owner’s Manual

xtant.com
Xtant3.1/Xtant6.1 Amplifier Owner’s Manual
WELCOME TO XTANT
Congratulations on your Xtant amplifier purchase. The concept is simple—a more carefully engi-
neered amplifier to produce superior sound. That is our passion—to exceed your expectation of
the automotive listening experience. We are driven by it. To accomplish this lofty goal, it takes
the finest engineering talent in the business, combined with a dedication to superior materials.
We add in a multitude of features, unique cosmetics, and creative system integration.
Xtant products are only available through the finest, most highly-specialized mobile audio retailers.
Your authorized Xtant retailer was chosen because of their passion for excellence and their commit-
ment to expanding their expertise. Please remember, exceptional audio requires professional
installation. Your Xtant retailer will optimize your system to meet your personal tastes.
With your purchase of Xtant mobile audio, you publicly confirm your status as a connoisseur of
fine music. We salute you and welcome you to our family.
Welcome to Xtant!
INSTALLING YOUR XTANT AMPLIFIER
All Xtant amplifiers and accessories are intended to be installed by an Xtant-certified professional
mobile audio installation specialist. It is the recommendation of Xtant Technologies that your
new Xtant product(s) and all of your mobile audio products be installed by your Authorized
Xtant retailer.
In the event you decide to install your new Xtant product(s), please take the time to read this
Owner’s Manual in its entirety. Installation and/or use of your amplifier in applications or methods
other than those specified in your Xtant amplifier owner’s manual may result in a reduction of the
overall performance capability of the amplifier. Any such installation or usage renders the prod-
uct warranty void. The following guidelines are designed to assure a safe and properly installed
Xtant Mobile Audio System.
We strongly recommend that you acquaint yourself with your Xtant amplifier’s available features
and spend some time designing a system most suitable for you. Consider the components you
have now, those you have and plan to upgrade, and those you plan to add in the future.
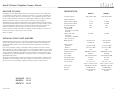
SPECIFICATIONS
XTANT3.1 XTANT6.1
Frequency Response: 20 Hz-120 Hz ±1dB 20 Hz-120 Hz ±1dB
Number of Channels: 1 1
Watts per Channel @ 4Ω: 1 x 150
1 x 300
Watts per Channel @ 2Ω: 1 x 300
1 x 600
Recommended Load: ≥2Ω≥2Ω
Distortion (THD): ≤2% ≤2%
20 Hz-120 Hz
at rated power, all channels
driven 4Ω
Signal to Noise Ratio: ≥ 100dB ≥ 100dB
A-weighted
in 20 kHz noise bandwidth
@ 1 volt sensitivity
Damping Factor: ≥ 100 @ 100 Hz ≥ 100 @ 100 Hz
with 4Ω load with 4Ω load
Input Sensitivity:
Unbalanced 100 mV-8.5 V RMS 100 mV-8.5 V RMS
Balanced 200 mV-17 V RMS 200 mV-17 V RMS
Input to Line Output Gain: 0dB 0dB
On-Board Crossover: 24dB/Octave Low Pass 24dB/Octave Low Pass
Balanced Line: On Board On Board
Power Supply: Fully Regulated, PWM Fully Regulated, PWM
Operational Voltage: 10-16 Volts 10-16 Volts
Fusing Requirement: 40 Amp 80 Amp
Size (L x W x H): 11
11
⁄16" x 9
1
⁄16" x 2" 15
9
⁄16" x 9
1
⁄16" x 2"
297mm x 230mm x 51mm 395mm x 230mm x 51mm
Subsonic Filter: 24dB/Octave 20-80 Hz 24dB/Octave 20-80 Hz
Bass Boost: 0-12dB @ 45 Hz 0-12dB @ 45 Hz
Warranty: Limited 4 Year Parts Limited 4 Year Parts
and Labor and Labor
3
FRANÇAIS PG 11
ESPAÑOL PG 19
DEUTSCH PG 27

xtant.com
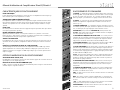
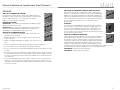
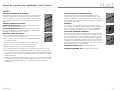
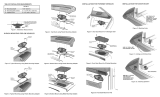
CONNECTIONS & CONTROLS
1. INPUT – Xtant3.1 and Xtant6.1 amplifiers feature RCA type input connec-
tions. Source units with an output signal level of 100mV–17V may be used.
See "Balanced Input" for proper voltage level setting.
2. OUTPUT – These RCA type output connections send full range signals to
additional amplifiers eliminating the need for "Y" connectors.
3. BALANCED INPUT – The balanced input switch serves two purposes. First,
it helps eliminate noises being induced into the signal path by isolating the sig-
nal ground. Second, it is used to set the proper input voltage range:
OFF POSITION: 100mV – 8V ON POSITION: 200mV – 17V
4. GAIN – This feature is used to fine-tune the input sensitivity of the
amplifier to the source unit’s output level.
5. XOVER FREQUENCY CONTROL – This control allows the user to choose
the exact low-pass frequency range the amplifier will play for the best possible
performance. The upper end of the crossover frequencies can be selected from
40Hz–120Hz at 24dB per octave.
6. BASS BOOST – This feature will add up to 12dB of low frequency impact
to the audio system. The Bass Boost is centered at 45Hz.
7. SUBSONIC – This feature limits the lower end of the low-pass frequencies
sent to the subwoofers. The subsonic feature includes a selectable on/off
switch, and a control knob used to adjust the lower end of the low-pass range.
The subsonic setting can be selected from 20Hz-80Hz at 24dB per octave.
8. RLC – This port allows the use of the optional Xtant “remote level control”
(RLC). The RLC is a bass control module that can be installed in any location
within the vehicle for remote adjustments.
9. SPEAKER CONNECTION – Two sets of speaker terminals are provided for
dual woofer applications. When connecting a single woofer, use only one set of
speaker terminals.
WARNING: Xtant3.1 and Xtant6.1 amplifiers are not bridgeable.
10. POWER TERMINALS – This is the main power connection for the ampli-
fier. The power and ground wire size should be the same gauge.
GND – The ground wire from this connection must be attached
to bare metal on the vehicle.
REM – To turn the amplifier on/off, this terminal must be connected
to the source unit’s "remote or electric antenna" wire.
+12V – The power wire from this connection must be attached
to an inline fuse, then to the positive side of the vehicle battery.
WARNING: An outboard fuse must be installed in-line with the power wire within
18 inches of the battery.
5
Xtant3.1/Xtant6.1 Amplifier Owner’s Manual
PERFORMANCE FEATURES
SUBSONIC FILTER
The subsonic filter maximizes your Xtant amplifier’s output when a specifically tuned subwoofer
system is used.
FULLY REGULATED PWM POWER SUPPLY
Xtant amplifiers feature a Fully Regulated, Pulse Width Modulated power supply. This power
supply technology provides high efficiency and consistent output performance even when
battery voltage is less than optimum.
CROSSOVER
This control allows the user to choose the exact low-pass frequency range the amplifier will play
for the best possible performance.
BALANCED/FLOATING INPUT
When enabled, this circuitry helps to eliminate “system noise” associated with ground loops.
When combined with the input sensitivity adjustment, it allows the amplifier to accept up to 17V
of input signal.
PROTECTION CIRCUITRY
Both Thermal and Overcurrent protection are incorporated into Xtant amplifiers. In the event of
a problem, the amplifier will reduce its power to maintain operation.
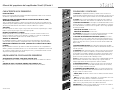
STATUS LEDS (LOCATED ON THE TOP OF THE AMPLIFIER)
Three LEDs indicate operational status of Xtant amplifiers. The red LED illuminates when the
amplifier is “ON”, the yellow LED indicates that overcurrent protection is engaged, the orange
LED indicates that the thermal protection circuit is engaged.
OPTIONAL PERFORMANCE ENHANCEMENTS
HIGH LEVEL ADAPTER (HLA)
High Level Adapters allow you to connect a source unit with speaker level outputs to your Xtant
amplifier.
REMOTE LEVEL CONTROL (RLC)
The RLC or Remote Level Control allows a bass control to be adjusted remotely from the driver’s
seat.
10
9
8
7
6
5
4
3
1
2

xtant.com
Xtant3.1/Xtant6.1 Amplifier Owner’s Manual
SAFEGUARDS
All Xtant amplifiers and accessories are intended to be installed by an Xtant-certified professional
mobile audio installation specialist. It is the recommendation of Xtant Technologies that your
new Xtant product(s) and all of your mobile audio products be installed by your Authorized
Xtant retailer.
In the event you decide to install your new Xtant product(s), please take the time to read this
Owner’s Manual in its entirety. Installation and/or use of your amplifier in applications or methods
other than those specified in your Xtant amplifier owner’s manual may result in a reduction of the
overall performance capability of the amplifier. Any such installation or usage renders the prod-
uct warranty void. The following guidelines are designed to assure a safe and properly installed
Xtant Mobile Audio System.
WIRING REQUIREMENTS
Your Xtant power amplifier is designed for use with a 12 Volt, negative ground system. Installation
of your Xtant amplifier in a vehicle with a POSITIVE ground system will result in severe damage to
the amplifier, other audio components and/or the vehicle’s electrical components. If your vehicle
uses a positive ground system, please consult your authorized Xtant retailer or specialty install shop.
Xtant3.1 and Xtant6.1 amplifiers have minimum wire gauge requirements for:
Power - 4 gauge Ground - 4 gauge Speaker cables - 12 gauge
FUSING REQUIREMENTS
Xtant3.1 and Xtant6.1 amplifiers are not fuse protected! A fuse must be installed in-line with
the power wire at the battery, no further than 18" from battery. For safety, an outboard fuse
should be added close to the amplifier. For fuse requirements for a single amplifier, refer to page
3 of this manual. In the case of a multi-amp system, use a fuse value equal to the combined
value of all system amplifier’s power fuses.
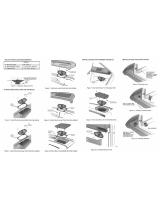
LOCATION
A firm, flat surface with minimum vibration is ideal. Your Xtant amplifier may be mounted
horizontally or vertically on a flat surface. The amplifier should NEVER be mounted upside
down. This ill-advised configuration can increase internal operating temperatures, decrease the
amplifier’s ability to dissipate heat and speed up the amplifier’s automatic thermal shut down
mechanism.
Under no circumstances should your amplifier be exposed to moisture and water.
To ensure adequate ventilation, the ideal location for your Xtant amplifier is an area away from
any heat source, with at least 2 inches of clearance above and around the amplifier.
COMMON OVERSIGHTS
• The battery ground should remain DISCONNECTED at all stages of installation.
• Do not begin drilling until you have put your Xtant amplifier aside. Using the amplifier as a drilling
guide may cause irreparable damage to the amplifier and void your warranty.
• Do not route any wires underneath or outside the vehicle body.
• Route signal wires (RCAs from source unit, speaker wires, etc.) away from power wires (power,
ground, etc.) to avoid ground loops and other sources of noise.
INSTALLATION
Any deviation from the connection specifications recommended may cause serious damage to
the amplifier, speakers and/or vehicle electrical system. Please double-check the connections
before turning the system on.
PROCEDURE
1. Disconnect the vehicle’s negative battery connection.
2. Using the supplied allen wrenches, remove the four (4) screws from the annealed stainless steel
amplifier cover. Put this aside until your installation is complete to prevent damage to the cover.
3. Place your Xtant amplifier at the predetermined mounting location. Using a felt pen, mark
the exact position of the mounting holes on the mounting surface. Set your Xtant amplifier
aside. Use a sharp, precise blade to cut small circles in the carpet and padding around the
four marks denoting your mounting holes to expose the metal underneath. Use a center
punch to make an indentation in the metal to ensure that you drill the exact position for the
screws. Drill the four holes as marked.
4. Temporarily mount your Xtant amplifier using the four (4) long screws provided.
5. Run a power cable from the vehicle’s battery through the firewall and through the interior of
the vehicle connecting one end to your Xtant amplifier’s B+ terminal and connecting the
other end to the positive post on the battery.
NOTE: Install a circuit breaker/fuse within 18" of the battery. This effectively lowers the risk of
severe damage to your vehicle should a short circuit ever occur in the audio system. Do not install
the fuse in the fuse holder until all installation steps have been completed.
6. Find a good ground spot on the vehicle’s chassis and remove the paint to reveal bare metal at
the contact point. Attach the ground wire to that contact point and connect the other end of
the ground wire to the GND terminal of your Xtant amplifier.
7. Connect a Remote Turn-on wire from your source unit to your Xtant amplifier’s REM terminal
(14 or 16 gauge wire). If your source unit does not have a dedicated Remote Turn-on lead,
you may connect to the source unit’s Power Antenna lead.
8. Connect RCA cables from your source unit to your Xtant amplifier’s RCA input jacks. If RCA
(low) level output is not available, use Xtant’s High Level Adapters (HLA—not included) to
connect the speaker level (high level) wires to a set of RCA cables.
9. Connect your speakers to your Xtant amplifier’s speaker terminals using 12 gauge minimum
speaker cable.
10. If you are using the RLC remote level control, mount the control in a convenient location in the
driver’s area and route the wire and connect to your Xtant amplifier’s RLC port.
11. Double-check all the previous installation steps, in particular, the wiring and component con-
nections. Securely mount the amplifier. Remove the protective film and screw the annealed
stainless steel cover back onto the amplifier.
12. If everything is in order, reconnect the vehicle’s negative battery connection and begin
adjusting your amplifier.
NOTE: Be sure that the Gain Level on the amplifier is turned all the
way down (counter clockwise) before proceeding with adjustments.
7

xtant.com
Xtant3.1/Xtant6.1 Amplifier Owner’s Manual
ADJUSTMENTS
CROSSOVER FREQUENCY SELECTION
Your Xtant amplifier has a built-in low-pass filter offering continuously
adjustable crossover frequencies between 40-120Hz Hz. Adjust the setting
according to your speaker component specification or to your particular
preference—counter-clockwise for a lower frequency, clockwise for a higher
frequency.
BALANCED INPUT ADJUSTMENT
OFF POSITION: when using Low Level (RCAs) without a Line Driver
(100mV-7.5V)
ON POSITION: when using High Level (speaker) inputs with Xtant High
Level Adapters (HLA) or Low Level (RCAs) with a Line Driver (7.5V-17V)
GAIN CONTROL ADJUSTMENT
1. Turn the Gain control all the way down (counter-clockwise)
2. Set the volume control of the source unit to approximately
2
⁄3
of its maximum output
3. Turn the balance control of the source unit to its center position
4. Leave the tone (bass/treble) controls at their usual position
5. Play a CD track with wide dynamic range
6. Use the Bass Boost Control to enhance the bass performance (if desired)
7. To locate the optimum input sensitivity setting, turn the Gain control clockwise until audible
distortion starts to develop. Turn the sensitivity control counter-clockwise slightly to minimize the
distortion.
8. If you often switch between sources (CD, tape, radio, etc.) you will need further adjustment
since radio output level differs from that of CD or tape. In this case, you need to locate a balanced
sensitivity setting which is best for the output level of your sources.
BASS BOOST CONTROL ADJUSTMENT
Select a boost level between 0dB and +12dB to enhance the bass perform-
ance for your sound system. Remember that every 3dB of boost costs you
twice as much in power. Make sure to set the final gains after setting the
Bass Boost to work best with your subwoofer/enclosure combination.
RLC PORT
If you are using the RLC control, make sure to take this into account during
set-up procedures. Set-up the system with the RLC plugged in and with the
level knob turned all the way up (clockwise). Adjust according to taste and to
work best with your subwoofer system.
SUBSONIC FREQUENCY SELECTION
The subsonic filter maximizes your Xtant amplifier’s output when a specifi-
cally tuned subwoofer system is used. For example, if your subwoofer sys-
tem is designed to play 40Hz-80Hz only, setting the Subsonic Filter to 40Hz
will prevent the amplifier from wasting power trying to reproduce signals
below 40Hz. The subsonic frequency settings are continuously adjustable
from 20Hz-80Hz. Select the setting according to your preferred subwoofer
system specification or to your particular preference.
OFF POSITION: defeats Subsonic Filter
ON POSITION: engages Subsonic Filter
9

BIENVENUE CHEZ XTANT
Merci d’avoir acheté un amplificateur Xtant. Le concept est simple – un amplificateur bien conçu
produira un son de meilleure qualité. C’est notre passion – Dépasser vos attentes et vous donner
une expérience musicale sans pareil en automobile. C’est notre but. Pour l’atteindre, nous met-
tons à votre disposition la meilleure ingénierie et les meilleurs matériaux disponibles. Nous avons
ainsi créé un système intégré disposant de nombreuses fonctions et d’une esthétique unique.
Les produits Xtant sont uniquement disponibles auprès des meilleurs détaillants spécialisés en hifi
audio mobile. Les distributeurs Xtant ont été choisis pour leur amour du matériel de qualité et
pour leur désir d’améliorer leur savoir faire. N’oubliez pas que l’installation d’un matériel audio
d’une telle qualité doit être réalisée par des professionnels. Votre distributeur Xtant optimisera
votre système et votre niveau de satisfaction.
Que vous fassiez des compétitions de son automobile ou que vous soyez un passionné de
musique, nous vous remercions et nous apprécions l’investissement que vous venez de réaliser
dans un système audio mobile de qualité.
Bienvenue chez Xtant !
INSTALLATION DE L’AMPLIFICATEUR XTANT
Tous les amplificateurs et accessoires Xtant doivent être installés par un spécialiste professionnel
agréé par Xtant pour l’installation du matériel audio mobile. Xtant Technologies vous conseille
de faire installer les produits Xtant ainsi que tout autre matériel audio mobile par un revendeur
agréé par Xtant.
Si vous décidez d’installer vous-même vos nouveaux produits Xtant, veuillez prendre le temps de
lire intégralement le présent manuel d’utilisation. L’installation ou l’utilisation de l’amplificateur
dans des applications ou méthodes autres que celles spécifiées dans le manuel d’utilisation de
l’amplificateur Xtant risque de se traduire par une dégradation de l’ensemble des possibilités de
l’amplificateur. Une telle installation ou utilisation rendra caduque la garantie du produit. Les
directives ci-dessous ont été conçues pour assurer une installation sûre et correcte du système
audio mobile Xtant.
Nous vous conseillons vivement de vous familiariser avec les fonctions offertes par l’amplificateur
Xtant et de consacrer le temps nécessaire à la conception du système qui vous convient le
mieux. Prenez en compte les composants que vous possédez déjà, ceux que vous possédez et
envisagez de moderniser, et ceux que vous pensez ajouter à l’avenir.
REMARQUE : LES CARACTÉRISTIQUES TECHNIQUES SE TROUVENT À LA PAGE 3 DU
PRÉSENT MANUEL
11xtant.com
Xtant3.1/Xtant6.1 Amplifier Owner’s Manual
TROUBLESHOOTING
SYMPTOM: No power
SOLUTION: Check connections to the amplifier’s Ground, B+ & Remote terminals. Check con-
nection at “+” terminal of the battery. Check the remote turn-on terminal. Ensure it receives
power when the source is turned on (or when the switch is turned on). Refer to the Installation
Section. Check the power line fuse: if fuse is blown, replace it; if fuse continues to blow, check
the power wire and also the amplifier for a short. If the short is in the power wire, fix it; if the
short is in the amplifier itself, see your Xtant dealer.
Check the voltage at the amplifier, and the remote ON/OFF lead. The voltage should measure
between 11 V - 15 V. If the measurement is beyond this range, have the source unit checked out
by an authorized dealer.
SYMPTOM: Power without sound with red power indicator on
SOLUTION: Turn the amplifier off, and Check all input & output signal cables and connections.
Check the speakers for short with a VOM (volt meter) or by connecting them to another audio
system. After making sure everything is normal, turn the amplifier on again.
SYMPTOM: Power without sound with orange protection indicator on
SOLUTION: The continuous orange light of the protection indicator signals a high internal oper-
ating temperature, which results in the amplifier switching off temporarily; when the amplifier
cools down to a safe level, the amp will automatically restart.
SYMPTOM: Very low sound from both radio & other source
SOLUTION: Check your radio’s fader control. Check the amplifier’s Input Sensitivity Level.
SYMPTOM: Frequent automatic amplifier shut down
SOLUTION: This indicates that the amplifier is operating continually at an exceedingly high
internal temperature. High operating temperature caused by inadequate ventilation: Refer to the
sub-section titled LOCATION for better amplifier location.
High operating temperature caused by an excessively low impedance load, say below 2 ohms
stereo or 4 ohms bridged: Check for bad speakers and/or electronic crossover, proper passive
crossover components; if difficulty persists, please consult your local authorized Xtant retailer.
High operating temperature can be caused by an incorrect input sensitivity level: refer to sub-
section titled GAIN CONTROL ADJUSTMENTS for correct setting.
SYMPTOM: “Motorboating”: The amplifier power indicator going off repeatedly when the
audio system is on
SOLUTION: Check the amplifier’s connection to the battery.
Check battery voltage. If low, recharge or replace battery. Check all ground connections.
Page is loading ...
Page is loading ...
Page is loading ...
Page is loading ...
Page is loading ...
Page is loading ...
Page is loading ...
Page is loading ...
Page is loading ...
Page is loading ...
Page is loading ...

XTANT FOUR YEAR LIMITED WARRANTY
Xtant Amplifiers purchased in the United States from an authorized Xtant dealer are
guaranteed against defects material and workmanship for a period of FOUR YEARS
from the date purchased by the end user if the product is installed by an authorized
Xtant dealer, and ONE YEAR if installed by the consumer. This warranty limited to the
original retail purchaser of the product.
Product found to be defective during that period will be repaired or replaced by Xtant
at no charge. This warranty is void if it is determined that unauthorized parties have
attempted repairs or alterations of any nature. Warranty does not extend to cosmetics
or finish. Before presuming a defect is present in the product, be certain that all related
equipment and wiring is functioning properly. Xtant disclaims any liability for other
incurred damages resulting from product defects. Any expenses incurred in the removal
and reinstallation of products are not covered by this warranty. Xtant's total liability will
not exceed the purchase price of the product. If a defect is present, your authorized
Xtant dealer may be able to effect repairs.
Proof of purchase is required when requesting service, so please retain your sales
receipt and take a moment to register your warranty on line @ xtant.com.
35xtant.com
Betriebsanleitung für Verstärker Xtant3.1/Xtant6.1
FEHLERSUCHE
SYMPTOM: Kein Strom
LÖSUNG: Überprüfen Sie die Anschlüsse an den Verstärkerklemmen Ground (Masse), B+ und
Remote (Fernbedienung). Überprüfen Sie die Verbindung am Pluspol der Batterie. Überprüfen Sie
die entfernte Einschaltklemme. Diese muss Strom erhalten, wenn die Quelle eingeschaltet ist
(oder wenn der Schalter betätigt wird). Siehe den Abschnitt Installation. Überprüfen Sie die
Sicherung der Stromleitung: Wenn die Sicherung durchgebrannt ist, muss sie ausgewechselt wer-
den. Wenn sie wieder durchbrennt, müssen Stromkabel und Verstärker auf einen Kurzschluss
überprüft werden. Beheben Sie den Kurzschluss, wenn sich dieser im Stromkabel befindet; wenn
er im Verstärker liegt, wenden Sie sich an Ihren Xtant-Händler.
Überprüfen Sie die Spannung am Verstärker und am entfernten EIN/AUS-Leiter. Die gemessene
Spannung sollte zwischen 11 V und 15 V betragen. Wenn sie außerhalb dieses Bereichs liegt,
sollte die Quelle von einem autorisierten Händler geprüft werden.
SYMPTOM: Strom, jedoch kein Ton; rote Strom leuchtet
LÖSUNG: Schalten Sie den Verstärker aus und überprüfen Sie alle Eingangs- und
Ausgangssignalkabel und Anschlüsse. Überprüfen Sie die Lautsprecher auf Kurzschlüsse; verwen-
den Sie hierzu einen Spannungsmesser, oder schließen Sie die Lautsprecher an ein anderes
Audio-System an. Schalten Sie den Verstärker anschließend wieder ein.
SYMPTOM: Strom, jedoch kein Ton; orange Schutzanzeige leuchtet
LÖSUNG: Wenn die Schutzanzeige stetig orange leuchtet, bedeutet dies, dass die interne
Betriebstemperatur des Verstärkers sehr hoch ist; dies führt zu einem vorübergehenden
Abschalten des Verstärkers. Er wird automatisch wieder eingeschaltet, wenn er auf einen sicheren
Temperaturwert abgekühlt ist.
SYMPTOM: Der Ton des Radios und Kassettenspielers ist kaum hörbar
LÖSUNG: Prüfen Sie den Überblendregler des Radiogeräts. Prüfen Sie den
Eingangsempfindlichkeitspegel des Verstärkers.
SYMPTOM: Häufiges automatisches Abschalten des Verstärkers
LÖSUNG: Dies weist darauf hin, dass die Betriebstemperatur im Verstärker andauernd über-
mäßig hoch ist. Durch unzureichende Belüftung verursachte hohe Betriebstemperatur: Die opti-
male Positionierung des Verstärkers wird im Unterabschnitt PLATZIERUNG beschrieben.
Durch extrem niedrige Impedanzlast (z. B. unter 2 Ohm) verursachte hohe
Betriebstemperaturen: Prüfen Sie, ob an den Lautsprechern und/oder im elektronischen
Crossover sowie in den entsprechenden passiven Crossover-Komponenten eine Störung vorliegt.
Wenn die Störung nicht behoben werden kann, wenden Sie sich an Ihren autorisierten Xtant-
Einzelhändler.
Eine hohe Betriebstemperatur kann ferner von einem falsch eingestellten
Eingangsempfindlichkeitspegel verursacht werden: Hinweise zur korrekten Einstellung sind im
Unterabschnitt EINSTELLUNG DER VERSTÄRKUNGSREGELUNG enthalten.
SYMPTOM: „Blubbern": Die Verstärkerleistungsanzeige erlischt wiederholt, wenn das Audio-
System eingeschaltet ist.
LÖSUNG: Prüfen Sie den Anschluss des Verstärkers an der Batterie.
Überprüfen Sie die Batteriespannung. Wenn diese niedrig ist, muss die Batterie geladen oder aus-
gewechselt werden. Überprüfen Sie alle Masseanschlüsse.

7676 South 46th Street • Phoenix, AZ 85042
602.431.8686 • fax 602.431.8600 • xtant.com
XT001292 RevA 7/02 NDM198
© 2002 Xtant Technologies. All rights reserved. Xtant is a registered trademark of Mitek Corporation.
Due to continual product development, all specifications are subject to change without notice.
-
 1
1
-
 2
2
-
 3
3
-
 4
4
-
 5
5
-
 6
6
-
 7
7
-
 8
8
-
 9
9
-
 10
10
-
 11
11
-
 12
12
-
 13
13
-
 14
14
-
 15
15
-
 16
16
-
 17
17
-
 18
18
-
 19
19


Xtant XTANT6.1 User manual
- Category
- Car audio amplifiers
- Type
- User manual
Ask a question and I''ll find the answer in the document
Finding information in a document is now easier with AI
in other languages
- français: Xtant XTANT6.1 Manuel utilisateur
- español: Xtant XTANT6.1 Manual de usuario
- Deutsch: Xtant XTANT6.1 Benutzerhandbuch
Related papers


Other documents
-
Sony MONAURAL Owner's manual
-
Sony XM-DS1600P5 User manual
-
Sony XM-1S Operating instructions
-
Sony XM-D9001GTR User manual
-
 Coustic HP46.4 User manual
-
 Coustic HP46.4 User manual
-
Vox AV30/AV60 Auto Power Off Owner's manual
-
 Coustic 320QE User manual
-
 Coustic AMP-401DB User manual
-
DLS Reference series Owner's manual


