Culligan HE Softener-Cleer Home Water Conditioner Owner's manual
- Type
- Owner's manual

Culligan®
High
Efficiency
Softener-
Cleer
and
Softener-
Cleer Plus
Water
Conditioner
Owners
Guide
01026018_RevG
DCO 230094 07/23 ©2023 Culligan International Company

2
Attention
Culligan
Customer
The installation, service and maintenance of this equipment should be rendered by a qualified and
trained service technician. Your local independently operated Culligan dealer employs trained service
and maintenance personnel who are experienced in the installation, function and repair of Culligan
equipment. This publication is written specifically for these individuals and is intended for their use.
We encourage Culligan users to learn about Culligan products, but we believe that product knowledge is
best obtained by consulting with your Culligan dealer. Untrained individuals who use this manual assume
the risk of any resulting property damage or personal injury.
WARNING! Electrical shock hazard! Prior to servicing equipment,
disconnect power supply to prevent electrical shock.
NOTE: This system is not intended for use where water
is microbiologically unsafe or with water of unknown quality.
WARNING! If incorrectly installed, operated or maintained, this product can cause
severe injury. Those who install, operate, or maintain this product should be
trained in its proper use, warned of its dangers, and should read the entire
manual before attempting to install, operate, or maintain this product.
WARNING! This device complies with part 15 of the FCC rules subject to the
two following conditions: 1) This device may not cause harmful
interference, and 2) This device must accept all interference received
including interference that may cause undesired operation.
This equipment complies with Part 15 of the FCC rules. Any changes or modifications not expressly
approved by the manufacturer could void the user’s authority to operate the equipment. Changes or
modifications not expressly approved by the party responsible for compliance could void the user’s
authority to operate the equipment.
CAUTION! To reduce the risk of fire, use only No. 26 AWG or larger
telecommunications line cord.
CAUTION! This product is not to be used by children or persons with reduced
physical, sensory or mental capabilities, or lack of experience or
knowledge, unless they have been given supervision or instruction.
CAUTION! Children should be instructed not to play with this appliance.
CAUTION! If the power cord from the transformer to the unit looks or becomes
damaged, the cord and transformer should be replaced by a Culligan
Service Agent or similarly qualified person in order to avoid a hazard.
Products manufactured and marketed by Culligan International Company (Culligan) and its affiliates are
protected by patents issued or pending in the United States and other countries. Culligan reserves the
right to change the specifications referred to in this literature at any time, without prior notice. Culligan,
AquaSensor, Tripl-Hull, and SoftMinder are trademarks of Culligan International Company or its affiliates.
Culligan International Company
9399 West Higgins Road, Suite 1100
Rosemont, Illinois 60018
1-847-430-2800
www.culligan.com
01026018 G 07/23

3
Contents
01026018 G 07/23
About this Manual ........................................................................................................................................4
Thank You....................................................................................................................................................5
Specications ..............................................................................................................................................6
Introduction ..................................................................................................................................................8
Application ...................................................................................................................................................9
The Culligan Process ................................................................................................................................10
Modes of Operation ...................................................................................................................................12
Salt Supply, Usage and Service ...............................................................................................................13
Care and Cleaning of Your Water Conditioner ..........................................................................................14
Cleaning Out the Salt Storage Tank ..........................................................................................................15
First Time Setup ........................................................................................................................................16
Set Date and Time .....................................................................................................................................19
Information.................................................................................................................................................21
Regeneration .............................................................................................................................................23
Error Codes ...............................................................................................................................................25
Sanitizing Procedure .................................................................................................................................27
When and How to Bypass Your Water Conditioner ...................................................................................28
Things to Check Before You Call for Service.............................................................................................29
Navigating the Menus and Keypad............................................................................................................30
Performance Data Sheet ...........................................................................................................................32
Culligan HE 9” Softener-Cleer Water Conditioner .....................................................................................32
Culligan HE 10” Softener-Cleer Water Conditioner ..................................................................................33
Culligan HE 12” Softener-Cleer Water Conditioner ...................................................................................34
Culligan HE 14” Softener-Cleer Water Conditioner ...................................................................................35
Culligan HE 9” Softener-Cleer Plus Water Conditioner .............................................................................36
Culligan HE 10” Softener-Cleer Plus Water Conditioner ...........................................................................37
Culligan HE 12” Softener-Cleer Plus Water Conditioner ...........................................................................38
Culligan HE 14” Softener-Cleer Plus Water Conditioner ...........................................................................39
Culligan Limited Warranty .........................................................................................................................40

401026018 G 07/23
This manual:
• familiarizes the operator with the equipment
• explains installation and setup procedures
• provides basic programming information
• explains the various modes of operation
• gives specifications and troubleshooting information
Read this Manual First
Before you operate the Culligan High Efficiency Softener-Cleer or Softener-Cleer Plus Water
Conditioner, read this manual to become familiar with the device and its capabilities.
Installation or maintenance done on this system by an untrained service person can cause major
damage to equipment or property damage. Not adhering to the recommended service/maintenance
can cause damage to equipment or property damage.
Safe Practices
Throughout this manual there are paragraphs set off by special headings.
Notice (or Note) is used to emphasize installation, operation or maintenance information which is
important, but does not present any hazard. For example,
NOTICE The nipple must extend no more than 1 inch above the cover plate.
Caution is used when failure to follow directions could result in damage to equipment or property.
CAUTION! Disassembly while under water pressure can result in flooding.
Warning is used to indicate a hazard which could cause injury or death if ignored.
WARNING! Electrical shock hazard!
Unplug the unit before removing the timer mechanism or cover plates!
The CAUTION and WARNING paragraphs are not meant to cover all possible conditions and
situations that may occur. Understand that common sense, caution, and careful attention are
conditions which cannot be built into the equipment. These MUST be supplied by the personnel
installing, operating, or maintaining the system.
Be sure to check and follow the applicable plumbing codes and ordinances when installing this
equipment. Local codes may prohibit the discharge of sanitizing or descaling solutions to drain.
Use protective clothing and proper face or eye protection equipment when handling chemicals or tools.
NOTE: The Culligan High Efficiency Softener-Cleer and Softener-Cleer Plus Water
Conditioners are not intended for use with water that is microbiologically unsafe or
of unknown quality without adequate disinfection either before or after the system.
NOTE: Check with your public works department for applicable local plumbing
and sanitation codes. Follow local codes if they differ from the standards
used in this manual. To ensure proper and efficient operation of the High
Efficiency Softener-Cleer and Softener-Cleer Plus Water Conditioners to
your full satisfaction, carefully follow the instructions in this manual.
About this
Manual

5
01026018 G 07/23
Thank You
Welcome To Your New World of Better Living with Culligan Water.
The High Efficiency Softener-Cleer and Softener-Cleer Plus Softeners
are tested and certified by WQA against CSA B483.1, NSF/ANSI/CAN
Standard 61, NSF/ANSI Standard 372, NSF/ANSI Standard 44 for the
effective reduction of hardness (calcium and magnesium), and NSF/
ANSI 42 for the effective Iron Reduction up to 10ppm, as verified and
substantiated by test data.
If this is your first experience having soft, conditioned water in your home, you’ll be amazed at the marvelous
difference it makes. We promise that you’ll never want to be without it again.
Congratulations, too, on selecting one of the “first family” of water conditioners in the prestigious Culligan
High Efficiency Water Conditioners. With Culligan’s many years of knowledge and experience in water
treatment, you can be confident that the model you selected has been designed and engineered to
provide years of service with a minimum of care and attention.
Some localities have corrosive water. A water softener cannot correct this problem and so its written
warranty disclaims liability for corrosion of plumbing lines, fixtures or appliances. If you suspect corrosion,
your Culligan Dealer has equipment to control the problem.
NOTICE Sodium Information: Water softeners using sodium chloride for regeneration add
sodium to the water. Persons who are on sodium restricted diets should consider
the added sodium as part of their overall sodium intake.
Serial Numbers
The control valve serial number is located on the back of the electrical enclosure.
The media tank serial number is located on the top surface of the tank.
NOTE: DO NOT remove or destroy the serial number.
It must be referenced on request for warranty repair or replacement.

601026018 G 07/23
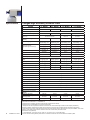
Culligan High Efficiency Softener-Cleer
Model 9" Model 10" Model 12" Model 14" Model
Control Valve 1” Reinforced Thermoplastic w/ HE Circuit Board
Overall Softener Ht 56 in 62 in 60 in 73 in
Media Tank Design Quadra-Hull™
Media Tank Dimensions (Dia x Ht) 9 x 48 in 10 x 54 in 12 x 52 in 14 x 65 in
Salt Storage Tank Dimensions
(Dia x Ht) 16 x 43 in or 18 x 43 in 18 x 43 in 24 x 42 in
Exchange Media, Type and
Quantity Cullex® Media,1.0 ft3Cullex Media, 1.5 ft3Cullex Media, 2.0 ft3Cullex Media, 3.0 ft3
Underbedding, Type and Quantity Cullsan®
Underbedding, 12 lb
Cullsan
Underbedding, 15 lb
Cullsan
Underbedding, 20 lb
Cullsan
Underbedding, 25 lb
Exchange Capacity
@ Salt Dosage Per Recharge
17,854 gr @ 4.0 lb 26,781 gr @ 6.0 lb 31,352 gr @ 7.0 lb 42,548 gr @ 10.5 lb
27,108 gr @ 8.0 lb 40,662 gr @ 12.0 lb 48,458 gr @ 16.0 lb 67,146 gr @ 24 lb
31,736 gr @ 12.0 lb 47,604 gr @ 18.0 lb 59,267 gr @ 24.0 lb 87,987 gr @ 36 lb
Efficiency rated dosage1 4,463 gr/lb @ 4 lb
salt dosage
4,463 gr/lb @ 6 lb
salt dosage
4,479 gr/lb @ 7 lb salt
dosage
4,052 gr/lb @ 10.5 lb salt
dosage
Freeboard to Media214.5 in 14.5 in 16 in 25 in
Freeboard to Underbedding344.5 in 47.5 in 46 in 59 in
Salt Storage Capacity 375 lb 600 lb
Rated Service Flow @ Pressure
Drop 9.0 gpm @ 12 psi 9.4 gpm @ 13 psi 10.0 gpm @ 11 psi 10.6 gpm @ 11 psi
Auxiliary Flow Rate410.8 gpm @ 15 psi 11.0 gpm @ 15 psi 12.6 gpm @ 15 psi 12.8 gpm @ 15 psi
Total Hardness, Max. 50 gpg 75 gpg
Total Dissolved Iron,Max 10 ppm5 2000 gal 3000 gal 4000 gal 6000 gal
Flow Rate for Iron Reduction⁶ 9.0 gpm 9.4 gpm 10.0 gpm 10.6 gpm
Iron and Sulfur Reducing Bacteria8Trace Amounts
pH 6.5–8.5
Tannins 0.0 ppm
Total Organic Carbon 0.0 ppm
Free Chlorine Level 0.0 ppm
Dissolved Oxygen 3.0 ppm or below
Polyphosphate 0.0 ppm
Operating Pressure 20-125 psi (138–862 kPa)
Operating Pressure (Canada) 20-90 psi (138–621 kPa)
Operating Temperature 33-120°F (0–49°C)
Electrical Requirements 28 VDC/60 Hz
Electrical Power Consumption,
Min/Max 8.4 watts/21.6 watts
Drain Flow, Maximum62.38 gpm 2.5 gpm 3.5 gpm 5.3 gpm
Recharge Time, Average7
Recharge Water 78 minutes 67 minutes 62 minutes 76 minutes
Consumption, Average758.1 gallons 65.1 gallons 108.2 gallons 167.1 gallons
1The efficiency rated dosage is only valid at the stated salt dosage and is efficiency rated according to NSF/ANSI 44. Water consumption
determined in accordance with 7.1.1 of NSF/ANSI 44.
2Measured from top of media to top surface of tank threads. (backwashed and drained).
3Measured from top of underbedding to top surface of tank threads.
4 Auxiliary flow rates do not represent the maximum service flow rate used for determining the softener’s rated capacity and efficiency.
Continuous operation at these flow rates greater than the maximum service flow rate might affect capacity and efficiency performances.
5Performance testing on these models was performed at the flow rates specified. When a higher flow rate occurs upon installation, a flow control,
restrictor, or other method of flow reduction should be used in order to mimic these performance results.
6Backwash at 120 psi (830 kPa).
710 minute backwash, 4 lb 9” model, 6 lb. 10” model, 7 lb. 12” model or 12 lb. 14” model salt dosage.
8The Iron and Sulfur reducing bacteria performance is a manufacturer claim and has not been evaluated or certified by WQA.
Specifications

7
01026018 G 07/23
Culligan High Efficiency Softener-Cleer Plus
Model 9" Model 10" Model 12" Model 14" Model
Control Valve 1” Reinforced Thermoplastic w/ HE Circuit Board
Overall Softener Ht 56 in 62 in 60 in 73 in
Media Tank Design Quadra-Hull™
Media Tank Dimensions (Dia x Ht) 9 x 48 in 10 x 54 in 12 x 52 in 14 x 65 in
Salt Storage Tank Dimensions
(Dia x Ht) 16 x 43 in or 18 x 43 in 18 x 43 in 24 x 42 in
Exchange Media, Type and Quantity Cullex® Media,1.0 ft3Cullex Media, 1.5 ft3Cullex Media, 2.0 ft3Cullex Media, 3.0 ft3
Underbedding, Type and Quantity Cullsan®
Underbedding, 12 lb
Cullsan
Underbedding, 15 lb
Cullsan
Underbedding, 20 lb
Cullsan
Underbedding, 25 lb
Media, KDF-85 13.5 lb 13.5 lb 27.0 lb 40.5 lb
Exchange Capacity
@ Salt Dosage Per Recharge
17,854 gr @ 4.0 lb 26,781 gr @ 6.0 lb 31,200 gr @ 7.0 lb 42,548 gr @ 10.5 lb
27,108 gr @ 8.0 lb 40,662 gr @ 12.0 lb 44,764 gr @ 16.0 lb 67,146 gr @ 24 lb
31,736 gr @ 12.0 lb 47,604 gr @ 18.0 lb 63,472 gr @ 24.0 lb 87,987 gr @ 36 lb
Efficiency rated dosage7 4,463 gr/lb @ 4 lb salt
dosage
4,463 gr/lb @ 6 lb salt
dosage
4,457 gr/lb @ 7 lb
salt dosage
4,052 gr/lb @ 10.5 lb
salt dosage
Freeboard to Media212 in 12 in 13.5 in 22.5 in
Freeboard to Underbedding344.5 in 47.5 in 46 in 59 in
Salt Storage Capacity 375 lb 600 lb
Service Flow @ Pressure Drop 8.0 gpm @ 9.5 psi 9.9 gpm @ 14 psi 8.5 gpm @ 9 psi 11.0 gpm @ 15 psi
Auxiliary Flow Rate 10.7 gpm @ 15 psi 10.8 gpm @ 15 psi 11.7 gpm @ 15 psi 11.0 gpm @ 15 psi
Total Hardness, Max. 50 gpg 75 gpg
Total Dissolved Iron, Max 10ppm62000 gal 3000 gal 4000 gal 6000 gal
Flow Rate for Iron Reduction64 gpm 5.9 gpm 8.5 gpm 11.0 gpm
Hydrogen Sulfide12 ppm
Iron and Sulfur Reducing Bacteria1Trace Amounts
pH 6.5–8.5
Tannins 0.0 ppm
Total Organic Carbon 0.0 ppm
Free Chlorine Level 0.0 ppm
Dissolved Oxygen 3.0 ppm or below
Polyphosphate 0.0 ppm
Operating Pressure 20-125 psi (138–862 kPa)
Operating Pressure (Canada) 20-90 psi (138–621 kPa)
Operating Temperature 33-120°F (0–49°C)
Electrical Requirements 28 VDC/60 Hz
Electrical Power Consumption,
Min/Max 8.4 watts/21.6 watts
Drain Flow, Maximum42.34 gpm 2.5 gpm 3.5 gpm 5.3 gpm
Recharge Time, Average5
Recharge Water 78 minutes 67 minutes 62 minutes 76 minutes
Consumption, Average558.1 gallons 65.1 gallons 108.2 gallons 167.1 gallons
1The Hydrogen Sulfide and Iron and Sulfur reducing bacteria performance are manufacturer claims and have not been evaluated or certified by
WQA.
2Measured from top of media to top surface of tank threads. (backwashed and drained).
3Measured from top of underbedding to top surface of tank threads.
4Backwash at 120 psi (830 kPa).
510 minute backwash, 4 lb 9” model, 6 lb. 10” model, 7 lb. 12” model or 12 lb. 14” model salt dosage.
6Performance testing on these models was performed at the flow rates specified. When a higher flow rate occurs upon installation, a flow
control, restrictor, or other method of flow reduction should be used in order to mimic these performance results.
7The efficiency rated dosage is only valid at the stated salt dosage and is efficiency rated according to NSF/ANSI 44.

801026018 G 07/23
It’s All So Easy, So Economical, So Efficient, So Enjoyable!
Kind To Skin And Complexion
Soft water will help prevent red, itchy or dry skin because there are no hardness impurities to cause
soreness, no soap curd to coat the skin. Shaving is easier, smoother—either with a blade or electric shaver.
Bathing And Showering
You’ll use far less soap with conditioned water. Use your soap very sparingly—not as you did
before soft water. Just a quick rinse removes all lather, leaving your skin pleasantly smooth
and silky because now it’s free of sticky soap curd and film.
Saves Washing Costs. Helps Control Environmental Pollution
Soft water washes whiter and cleaner with less soap or detergent. Because the hardness impurities
are removed, your soap can concentrate solely on washing. People usually find that they can reduce
the amount of soap they use substantially. If you normally use a cup per wash load with hard water,
try using 1/3 cup depending on the size of your wash load and the degree of soil. Different amounts
are required, but you can use less with softened water. An added bonus is the fact that your
washable fabrics will last longer.
Super Hair Conditioning
Soft water is great for scalp and hair care. No insoluble deposits are formed. Hair is shinier, softer,
more manageable. Reduce the amount of shampoo you have normally used.
Dishes Are A Delight
Washed by hand or in a dishwasher, glassware, dishes and silver wash cleaner, easier. Follow your
dishwasher manufacturer’s instructions. Soft water promotes sanitation because no greasy hard water
film can form to collect or harbor bacteria.
Easier Housekeeping, Gleaming Fixtures
You’ll be amazed at the marvelous difference. Just a swish of the cloth, and the bathtub or shower and
fixtures are clean and sparkling. Imagine, no scouring! No hard water scum to cause rings, streaks, spots
and stains. To keep their gleaming luster, simply wipe fixtures with a towel after use. Formica, tile, walls,
floors, woodwork surfaces clean easier, stay clean longer. You’ll save on cleaning aids and save on time.
Saves Water-Heating Energy, Helps Water-Using Appliances
Soft water reduces the formation of rock-like hard water scale that encrusts water heaters, hot water pipes,
shower heads, and water-using appliances. This scale can cause premature maintenance and failure.
Elimination of hard water also provides substantial energy savings because scale acts as an insulator,
wasting electricity or gas used to heat water.
Water For Lawns And Household Plants
If possible, lawn sprinkling faucets should be supplied with hard water primarily because it is not
economical to soften so much water.
Household plants are much more sensitive than lawns with respect to the kind of water which is
best. First, because they receive no rainfall and, second, there is little or no drainage of the soil.
Preferably they should be watered with rainwater or water which is low in mineral content such
as distilled or demineralized water. Softened water is not recommended for house plants because
a build-up of sodium in the soil may interfere with efficient absorption of water by the plant root
system. Additional information may be obtained from your independently operated Culligan dealer.
Introduction

9
01026018 G 07/23
Application
Water Quality
Verify that raw water hardness and iron are within limits. Note the hardness for setting the salt
dosage and recharge frequency.
Iron—A Common Water Problem
The chemical/physical nature of iron found in natural water supplies is exhibited in four general types:
1. Dissolved Iron—Also called ferrous or “clear water” iron. Up to 10 ppm of this type of iron can be
removed from the water by the Softener-Cleer. Dissolved iron is soluble in water and is detected
by taking a sample of the water to be treated in a clear glass. The water in the glass is initially
clear, but on standing exposed to the air, it may gradually turn cloudy or colored as it oxidizes.
2. Particulate Iron—Also called ferric or colloidal iron. This type of iron is an undissolved
particle of iron. Softener-Cleer will remove larger particles, but they may not be washed out
in regeneration effectively and will eventually foul the ion exchange resin. A filtering treatment
will be required to remove this type of iron.
3. Organic Bound Iron—This type of iron is strongly attached to an organic compound in the
water. The ion exchange process alone cannot break this attachment, and Softener-Cleer
will not remove this type of iron.
4. Bacterial Iron—This type of iron is protected inside a bacteria cell. Trace amounts of Bacterial
Iron is inactivated by Softener-Cleer.
When using a softener to remove both hardness and up to 10 ppm of dissolved iron it is important that
it regenerates more frequently than ordinarily would be calculated for hardness removal alone. This will
minimize the potential for bed fouling.
CAUTION! Do not use where the water is microbiologically unsafe or with water of
unknown quality without adequate disinfection before or after the unit.
Pressure
Do not operate the system at the maximum pressure rating of 125 psi. If water pressure is greater than
80 psi, Culligan recommends following the IAPMO Uniform Plumbing code section 806.2 by installing a
Pressure Regulating Valve before the system. Operating on high pressure for extended periods of time
can increase the service frequency of replacement parts. If water pressure can drop below the minimum
water pressure, add a booster pump to increase it above the minimum operating pressure.
CAUTION! The use of a pressure reducing valve may limit the flow
of water in the household.
Temperature
Do not install the unit where it might freeze, or next to a water heater or furnace or in direct sunlight. Outdoor
installation is not recommended and voids the warranty. If installing in an outside location, you must take
the steps necessary to assure the softener, installation plumbing, wiring, etc. are as well protected from the
elements (sunlight, rain, wind, heat, cold), contamination, vandalism, etc. as when installed indoors.
Location—Space Requirements
Allow 6-12 inches (15-30 cm) behind the unit for plumbing and drain lines and 4 feet (1.3 meters)
above for service access and filling the salt container.

10 01026018 G 07/23
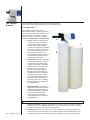
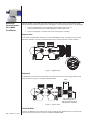
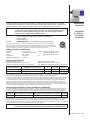
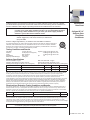
Your Culligan water conditioner consists of three basic components,
(A) the Control Valve, (B) the Mineral Tank, and (C) the Brine System.
A. Control Valve
The exclusive Culligan control valve
automatically performs a variety of tasks that
are necessary for the proper operation of your
water conditioner. These tasks, commonly
referred to as cycles or operating positions,
are Service, Regeneration, and Brine Refill.
1. Service: While the control valve is
in the service cycle, hard water is
directed down through the column
of Cullex® resin where hardness
minerals are removed from the water.
The softened water is then directed
into your household plumbing lines.
The ability of the Cullex resin to
remove hardness minerals needs to
be periodically replenished; this is
referred to as regeneration.
2. Regeneration: While the control valve
is in the regeneration cycle, water is
first directed up through the column
of Cullex resin to flush accumulated
sediment out of the resin and down
the drain. Then, the regenerant
brine solution is slowly drawn from
the bottom of the salt storage tank
of the Brine System and is directed
down through the column of Cullex
resin, restoring the ability of the resin
to remove hardness minerals from
your water supply. Once completed,
the regeneration cycle is followed by
mineral reactivation.
Mineral Reactivator: The Mineral
Reactivator is educted for a specified
duration during the Brine Draw cycle.
The Mineral Reactivator is designed
to clean the Cullex resin pores
of iron, manganese, and organic
compounds that cause resin fouling
and inefficiencies.
NOTE: Contact your Culligan dealer when you need to replenish the Mineral Reactivator.
Chlorine Generator: Chlorine is generated from the brine solution and then is added
after the eduction of the Mineral Reactivator. The chlorine inactivates trace amounts of
iron-reducing bacteria and sulfur-reducing bacteria.
3. Brine Refill: While the control valve is in the brine refill cycle, a predetermined amount of
water is directed to the salt storage tank of the Brine System so that additional salt can be
dissolved to provide the brine solution that will be needed for the next regeneration cycle.
A
B
C
The Culligan
Process

11
01026018 G 07/23
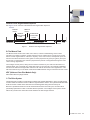
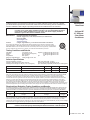
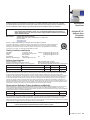
Softener-Cleer Regeneration Sequence
See Figure 1 for an overview of the Softener-Cleer regeneration sequence.
BACKWASH
1 MINUTE
DELAY
MINERAL
REACTIVATOR
X MIN.
CHLORINATOR
—HI SETTING
2 MINUTE
DELAY
FAST
RINSE
10 MIN.
FILL
BRINE DRAW SLOW RINSE
BRINE DRAW/SLOW RINSE
Figure 1. Softener-Cleer regeneration sequence.
B. The Mineral Tank
The Mineral Tank contains the Cullex resin column, Cullsan® underbedding, and an outlet
manifold. The number of gallons of hard water that can be softened by the Cullex resin column
before it needs regeneration is called the “capacity” of the resin column, and depends upon the
amount of hardness minerals in each gallon of water (expressed as grains per gallon) and upon
the amount of regenerant brine solution (expressed as pounds of salt) passed through the resin
column during regeneration.
Your Culligan service person, taking into account the hardness of your water and the amount of
softened water your household may reasonably expect to use each day, has carefully established
how often the softener will regenerate and how much salt will be used for each regeneration. This
will ensure that all of your soft water needs will be fulfilled without using an excessive amount of salt.
KDF (Softener-Cleer Plus Models Only):
KDF media reduces hydrogen sulfide.
C. The Brine System
The Brine System consists of a salt storage container and hydraulic Dubl-Safe™ valve. The salt storage
container holds the salt that is used to make the regenerant brine solution. The hydraulic Dubl-Safe valve
limits the amount of water that is returned to the salt storage tank during the brine refill cycle.
Because a predetermined amount of salt is dissolved with each brine refill cycle, the salt must be
periodically replenished in order to maintain efficient operation. Your Culligan service person will be
able to tell you about how often salt must be added to the salt storage container.

12 01026018 G 07/23
Water Meter
The water meter keeps track of the quantity of water that has flowed through the resin bed.
Based on the influent water hardness and the hardness capacity of the resin bed, a service
life expectancy in the quantity of softened water is calculated and programmed into the control.
When the set point is reached, regeneration is triggered. The regeneration will start at time
of regeneration (typically 2:00 a.m.). In immediate mode the regeneration starts as soon as
the regeneration signal is provided. If time clock backup is set and the capacity has not been
exhausted, but the days since last regen is greater than the time clock backup setting, the
softener will regenerate.
Smart Brine Tank Probe
The optional smart brine tank probe monitors conditions inside the brine tank. It predicts when
salt needs to be added to the brine tank, detects the presence of salt-bridging, eductor line
plugging and brine tank overfilling.
Wireless Remote Control
The optional wireless remote control displays the current status of the water softener or filters and allows
for remote control. It can be located up to 200 feet away from the softener (depending upon building
construction materials). The wireless remote displays information about softener performance, problems,
days of salt remaining and allows remote control for regeneration.
The wireless remote control is designed to communicate at 915 MHz and to work without
interference with other 915 MHz devices such as cordless telephones and baby monitors.
Modem
The optional modem allows for the system to be remotely monitored detecting problems before
they occur, to schedule salt delivery when it is needed and to keep the system software up to date
with the latest advances.
Culligan ConnectTM
The Culligan Connect™ interface is an intuitive mobile app and is available on both iOS and Android
Users will see their daily and weekly usage patterns graphically represented and instantly updated
each time they open the app. In addition, low salt alerts and the ability to put the unit in bypass
mode or regeneration from anywhere offer an all new level of control and convenience.
Manual Regeneration
Manual regeneration can be initiated via the softener control valve or wireless remote
display. Manual regeneration can be initiated to begin regeneration immediately or that night.
To immediately initiate regeneration, press and hold for at least ten (10) seconds. To cancel
a delayed regeneration, press and hold for at least five (5) seconds.
Modes of
Operation

13
01026018 G 07/23
Salt Supply,
Usage and
Service
Salt is the mineral used to “recharge” your water conditioner. A brine solution is automatically made up in
the bottom of the salt storage container, the Cullex® resin beads in the mineral tank are flushed with the
brine solution as a step in the recharging process.
Your Culligan Water Conditioner has been carefully designed to get the greatest amount of softening
capacity from the salt it uses. Here is some pertinent information about salt usage, types and service.
Salt Economizer
This control is set at the time of installation, and determines salt usage according to the water hardness,
number of persons in the household, and water usage.
What Kind of Salt is Best
All Culligan Water Conditioners are designed to use any water conditioner salt of good quality,
including rock, pellet, solar, or “evaporated” types.
All rock salt, regardless of source, contains insoluble material which collects at the bottom
of the salt storage tank and requires periodic clean-out.
If purified salt products are used, the salt storage compartment will require less frequent
clean-out, but you must check more frequently for “bridging.”
Regardless of what type of salt is used, we recommend Culligan Brand Salt as suggested
by your Culligan Dealer. He or she is the expert and can provide you with the best product
for your Culligan Water Conditioner.
Automatic Salt Delivery Service
Ask your Culligan Dealer for details about salt delivery service. You can have your salt supply
replenished on a regular basis. Whether you have automatic delivery service or pick up salt
from your Culligan Dealer, you will be getting quality salt packaged according to rigid Culligan
specifications. Using Culligan Brand Salt will help assure continued efficiency and trouble-free
operation of your water conditioner.
The modem allows for the system to be remotely monitored, detecting problems before they
occur, to schedule salt delivery when it is needed and to keep the system software up to date
with the latest advances.
NOTICE Sodium Information: Water softeners using sodium chloride for regeneration
add sodium to the water. Persons who are on sodium restricted diets should
consider the added sodium as part of their overall sodium intake.

14 01026018 G 07/23
Following these simple precautions will help assure continued trouble-free service
and keep your Culligan Water Conditioner looking like new for years.
1. Do not place heavy objects on top of the salt storage tank or timer cover.
2. Use only mild soap and warm water when cleaning the exterior of the conditioner. Never
use harsh, abrasive cleaning compounds or those which contain acid, such as vinegar,
bleach and similar products.
3. Important: Protect your water conditioner and the entire drainline from freezing temperatures.
WARNING! DANGER: If your unit should freeze, do not attempt to disassemble it.
Call your Culligan Dealer.
4. Important: Culligan water softeners are sold for use on potable water only. If at any time
the water becomes contaminated, such as during a “boil water” advisory, the operation of
the water softener should be discontinued until it is verified that the water is again potable.
To do this, turn the blue knob in a clockwise position, then call your Culligan dealer to have
your system sanitized before it is placed back into service.
5. Should service, adjustment or trouble-shooting information be needed which is not
covered in the Use and Care Guide, call your Culligan Dealer.
For parts and service availability please call your local independently operated Culligan dealer.
For your nearest Culligan dealer, call (800) 285-5442.
Recommended Preventative Maintenance Inspection Schedule
The Culligan High Efficiency household water softener has been designed to provide a good,
consistent service life. Routinely inspecting the system may help avoid potentially costly
breakdowns related to circumstances outside of the control of the dealer and/or user.
Component Suggested Inspection
Frequency
Reason for Maintenance
Entire System At Start-up, after infrequent use
(idle for one week or more) or
every 3–6 months.
On private supplies, the appearance of off-
tastes and odors, particularly if musty or
“rotten egg” (caused by harmless sulfate-
reducing bacteria) may indicate a need for
the system to be sanitized. See page 48.
Backwash
Flow Controller
Every 12 months or every time
service is performed on the system.
Build up of sediment, iron and/or other foreign
materials (found in some water supplies but
not necessarily all) could negatively affect
system performance. Monitor item for normal
or unexpected wear.
Brine eductor
nozzle and throat
Every 12 months or every time
service is performed on the system.
Build up of sediment, iron and/or other foreign
materials (found in some water supplies but
not necessarily all) could negatively affect
system performance. Monitor item for normal
or unexpected wear.
Softening Media
(Cullex)
Every 2–3 years Chlorinated water supplies can breakdown
and destroy resin material. Resin material
may also perform poorly if subjected to other
materials (sediment, iron, alum, etc.) found in
some water supplies (but not necessarily all).
Care and
Cleaning of
Your Water
Conditioner

15
01026018 G 07/23
Cleaning
Out the Salt
Storage Tank
A periodic clean-out of the Salt Storage Tank is necessary to keep your Culligan Water Conditioner
at peak operating efficiency. Do it at least every two years when the salt supply is low.
Follow these step-by-step procedures:
Tools Needed
• Scoop
• Clean, bucket-size container
• Garden hose
• Household scrub brush or sponge
Procedure
1. Remove the salt storage tank cover and the cap from the brine valve chamber.
2. Disconnect the brine line from the brine valve by holding the outer ring of the push fitting;
push the tubing in slightly before pulling it out.
3. Lift the brine valve out of the brine valve chamber and set aside in an upright position.
4. If you’d like to save any clean, dry salt remaining in the tank, remove it and place
it in a clean container.
5. Using the scoop, dig out and discard as much remaining salt, water and debris as possible.
6. Remove the brine valve chamber by removing the screws on either side of the salt tank.
7. Remove the salt plate at the bottom of the brine tank.
8. Lay the salt tank on its side and direct a brisk stream of water from your garden hose to its
inside to rinse out all residue.
9. Using a household scrub brush and a mild soapy solution, clean the salt plate.
This will complete the tank cleaning.
10. Insert the brine valve into the chamber and replace brine valve chamber cap.
(Re-insert the brine valve into the chamber, re-insert the brine line fully,
and replace brine valve chamber cap.)
11. Fill the salt storage tank with 4 to 6 inches of water.
12. Fill the tank with salt to within a few inches of the top.
13. Replace salt storage tank cover.

16 01026018 G 07/23
First Time
Setup
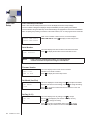
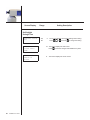
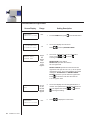
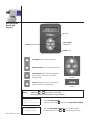
First Time Setup Procedure
When a new controller is first powered on, the screen will display the first time setup message.
The HE Controller is designed to simplify the setup and installation process by making some default
recommendations during the initial setup. These default settings are appropriate for most common installations.
After completing the plumbing connections to the water softener, turn on and program the HE Controller.
FIRST TIME SETUP
PRESS DOWN ARROW
When a new controller is first turned on, the screen displays
FIRST TIME SETUP. Press to display the first setup screen.
Serial Number
S/N: 00000123
The screen displays the serial number for this Smart Controller.
Press to display the firmware version information screen.
NOTE: If this unit will be installed with a modem, it is required that this
electronic ID number be reported to Culligan on the IQR form.
Firmware Version
FWR***LT21
MON DD YEAR
The screen displays the firmware version and date
installed for this Smart Controller.
Press to display the month setup screen.
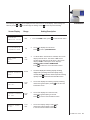
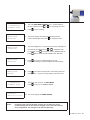
Set Month (Jan–Dec)
SET MONTH
>JAN
The screen displays the month setting. Press to accept the information
displayed (and view the next setting), or press to change the setting.
Press to accept the selected month and advance to the next
setting, SET DAY.
Set Day (0–31)
SET DAY
>1
The screen displays the day setting. Press to accept
the information displayed (and view the next setup screen),
or press to change the setting.
Press to see the next available value. Press to accept
the selected day and advance to the next setting, SET YEAR.

17
01026018 G 07/23
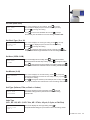
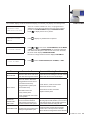
Set Year (2009–2030)
SET YEAR
>2019
The screen displays the year setting. Press to accept
the information displayed (and view the next setup screen),
or press to change the setting.
Press to see the next available value. Press to accept
the selected year and advance to the next setting, CLOCK TYPE.
Set Clock Type (12 or 24)
CLOCK TYPE
>12 HR
The screen displays the clock type setting. Press to accept
the information displayed (and view the next setup screen),
or press to change the setting.
Press to change the clock type from 12-hour to 24-hour. Press to
accept the selected clock type and advance to the next setting, SET HOUR.
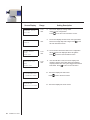
Set Hour (12PM–11AM)
SET HOUR
>12AM
The screen displays the hour setting. Press to accept the information
displayed (and view the next setup screen), or press to change the setting.
Press to change the hour (in this example, from 12PM to 10AM). Press
to accept the selected hour and advance to the next setting, SET MINUTES.
Set Minutes (0–60)
SET MINUTES
>01
The screen displays the minutes setting. Press to accept the
information displayed (and view the next setup screen), or press
to change the setting.
Press to change the minutes (in this example, from 0 to 20). Press
to accept the selected hour and advance to the next setting, UNIT TYPE.
Unit Type (Softener, Filter, or Resin + Carbon)
UNIT TYPE
>SOFTENER
The screen displays the unit type setting. Press to accept
the default setting (softener) and advance to the next setting,
VALVE TYPE.
Valve Type
(HE 1, HE 1.25, HE 1.5, HE 1 Twin, HE 1.5 Twin, 4-Cycle, 5-Cycle, or Plat Plus)
VALVE TYPE
>HE 1
The screen displays the valve type setting. Press to
accept the default setting (HE 1) and advance to the next setting, UNITS.

18 01026018 G 07/23
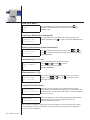
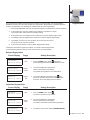
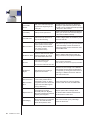
Units (US or Metric)
UNITS
>US
The screen displays the units of measure setting. Press to
accept the default setting (US) and advance to the next setting,
INSTALL TYPE.
Install Type (Residential or Commercial)
INSTALL TYPE
>Residential
The screen displays the installation type setting. Keep this at the
default, Residential. Press to view the next setting, BRINING TYPE.
Brining Type (Downflow, Upflow, Proportional)
BRINING TYPE
>Downflow
The screen displays the brining type setting. Press or and
then to change this setting to Downflow and view the next setting,
TANK DIAMETER.
Tank Diameter (9, 10, 12, 14)
TANK DIAMETER
>10
The screen displays the tank diameter setting.
Press or and then to change
the value and view the next setting,
WATER HARDNESS.
Water Hardness (1–170)
HARDNESS GPG
25 (1109 GAL)
The screen displays the water hardness setting in grains per
gallon. Press or and then to change the value
and begin initialization.
Completed First Time Setup
Initializing
JAN-01-19 12:01P
When the setup is complete, the circuit board microprocessor
automatically calculates softener capacity. The screen displays the
initializing status and the current date and time, and then transitions
to the home screen.
SOFTENING
JAN-01-19 12:01P
The screen displays the current state (the display alternates between
Softening and any error) and the date/time set for the unit.
This is the default home screen.
The controller is designed to simplify the setup and installation process by making some default
recommendations during the Initial Setup. The default settings are designed to be appropriate
for most common installations.

19
01026018 G 07/23
Set Date
and Time
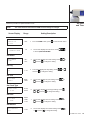
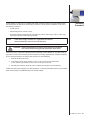
Follow this procedure to update the date or time.
NOTE: The control must be returned to the HOME screen if settings are changed.
Screen Display Range Setting Description
SOFTENING
JAN-01-19
12:01P
N/A 1. From the HOME screen, press to view the main menu.
>1)INFORMATION
2)MANUAL MODE
1–6 2. The screen displays the main menu. Press
to select 3) SET DATE/TIME.
Set Month
SET MONTH
>JAN
Jan–
Dec
3. The screen displays the month setting. Press or
and then to change the setting.
Set Day
SET DAY
>1 1–31 4. The screen displays the day setting. Press or
and then to change the setting.
Set Year
SET YEAR
>2019
2009–
2030
5. The screen displays the year setting. Press or
and then to change the setting.
Set Clock Type
CLOCK TYPE
> 12 HR
12 HR,
24 HR
6. The screen displays the clock type setting. Press
or and then to change the setting.
Set Hour
SET HOUR
> 12PM
12PM–
11AM,
0–23
7. The screen displays the hour setting. Press or
and then to change the setting.
Set Minutes
SET MINUTES
>01 0–59 8. The screen displays the minutes setting. Press
or and then to change the setting.

20 01026018 G 07/23
Screen Display Range Setting Description
Set Daylight
Savings Time
DAYLIGHT SAVING
YES
Yes,
No
9. The screen displays the Daylight Savings Time setting.
Press or and then to change the setting.
2)MANUAL MODE
>3)SET DATE/
TIME
10. The screen displays the main menu.
Press to save the changes and initialize the system.
SOFTENING
JAN-01-19
12:01P
11. The screen displays the home screen.
Page is loading ...
Page is loading ...
Page is loading ...
Page is loading ...
Page is loading ...
Page is loading ...
Page is loading ...
Page is loading ...
Page is loading ...
Page is loading ...
Page is loading ...
Page is loading ...
Page is loading ...
Page is loading ...
Page is loading ...
Page is loading ...
Page is loading ...
Page is loading ...
Page is loading ...
Page is loading ...
Page is loading ...
-
 1
1
-
 2
2
-
 3
3
-
 4
4
-
 5
5
-
 6
6
-
 7
7
-
 8
8
-
 9
9
-
 10
10
-
 11
11
-
 12
12
-
 13
13
-
 14
14
-
 15
15
-
 16
16
-
 17
17
-
 18
18
-
 19
19
-
 20
20
-
 21
21
-
 22
22
-
 23
23
-
 24
24
-
 25
25
-
 26
26
-
 27
27
-
 28
28
-
 29
29
-
 30
30
-
 31
31
-
 32
32
-
 33
33
-
 34
34
-
 35
35
-
 36
36
-
 37
37
-
 38
38
-
 39
39
-
 40
40
-
 41
41


Culligan HE Softener-Cleer Home Water Conditioner Owner's manual
- Type
- Owner's manual
Ask a question and I''ll find the answer in the document
Finding information in a document is now easier with AI
Related papers
-
Culligan Aquasential Smart HE Water Softener Owner's manual
-
-
-
-
-
-
-
-
-