Page is loading ...

TW10 / TW10 SB
MANUAL
AUTOMOTIVE ALARM
Without Lock

01
•Clean the place where the ultrasound sensors and t he master key will be xed.
•During installation, use a multmeter to measure voltage.
•T he installation of this product must be done by a specialized professional.
•For perfect f unctioning, the door and ignition s witch signals need to be connected to the alarm.
• This product is intended to make it porevent or inhibit the theft of the vehicle, as well as robbery of
objects i n its interior.
•Before contacting T ARAMPS technical support, read this manual, it contains a ll the necessary information
for the installation and use of the product.
•Keep the master key i n a secret and easily accessible location.
1) Before Starting
ATTENTION: We recommend the complete reading of this manual before proceeding with the
installation of this product.
2) Technical Features
Supply voltage
Consumption
Engine Lock
Turning lights Output
Lock, Unlock and Auxiliary Outputs
Sound control and dedicated Siren
Congurable output for activating locks and original power windows
9 to 16 Volts
6 to 25 mA
Max. 20 A
2 x 70W with digital protection
Max. 200 mA - (ground signal)
Max. 200 mA - (positive signal)
Universal, Fiat Line, VW G5, G6, G7, VW UP and Mobi
3) Composition
BASIC ALARM OPERATION: When turning on the alarm by remote control (if the vehicle has audio equipment, windows and
power locks properly installed), the audio will be shut off, the doors will be locked, power windows will be closed, and ultrasound
sensors and doors will start to monitor the vehicle.
TW10-1SB TW10
TECHNOLOGY G4
TR3C
TR4C
TR5
From June
2019
From June
2019
From June
2019
From June
2019
DEDICATED SIREN
ENGINE LOCK YES
X
TR5
Control
The TW10 Alarm Line is compatible with all Tarsafe
controls that were manufactured from June 2019.
ATTENTION: Using the TR1, TR2, TR3C or TR4C
controls, in the TW10 line alarms, the AUXILIARY
button will have no function.
1
compatible
compatible
compatible
compatible
compatible
compatible
compatible
compatible
CONTROLS

the siren goes off and turning lights ash for 45 seconds.
ALARM RESPONSE
1 Blink on turning lights +1 Siren beep
3 Beeps indicate an Open Door Item 11.1
2 ashes on turning lights + 2 siren beeps
Note: 4 ashes on the turning lights + 4 beeps, indicate that the alarm
went off when the it was activated. Item 11.1
‘‘This equipment operates on a secondary basis, that is, it is not entitled to protection against
harmful interference, even from stations of the same type, and may not cause interference to
systems operating on a primary basis. ’’
Control Functions (Manufactured from June 2019)
- Anti Jammer Function. EXCLUSIVE IN THE G4 TARAMPS LINE.
Jammer is when there is another control transmitting near the central of the alarm, making it impossible to
turn the alarm on or off by the registered control.
Use high-quality
batteries
Use CR2032 batteries.
(+) and (-).
Carefully open the plastic
box from the sides.
Replace the battery,
observing the polarity
Replacing the Control Battery.
Change code G3 / G4 - TR5 controls
A - Hold down the ON and OFF keys;
3 blinks = line G1 to G3 4 ashes = line G4 and forward.
B - Release after LED goes out;
C - The LED will ash informing the new code system:
Press the ON + OFF keys simultaneously, the alarm will sound 3 Beeps conrming the recording.
Register NEW control in the Alarm Center
- Hold the master pressed until beep 3.
It is possible to record up to 4 controls, when recording the 5th the rst one will be erased.
- With the door open, switch on the ignition..
- When releasing, the alarm will sound1 long beep and the turning lightswill be lit;
PROCEDURE:
To exit setup, turn off the ignition.
+ +
IGNITION
ON
START
OFF
DOOR OPEN
+ than
7 seconds
3949-13-9573
Agência Nacional de Telecomunicações
5)Remote Control Functions:
FUNCTION ACTION IN CONTROL
1 Turn Alarm on
2 - Turn Alarm off Press
Press
Press for 2 seconds with
the alarm on
3 - Panic
4 - Output, Auxiliary,
use auxiliary module
Press for 2 seconds
with the alarm off
Illustrative images, which may differ from the real image.
BOTÕES
Control
TR5
ŸAnti Jammer Transmission System
ŸOperating Frequency 433,92MHz
ŸAnti-cloning technology (Hopping Code)
Ÿ13v Battery - CR 2032 LITHIUM
4) Remote controls*
ON
OFF
02
when you keep the button pressed, the alarm generates negative
signal on the brown wire.
MASTER

- hold the master until beep 7.
The alarm will respond informing:
3 Beeps = Blocking in 3 Minutes
- With the door open, turn the ignition on.
1 Beep = Blocking in 1 Minute
2 Beeps = 2 Minute Lockout
7) Set time to lockout (TW10 only)
To change, press the Master key the number of times referring to the desired time. Each time
the Master is pressed, the alarm conrms with 1 beep. After turning the ignition, off the alarm
will conrm the new setting with beeps.
+
ON
START
OFF
Congure
Select the Beep 7 function
IGNITION MASTER
DOOR OPEN
1X = 1 minute
2X = 2 minutes
3X = 3 minutes
MASTER
+
++
Enable Secret Button Lock Function:
- Hold the master pressed until beep 6.
- The alarm will respond informing:
1 Beep = Secret button Function ON
2 Beeps = Secret button Function OFF
- With the door open, switch on the ignition.
+ +
IGNTION
ON
START
OFF
MASTER
DOOR OPEN
+
congure
1X enable
2X disable
Select the Beep 6 function
Attention: Function canceled from factory, It is required to be enabled by Beep 8.
6) Lock by Secret Button - required to be enabled by master. (TW10 only)
With the ignition on and the doors closed, press the master key for 1 second. Otherwise, Secret Button Lock
will be enabled. After the programmed time, (according to the Beep 7 setting), the ultrasound LED starts
blinking, the audio system will be turned off, the siren and turning lights will go off, another 20 seconds, the
engine will begin failing until it is denitively Locked .To cancel the lock, press the master.
Operation:
ATTENTION: In this case, it will not be possible to cancel the triggering by the control.
6.1) Valet Function (only for TW10 - for Secret Button Lock)
It is used when leaving the vehicle in a parking lot, for example, without the need to indicate to the location of
the Master (Secret Button) to the valet.
With the door closed, turn off the ignition and hold the Master pressed
To cancel the Valet function and return to normal operation,
Operation:
for 3 seconds. The ultrasound LED will ash 3 times conrming activation.
turn the ignition on with the door closed and press the Master for 1 second.
+ +
IGNIÇÃO
OFF
ON
START
OFF
MASTER
DOOR CLOSED
3 Seconds
After turning the ignitionoff , the alarm will conrm the new setting with beeps.
To change, press the Master key once to Enable or 2 times to Disable.
03
MASTER
+

04
Click
1 time
2 times
3 times
4 times
5 times
Alarm Response
Sensors Sensitivity
+20%
+10%
Factory Standard
-10%
-20%
1 Beep
2 Beeps
3 Beeps
4 Beeps
5 Beeps
Decrease
Increase
8.1) LED functions
- 1 blink - ignition
- 3 consecutive blinks - doors, hood or trunk.
LED OFF - Alarm off;
LED ALWAYS ON - Door, Hood or Trunk open;
LED FLASHES 2X - Alarm on with cancelled ultrasound sensor;
LED FLASHING AFTER TURNING ALARM OFF BY REMOTE CONTROL
- 2 consecutive blinks - ultrasound sensor.
LED FLASHING NORMALLY - Alarm on;
Indicates which sensor caused the last trigger:
8) Ultrasound Sensors
Attach the sensors to the vehicle's windshield, 10cm below the roof.
Ultrasound Sensors come with digital sensitivity adjustment.
Only change the default setting if necessary.
Follow the table below:
- Hold the master pressed until beep 9.
Set Ultrasound Sensitivity
- With the door open, turn he ignition on .
4 Beeps = Sensitivity-10%
5 Beeps = Sensitivity-20%
3 Beeps = Sensitivity STANDARD
1 Beep = Sensitivity +20%
- The alarm will respond informing the current setting:
2 Beeps =Sensitivity+10%
To change, press the Master key the number of times referring to the desired sensitivity. Each
press on the Master the alarm will conrm with 1 beep. After turning the ignition off , the alarm
will conrm the new setting with beeps.
+
Congure
1X = +20%
2X = +10%
3X = Standard
4X = -10%
5X = -20%
+ +
IGNITION
ON
START
OFF
MASTER
DOOR OPEN
Select Function Beep 9
MASTER
+

9) Window Activation Setup:
6 Beeps = MOBI
3 Beeps = FIAT
- Hold the master pressed until beep 8.
- The alarm will respond informing:
- With the door open, switch on the ignition.
Configure Signal to trigger window / Lock
4 Beeps = VW G6
5 Beeps = VW UP
1 Beep = Universal
2 Beeps = VW G5
To change, press the Master key the number of times referring to the desired setting.
Each time you press the Master, the alarm conrms with 1 beep. After turning off the
ignition, the alarm will conrm the new setting with beeps.
+
MASTER
+
Congure
1X = Universal
2X = VW G5
3X = FIAT
4X = VW G6
5X = VW UP
6X = MOBI
+ +
IGNITION
ON
START
OFF
MASTER
DOOR OPEN
Select the Beep 8 function
9.5 VW UP: Only for LOCK and UNLOCK.Connect the Red / Black alarm wire to the Brown / Green wire located
on the left pillar of the vehicle.
9.4 VW G6 and G7 Mode: Gol, Saveiro, Voyage (generation 6 and 7), with original windows. Connect the Red
/ Black alarm wire to the Brown / Red wire, pin 36, from the original control panel located above the fuse
box.Functions: lock, unlock, close and open the windows.To openthe windows, hold the control off button
pressed with the alarm off.
9.2 VW G5 mode: Gol, Saveiro, Voyage (generation 5) manufactured after February 2009, with window and
original electric lock. Close the windows, lock and unlock the doors. Connect the Green/Black alarm wire to
pin 5 of the original panel 23-way connector, located above the accelerator pedal. DO NOT connect Red /
Black and Red / Yellow (lock and unlock) wires.
9.3 FIAT Mode: Palio, Idea, Punto and Linea with automated power windows, up and down. Connect the
Green / Black alarm wire to pin 8 on the original switch, to the Palio and Idea line located behind the glove
box. On Linea and Punto, Red / Black wire in the switch located behind the fuse box.
IT IS NOT NECESSARY TO USE A RESISTOR.
9.6 MOBI: New Uno after2015, MOBI and ARGO, with original power windows.Connect the Green / Black
wire of the alarm to the Brown / Green wire of the 6-way harness of the original alarm, located at the steering
column.
9.1 Universal Mode: negative signal 15 seconds.
05

ORIGINAL CENTRAL VW G6 / G7
36 - Brown / Red
Relay Connections:
+
MASTER
Transform NEGATIVE signal from
alarm (200mA) into POSITIVE +12V
Alarm wire 85
30
+12V
87
86
ouput+12V
Purple wire
Alarm
Transform POSITIVE signal (AUDIO)
of the alarm (200mA) into POSITIVE
+12V of higher power
85
30
87
+12V
86 Battery
negative
Battery
negative
+ACC
Audio equipment
Transform NEGATIVE signal from
alarm (200mA) into NEGATIVE
of higher power
30
85
87
Alarm wire
Negative Output
86 +12V
Battery
Positive
Located above the
fuse box
11 - Red / Black
In case you need to install equipment with a consumption that is greater than 200mA, relays must be
used.
The lock, unlock, auxiliary and sound equipment outputs can handle a maximum of 200mA.
4 Beeps = VW G6
6 Beeps = MOBI
Configure Signal for Window/Electric Lock activation
- With the door open, turn the ignition on .
- Hold the master pressed until beep 8.
- The alarm will respond informing
1 Beep = Universal
2 Beeps = VW G5
3 Beeps = FIAT
5 Beeps = VW UP
Each press on the Master, the alarm conrms with 1 beep. After turning the ignition off , the
alarm will conrm the new setting with 4 beeps.
To change it, press the Master key 4 times, referring to the VW G6/G7 signal.
Attention: For perfect operation, ground the alarm module properly . Some wire colors may change without
prior notice from the car manufacturer. It is necessary to test before making the connections.
+
Congure
1X = Universal
2X = VW G5
3X = FIAT
4X = VW G6
5X = VW UP
6X = MOBI
+ +
IGNITION
ON
START
OFF
MASTER
DOOR OPEN
Select the Beep 8 function
Window activation signal setting = VW G6 / G7, . item 8
Function: Closes and opens the power windows, locks and unlocks the doors.
To open the windows, turn the alarm off and hold down the off button on the control.
9) Window Connections and VW G6 and G7 Electric Lock (continuation)
06

11) Alarm Functions:
2 SHUTDOWN - ACTIVATION LIMITER: In case of violation, the alarm will activate the SIREN and
will ash the TURNING LIGHTS for 45 seconds. After 5 seconds, it will go back to monitoring the
sensors. After 4 triggerings by the same sensor, it will be canceled, keeping the others active. It will
only be monitored again when the alarm is reset by the remote control.
3AUTOMATIC LOCK: About 8 seconds after turning the ignition on, doors will be locked and
unlocked by turning the ignition off. It will not lock if a door is left open or turn on the ignition
before closing the door.
- Ultrasonic sensor does not detect movement. It is possible to disable, .item 12.5
4 AUTOMATIC REACTIVATION: Automatically turns the alarm back on after 60 seconds, when
turned off by the remote control and:
1 OPEN DOOR WARNING: When turning the alarm on , if there are 3 BEEPs, it indicates that there is
an open door. Close it and turn the alarm back on. If not solved the alarm will cancel the door
monitoring. The other functions will continue operating normally. If the problem persists, look for
a specialized service to repair the door switch.
-ignition is not turned on;
- Door, hood or trunk are not opened;
3) Auxiliary Output .
The use of Auxiliary Relay is required.
It is used to open electric windows, for example.
2)Reads Positive switch..
To install on door switch, hood or trunk with Positive signal when open.
1) Reads Negative switch.
To install on door switch, hood or trunk with Negative signal when open.
3 Beeps = Auxiliary Output
Programming by Master
- With the door open, turn on the ignition.
- Hold the master pressed until beep 10.
-The alarm responds with the current setting :
1 Beep = Reads Negative switch
2 Beeps = Reads Positive switch
Every time the Master is pressed, the alarm conrms with 1 beep. After turning the ignition,
off the alarm will conrm the new setting with beeps.
To change, press the Master key the number of times referring to the desired function.
+
MASTER
+
CONFIGURE
1X = Door -
2X = Door +
3X = Auxiliary
+ +
IGNITION
ON
START
OFF
MASTER
DOOR OPEN
Select Function Beep 10
10) Auxiliary Output Setting- brown wire
07

With the door open, turnon the ignition and hold the master pressed until the desired function beeps. The
alarm will beep according to the current setting, to change, press the master the number of times of the
desired setting.
1 - ENABLE/DISABLE alarm 1 beep = ENABLE
2 beeps = DISABLE
+ +
IGNITION
ON
START
OFF
MASTER
DOOR OPEN
+Congure
Example:
1x enable
2x disable
Select Function
12) Programming by Master Key
3 - CONTROL RECORDING see item 4
5 -
AUTOMATIC RESET
item 11.4
1 beep = ENABLE
2 beeps = DISABLE
7 - TIME TO BLOCKING 31 beep = starts in 1 minute
2 beeps = starts in 2 minutes
3 beeps = starts in 3 minutes
6 - ANTI-THEFT BY SECRET BUTTON item 6
1 beep = ENABLE
2 beeps = DISABLE
4 - AUTOMATIC LOCK item 11.3
1 beep = ENABLE
2 beeps = DISABLE
2 - On/Off BEEP 1 beep = ENABLE
2 beeps = DISABLE
8 - SIGN FOR / ORIGINAL WINDOW/LOCK 1 item 9
1 beep = UNIVERSAL
2 beeps = VW G5
3 beeps = FIAT
4 beeps = VW G6 e G7
5 beeps = VW UP (only locking and unlocking)
6 beeps = MOBI (config. available in alarms
manufactured after 12/2020))
BROWN WIRE SETTING
see Item 10
10 - 31 beep = Reads Negative Switch
2 beeps = Reads PositiveSwitch
3 beeps = Auxiliary
11 - FACTORY RESET
1 beep LONG
factory setup restored
3 LONG BEEPS = END OF PROGRAMMING WITHOUT SETTINGS CHANGING
9 - ULTRASOUND SENSITIVITY ADJUSTMENT 3To change, see item 8
08
Tw10
Only

09
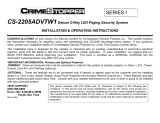
Installation Scheme Attention: The G4 ALARMS LINE has a new Ultrasound transmitter .
In case of replacement of the old alarm panel by G4, the sensortransmitter,
(right side sensor, no LED) must also be replaced by the new one.
Left side receiver
Right side receiver
Master Key
Fix to the vehicle’s windshield, 10cm below the ceiling
7 - Red
13 - Black
6 - Yellow
8 - Green
Negative door switch
2 - Red / Yellow LOCK
1 - Black / Yellow
Dedicated Siren
1- Red +12Vcc
3 - Black GND
4 - Green/Black Turning Lights
4 - Green/Black Turning Lights
9 - Brown
10 - Green / Black
Output to power window closing modules
Auxiliary Output Cong. Beep 10
1 - Negative Switch
2 - Positive Switch
4 - Auxiliary Output
Cong. Beep 8
Mode VW G6,G7 and UP
11 - Red / Black UNLOCK 12- Blue
Ignition
15 - Black / White
14 - Black
ACC + of the audio equipment Max.200mA
16 - Purple Audio equipment
Model TW10-1 SB
NO ENGINE LOCK
Gray
Gray
Illustrative images only
5 - Black
4 - Black
ENGINE LOCK
MAX. 20A

Fabricado por / Manufactured by:
TARAMPS ELECTRONICS LTDA
CNPJ / TAX ID: 11.273.485/0001-03
R. João Silvério, 121• Res. Manoel Martins
Alfredo Marcondes - SP
Indústria Brasileira - Made in Brazil
Taramps reserves the right to change the contents of this manual without prior notice or obligation to apply
modications to previously produced units.
Factory technical assistance department:
Phone number(18) 3266-4050 / 99749-3391
E-mail: [email protected]
Taramps Electronics - Rua: Abílio Daguano, nº 274 - Alfredo Marcondes - ZIP 19.180-000
Warranty term
In the event of a defect within the warranty period, TARAMPS' liability is limited to repairing or replacing the device
manufactured by it.
• Products damaged by incorrect installation, water infiltration, tampering by unauthorized individuals;
• Natural wear components: such as battery;
• Scratched or torn warranty seal;
• Damage of any kind, resulting from problems with the product, as well as losses caused by discontinuation of use.
•Equipment removal and reinstallation costs, as well as its transportation to the technical assistance post;
• The product presents damage resulting from drops, impacts or the action of agents of nature (floods, lightning, etc.);
TARAMPS, located at Rua Abílio Daguano, 274 Res. Manoel Martins - Alfredo Marcondes - SP, ZIP19.180-000, guarantees this
product against design, manufacturing, assembly and/or joint and several malfunctions due to design flaws that make it
unsuitable or inappropriate for its intended use, for a period of 24 months from the date of purchase.
• malfunction caused by accessories, modifications or equipment attached to the product;
• Cases where the product is not used under regular conditions;
MN_016013_R02
/