Page is loading ...

v230606
USER MANUAL
B1 MODEL 510 ELECTRIC BIKE
Thank you for purchasing the B1 Model 510 Electric Bike from Glion. The B1 is a top-quality electric bike
that will provide years of enjoyment. This manual contains instructions for assembling and operating
your bike. Please read and understand this manual fully before assembling and operating your bike. If
you still have any questions after reading this manual, please visit our website, send us an email, and/or
give us a phone call.
We are here to help.
Website: www.getglion.com/support
Email: support@getglion.com
Phone: 855-500-2640

1
Table of Contents
ABOUT THIS MANUAL ............................................................................................................................................ 2
GENERAL INFORMATION ....................................................................................................................................... 3
WARNINGS AND SAFETY ........................................................................................................................................ 6
SPECIFICATIONS AND PARTS DIAGRAM ............................................................................................................... 10
ASSEMBLY INSTRUCTIONS ................................................................................................................................... 14
BATTERY CHARGING ............................................................................................................................................ 20
OPERATION ......................................................................................................................................................... 26
MAINTENANCE .................................................................................................................................................... 34
TROUBLESHOOTING............................................................................................................................................. 38
LIMITED WARRANTY ............................................................................................................................................ 39
LINKS TO INSTRUCTIONAL VIDEOS AND ONLINE RESOURCES .............................................................................. 41

2
ABOUT THIS MANUAL
This manual contains details of the product, its equipment, and information on operation, maintenance,
and other helpful tips for owners. Read it carefully and familiarize yourself with the E-bike before using
it to ensure safe use and prevent accidents. This manual contains many warnings and cautions
concerning the safe operation and consequences if proper setup, operation, and maintenance are not
performed. All information in this manual should be carefully reviewed and if you have any questions
you should contact Glion immediately.
The notes, warnings, and cautions contained within the manual and marked by the triangular Caution
Symbol below should be given special care.
Users should also pay special attention to information marked in this manual beginning with NOTICE.
Keep this manual, along with any other documents that were included with your bike, for future
reference, however all content in this manual is subject to change or withdrawal without notice. Visit
www.getglion.com to view and download the latest version. Glion makes every effort to ensure the
accuracy of its documentation and assumes no responsibility or liability if any errors or inaccuracies
appear within.
Assembly and first adjustment of your bike from Glion requires special tools and skills and it is
recommended that this should be done by a certified, reputable bike mechanic if possible.
Because it is impossible to anticipate every situation or condition that can occur while riding, this
manual makes no representations about the safe use of bikes under all conditions. There are risks
associated with the use of any bike that cannot be predicted or avoided and are the sole responsibility
of the rider.
WARNING: Incorrect assembly, maintenance, or use of your E-bike can cause component or
rider, you must read and understand the entire manual and any documentation provided for
subcomponents or accessories before riding. If you are not sure you have the experience, skills, and
tools to correctly perform all assembly steps in the manual and the assembly video at
www.getglion.com, consult a local, certified, reputable bike mechanic.
WARNING: To reduce the risk of injury, close supervision is necessary when the product is used
near children.
WARNING: Damage to your E-bike
intrusion, can lead to battery failure, electrical system malfunction, or electrical fire and
consequent property damage, injury, or death. Follow all recommendations to minimize chance of water
damage. If you have any questions, contact Glion Product Support.

3
GENERAL INFORMATION
E-BIKE CLASSIFICATION
The Glion B1 Model 510 is a Class 2 electric bicycle. A Class 2: electric bicycle is equipped with a
throttle-actuated motor that ceases to provide assistance when the E-bike reaches 20 mph.
The Glion B1 Model 510 has a 500 watt (W) electric motor.
WARNING: Many states require specific safety devices. It is your responsibility to familiarize
yourself with the laws of the state where you ride and to comply with all applicable laws,
including properly equipping yourself and your electric bicycle as the law requires. Observe
all local electric bicycle laws and regulations. Observe regulations about electric bicycle lighting,
licensing of electric bicycles, riding on sidewalks, laws regulating bike path and trail use, helmet laws,
and special electric bicycle traffic laws.
APPLICABLE LAWS.
ASSEMBLY AND FIT
Correct assembly and fit are essential to ensure your bicycle safety and comfort. Glion highly
recommends you have a certified bike mechanic assemble your bike before your first ride. Even if you
have the experience, skills, and tools to assemble your bike, Glion recommends for your safety having a
certified bike mechanic inspect your work before the first ride.
WARNING: If you do not have the experience, skill, or tools to assemble your electric bike,
Glion highly recommends having a certified, reputable bike mechanic assemble your electric
bicycle for you, including any future adjustments or tuning.
WARNING: A critical aspect of assembling and safely riding your electric bicycle is the front
and rear wheel axle nuts. The security and torque of all wheel mounting hardware should be
inspected before your first ride upon arrival as well as on a regular basis. Both wheels axle
nuts must be properly secured before operating your bike.
SAFETY CHECK BEFORE EACH RIDE
In addition to regular maintenance, always check the condition of your bike before each ride. If you are
unsure of how to conduct a complete check of you
consult a certified bike mechanic for assistance. See the -Ride
manual for more information.
ELECTRICAL SYSTEM
The electrical system of your E-bike offers various levels of power assistance and lighting for different
your E- he front
and rear brake levers contain motor cutoff switches that disable the hub motor's assistance when the
brake is applied. Both levers should be checked if they are working correctly by pulling each brake lever
and then carefully depressing the throttle.

4
When operating the bike at a higher power assist level, the hub motor should provide a smooth, gradual
acceleration of the motor's power. Should the power assist or motor levels function abnormally,
intermittently, or not work at all, please stop using your E-bike immediately and contact our support
team for assistance.
BRAKES
Ensure that brakes function normally and all components of the braking system are properly secured
without any damage. When you fully squeeze the brake levers, ensure that neither the front nor the
rear brake lever touches the handlebars and that the wheels are locked. Add tension to the brake cables
or take your bike to a certified bike mechanic to have the brakes repaired when you face any problems.
WARNING: Do not touch the brake rotor. Touching the brake rotor, which has sharp edges and
can get very hot while you're riding, can cause serious injury, slicing damage, or burns. The
brake rotor heats up from normal friction when the brake pads press against the brake rotor to slow or
stop the bike. Touching the brake rotor with bare skin can also transfer natural oils to the rotor, which
can decrease braking performance. Do not touch the brake rotor, especially when it's in motion or after
you've been riding your bike. Touch the brake rotor only for necessary maintenance when it is cool, not
moving, and while you are wearing gloves or using other appropriate protective equipment.
RIMS AND TIRES
Your tire rims should always spin straight and must be repaired or replaced if they wobble from side to
side or up and down when spinning. If your rims become untrue or spokes loosened, which could
happen due to shipping or after use, we recommend having a certified bike mechanic tune the rims of
your E-bike. Do not attempt to tune rims or tighten spokes unless you have adequate knowledge, tools,
and experience. Inspect the tires for any physical damage and they are filled to the proper air pressure
as indicated on the tire sidewall. Do not ride the bicycle with a tire that is physically damaged or is low
or flat. Tires without the correct amount of air pressure could reduce performance, cause tires to wear
faster, and make riding your bike dangerous. See the Tire Inflation and Replacement section of this
manual for more information.
QUICK RELEASE LEVERS
Quick release levers are for securing the seat post and handlebar height adjustment. They allow the user
to adjust the seat post and handlebar height without tools. Since quick release levers could be loosened
during transportation, or accidentally between or during rides, it is important that you regularly check to
ensure these quick releases are properly tightened.
WARNING: Failure to properly tighten, fully close, and secure the quick release clamps on your
E-bike before riding could lead to loss of control causing serious injury or death.
HANDLEBAR, GRIPS, AND SEAT ADJUSTMENTS
Make sure that the handlebar and the handlebar stem are properly aligned, fitted to the user, and
tightened to their corresponding, recommended torque values. Handlebar grips should not move easily
at the ends of the handlebar. Loose, worn, or damaged handlebar grips should be replaced before
riding. The handlebar, seat and seat post should be properly aligned, fitted to the user, and the seat
post and handlebar quick releases should be properly tightened, fully closed, and secured before riding.

5
BATTERY CHARGED, SECURED, AND UNPLUGGED
Make sure that the battery is adequately charged and operating properly. The battery gauge on the LCD
display and charge status indicator on the battery should be approximately the same. Also make sure
the battery charger is unplugged from the outlet and the battery and is stored safely before riding. The
battery MUST be locked using the provided key into the internal battery mount properly before use. Do
not operate the electrical system if the battery is removed.
ACCESSORIES, STRAPS, AND HARDWARE
Ensure all hardware to be secured and all approved accessories to be properly attached following the
l hardware, straps,
and accessories before each ride and, if you discover something wrong or find something you are unsure
of, have it checked by a certified bicycle mechanic.
WARNING: DO NOT USE NON-GLION PRODUCTS WITH YOUR GLION ELECTRIC BICYCLE. Glion
bicycles have been built to certain Glion design specifications. The original equipment supplied
at the time of sale was selected based on its compatibility with motor, battery, controller, battery
charger, frame, fork, and all other parts. Certain aftermarket products may not be compatible, may
create a hazard, and will void the warranty.

6
WARNINGS AND SAFETY
SAFETY NOTES
WARNING: The following safety notes provide additional information on the safe operation of
your bike from Glion and should be closely reviewed. Failure to review these notes can lead to
serious injury or death.
Glion. Additional
manuals for components used on the bike may also be provided and should be read before installing or
using those components.
big or too small.
wear an approved bicycle helmet whenever riding a bike and ensure that all helmet
manufacturer instructions are used for fit and care of your helmet. Failure to wear a helmet when riding
may result in serious injury or death.
ening, and torquing to recommended torque values is performed on your
bike before first using it and check the setup, tightening, and condition of components and hardware
regularly.
irements of operating this product
in the area(s) where you ride.
you to lose control and fall.
Glion has
not tested for safety and compatibility and have verified as safe and compatible with the bike. Contact
Glion to check if your equipment will work with the bike.
-road riding requires close attention, specific skills, and presents variable conditions and hazards
which accompany the conditions. Wear appropriate safety gear and do not ride alone in remote areas.
Check local rules and regulations about whether off-road E-bike riding is allowed.
that exceeds your capabilities. Although many articles/advertisements/catalogs depict extreme riding,
this is not recommended nor permitted, and you can be seriously injured or killed if you perform
extreme riding.
luding but not
limited to jumps, stunts, etc., should not be performed as it can damage bike components and/or cause
or lead to dangerous riding situations in which you may be seriously injured or killed.
n, compatibility, proper operation, or maintenance of
any component or accessory can result in serious injury or death.

7
incident, you must consider your bike unsafe to ride until you consult with a certified,
reputable bike mechanic for a comprehensive inspection of all components, functions, and operations of
the bike.
situation.
itches before each ride. The brake system
is equipped with an inhibitor that cuts off power to the electric motor whenever the brakes are
squeezed. Check proper operation of brake motor cutoff switches before riding.
ng the pedal assistance sensor and throttle on this product.
Ensure you understand and are prepared for the power assistance to engage as soon as pedaling is
underway.
humb throttle and pedal assistance sensors before using
the bike and must take care to travel at speeds appropriate for the usage area, riding conditions, and
user experience level. Always use the lowest assist level until you are comfortable with the bike and feel
confident in controlling the power.
Glion not expressly approved by Glion could void the
warranty and create an unsafe riding experience.
while riding.
distances. Feet or hands can slip in wet conditions and lead to serious injury or death.
pedestrian bell.
GENERAL OPERATING RULES
WARNING: Pay special attention to all the general operating rules below before operating your
bike from Glion.
ormation regarding traffic/vehicle laws, contact the road traffic authority in your
area.
to other road users you may be hard to see.
tracks, speed bumps, drain gates, thorns, broken glass, and other obstacles, hazards, and puncture flat
risks.

8
-degree angle or walk your bike across.
yourself with all the features and operations of the bike by Glion. Practice and become
proficient at shifting gears, applying the brakes, using the power assist system, and using the throttle in
a controlled setting before riding in riskier conditions.
Wear proper riding clothes including closed-toe shoes. If you are wearing loose pants, secure the
bottom using leg clips or elastic bands to prevent them from being caught in the chain or gears. Do not
use items that may restrict your hearing.
Check your local rules and regulations before carrying cargo.
may lock up, you may lose control, and you could fall.
ng distance from all other objects, riders, and vehicles. Safe braking
distances are based on factors such as road surface and light conditions among other variables.
GENERAL WARNINGS
Like any sport, bicycling involves risk of damage, injury, and death. By choosing to ride a bike,
you assume the responsibility for that risk, so you need to know, and practice the rules of safe
and responsible riding and the proper use and maintenance of this bike. Proper use and maintenance
of your bike reduces risk of damage, injury, and death.
Biking and controlled substances do not mix. Never operate a bike while under the influence of
alcohol, drugs, or any substance or condition that could impair motor functions, judgement, or
the ability to safely operate a bike or another vehicle.
The Glion B1 is designed for use by persons 18 years old and older. Riders must have the
physical condition, reaction time, and mental capability to ride safely and manage traffic, road
conditions, and sudden situations, as well as respect the laws governing electric bike use where they
ride, regardless of age. If you have an impairment or disability such as a visual impairment, hearing
impairment, physical impairment, cognitive/language impairment, a seizure disorder, or any other
physical condition that could impact your ability to safely operate a vehicle, consult your physician
before riding any bike.
A NOTE FOR PARENTS AND GUARDIANS
As a parent or guardian, you are responsible for the activities and safety of your child. The Glion B1 is
not designed for use by children under the age of 18. If you are carrying a passenger in a child safety
seat, they should also be wearing a properly fitted and approved helmet.

9
HELMETS
It is strongly advised that a rider always wear a properly fitting and approved
bicycle safety helmet when riding. Bicycle helmets should only and always be
used for bicycle riding. When riding a bike, always wear a properly fitted helmet that
covers the forehead. Many locations require specific safety devices. It is your
responsibility to familiarize yourself with the local laws, rules, and regulations where
you ride and to comply with all applicable laws, including properly equipping yourself and your bike as
the law requires.
NIGHT RIDING
It is recommended to not ride at night if avoidable. Ride at night only if necessary.
-colored clothing.
obstructed.
Glion recommends the purchase of a taillight for night riding. Ensure your head light and taillight is
functioning properly and use them when night riding.
WET WEATHER
It is recommended to not ride in wet weather if avoidable. Ride in wet weather only if necessary.
This electric bike is not meant for use in puddles, heavy rain, or streams. Never immerse or submerge
this product in water or liquid as the electrical system may be damaged.
ting this bike.
ing and use approved safety
lights.

10
SPECIFICATIONS AND PARTS DIAGRAM
SPECIFICATIONS
Model Name Glion B1
Model Number Model 510
Maximum Speed 20 mph/32 kmh
Battery 48V 10.4 ah
Motor 500 Watts
Average Range Per Charge* 30 miles average
Wheel Size
Charger 48 V 3A
Charging Time Approximately 5 hours
Water Resistance IPX4
Max Load 250 lbs./113 kg
Weight 60 Lbs./28 kg
*Average Range Per Charge is measured under the conditions that power is sufficient, with a 165 lbs.
(75kg) load, at 6°F(30°C), 70% humidity, on a level hard surfac ed road, in pure electric riding mode with
no wind. Actual results may vary based on d i f f e r e n c e s in temperature, load, wind speed, road
conditions and other factors.

11
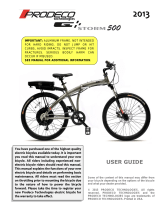
PARTS DIAGRAM
NO
Part NO
Part NO
Part
1
Two Step Frame Folding
Mechanism
8
Derailer
15
Front Reflector/ Headlamp
2
Seat/Saddle
9
Chain
16
Headset
3
Seat Post
10
Crank
17
Two Step Stem Folding
Mechanism
4
Seat Post Clamp
11
Pedals
18
Stem
5
Rear Fender
12
Front Wheel
Axle
19
Handlebar Clamp
6
Hub Motor
13
Front Fork
20
Break Levers
7
Rear Wheel Axle
14
Front Fender
21
Right Grip (Shift, Lever,
Pedestrian Bell)

12
NO
Part NO
Part NO
Part
22
Charge Port and Battery Indicator
29
Tires
36
Air Stem
23
LCD Display Center
30
Rims
37
Rear Fender
24
LCD Controls, Left Grip
31
Brake Rotors
38
Seat Post Clamp
25
Handlebar Clamp
32
Front Brakes
39
Rear Reflector
26
Stem
33
Kick Stands
40
Seat/Saddle
27
Two Step Stem Folding Mechanism
34
Rear Brake
41
Controller Access Plate
28
Front Reflector/ Headlamp
35
Hub Motor
42
Frame Stand

13
NO
Part NO Part NO Part
43
Battery Lock
46
LCD Display Remote
49
Shifter
44
Battery Insert
47
LCD Display
50
Thumb Throttle
45
Brake Levers
48
Pedestrian Bell

14
ASSEMBLY INSTRUCTIONS
(Please Reference Unboxing/Assembly video at www.getglion.com)
The following steps are only a general guide to assembling your E-bike and are not a complete or
comprehensive manual of all aspects of assembly, maintenance, and repair. If you do not have the
experience, skill, or tools to assemble your electric bike, Glion highly recommends having a certified,
reputable bike mechanic assemble your electric bicycle for you, including any future adjustments or
tuning. At a minimum, please have the certified, reputable bicycle mechanic inspect the assembled
bicycle before your first ride.
UNBOXING AND ASSEMBLY
WARNING: Incorrect assembly, maintenance, or use of your E-bike can cause component or
bike rider, you must read and understand the entire manual and any documentation
provided for subcomponents or accessories before riding. If you are not sure you have the experience,
skills, and tools to correctly perform all assembly steps in the manual and the assembly video at
www.getglion.com, consult a local, certified, reputable bike mechanic.
Step 1 Unpack the electric bike
Open the bike box and remove the small box inside. With the help of someone who is capable of safely
lifting a heavy object, remove the E-bike from the bike box. Carefully remove the packaging materials
protecting the bike frame and all other components. Please recycle packaging materials, especially the
cardboard and the foam. Open the small box and carefully set out all contents. The following should be
included with the Glion B1 Model 510 Electric Bike:
Assembly Toolkit (Allen Wrench/Screwdriver
and Pedal Wrench)
Left and Right Pedals
Spoke Reflectors
48 v 10.4 ah battery (inserted in bike frame)
Charger
Keys (2 identical)
Rear Axle Cap
Rear Facing Reflector
If there are any missing parts, please contact Glion.
Step 2 Unfold the Electric Bike
Unfold the electric bike and lock the Two Step Frame Folding Mechanism. Extend Kickstand. Unfold the
handlebar Stem to its upright position and secure by locking the Two Step Handlebar Folding
Mechanism. Use caution keeping fingers, clothes or anything else away from the hinge.
Check that the Two Step Frame Folding Mechanism is latched and securely locked as shown in the
assembly video. You should not be able to open the latch without disengaging the latch safety lock

15
(silver knob circled in red in image on right). Use caution to keep
fingers, clothing, etc. away from folding parts and pitch points.
Always check the frame folding mechanism latch and the handlebar
folding mechanism latch are locked before moving the bike.
Step 3 Adjust Handlebar and Pedestrian Bell.
Using the 5 mm Allen Wrench provided, loosen (do not remove) the
rear handlebar stem bolt located below the LCD Display (you will
need to gently twist the LCD Display to expose bolts), rotate the
handlebar upwards so the grips are approximately parallel to the
ground and then securely tighten front and back handlebar stem screws and check that the handlebar
cannot rotate up or down. Each stem screw should be secured to the recommended torque value (16
nm/12 F-lb).
Stand in front of the bike and clamp the front wheels with both legs, verify the handlebars are straight
and inline with the front wheels.
Gently rotate the pedestrian bell so that it is also parallel to the ground. Using the Phillips head screw
end of the provided Allen wrench, lock the pedestrian bell into position. Test bell.
Step 4 Install Reflectors
Install rear facing reflector on the Seat Post. Install the side spoke reflectors on the spokes opposite the
tire air stem located on the front and rear tires.
Step 5 Set the Desired Seat Height
Open the Seat Post Clamp by hinging it open fully. Ensure the Seat Post Clamp opening is aligned with
the notch at the rear of the seat tube. Adjust the seat post up or down to a comfortable height, while
ensuring the seat post is inserted into the frame past the Minimum Insert position shown on the seat
post.
If needed, use the thumb nut to add tension to the clamp so there is some resistance when the lever is
in line with the clamp bolt but do not overtighten. Close the quick release clamp lever to secure the seat
post and check that it cannot move. See Adjusting the Seat section of this manual for more details.
Step 6 Install Pedals
Locate the right side pedal. Pedal marked with an R. The right pedal goes on the Crank on the right side
of the bike (chain side and
the ride side of the bike slowly by hand. Be careful to not cross thread or damage the threads. Finish
tightening the right pedal with provided wrench.
Locate the left side pedal. Pedal marked with an L. The left pedal is reverse threaded and tightens
e pedal onto the left crank slowly by
hand. Be careful to not cross thread or damage the threads. Finish tightening the left pedal with
provided wrench.

16
Step 7 Inflate Tires
Check that the tire beads and tires are evenly seated around the rims. Use a pump with a Schrader
valve and pressure gauge to inflate each tire to the recommended pressure indicated on the tire
sidewall. Do not over/under inflate the tires.
Step 8 Review the Remainder of this Manual and Watch All Instructional Videos at www.getglion.com
If you assembled the bicycle yourself, Glion highly recommends you have a certified, reputable bicycle
mechanic inspect the assembled bicycle before your first ride.
Once the bike has been assembled following the instructions above, read, understand, and follow the
procedures outlined in the remainder of the manual before operating the bike.
NOTICE: If you have any questions regarding the assembly of your bike, please contact Glion. If you are
unsure whether you assembled your bicycle correctly, please, for your safety and the safety of others,
have a certified, reputable bicycle mechanic inspect the assembled bicycle before your first ride.
NOTICE: Ensure that all hardware is tightened properly following recommended torque values. Also
ensure that all safety checks in the following sections are performed before the first use of the bike.
WARNING: Do not extend any components including the handlebar, seat post, or seat
saddle beyond any minimum insertion marking etched into the components. Ensure that
all hardware is properly tightened (to the values in the Recommended Torque Values
table) and components are secured before moving on to the next step, otherwise, bike
damage, serious injury, or even death could occur.
Generally, for the most comfortable riding position and the best pedaling efficiency, the seat height
Adjusting the Seat Height section,
allowing the knees to be slightly bent with the ball of the foot still on the pedal when the pedal is at the
lowest point at the bottom of each stroke.
NOTICE: perience with bikes and
E-bikes, lowering the seat so the rider can put one or both feet on the ground without
dismounting from the seat might offer a safer seat height to learn how to operate and
balance the E-bike. Otherwise, you will have to dismount from the seat to straddle the bike with both
feet on the ground.
typically advised to ensure that the handlebar and brake lever angles allow a comfortable arm position
and relatively straight line from forearms, wrists, and hands. Ensure that the handlebar angle is adjusted
a certified bike mechanic who specializes in bike fitting, should be consulted to ensure you have a good
fit.
WARNING: If you have any questions regarding the proper fit of your bike, please consult a
certified local bike mechanic for assistance.

17
ADJUSTING THE SEAT HEIGHT
For most users, the seat height should be set by placing the ball of their foot on
the pedal when the pedal is at its lowest point. In this orientation, their legs
should be almost fully extended, with a slight bend at the knee. The correct seat
height should not allow leg strain from overextension and the hips should not
rock from side to side when pedaling. To adjust the seat height:
1. Open the quick release lever by swinging the lever open and outwards fully .
2. Move the seat up and down by sliding the seat post in or out of the seat tube.
Set the desired seat height.
WARNING: Ensure that both the seat post and seat are both properly
adjusted before riding. DO NOT raise the seat post beyond the
minimum insertion marking etched onto the seat post tube (as shown at figure
to right). If the seat post projects from the frame beyond these markings
(shown figure to right), the seat post and the frame may break, which could
cause a rider to lose control and have an accident.
Ensure that the minimum insertion markings on the seat post are inside the
seat tube of the frame (shown far right).
3. After tightening the adjustment nut (opposite the quick release lever) on the seat post quick release
properly, close the quick release lever fully so it looks like the image above and the seat cannot move
up, down, to the left, or right.
WARNING: Before using the bike, always check to ensure all latches, levers, and quick
releases are properly tightened and undamaged. Check that they are correctly tightened and
secured before every ride and after every time the bike is left unsupervised, even for a short
time. Otherwise, the handlebar stem and/or seat post may come loose and can result in loss of control,
damage to the bike/property, serious injury, or death.
ADJUSTING THE SEAT POSITION AND ANGLE
To change the angle and horizontal position of the seat:
1. Use a 6 mm hex wrench to loosen but not remove the seat
adjustment bolt underneath the seat shown on figure to the right.
2. Once the bolt and clamp are adequately loose, rotate the front of
the seat up or down to adjust the angle of the seat; a horizontal seat
position is desirable for most riders. Move the seat backwards or
forwards within the white limit markings on the seat rail, which show
the minimum and maximum horizontal movement allowed for this component. Do not exceed these
limits.

18
3. While holding the seat in the desired position, use a 6 mm hex wrench to tighten the seat adjustment
bolt securely.
WARNING: Prior to first use, be sure to tighten the seat clamp via the seat adjustment bolt
properly. A loose seat clamp or seat post adjustment bolt can cause bike/property damage, loss
of control, a fall, serious injury or death. Periodically check to make sure that the seat clamp is properly
tightened.
ADJUSTING HANDLEBAR HEIGHT
1. Open the quick release lever by swinging the lever open and
outwards.
2. Move the handlebars up and down by sliding the handlebar post in or
out of the stem careful not to over extend the handlebar electrical
wires/brake cables.
Set the desired handlebar height.
3. After tightening the adjustment nut (opposite the quick release lever)
on the handlebar quick release clamp, properly close the quick release
lever fully as shown in the image on the right and the handlebar is secure
and cannot move up or down. Push down and pull up on the handlebar to
make sure it is secure.
FOLDING AND UNFOLDING THE FRAME
Folding the frame of Glion B1 Model 510:
1. Stand at the left side of the bike and ensure the cranks are parallel to the ground and the kickstand is
in the up position.
2. Push forward the silver knob located underneath the black latch of the
Two Step Frame Folding Mechanism (step 1) and then pull open the black
latch so that it is at least perpendicular to the frame (step 2).
3. Begin to fold until both sides of the frame are next to each other, turning
the front wheel slightly left to facilitate folding if needed. Rest the bike on
the frame stand under the cranks.
Helpful tip: While applying the front brake, press thigh against hinge to
slightly unfold the bike and walk the rear of the bike forward.
Unfolding the frame of the Glion Model 510:

19
1. Carefully stand between the two wheels and unfold the frame while it rests on the frame stand under
the crank.
2. Once the bike is
pinched and finish unfolding the bike. You may have to use your fingers to carefully push the wires into
the frame. Be careful not to pinch your fingers when doing so.
4. Push forward the silver knob located underneath the black latch of the Two Step Frame Folding
Mechanism and then close the black latch and then release the silver knob. Try to pull the black latch
away from the frame. It should not move without engaging the silver knob. Be careful when folding
not to pinch the wires running through the frame.
NOTICE: Use caution to keep fingers, clothing, etc. away from the folding parts and potential pinch
points when folding and unfolding your E-bike. Always check the frame folding mechanism latch and
handlebar folding mechanism latch are locked before moving or riding the bike.
WARNING: Before each ride, visually inspect the frame for proper alignment and ensure
all hardware is properly secured and the frame is tightly hinged together. Move the folded
bike by tilting onto the front wheel, or by lifting with care; get help if needed.
FOLDING HANDLEBAR STEM OPERATION:
Follow these steps to fold and unfold the handlebar stem on the Glion Model 510:
Folding the Handlebar Stem for Storage:
1. Press and push up the circled stem clasp release button (step 1) and then pull
the stem clasp away and down (step 2).
2. Fold the handlebar stem to the side, hinging away from the clasp.
Securing the Handlebar Stem in the Unfolded (Ready to Ride) Position:
1. Align the handlebar so it is upright and the hinge is closed, using caution to
keep fingers, clothes, or anything else away from the clasp.
2. Press and push up the circled stem clasp release button and close the stem clasp and then release the
circled button. When properly secured, the stem clasp should not move and you should not be able to
pull the clasp away from the stem without pressing the stem clasp release button.
When properly secured, the stem clasp should not move. Contact Glion Product Support if the clasp
moves when locked, which requires tightening.
WARNING: Before each ride, visually inspect the handlebar for proper alignment and ensure
all hardware is properly secured and the stem and frame are securely locked.
/