Page is loading ...

AVerVision A30
Universal Camera
— User Manual —

Warning
Do not twist the camera arm while folding it.
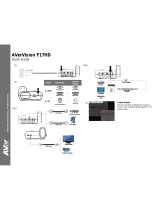
Adjust the angles of the adjustable arm as illustrated.
Do not drop the camera or subject it to physical shock.
Ensure the power supply voltage is correct before using the camera.
Do not place the camera where the cord can be stepped on as this may result in fraying or
damage to the lead or the plug.
To reduce the risk of fire or electric shock, do not expose the camera to rain or moisture.
Warranty will be voided if any unauthorized modifications are done to the camera.
Federal Communications Commission Statement
NOTE: This equipment has been tested and found to comply with the limits for a Class A digital
device, pursuant to part 15 of the FCC Rules. These limits are designed to provide reasonable
protection against harmful interference when the equipment is operated in a commercial
environment. This equipment generates, uses, and can radiate radiofrequency energy and, if not
installed and used in accordance with the instruction manual, may cause harmful interference to
radio communications. Operation of this equipment in a residential area is likely to cause harmful
interference in which case the user will be required to correct the interference at his own
expense.
FCC Caution: Any changes or modifications not expressly approved by the party responsible for
compliance could void the user's authority to operate this equipment.
This device complies with part 15 of the FCC Rules.
Operation is subject to the following two conditions:
(1) This device may not cause harmful interference, and
(2) this device must accept any interference received, including interference that may cause undesired
operation.
This Class A digital apparatus complies with Canadian ICES-003. Cet appareil numérique de la
classe A est conforme à la norme NMB-003 du Canada.

Warning
This is a class A product. In a domestic environment this product may cause radio interference in
which case the user may be required to take adequate measures.
Caution
Risk of explosion if battery is replaced by an incorrect type. Dispose of used batteries in a safe
and proper manner.
DISCLAIMER
No warranty or representation, either expressed or implied, is made with respect to the contents
of this documentation, its quality, performance, merchantability, or fitness for a particular purpose.
Information presented in this documentation has been carefully checked for reliability; however,
no responsibility is assumed for inaccuracies. The information contained in this documentation is
subject to change without notice.
In no event will AVer Information Inc. be liable for direct, indirect, special, incidental, or
consequential damages arising out of the use or inability to use this product or documentation,
even if advised of the possibility of such damages.
TRADEMARKS
“AVer” is a trademark owned by AVer Information Inc. Other trademarks used herein for
description purpose only belong to each of their companies.
COPYRIGHT
© 2023 AVer Information Inc. All rights reserved. | December 27, 2023
All rights of this object belong to AVer Information Inc. Reproduced or transmitted in any form
or by any means without the prior written permission of AVer Information Inc. is prohibited. All
information or specifications are subject to change without prior notice.

More Help
For FAQs, technical support, software and user manual download, please visit:
Headquarters
Download Center: https://www.aver.com/download-center
Technical Support: https://www.aver.com/technical-support
USA Branch Office
Download Center: https://www.averusa.com/business/support
Technical Support: https://averusa.force.com/support/s/contactsupport
Europe Branch Office
Download Center: https://www.avereurope.com/download-center
Technical Support: https://www.avereurope.com/technical-support
Contact Information
Headquarters
AVer Information Inc.
https://www.aver.com
8F, No.157, Da-An Rd., Tucheng Dist., New Taipei City 23673, Taiwan
Tel: +886 (2) 2269 8535
USA Branch Office
AVer Information Inc., Americas
https://www.averusa.com
668 Mission Ct., Fremont, CA 94539, USA
Tel: +1 (408) 263 3828
Toll-free: +1 (877) 528 7824
Technical support: support.usa@aver.com
Europe Branch Office
AVer Information Europe B.V.
https://www.avereurope.com
Westblaak 134, 3012 KM, Rotterdam, The Netherlands
Tel: +31 (0) 10 7600 550
Technical support: eu.rma@aver.com
Japan Branch Office
アバー・インフォメーション株式会社
https://jp.aver.com
〒160-0023 日本東京都新宿区西新宿 3-2-26 立花新宿ビル 7 階
Tel: +81 (0) 3 5989 0290
テクニカル・サポート: https://jp.aver.com/technical-support
Vietnam Branch Office
Công ty TNHH AVer Information (Việt Nam)
Tầng 5, 596 Nguyễn Đình Chiểu, P.3, Quận 3,
Thành phố Hồ Chí Minh 700000, Việt Nam
Tel: +84 (0)28 22 539 21

Contents
Warning .............................................................................................................................. 2
Overview ............................................................................................................................. 1
Package Contents ........................................................................................................... 1
Parts Info ......................................................................................................................... 2
Operation Angles ............................................................................................................ 3
Function Buttons ............................................................................................................. 2
Auto Rotate ..................................................................................................................... 3
Remote Control ............................................................................................................... 5
Connections ....................................................................................................................... 7
Power Connection ........................................................................................................... 7
HDMI Connection ............................................................................................................ 8
Audio Input Connection ................................................................................................... 8
USB Device Connection.................................................................................................. 8
Bluetooth Connection (US Only) ..................................................................................... 8
Set Up Your Camera .......................................................................................................... 9
Open the OSD Menu....................................................................................................... 9
Remote control Operation .......................................................................................... 9
Function Buttons Operation ........................................................................................ 9
OSD Menu .................................................................................................................... 10
Image ....................................................................................................................... 10
Picture In Picture ...................................................................................................... 12
Presentation ............................................................................................................. 13
Audio ........................................................................................................................ 14
Setting ...................................................................................................................... 15
System ..................................................................................................................... 16
OSD Menu Tree ............................................................................................................ 17
Specification .................................................................................................................... 19
Troubleshooting ............................................................................................................... 21

1
Overview
Package Contents
A30
Power Adapter & Power
Cord*
Remote Control
USB 2.0 Type-C to
Type-A Cable (1.8m)
Bluetooth Dongle
(US only)
QR Code Card
*The power cord will vary depending on the standard power outlet of the country where it is sold.

2
Parts Info
1. Microphones
2. LED Indicator
Solid blue: Normal
Solid red: Standby
(connected to power but not
turned on)
Flashing red: Start-up
3. IR Sensor
4. Speaker (up to 6x6m)
5. Audio Input
- 3.5mm Line in / Mic in
6. Kensington Lock
7. USB Type-A Port
8. USB Type-C Port
9. DC Power Jack
10. HDMI Output Port
11. Power Button
12. LED Lamp
13. Camera Lens
14. Foldable Arm
15. Function Buttons
16. Tripod Screw Hole
- Screw: 1/4”-20 (not
included)
Function Buttons
Press
To
Autofocus once.
Zoom in. Press and hold to zoom in continuously.
Zoom out. Press and hold to zoom out continuously.
Turn LED lamp on or off. Press and hold for 3 seconds to flip the live view.
Increase volume. Press and hold to increase volume continuously.
Decrease volume. Press and hold to decrease volume continuously.
+
Turn Auto Rotate on or off. Auto Rotate automatically flips images in the correct
orientation.

3
Operation Angles

4
Auto Rotate
You can enable the Auto Rotate function for the unit to automatically flip 0/180° of the live images
when turning the Camera Head upward or downward.
For the Auto Rotate function to work, enable the Auto Rotate function in advance. Please refer to
Auto Rotate in the <Image> chapter for more details.
When the angle of the Camera Head is less than 30°, the live images will rotate to 0°.
When the angle of the Camera Head is more than 60°, the live images will rotate to 180°.
Since A30 Universal Camera can be used as a document camera or a Webcam, the Auto Rotate
function is able to ensure the live images to be displayed with the right orientration, which will
automatically flip the images when they appear upside-down. Below are 2 scenarios for your
reference.
Scenario 1: When a presenter is shooting on a document at the beginning, and then turn the Camera
Head upward to shoot him/herself, the live images will automatically flip if the Auto Rotate function is
turned on.
Scenario 2: When a presenter is shooting him/herself at the beginning, and then turn the Camera
Head downward to shoot on a document, the live images will automatically flip if the Auto Rotate
function is turned on.

5
Remote Control
(18)
(14)
(11)
(7)
(8)
(5)
(2)
(1)
(22)
(13)
(4)
(3) (15)
(12)
(17)
(23)
(20)
(19)
(9)
(6) (16)
(10) (21)
AAA battery x2
(not included)
Name
Function
1. Power
Turn the camera on or off.
2. Camera
Enter the Camera mode (live view).
3. Record
Start/stop audio/video recording. The recordings
will be saved in a USB flash drive.
4. Capture
Capture still image. In continuous capture mode,
press this button again to stop. The images will
be saved in the selected storage.
5. Visor
Visor covers part of the camera view and allows
the presenter to reveal the desired part of the
camera view.
To enable Visor:
1. Press the Visor button to enter the Visor setup
page in OSD menu.
2. Select On and press to enable Visor,
the upper-left part of the camera view will be
exposed.
3. Use the ▲,▼,◄, & ► buttons to reveal more
of the covered camera view.
4. To exit Visor mode, press the Visor button
again.
6. Rotate
Rotate the image by 0/180°.
7. Menu
Open or close the OSD menu.
8. ▲,▼,◄, & ►
- Select options in OSD menu. Enter the
previous/next level page in OSD menu.
- In Zoom mode, use ▲,▼,◄, & ► to navigate
the live view.
- In Playback mode, use ▲&▼ to increase and
decrease the volume.
- In Playback mode, use ◄&► to play the video
backward and forward.
9. Auto Focus
Adjust the focus automatically.
10. Zoom +/-
In Camera Live mode or Split Screen (live) and
Playback (image) mode, use Zoom +/- to zoom
in or zoom out the images.
11. Zoom 1x
Reset zoom level to 100%.
12. Playback
Playback the captured pictures/videos from the
USB flash drive.
- Use ▲,▼,◄, & ► to select an image or video.
- Press to display the image or playback
the video. Press again to pause
playback.
- Press the Freeze/Stop button to stop playing
back.

6
13. PC 1/2
In PIP mode, press this button to switch the
video source displayed on the Main View.
14. Freeze / Stop
- In Live mode, freeze live images.
- In Playback mode, stop video playback.
15. Spotlight
Spotlight will focus on the central area of the
camera view and cover all of the rest areas.
To enable Spotlight:
1. Press the Spotlight button to enter Spotlight
setup page in OSD menu.
2. Select On and press to enable
Spotlight, the central area of the camera view
will be displayed.
3. Optionally use ▲,▼,◄, & ► to adjust the
revealed area.
4. To exit Spotlight mode, press the Spotlight
button again.
16. Split Screen
Divide the screen into two. One side displays the
camera live view and the other side displays the
captured image or recorded video thumbnails
from the USB flash drive.
The split options include Left, Right, Top and
Bottom.
After selecting a split option, use ▲,▼,◄, & ► to
select a capture image or video. Press to
display the image or playback the video.
17. Mode
Press to switch among Normal, High Quality and
Motion modes.
18. Timer
Press the Timer button to enter Presentation
Timer setup page in OSD menu. Select to
Start/Pause/Stop the timer countdown.
Select Timer Interval to set the timer duration.
19.
- Confirm a selection.
- Enter the submenu in the OSD menu.
- Play/Pause video playback.
- Display the captured images.
20. Lamp
Turn LED lamp on or off.
21. Brightness +/-
Adjust the brightness.
22. Default
Reset to factory default settings.
23. DEL
Delete the selected picture/video in Playback
mode.

7
Connections
Power Connection
1. Connect to a power outlet using the included
power adapter and cord.
2. Press the power button to turn on your
camera.
You can also use the USB Type-C port to power
your camera by connect it to a computer using the
included USB Type-C cable.
Note:
We recommend using a USB Type-C to Type-C cable. Using the USB Type-C to Type-A cable
may provide limited functions.
When switching between DC power jack and USB Type-C port, your camera goes into Standby
mode. Press the power button to turn on your camera.
Video and volume limits:
- The maximum HDMI resolution is 1080p.
- When you use the included USB Type-C to Type-A cable (1.8m), the maximum volume level
decreases from 15 to 5.
LED lamp, USB flash drive and upgrade firmware are unavailable.

8
HDMI Connection
Connect to a TV or Monitor using an HDMI cable
to stream video or configure settings on the OSD
menu.
Audio Input Connection
Connect to an external microphone using an audio
cable and deliver audio from your camera’s built-in
speaker.
Line input level: 1Vrms (max.)
Mic input level: 50mVrms (max.); supplied
voltage: 2.5 +/- 0.5 (V)
USB Device Connection
USB Type-A port: Connect to a USB camera
for picture-in-picture or an external storage of
up to 32GB (FAT32) for images and videos.
USB Type-C port: Connect to a computer
using the included USB cable to work with
your video conferencing software.
Bluetooth Connection (Optional accessory)
Connect your camera as a Bluetooth speaker via
the Bluetooth dongle.
1. Plug the included Bluetooth dongle into the
USB Type-A port on your camera. Do not
connect through a USB hub.
2. Open the Bluetooth settings on your computer,
smartphone or tablet and select A30 to
connect your camera.

9
Set Up Your Camera
Open the OSD Menu
You can open the on-screen display (OSD) menu to configure camera settings using the remote
control or function buttons. Make sure you have connect the camera to a monitor or TV using an
HDMI cable.
Remote control Operation
Press the Menu button on the remote control to open the OSD menu. Press again to close the menu.
Button
Function
◄
Exit the selection or go back to the previous selection.
►
Enter or confirm a selection.
▲
Move through the menu.
▼
Move through the menu.
Enter or confirm a selection.
Function Buttons Operation
Press and hold the autofocus button for 3 seconds to open the OSD menu. Press again to close
the menu.
Button
Function
Back
Up
Down
Left
Right
Enter

10
OSD Menu
Image
Brightness: Adjust the brightness level (0-255).
Contrast: Adjust the contrast level (0-255).
Saturation: Adjust the saturation level (0-255).
Preview Mode: Select a mode.
Normal: Adjust the gradient of image.
Motion: High refresh rate upon motion images.
High Quality: High resolution with the best quality.
Effect: Select an effect.
Color: Convert the images into positive (true color).
B/W: Convert the images into monochrome (black and white).
Negative: Convert the images into negative.
Mirror: Enable or disable the function to flip left or right of the images.
Auto Rotate: Enable or disable the function to automatically rotate 0/180° of the images.
Exposure Setup: Select an option.
Auto: Select to automatically adjust the exposure setting.
Manual: Select to manually adjust the exposure setting. Adjust the Manual Exposure below.
Manual Exposure: This function only appears when Manual is selected in Exposure Setup.
Adjust the exposure value (0-99).
White Balance Setup: Select an option.
Auto: Select to automatically adjust the white balance setting.
Manual: Select to manually adjust the white balance. Adjust the blue and red color below.
Manual W.B Blue: This function only appears when Manual is selected in White Balance Setup.
Adjust the value (0-255).

11
Manual W.B Red: This function only appears when Manual is selected in White Balance Setup.
Adjust the value (0-255).
Focus: Adjust the focus value (0-1023).

12
Picture In Picture
The Picture In Picture (PIP) function allows you to display two camera streams, one from the A30 and
the other from an USB camera, on a screen. It’s useful for a presenter to display the content of the
materials and the presenter/audience simultaneously.
PIP Mode: Manually enable or disable the PIP mode. To manually display the PIP mode:
1. Connect an USB camera to the USB Type-A port of A30.
2. Go to OSD menu > Picture In Picture > PIP Mode and select On. You should see the PIP
mode displayed on the screen.
3. Optionally switch the main view, or adjust the position or size of the sub view.
4. To turn off the PIP mode, go to OSD menu > Picture In Picture > PIP Mode and select Off.
Main Screen Switch: Select a video source to be displayed on the Main View. Options include
A30 and External Source (camera connected to the USB Type-A port of A30).
Main View
Sub View
Position: Select a position for the Sub View. Options include Bottom Left, Top Left, Top Right,
Bottom Right and Manual. If Manual is selected, you can position the Sub View manually. Use
the ▲, ▼, , buttons on the Remote Control to select a position.
Size: Select a size for the Sub View. Options include Large and Small.
Start PIP Automatically: Turn on this function if you want A30 to automatically display PIP Mode
when an USB camera is connected to A30. For this function to work:
1. Go to OSD menu > Picture In Picture > PIP Mode and select On.
2. Go to OSD menu > Picture In Picture > Start PIP Automatically and select On.
3. Connect an USB camera to the USB Type-A port of A30. You should see the PIP mode
displayed on the screen.

13
Presentation
Spotlight: Enable or disable the function. Spotlight will focus on the central area of the camera
view and cover all of the rest areas. To enable Spotlight:
1. Go to OSD menu > Presentation > Spotlight and select On, the central area of the camera
view will be displayed.
2. Optionally use the ▲,▼,◄, & ► buttons on the Remote Control to adjust the revealed area.
3. To disable the Spotlight function, press the Spotlight button on the Remote Control.
Visor: Enable or disable the function. Visor covers part of the camera view and allows the
presenter to reveal the desired part of the camera view. To enable Visor:
1. Go to OSD menu > Presentation > Visor and select On, the upper-left part of the camera
view will be exposed.
2. Use the ▲,▼,◄, & ► buttons on the Remote Control to reveal more of the covered part.
3. To disable the Visor function, press the Visor button on the Remote Control.
Split Screen: Divide the screen into two. One side displays the camera live view and the other
side displays the captured image or recorded video thumbnails from the USB flash drive. The split
options include Left, Right, Top and Bottom.
After selecting a split option, use the ▲,▼,◄, & ► buttons on the Remote Control to select a
capture image or video. Press to display the image or playback the video.
Timer: Select to Start, Pause or Stop the timer countdown. You can optionally set up the Timer
Interval below. When Start is selected, a timer will be displayed on the top-center of the live view.
To pause or stop Timer, press the Timer button on the Remote Control and select Pause or Stop
on the OSD menu.
Timer Interval: Set up an interval for the Timer above.

14
Audio
Noise Reduction: Enable or disable the Noise Reduction function.
Echo Cancellation: Enable or disable the Echo Cancellation function.
Microphone Volume: Adjust the microphone volume (0-32).
Speaker Volume: Adjust the speaker volume (0-15).
Audio Input Source: Select an audio input source. Options include MIC In and LINE In.
Bluetooth Speaker (Optional accessory): Turn Bluetooth on or off.

15
Setting
Capture Resolution: Select a resolution for the captured images.
13M: Apply the 4208x3120 resolution to the captured images.
Normal: The resolution of the captured images will be based on the selected resolution in the
Output Display (System > Output Display).
Capture Quality: Select a quality for the captured images.
Capture Type: Select Single to manually capture one image at a time. Select Continuous to
continuously capture images based on the setup Capture Interval. To stop continuously capturing
images, press the Capture button on the Remote Control.
Capture Interval: If Continuous is selected in the Capture Type above, you can further set up
an interval.
Storage: To set up this funcion, remove the USB cable from the unit first. Select a storage to store
the capture images or recording videos. Options include Embedded or USB Drive.
[Note]
1. The unit will automatically detect whether an USB drive has been connected. If an USB drive is
connected, the unit will automatically assign USB Drive to store data.
2. The internal Embedded storage can only store images with a maximum of 200 frames. If you
want to store videos, please connect an USB drive to the unit.
Format: To set up this funcion, remove the USB cable from the unit first. You can format the
Embedded or USB Drive storage to erase all the data permanently.
USB to PC: To set up this funcion, remove the USB cable from the unit first. When connecting the
unit to PC through the USB cable, you can either select Camera to use it as a Webcam, or select
Storage if you want to transfer the images or recordings from the unit to your PC.
USB Streaming Resolution: To set up this funcion, remove the USB cable from the unit first.
Select a streaming resolution. Options include Max to 4K and Max to 1080P.
Flicker: Select 50Hz or 60Hz. Some display devices cannot handle high refresh rates. The image
will flicker a couple of times as the output is switched to another refresh rate.
/