Page is loading ...

HOWDENS
FAST FIT
ENGINEERED
REAL WOOD
FLOORING
15
Years
Guarantee
2200mm x 180mm x 11mm
6 Panels Per Pack
Coverage 2.38m²
Pack Weight: 21.4kgs
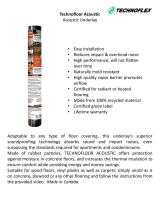
Important information
Features and benefits
Sealed packs must be stored for at least 48 hours where they are
to be laid.
Packs are to be laid flat on the floor with at least 50cm between
packs and walls.
Packs should be stored in a room with a minimum temperature of
18°C.
Do not open packs until you are ready to install the flooring.
The fitting method for this flooring is unique and laying instructions
must be followed on the reverse of this sheet
48
18 C
hrs
Suitable for hot water &
electrical underfloor heating
Flooring can be
taken up again
Fully
Restorable
25°C max
Easy to
Clean
Simple and quick installation
IMPORTANT ENGINEERED FLOORING FITTING NOTICE
Flooring MUST be allowed to acclimatise
• MUST LEAVE 15MM EXPANSION GAP
- Around the entire floor including cabinet legs, radiator pipes and
door frames
- Do not install cabinets over the floor
• SUB-FLOOR MUST BE CLEAN, DRY, FLAT AND LEVEL
- Timber based sub floors must be securely fixed before laying
- Always use a moisture barrier paper on timber based sub floors
• MUST USE HOWDENS FOAM OR XPS UNDERLAY
• ALWAYS USE A DPM ON CONCRETE FLOORS
- And any other mineral based subfloor
Reaction to fire:
D -s1
Emission of Formaldehyde: Class E1
Slipperiness: NPD
Thermal conductivity: 0.145 W/mk
Durability (Biological): NPD
EN14342
Wood flooring for internal non structural use
DoP: HJ-005-JC
40 Portman Square, London W1H 6LT
Howden Joinery Group Plc
13
fl
Flooring to be left in sealed pack in the room of installation for 48hours before fitting

Before Laying
Please read this information before commencing installation
Do not open the cartons prior to installation. Store and acclimatise the unopened cartons inside.
New constructions to be closed in with air conditioning or heating units during the winter months. Recommended
room conditions for installation are 18 °C (65 °F).
Important: Prior to installation, inspect the boards in daylight for any visible faults or damage and also check colour
and texture.
To achieve a regular distribution of the grade in the installed floor, we recommend installing from different packs at
the same time. No claims are accepted once flooring boards have been installed. Elastic and textile floor coverings
must be completely removed leaving no remains.
Direction of installation:
The direction of laying normally depends on the main source of light fall in the room, e.g. French windows. The
boards should run parallel with the entering light for best appearance. However, the proportions of the room can
also be emphasised by skilled selection of the direction in which your parquet is laid. Light-coloured wood makes
small rooms appear larger.
With floating installation in large areas over 10 m (33 ft.) in length or width, an expansion joint must be allowed for.
Apply an expansion moulding or cover strip over said expansion joint.
- Ensure that the boards are always laid lengthways in narrow hallways.
- When installing T, L or U-shaped areas, separate the flooring areas according to the room layout by using a
suitable profile system.
Moisture check:
The subfloor must be checked in a workmanlike manner by using a suitable measuring instrument (CM meter) in
order to verify compliance with the required limit moisture content for laying the floor covering.
Limit moisture content without underfloor heating: Cement or poured cement floors ≤ 2.0 CM (weight)%; anhydrite
or anhydrite cast floors ≤ 0.5 CM (weight)%.
Limit moisture content with underfloor heating: Cement or poured cement floors ≤ 1.8 CM (weight)%; anhydrite or
anhydrite cast floors ≤ 0.3 CM (weight)%.
Installation over underfloor heating:
Set the heating at 18°C on the surface of the floor for 2 weeks minimum prior to installation.
The flooring should be installed at the same temperature, following the standard instructions for floating
installation.
Note: Total thermal resistance for the floor coverings should not exceed approx. 0,15m² K/W
Caution: A precondition for laying the floor on underfloor heating system is to perform a preheating for a period of
30 days while gradually increasing the temperature from the lowest values to the maximum ones allowed by the
heating system.
If the installation is not to be carried out at once, but is scheduled at a later date, the heating system must be set
to 18°C (measured on the floor surface) 2 weeks before the installation and the floor must be laid at the same
temperature. In order to prevent wood from warping making sure that the floor humid does not exceed 7+/-% when
laying the floor.
After the installation set the temperature at 18°C at the floor surface for no less than 48hrs, then slowly increase
the temperature by 1 or 2°C a day until the optimal temperature has been reached. Do not make any sudden
changes to the heating output during this period.
Do not raise the temperature above 25°C on the floor surface.
Care:
Dry cleaning: It is generally sufficient to clean the flooring dry using a mop, soft broom or vacuum cleaner.
Damp cleaning/Care: We recommend damp mopping your floor surface regularly with Polish or natural diluted in
water.
Please note: Always wring out the cloth or mop very well before wiping the floor. Do not wet mop the parquet
surface and never leave puddles or standing water! Steam cleaning machines are not suitable for cleaning parquet
flooring. Cleaning frequency depends here on the wear and tear your floor is subjected to.
Climatic conditions:
What is good for people, is also good for the high-grade woods of parquet. At a room temperature of 20° C (68 °F),
a relative humidity of about 50–60 % should be maintained. In order to keep the air humidity constant, especially
during hot periods, we recommend you use a humidifier. This will prevent any extreme drying out of the floor. Air
humidifiers should be switched on right from the beginning of the heating season. If air humidity falls below normal
values, small gaps may appear which generally close again after the heating period.
Additional protection for your floor:
To preserve the quality and beauty of your parquet we recommend using protective pads under chairs and furniture
legs.
Step by step laying instructions
Please read this information before commencing installation
1. Installation tools: Tapping block, distance spacers, pull tool, hammer (min. 800 g), pencil; for sawing, a simple hand saw will do.
2. Always use 0.2 mm thick PE film as a moisture barrier when laying your floor over floor screed. The overlap seams must overlap
by 30 cm. Extend underlay up all walls. After having installed the skirtings cut underlay at the upper edge of the skirtings.
3. For sound insulation and to smooth out slight irregularities of the subfloor, unroll Howdens Joinery foam, 4 in 1 underlay (mineral
based subfloors only) or high performance XPS underlay. Do not overlap, but taping joints is recommended.
Note: If flooring is being installed over underfloor heating, Howdens White Foam Underlay should be used.
4. Ensure you are familiar with the Tongue side / Groove side of the flooring planks.
5. Start installation in the right-hand corner of the room and fix the first flooring board in place with distance spacers (keep
expansion gap of 10 –15 mm (3/8 ” –1/2 ” ) around perimeter). Always lay the boards with the tongue side to the wall.
6. Join the boards of the first row by dropping the board into position. engaging the end joints until you hear a 'click'. Cut the last
board of the row to length. The off-cut can be used to start an adjacent row.
Engage boards along the long-side. First, angle the board into the previous row, and then by push downwards applying a small
amount of pressure.
8. If the joint appears tight. Tap the edge of the board gently with a tapping block.
9. Once lowered, ensure the joint on the short-side is engaged. Apply downward pressure so that the joint clicks into place.
10. Cross section of the fast-fit end joint profile, showing locking into position.
11. Install all rows using the same methods, ensuring that all boards are cut to size. Leave a gap of 10 to 15mm between boards
and wall - and all fixed objects.
12. If radiator pipes protrude from the floor, drill and saw a cutout into the board (the size of the cutout depends on the radiator
pipe and the required expansion space).
13. In doorways, mount a suitable moulding system to ensure the necessary expansion space. This also applies if the same floor
is to be laid in the adjoining room. In this case, a transition moulding should be used for covering the required expansion gap.
Leave an expansion space of approximately 5mm between the board and the base of the moulding. As a rule, a fine saw must be
used to cut a gap the thickness of a board in wooden door frames to allow the parquet to expand.
14. Be sure to remove all distance spacers once all boards are laid. Finally Fasten skirtings (with or without clip system) to the
walls.
1 2 3 4
5 6 7 8
9 10 11
13 14
12
/