Diamondback HD CAB GUARD Installation guide

Type
Installation guide

Diamondback HD CAB GUARD is a heavy-duty truck accessory designed to protect your vehicle's cab from dents and scratches caused by cargo or other objects. Made from durable materials, it features a mesh design that allows for airflow while providing protection. Installation is simple and can be completed in about 30 minutes using common tools. The HD CAB GUARD is compatible with a wide range of truck models and can be customized to fit your specific needs with additional accessories.

Diamondback HD CAB GUARD is a heavy-duty truck accessory designed to protect your vehicle's cab from dents and scratches caused by cargo or other objects. Made from durable materials, it features a mesh design that allows for airflow while providing protection. Installation is simple and can be completed in about 30 minutes using common tools. The HD CAB GUARD is compatible with a wide range of truck models and can be customized to fit your specific needs with additional accessories.

5/16" × 1" SS Button
Head Bolts (4)
Frame
5/16" Fender
Washers (4)
5/16" Lock
Nuts (4)
5/16" × 3" SS Button
Head Bolts (4)
Gussets (2)
1/2" SocketRatchet WrenchMarker Drill 5/16" Bit 3/16" Hex Key
5/16" Foam
Washers (4)
5/16" × 2" SS
Button Head Bolts (2)
5/16" SS Flat
Washers (8)
× 8
5/16" SS Lock
Washers (6)
× 6
AX-5
INSTALLATION GUIDE
DiamondBackCovers.com / 800 935 4002
HD CAB GUARD
Important installation information
IMPORTANT!
Keep an eye out for these icons:
Normal install time
30 minutes
Tips to assist installation
Helpful Hints
PARTS INCLUDED:
TOOLS REQUIRED:
ASSEMBLE THE GUARD
Ax one of the strips of gasket tape to the underside of
each gusset bolt flange, covering the pre-drilled hole.
1
2Attach a gusset to the
frame by inserting a 2"
bolt through the hole at
the bottom corner of
the outside face of the
gusset and into the
hole at the bottom of
the side of the frame.
Make sure to orient the
frame so that the dog ears
are up and the mesh is
facing the tailgate.
Put a lock washer and
stainless nut onto the bolt.
Hand-tighten only.
3
Attach a cleat to the
cab guard by insert-
ing a pair of 3" bolts
through the holes in
the cleat, through
the holes at the top
of the gusset, and
into the holes toward
the top of the side of
the frame.
4
Put a lock washer and
stainless nut onto
each cleat bolt.
Hand-tighten only.
5
6Repeat steps 2–5 on the opposite side of the frame, then
tighten all the bolts with a 1/2" socket & 3/16" hex key.
CONTINUED ON REVERSE >
10.5" Gasket
Tape (2)
Cleats (2)
5/16" SS
Nuts (6)
× 6
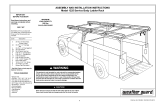
Re-attach the cab panel
to the rest of the cover.
Place the cab guard back
onto the cover. Drop a 1" bolt
through a stainless flat
washer and foam washer,
then into each flange hole,
then into the cover.
Put a fender washer, stain-
less flat washer, and lock
nut, in that order, onto
each bolt.
Tighten the lock nuts with a
1/2" socket and a 3/16" hex
key.
C
C
Lock Nut
Cover
Flange
SS Flat Washer
Fender Washer
SS Flat Washer
Foam Washer
June 2022
Repeat steps 12-14 for the new holes.
INSERT THE FIRST TWO MOUNTING BOLTS
INSERT THE SECOND TWO MOUNTING BOLTS
7Remove the cab panel of the cover. Place it
on a table or other flat surface.
Installing the cab guard is easiest if you let the sides of
the panel hang over the table to allow access to the
underside for drilling and bolting.
Poke a hole through the gasket tape where it passes under
the pre-drilled hole in each gusset bolt flange.
8
Align the leading edge of the cab guard
gussets with the top of the bevel at
the front edge of the cover. Center
the cab guard side to side.
9
Use the pre-drilled hole
on each gusset bolt
flange as a template to
mark drill locations on
the cover for the first
pair of bolts.
10
just 1 hole per gusset for now
Set the cab guard aside.
Drill the marks using a
5/16" bit.
12
13
14
15
Keep the gussets aligned with the top of the bevels of the
cover as you use a 5/16" bit to drill bolt holes up through
the cover and gusset flanges at the two ‘×’ marks labeled
‘C’ on the underside of the cover.
16 Use a 1/2" socket and 3/16" hex key to tighten all the
bolts holding the gussets to the frame.
18
19
17
Double-check the underside of the cover to verify
that nothing will obstruct the bolts or washers at
these locations. Adjust the locations of the bolt holes
if necessary.
11
To avoid hinge damage, make sure to fully
mate the hinges before bringing the cab
panel back into its closed position. FULLY MATED
  • Page 1 1
  • Page 2 2

Diamondback HD CAB GUARD Installation guide

Type
Installation guide

Diamondback HD CAB GUARD is a heavy-duty truck accessory designed to protect your vehicle's cab from dents and scratches caused by cargo or other objects. Made from durable materials, it features a mesh design that allows for airflow while providing protection. Installation is simple and can be completed in about 30 minutes using common tools. The HD CAB GUARD is compatible with a wide range of truck models and can be customized to fit your specific needs with additional accessories.

Ask a question and I''ll find the answer in the document

Finding information in a document is now easier with AI