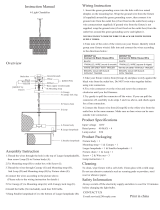
Zevni Z-P8JI6BZQ-48W4 is a stylish and versatile lighting fixture that can elevate the ambiance of any room. With its easy installation process, you can quickly and safely mount it on your ceiling or wall. The fixture supports up to four bulbs, each with a maximum wattage of 60W, allowing you to customize the brightness to your preference. The included lampshades provide a warm and inviting glow, creating a cozy atmosphere in your space.
Zevni Z-P8JI6BZQ-48W4 is a stylish and versatile lighting fixture that can elevate the ambiance of any room. With its easy installation process, you can quickly and safely mount it on your ceiling or wall. The fixture supports up to four bulbs, each with a maximum wattage of 60W, allowing you to customize the brightness to your preference. The included lampshades provide a warm and inviting glow, creating a cozy atmosphere in your space.


-
 1
1
-
 2
2
-
 3
3


Zevni Z-P8JI6BZQ-48W4 is a stylish and versatile lighting fixture that can elevate the ambiance of any room. With its easy installation process, you can quickly and safely mount it on your ceiling or wall. The fixture supports up to four bulbs, each with a maximum wattage of 60W, allowing you to customize the brightness to your preference. The included lampshades provide a warm and inviting glow, creating a cozy atmosphere in your space.
Ask a question and I''ll find the answer in the document
Finding information in a document is now easier with AI
Related papers
-
Zevni Z-V8BVZ7RV-50W2 User guide
-
Zevni Z-G8Y6NEYU-59W4 User manual
-
Zevni Z-F8F3IFIR-59W3 User manual
-
-
Zevni Z-R7VM7JYI-4138 User manual
-
-
Zevni A04884H5 User manual
-
-
-
Other documents
-
LNC A05152A User manual
-
Maxax 2464/2W User manual
-
TRUE FINE TD60008FL User manual
-
 TRUE FINE TD90027C User manual
-
Laura Ashley O7J3IEHD23723AQ User manual
-
LNC ZVBRNBHD176W4E8 User manual
-
LNC JYUQUMHD176W3D8 User manual
-
-
Uolfin A04846W1 Barbara Matte Black and Satin Gold Wall Sconce User manual
-
C Cattleya 120VAC 60Hz Ceiling Fixture User manual
