Timeguard LEDBHR7W Operating instructions

Type
Operating instructions

This manual is also suitable for

I n s t allation & Operating Instruc t ion s
LED Energy Saver
Bulkhead Light
Models: LEDBHR7W. LEDBHR15W. LEDBHR25W.
LEDBHO9W. LEDBHO15W. LEDBHO25W.
1
1. General Information
These instructions should be read carefully and retained for further reference
and maintenance.
2. Safety
Before installation or maintenance, ensure the mains supply to the luminaire
is switched off and the circuit supply fuses are removed or the circuit breaker
turned off.
It is recommended that a qualified electrician is consulted or used for
the installation of this luminaire and install in accordance with the
current IEE wiring and Building Regulations.
Check that the total load on the circuit including when this luminaire is fitted
does not exceed the rating of the circuit cable, fuse or circuit breaker.
3. Technical Specifications
230V AC 50 Hz
This luminaire is of class I construction and must be earthed
LED non replaceable lamp
Colour Temperature:
5000K
IP65 Rated suitable for restricted external applications
UKCA & CE Approved
Model
LEDBHR7W
LEDBHR15W
LEDBHR25W
LEDBHO9WN
LEDBHO15W
LEDBHO25W
Watts
7W
15W
25W
7W
15W
25W
Lumen
Output
700lm
1000lm
2000lm
700lm
1000lm
2000lm
Mounting
Hole Centres
88mm
126mm
155mm
124mm
176mm
220lm
Dimensions
Ø153 D:59
Ø185 D:65
Ø244 D:75
H:155 W:100 D:52
H:215 W:131 D:69
H:270 W:165 D:86
2
4. Installation
Remove the front of the unit by undoing the 4 bolt sremove the
bezel and lens with gasket.
Mark the position of the mounting holes on the wall using the unit
as a template.
Drill the holes for the wall plugs ensuring not to infringe with any
gas/water pipes or electrical cables that may be hidden below the surface.
Undo the cable gland sufficiently to allow the cable to be pushed through
the back.
Secure the supply cable into the luminaire through the hole(s) provided
ensuring that a cable gland, grommet or sealing compound is used
to maintain the IP rating of the luminaire.
Leave enough slack to allow for wiring, re-tighten the cable gland.
Fix the luminaire using the correct screws for the wall plugs installed.
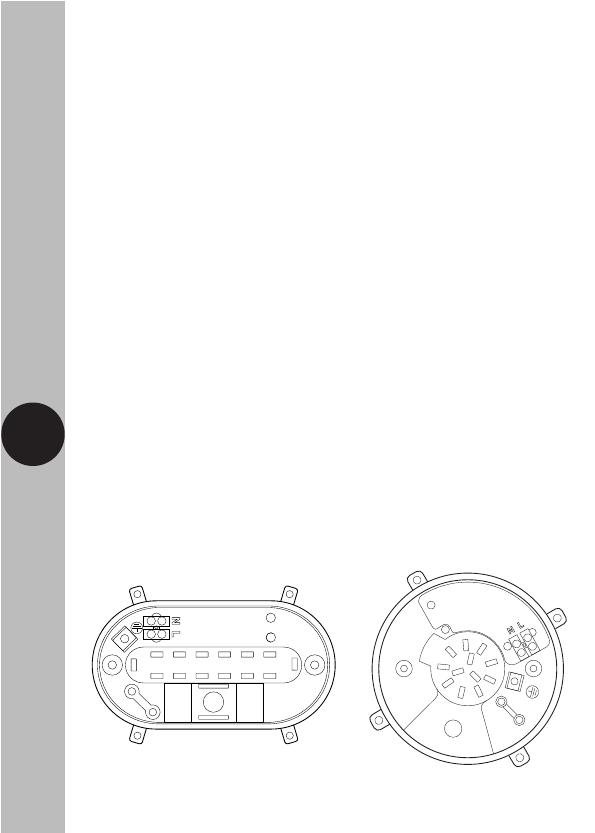
Terminate the cable into the terminal block (see section 5 connection diagram)
ensuring correct polarity is observed and that all bare conductors are sleeved.
Secure the supply cable using the cable clamp.
Reposition the lens over the unit, taking care to ensure the gasket is in place.
Secure the lens and bezel back into place using the 4 bolts previously
removed at the beginning of the installation.
3
6. Operation
Turn the power and the unit will illuminate.
5. Connection
Live (Brown or Red) L
Neutral (Blue or Black) N
Earth (Green/Yellow)
LN
MAINS
SUPPL
YL
N
E
ISOLATION
SWITCH
4
3 Year Guarantee
In the unlikely event of this product becoming faulty due to defective material or
manufacture within 3 years of the date of purchase, please return it to your supplier
in therst year with proof of purchase and it will be replaced free of charge.
For years 2 and 3 or any difficulty in the first year, telephone the helpline
on 020 8450 0515.
Note: A proof of purchase is required in all cases. For all eligible replacements (where
agreed by Timeguard) the customer is responsible for all shipping/postage charges
outside of the UK. All shipping costs are to be paid in advance before a replacement
is sent.
67-058-513 (Issue 4)
Timeguard Limited.
Victory Park, 400 Edgware Road,
London NW2 6ND
Sales Office: 020 8452 1112
or email csc@timeguard.com
For a product brochure please contact:
If you experience problems, do not immediately return the unit
to the store. Telephone the Timeguard Customer Helpline;
Qualified Customer Support Co-ordinators will be on-line
to assist in resolving your query.
HELPLINE
020 8450 0515
or email helpline@timeguard.com
www.timeguard.com
  • Page 1 1
  • Page 2 2
  • Page 3 3
  • Page 4 4
  • Page 5 5
  • Page 6 6

Timeguard LEDBHR7W Operating instructions

Type
Operating instructions
This manual is also suitable for

Ask a question and I''ll find the answer in the document

Finding information in a document is now easier with AI