Page is loading ...

INSTALLATION FALL - RFA17 / RFA17X
Doc. # DR109-0 / 30-09-2021 www.rubi.ca - 1.888.988.RUBI (7824)
01
Fixez le robinet au montant horizontal en vous assurant qu'une fois le mur posé, le manchon caré soit
entre 21 mm (7/8'') et 32 mm (1 1/4'') du mur fini.
Srew the mixer to the studs making sure the square sleeve is between 21 mm (7/8'') and 32 mm (1 1/4'')
from the finished wall.
02
Raccordez les entrées d'eau chaude et d'eau
froide.
Connect the hot and cold water inlets.
03
Testez votre installation.
Test your installation.
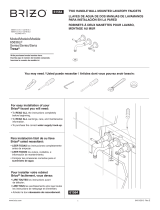
PIÈCES / PARTS
ÉTAPES / STEPS
Vérifiez que toutes les pièces de votre robinet sont dans l'emballage.
Make sure you have all the parts in hand.
LISTE DES PIÈCES / PARTS LIST
01 Corps du robinet / Faucet body
02 Plaque de finition / Finishing plate
03 Cartouche / Cartridge
04 Écrou de cartouche / Cartridge nut
05 Bride de cartouche / Cartridge flange
06 Poignée / Handle
07 Bec / Spout
08 Aérateur / Aerator
09 Boîtier d'aérateur / Aerator housing
04
Fermez le mur et faites une ouverture en suivant
les instructions ci-dessus.
Close the wall and make an opening by following
the instructions above.
06
Installez la plaque de finition
Install the trim.
05
Min: 21 mm ( 7/8’’)
Max: 32 mm (1 1/4’’)
Mur fini
Finished wall Entrée d’eau chaude
Hot water inlet
Entrée d’eau froide
Cold water inlet
01
02
03
04
05
06
07
08
09
165 mm
(6 1/2’)
50 mm
(2’’)

INSTALLATION FALL - RFA17 / RFA17X
Doc. # DR109-0 / 30-09-2021 www.rubi.ca - 1.888.988.RUBI (7824)
ÉTAPES / STEPS
ENTRETIEN
Pour nettoyer votre robinet, un savon doux, de l’eau chaude et un linge
doux suffiront pour faire disparaître saletés, tâches et traces d’accumulation
de savon. Rincez après le nettoyage et asséchez avec un linge doux et
sec pour retrouver le lustre original de votre tête pluie. La garantie sera
nulle et non avenue dans les cas d’utilisation de produits nettoyants
inadaptés (particulièrement ceux contenant des agents abrasifs, cires,
alcools, ammoniaques, javelisants, acides, des solvants ou autres produits
chimiques corrosifs), qu’ils soient utilisés par l’acheteur ou par un tiers pour
l’acheteur/propriétaire.
MAINTENANCE
A mild detergent, warm water and a soft cloth will remove normal dirt and
soap accumulations on your faucet surface. Rinse thoroughly after cleaning
and wipe with a soft dry cloth to restore original luster on its surface. Do not
use harsh abrasives cleaners to clean your shower head.
The warranty will be void in case of use of unsuitable cleaning products
(especially those containing abrasive cleansers, waxes, alcohols,
ammoniated, bleach, acids, solvents or other harsh chemicals), whether
they are used by the purchaser or a third party for the buyer/owner.
08
Assurez-vous que le bec soit bien droit et
bien appuyé sur la plaque et vissez les
deux vis avec la clé Allen.
Make sure the spout is straight and firmly against
the plate. Srew both screws with
the Allen key
07 1009 11
/