Page is loading ...

OPERATORS
MANUAL

Fast Rope Descender (FRD) User Instructions
WARNING!!
It is the user’s responsibility to read and fully under-
stand instructions before use. The FRD is intended for
expert use only. Proper training is essential before
using the FRD.
BE SURE TO FULLY UNDERSTAND THE LIMITATIONS
OF THE FRD AND PRACTICE AND MASTER THE
PROPER TECHNIQUES FOR USING THE FRD IN A SAFE
ENVIRONMENT BEFORE USING THEM IN THE FIELD.
FAILURE TO PROPERLY USE THE FRD MAY RESULT IN
SERIOUS INJURY OR DEATH.
IMPORTANT:
NEVER remove the brake-hand from the brake side of
the rope. Keep your hand on and control the brake
side of the rope at all times.
600 lbs is the maximum recommended total weight.
FRD performance can be affected by the following and
other factors:
•Rope diameter and length
•Rope condition
•Dirty, wet or icy conditions
These instructions are not fast rope deployment instruc-
tions. Thorough knowledge of fast rope techniques is
required before using the FRD.
Components of the FRD System:
1. FRD Unit
2. FRD Y Lanyard (Canine Bridle)
3. Rapid Connect Lanyard (Extender)
4. Canine/Load Retention Lanyard
5. FRIES Daisy Lanyard
Preparation of the FRD system:
WARNING: Ensure a safety spotter and/or a safety
lanyard are used to secure the FRD Operator as both
hands must be used to attach the FRD.
Each FRD Operator should put on the harness accord-
ing to the harness manufacturer’s instructions and have
a rescue knife accessible to cut the double leash in case
of complications on the ground.
1. Using a girth hitch, attach the 4’ FRD Daisy Lanyard
to the FRIES bar or to the Anchor Loop of the Fast
Rope.
2. Pivot open the plates of the FRD and lay the Fast
Rope in the FRD.
3. Close the FRD and verify that the rope travels
through the device as shown in the illustration and
on the etching on the FRD. WARNING: incorrect
set-up or orientation could result in injury or death!
4. Attach the Rapid Connect Lanyard to the FRD in
the high or low friction hole based on desired rate
of descent. This secures the FRD to the Fast Rope
and makes it a closed system. For lower resistance,
use the Low Friction Hole, and for higher resistance
use the High Friction Hole. Higher resistance will
provide a slower, more controlled descent. It is
recommended to use the High Friction Hole in
most scenarios.
5. Attach the Canine/Load Retention Lanyard to the
Aircraft with a girth hitch to a tie in point.
6. Attach short end of the Y Lanyard to the Second-
ary Load (soldier, canine, med pack, etc.) with
the other Double Gate Carabiner. If there is not a
secondary load being carried, clip the other end of
the Double Gate Carabiner that is attached to your
belay loop.
7. Attach the long end of the Y lanyard to the yourself
(Operator)
8. Attach the FRD Daisy Lanyard (from Step 1) to
the Retention Hole on the FRD. Insert the Quick
Release buckle from the outside of the FRD so that
the red pull-tab stays outside the FRD.
9. If a load will be carried, make sure it is prepared
and in position. For right-handed operators, orient
the secondary load to operator’s left and use the
right hand to brake. Left-handed operators should
do the opposite. 600 lbs is the maximum recom-
mended total weight (including the operator) that
may be loaded on the FRD.
10. If descending with a canine, utilize the Canine
Retention Lanyard to secure the canine to the heli-
copter while in ight and preparing to descend.
11. Attach the Single Double Gate Carabiner from
the Y lanyard to the FRD through Red loop of the
Rapid Connect Leash.
12. Double-check your equipment and surroundings.
COMPONENTS
1. 2.
3. 4.
5.

The following list is non-exhaustive, and your situ-
ation may require you to check additional points.
Check at least the following:
• Harness: Are harness buckles doubled back
and is the harness snug?
• Carabiners and Quick Releases: Are all gates
closed and locked on the correct attachment
points?
• Equipment/Load: Is it secured and stable? Is it
ready to exit the aircraft?
• Fast Rope: Is the Fast Rope connected se-
curely to the aircraft? Is the Fast Rope clear of
obstructions such as knots and tangles? Does
it reach all the way to the ground?
• Landing Site: Is the Landing Site secure?
• Team: Is your team ready? It is extremely
important that the pilot(s) knows when you are
departing the aircraft.
Descending with the FRD:
1. Only after all preparation is complete and dou-
ble-checked are you ready to depart the aircraft.
2. Hold the Fast Rope securely with at least one hand
below the FRD unit. Always keep at least one hand
on the Fast Rope to control your rate of descent.
3. When ready, unclip from your safety lanyard secur-
ing you to the aircraft and apply weight to the fast
rope.
4. Position the Canine or load appropriately below
you or to the side.
5. Unclip the Canine/Load Retention Lanyard from
Canine/Load.
6. Control pivot out of Aircraft and transfer weight to
4’ FRD Daisy Lanyard (Girth hitched to Fries Bar/
Anchor loop Fast Rope)
7. Utilize the red pull tab and release the Daisy Lan-
yard from the unit.
8. Slowly apply less pressure with your hand(s) on
the Fast Rope until you reach the desired rate of
descent. To slow your rate of descent, grip the Fast
Rope more rmly.
After Arrival at Secure Landing Site:
1. Immediately unclip the Double Gate Carabiner
from the High or Low Friction Carabiner Hole so
that the Operator is no longer attached to the FRD
or Fast Rope.
2. Remove the FRD from the Fast Rope by pivoting
the plates to the open position and taking it off of
the Fast Rope.
3. Unclip the Y Lanyard from the Operator’s harness.
Storage:
FRD Units and all leashes and carabiners should be
stored away from chemicals, UV light, and extreme
temperatures. Keep the included FRD Storage Bag for
a convenient place to store and protect all components.
Inspection:
Detailed inspections of all FRD Kit components should
take place before every use, without exception. The
following points should be checked. If you nd ANY
parts in disrepair, they should be retired from use
immediately.
1. Leashes: Inspect all leashes for frays, cuts, or
excessive surface abrasion that creates a fuzzed
appearance. Inspect all stitches for any damage or
inconsistency. Take special care at all stitches and
attachment points for the Quick Release Buckles,
Metal Ring, and Carabiners.
2. Carabiners: Examine the entire carabiner for dam-
age including chips, fractures, or other deformities.
Ensure the screw-gate operates smoothly through
its entire range of motion. You should always be
able to operate the screw-gate with nger pressure
(DO NOT use pliers).
3. Quick Release Buckles: Examine the entire buckle
for damage including chips, fractures, or other
deformities. Ensure that the buckle opens, closes,
and locks smoothly. Make sure there is no damage
to the red lanyard and its attachment point to the
buckle.
4. FRD Unit: Examine the entire FRD unit for damage
including chips, fractures, or other deformities on
all surfaces, especially the rollers that the rope
travels over. Check for excessive wear to the side
plates, which may cause a polished appearance
and removal of the anodized color. Development
of a sharp edge from wear is cause for immediate
retirement. Check the High Friction and Low Fric-
tion Carabiner Holes for any deformation.
DISCLAIMER
WARNING! BY USING THIS PRODUCT, YOU ACCEPT
ALL RISK AND RESPONSIBILITY FOR ANY INJURY,
DAMAGE OR DEATH THAT MAY RESULT. Trango dis-
claims all liability for all consequence, damage, injury,
or death that arises out of or relates to, directly or indi-
rectly, the use of the FRD.
For further information or inspection please contact:
www.fastropedescender.com
800.860.3653

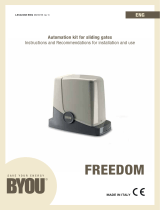
Fast Rope
FRIES
Daisy Lanyard
Rapid Connect Lanyard (Extension)
To FRIES
Ba
r
Hig
h Fr
ic
t
ion
Low Frictio
n
FRD Y Lanyard
T
o
O
p
e
r
a
t
o
r
To
C
a
nin
e
/Load
T
o
E
xte
n
sio
n
L
a
n
y
a
r
d
To R
e
tent
i
on Hole
Canine/Load Leash
(use in flight)
To Ai
r
c
ra
f
t
T
o
Ca
nine
FRIES Bar
Quick Reference Layout
Questions? Contact us at info@trango.com or 303-530-3035
/