
1
SimpliFire • SF-OD43, SF-OD55 • 2047-980 Rev. C • 5/23
Model(s):
WARNING: To reduce risk of re, electrical shock, or personal injury, read and understand
all instructions, including safety information before plugging in and using this appliance.
Owner’s Manual
Installation and Operation
SF-OD43
SF-OD55
READ CAREFULLY BEFORE ATTEMPTING TO ASSEMBLE, INSTALL, OPERATE, OR MAINTAIN
THIS PRODUCT.
PROTECT YOURSELF AND OTHERS BY OBSERVING ALL SAFETY INFORMATION. FAILURE
TO COMPLY WITH INSTRUCTIONS COULD RESULT IN PERSONAL INJURY AND/OR
PROPERTY DAMAGE.
Congratulations!
Congratulations on selecting a SimpliFire Electric Fireplace, an elegant and clean alternative to wood and gas burning
replaces. The SimpliFire electric replace you have selected is designed to provide the utmost in safety, reliability, and
efciency.
Printed in China - Copyright 2023
Forum Series:
Please contact your SimpliFire dealer with any questions or concerns.
For the location of your nearest SimpliFire dealer,
please visit www.hearthnhome.com.
NOTICE
• Important operating
and maintenance
instructions included.
• Read, understand and follow
these instructions for safe
installation and operation.
DO NOT
DISCARD
DO NOT DISCARD THIS MANUAL
• Leave this manual with
party responsible for use
and operation.

SimpliFire • SF-OD43, SF-OD55 • 2047-980 Rev. C • 5/23
2
11 IMPORTANT INSTRUCTIONS
WARNING! Risk of Fire!
Risk of Electrical Shock!
DO NOT:
• Install or operate damaged appliance
• Modify appliance
• Operate the heater without fully assembling all
components
Hearth & Home Technologies disclaims any
responsibility for, and the warranty and agency
listing will be voided by the above actions.
WARNING! DO NOT operate appliance before read-
ing and understanding operating instructions. Failure
to operate appliance according to operating instructions
could cause re or injury.
WARNING! Improper installation, adjustment, al-
teration, service or maintenance can cause injury or
property damage. Failure to install appliance accord-
ing to Owner’s Manual could cause property damage or
injury.
IMPORTANT SAFETY INSTRUCTIONS
SAVE THESE INSTRUCTIONS
When using electrical appliances, basic precautions should always be followed to reduce risk of re, electric shock,
and injury to persons, including the following:
• Read all instructions before installing this appliance.
• Extreme caution is necessary when any appliance is used
by or near children or other at risk individuals and whenever
the appliance is left operating and unattended.
• Do not operate any appliance if it malfunctions. Disconnect
power at service panel and have appliance inspected by a
reputable electrician before reusing.
• Do not insert or allow foreign objects to enter the appliance
as this may cause an electric shock, re, or damage the
appliance.
• Use this appliance only as described in this manual. Any
other use not recommended by the manufacturer may cause
re, electric shock, or injury to persons.
• Do not operate any appliance with a damaged cord, plug after
the appliance malfunctions, has been dropped or damaged
in any manner. Return appliance to authorized service
facility for examination, electrical or mechanical adjustment
or repair.
• Never locate appliance where it may fall into a bathtub or
water container.
• Do not run cord under carpeting. Do not cover cord with
throw rugs, runners, or the like. Arrange cord away from
trafc areas and where it will not be tripped over. Do not
tightly coil cord.
• Always use properly grounded, fused and polarized outlets.
• Always use ground fault protection where required by
electrical code.
• To disconnect appliance, turn controls to “OFF” then remove
plug from outlet.
• Always disconnect power before performing any cleaning,
maintenance or relocation of the appliance.
• To prevent electrical shock or re, always use a certied
electrician should new circuits be required.
• When transporting or storing the appliance, keep in a dry
place free from excess vibration to avoid damage.
• Avoid use of an extension cord because an extension
cord may overheat and cause a fire. However if you
have to use an extension cord, the cord should be No.
14 AWG minimum size and rated to not less than 1875
watts.

3
SimpliFire • SF-OD43, SF-OD55 • 2047-980 Rev. C • 5/23
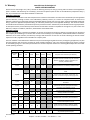
Safety Alert Key:
• WARNING! Indicates a hazardous situation which, if not avoided could result in death or serious injury.
• CAUTION! Indicates a hazardous situation which, if not avoided, could result in minor or moderate injury.
Table of Contents
Congratulations! ...................................1
1 IMPORTANT INSTRUCTIONS
A. Warranty .......................................4
2 GENERAL INFORMATION
A. Appliance Certication ............................6
B. Unpacking and Inspecting Appliance ................6
C. Model and Serial Number Information ............... 6
3 GETTING STARTED
A. Parts and Hardware .............................7
B. Tools and Supplies Needed . . . . . . . . . . . . . . . . . . . . . . . . 7
C. Appliance Weights and Dimensions ..................8
D. Location .......................................9
E. Clearance to Combustibles ........................9
F. Electrical Supply Circuit Requirements ...............9
4 INSTALLATION
A. Framing Dimensions ............................10
B. Appliance Preparation ........................... 11
C. Chase Construction and Moisture Resistance ......... 12
D. Installation .................................... 12
E. Finishing ..................................... 13
F. Electrical Connection / Installation ..................14
G. Appliance Final Setup ........................... 15
5 OPERATING INSTRUCTIONS
A. Operation with On-Device Controls ................. 16
B. Operating by Remote Control. . . . . . . . . . . . . . . . . . . . . . 17
6 MAINTENANCE
A. Maintenance .................................. 18
B. Cleaning ......................................18
C. Servicing. . . . . . . . . . . . . . . . . . . . . . . . . . . . . . . . . . . . . . 18
D. SimpliFire Troubleshooting Guide ..................19
E. Service Parts List ..............................20
F. Contact Information .............................22

SimpliFire • SF-OD43, SF-OD55 • 2047-980 Rev. C • 5/23
4
A. Warranty
Hearth & Home Technologies LLC
LIMITED LIFETIME WARRANTY
Hearth & Home Technologies LLC (“HHT”) extends the following warranty for HHT gas, wood, pellet and electric hearth appliances
(each a “Product” and collecvely, the “Product(s)”) and certain component parts set forth in the table below (“Component Part(s)”)
that are purchased from a HHT authorized dealer or distributor.
WARRANTY COVERAGE:
HHT warrants that the Products and their Component Parts will be free from defects in materials and workmanship for the applicable
period of Warranty coverage set forth in the table below (“Warranty Period”). If a Product or Component Parts are found to be
defecve in materials or workmanship during the applicable Warranty Period, HHT will, at its opon, repair the applicable Component
Part(s), replace the applicable Component Part(s), or refund the purchase price of the applicable Product(s). The maximum amount
recoverable under this Warranty is limited to the purchase price of the Product. This Warranty is transferable from the original purchaser
to subsequent owners, but the Warranty Period will not be extended in duraon or expanded in coverage for any such transfer. This
Warranty is subject to condions, exclusions, and limitaons as described below.
WARRANTY PERIOD:
Warranty coverage begins at the date of installaon. In the case of new home construcons, Warranty coverage begins on the date of
rst occupancy of the dwelling or six months aer the sale of the Product(s) by an independent, authorized HHT dealer or distributor,
whichever occurs earlier. However, the Warranty coverage shall commence no later than 24 months following the date of Product
shipment from HHT, regardless of the installaon or occupancy date.
The term “Lifeme” in the table below is dened as: 20 years from the beginning date of warranty coverage for gas appliances, 10 years
from the beginning date of warranty coverage for wood and pellet appliances, and 5 years from the beginning of warranty coverage
for standalone gas log sets. These me periods reect the minimum expected useful lives of the designated Component Parts under
normal operang condions.
Page 1 of 2
4021-645M 9/21
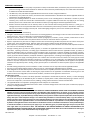
Component
Parts Labor Gas Pellet Wood Electric Venting Component Parts Covered by this Warranty
XAll parts except as covered by Warranty Conditions,
Warranty Exclusions, and Warranty Limitations listed
X X Igniters, Auger Motors, Electronic Components, and
Glass
X
Electrical components limited to modules, remotes/wall
switches, valves, pilots, blowers, junction boxes, wire
harnesses, transformers and lights (excluding light bulbs)
X X Molded Refractory Panels, Glass Liners
X
Burners and logs for standalone gas log sets
(Vented and Vent Free gas log sets not sold as
components of the fireplace or stove)
X
Vent Free Burners and Vent Free Log components of
HHT manufactured fireplaces or stoves
X X Castings, Medallions and Baffles
6 years 3 years XCatalysts
7 years 3 years X X Manifold tubes, HHT Chimney and Terminations
10 years 1 year X
Burners, logs and refractory components of HHT
manufactured fireplaces or stoves
Limited
Lifetime 3 years XXX Firebox and heat exchanger, FlexBurn® System
(engine, inner cover, access cover and fireback)
1 Year
None
XXXXX All purchased replacement parts
Warranty Period HHT Manufactured Appliances and Venting
All parts including handles, external enameled
components and other material except as covered by
Warranty Conditions, Warranty Exclusions, and
Warranty Limitations listed
2 years
X
1 Year X X X
2 Years
5 years 1 year
Firepots, burnpots, mechanical feeders/auger
assemblies
3 years X
5 years

5
SimpliFire • SF-OD43, SF-OD55 • 2047-980 Rev. C • 5/23
WARRANTY CONDITIONS:
• Because HHT cannot control the quality of any Products sold by unauthorized sellers, this Warranty only covers Products that are
purchased through an HHT authorized dealer or distributor unless otherwise prohibited by law; a list of HHT authorized dealers
is available on the HHT branded websites.
• This Warranty is only valid while the applicable Product remains at the site of original installaon.
• This Warranty is only valid in the country in which the HHT authorized dealer or distributor that sold the applicable Product is
authorized to sell applicable Product.
• Contact your installing distributor or dealer for Warranty service. If the installing dealer or distributor is unable to provide
necessary parts, contact the nearest HHT authorized dealer or supplier. Addional service fees may apply if you are seeking
Warranty service from a dealer other than the dealer from whom you originally purchased the applicable Product.
• No HHT consumer should bear cost of warranty service or costs incurred while servicing warranty claims (i.e., travel, gas, or
mileage) when the service is performed within the terms of this Warranty. Check with your dealer or distributor in advance for
any costs to you when arranging a warranty call. Travel and shipping charges for parts are not covered by this Warranty.
WARRANTY EXCLUSIONS:
This Warranty does not cover the following:
• Changes in surface nishes as a result of normal use. As a heang appliance, some changes in color of interior and exterior surface
nishes may occur. This is not a aw and is not covered under the Warranty.
• Damage to printed, plated, or enameled surfaces caused by ngerprints, accidents, misuse, scratches, melted items or other
external sources and residues le on the plated surfaces from the use of abrasive cleaners or polishes.
• Repair or replacement of parts that are subject to normal wear and tear during the Warranty Period are not covered. These parts
include: paint, wood and pellet gaskets, rebricks, grates, ame guides, baeries and the discoloraon of glass.
• Minor expansion, contracon, or movement of certain parts causing noise. These condions are normal and complaints related to
this noise are not covered by this Warranty.
• Damages resulng from: (1) failure to install, operate, or maintain the applicable Product in accordance with the installaon
instrucons, operang instrucons, and lisng agent idencaon label furnished with the applicable Product; (2) failure to
install the applicable Product in accordance with local building codes; (3) shipping or improper handling; (4) improper operaon,
abuse, misuse, connued operaon with damaged, corroded or failed components, accident, or improperly/incorrectly performed
repairs; (5) environmental condions, inadequate venlaon, negave pressure, or draing caused by ghtly sealed construcons,
insucient make-up air supply, or handling devices such as exhaust fans or forced air furnaces or other such causes; (6) use of fuels
other than those specied in the operaon instrucons; (7) installaon or use of components not supplied with the applicable
Product or any other components not expressly authorized and approved by HHT; (8) modicaon of the appliance not expressly
authorized and approved by HHT in wring; and/or (9) interrupons or uctuaons of electrical power supply to the applicable
Product.
• Non-HHT venng components, hearth connecons or other accessories used in conjuncon with the applicable Product.
• Any part of a pre-exisng replace system in which an insert or a decorave gas applicable Product is installed.
• HHT’s obligaon under this Warranty does not extend to the Product’s capability to heat the desired space. Informaon is provided
to assist the consumer and the dealer in selecng the proper Product for the applicaon. Consideraon must be given to the
Product locaon and conguraon, environmental condions, insulaon and air ghtness of the structure.
This warranty is void if:
• The applicable Product has been over-red, operated in atmospheres contaminated by chlorine, uorine, or other damaging
chemicals. Over-ring can be idened by, but not limited to, warped plates or tubes, deformaon/warping of interior cast iron
structure or components, rust colored cast iron, bubbling, cracking and discoloraon of steel or enamel nishes.
• The applicable Product is subjected to prolonged periods of dampness or condensaon.
• There is any damage to the applicable Product due to water or weather damage which is the result of, but not limited to, improper
chimney or venng installaon.
LIMITATIONS OF REMEDIES AND LIABILITY:
• EXCEPT TO THE EXTENT PROVIDED BY LAW, HHT MAKES NO EXPRESS WARRANTIES OTHER THAN THE WARRANTY SPECIFIED
HEREIN. The owner’s exclusive remedy and HHT’s sole obligaon under this Warranty or in contract, tort or otherwise, shall be
limited to replacement of the Component Part(s), repair of the Component Part(s), or refund of the original purchase price of the
applicable Product(s), as specied above; provided, however, that (i) if HHT is unable to provide replacement of the Component
Part(s) and repair of the Component Part(s) is not commercially praccable or cannot be mely made, or (ii) the customer is
willing to accept a refund of the purchase price of the applicable Product(s), HHT may discharge all such obligaons by refunding
the purchase price of the applicable Product. In no event will HHT be liable for any incidental or consequenal damages caused
by defects in the applicable Product. Some States do not allow the exclusion or limitaon of incidental or consequenal damages,
so the above limitaon or exclusion may not apply to you. This Warranty gives you specic legal rights and you may also have
other rights which vary from State to State. THE DURATION OF ANY IMPLIED WARRANTY IS LIMITED TO DURATION OF THE
EXPRESSED WARRANTY SPECIFIED ABOVE FOR THE APPLICABLE PRODUCT. Some States do not allow limitaons on how long an
implied warranty lasts, so the above limitaon may not apply to you.
Page 2 of 2
4021-645M 9/21

SimpliFire • SF-OD43, SF-OD55 • 2047-980 Rev. C • 5/23
6
Note: The device complies with Part 15 of the FCC Rules.
Operation is subject to the following two conditions:
1. This device may not cause harmful interference, and
2. This device must accept any interference received,
including interference that may cause undesired
operation.
MODELS: SF-OD43, SF-OD55
LABORATORY: ETL Intertek
TYPE: Luminaires; Household and Commericial
Furnishings
STANDARD: CSA C22.2 No 250; UL 962
A. Appliance Certication
NOT INTENDED FOR USE AS A HEAT SOURCE. This ap-
pliance is not equipped with a heater.
NOTICE: This installation must conform with local codes.
2 2 GENERAL INFORMATION
B. Unpacking and Inspecting Appliance
WARNING! DO NOT use this Electric Fireplace if any
part has been under water. Immediately call a qualied
service technician to inspect and to replace any part of the
electrical system if necessary. Keep plastic wrapping away
from children.
• Carefully remove the appliance and components from the
packaging. Discard packaging.
• Carefully inspect components for any damage.
• Reference parts list to verify all parts have been received.
• Read all the instructions before starting the installation.
Follow these instructions carefully during the installation to
ensure maximum safety and benet.
This equipment uses and can radiate radio frequency
energy and, if not installed and used in accordance with
the instructions, may cause harmful interference to radio
or television reception, which can be determined by turn-
ing the equipment off and on. The user is encouraged
to try to correct the interference by one or more of the
following measures:
• Increase the separation between the equipment and the
receiver.
• Connect the equipment into an outlet on a circuit different
from that to which the receiver is connected.
C. Model and Serial Number Information
The model and serial number information is located on the
rating plate. The rating plate is located behind the glass on
the top interior surface of the viewing area.
Model Name: ___________________________________________ Date purchased/installed: __________________
Serial Number: __________________________________________ Location on replace: _____________________
Dealership purchased from: _______________________________ Dealer Phone: __________________________
Notes: _______________________________________________________________________________________
We recommend that you record the following pertinent
information about your replace.
Homeowner Reference Information
ELECTRIC FIREPLACE
MODEL SF-OD**
VOLTAGE
FREQUENCY
AMPERAGE
WATTS
SERIAL No.:
MADE IN CHINA
600165
120V AC
60 Hz
0.5A
36W
WARNING: This product can expose you to Di-
(2-ethylhexyl) phthalate, which is known to the
State of California to cause cancer and reproductive
harm. For more information go to: www.P65Warnings.
ca.gov.

7
SimpliFire • SF-OD43, SF-OD55 • 2047-980 Rev. C • 5/23
3 3 GETTING STARTED
Before beginning the installation be sure that the following
tools and building supplies are available.
Tape measure
Gloves
Level
Square
Magnetic screwdriver, or electric screw gun with Phillips
bit
Safety glasses
Drill
3/32 slotted head screwdriver/or equivalent
Outdoor specic installation:
- Exterior Silicone Caulk Sealant
- Preferred Flashing Method, such as:
• Flashing Tape
• Aluminum Flashing
or available Drip Pan (SF-OD**-DP)
B. Tools and Supplies Needed
A. Parts and Hardware
Parts and Hardware List
Part Quantity
Appliance 1
Instruction Manual 1
Remote Control 1
AAA Battery 2
Small Crystal Stones - Clear 2 bags
Black Embers - SF-OD43 3 bags
Black Embers - SF-OD55 3 bags
Large Crystal Stones - SF-OD43 12
Large Crystal Stones - SF-OD55 12
Log set (12 per set) - SF-OD43 1
Log set (14 per set) - SF-OD55 1
Self-Trimming Decorative Front 1
Wood Screw (Appliance to Framing) 4
Rubber Bushing 4
Washer 4
GFCI Power Cord (shipped attached to
appliance, plug-in ready) 1
Suction Cup 1

SimpliFire • SF-OD43, SF-OD55 • 2047-980 Rev. C • 5/23
8
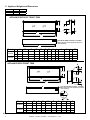
Figure 3.1 Appliance Dimensions
C. Appliance Weights and Dimensions
A
B
E
CD
I
H
F
J
G
ELECTRICAL WIRING LOCATION - TOP RIGHT
NOTE: Wire strain relief supplied by electrician
when hardwiring.
APPLIANCE WITHOUT FRONT TRIM
APPLIANCE WITH FRONT TRIM
Model A B C D E F G H I J
SF-OD43 in. 43 48 15 20 46 1-1/8 1/8 1-1/8 3/4 8-3/4
mm 1092 1219 380 507 1168 29 3 29 19 223
SF-OD55 in. 55 60 15 20 58 1-1/8 1/8 1-1/8 3/4 8-3/4
mm 1397 1523 380 507 1473 29 3 29 19 223
Model A B C D E F G H I J KL M
SF-OD43 in. 43-1/2 46 15-3/8 18-1/8 43-3/4 8 5 3-3/4 115-3/4 1-3/8 1/2 8-1/4
mm 1104 1168 392 460 1110 203 127 95 25 400 36 13 210
SF-OD55 in. 55-1/2 58 15-3/8 18-1/8 55-3/4 8 5 3-3/4 115-3/4 1-3/8 1/2 8-1/4
mm 1409 1473 392 460 1415 203 127 95 25 400 36 13 210
Model Pounds Killigrams
SF-OD43 110 50
SF-OD55 132 60
F
G
H
A
B
CD
E
K
J
I
L
M
ELECTRICAL WIRING LOCATION - TOP RIGHT
NOTE: Wire strain relief supplied by electrician
when hardwiring.

9
SimpliFire • SF-OD43, SF-OD55 • 2047-980 Rev. C • 5/23
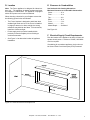
D. Location
Note: The Forum appliance is designed for indoor/out-
door use. The appliance is weather resistant and must
be installed in a framed wall. The appliance is equipped
with a GFCI power cord or can be hardwired.
When choosing a location for your replace ensure that
the following general rules are followed:
• The Forum replace is designed to work best when
ambient light levels are low. If the Forum is installed
in brightly lit areas or in direct sunlight, the strong
reections may diminish the ame. For best results,
install out of direct sunlight.
• Power supply service must be installed within
proximity of electric replace prior to nishing to
avoid reconstruction.
• See Figure 3.2 to determine location of appliance
installation.
E. Clearance to Combustibles
See Section 4.A for framing dimensions.
Minimum Clearance to Combustible Construction
Sides.......................0 in.
Floor........................0 in.
Top..........................0 in.
Back........................0 in.
Front........................0 in.
Mantel.....................0 in.
Mantel Depth..........Unlimited.
See Figure 3.2.
F. Electrical Supply Circuit Requirements
Plan the location of the appliance so that it will have ad-
equate electric power. A minimum 15 AMP, 120V/60Hz
circuit is required.
If hardwiring for an outdoor appliance, the circuit must
be Ground Fault Circuit Interrupter (GFCI) Protected.
Figure 3.2 Location and Clearances Requirements

SimpliFire • SF-OD43, SF-OD55 • 2047-980 Rev. C • 5/23
10
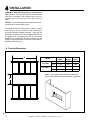
4 4 INSTALLATION
WARNING! Risk of Personal Injury or Property Dam-
age! Failure to install the appliance as instructed below
may result in damage to the equipment and or may ex-
pose the user to the risk of re, serious injury, illness or
death.
The appliance shall be installed into a wall as a stand-
alone structure, or into an exterior bump out wall sepa-
rate of the structures weather envelope. There are two
installation methods, built-in with nishing materials over
the appliance for a frameless look (this is a permanent
installation) or recessed with nishing materials up to the
opening, using self-trimming front (this is a removable in-
stallation). See Figure 4.1.
NOTICE: These instructions are not substitutes for the
requirements of local building codes.
A
B
Model A
Width
B
Height
C
Depth
SF-OD43 in. 46-1/4 18-1/2 9
mm 1175 470 229
SF-OD55 in. 58-1/4 18-1/2 9
mm 1480 470 229
A. Framing Dimensions
Note: Framing dimensions need to be adjusted for
thickness of chase interior wall sheathing, if applicable.
Figure 4.1
C

11
SimpliFire • SF-OD43, SF-OD55 • 2047-980 Rev. C • 5/23
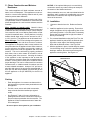
B. Appliance Preparation
Removing Front Finishing Trim:
To remove the front nishing trim, remove the two (2) Phil-
lips screws located at the top of the trim. See Figure 4.2.
With the screws removed pull the friction t trim straight
out and away from the appliance.
Glass Removal:
To remove the front viewing glass, remove the screws at-
taching the glass retaining bracket to the appliance. See
Figure 4.3.
With the retaining bracket removed from the appliance,
use the provided suction cup to pull the glass forward.
Do not rely on the suction cup for lifting of the glass!
See Figure 4.4.
Carefully tilt the glass forward and lift it out of the bottom
channel and away from the appliance. See Figure 4.4.
Set glass aside by placing one edge on a soft surface.
Interior Side Panel Removal:
To access the appliance mounting holes, the interior side
panels must be removed.
Remove the left and right interior side panels by removing
the two (2) screws attaching them to the appliance ceil-
ing. Use the small tab located on the top of each panel to
pull the top downward and away from the appliance side-
wall. The panel’s bottom tab will lift out of the appliance.
Repeat for both sides. See Figure 4.5.
REMOVE 2 PHILLIPS SCREWS
FOR FRONT REMOVAL
Figure 4.2 Front Removal
REMOVE PHILLIP SCREWS ATTACHING
GLASS RETAINING BRACKET
Figure 4.3 Remove Glass Retaining Bracket
1
2
Figure 4.4 Tilt and Remove Glass
REMOVE 2
PHILLIP SCREWS
PULL TAB AWAY FROM
APPLIANCE SIDEWALL
Figure 4.5 Side Panel Removal

SimpliFire • SF-OD43, SF-OD55 • 2047-980 Rev. C • 5/23
12
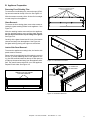
C. Chase Construction and Moisture
Resistance
This outdoor appliance will shed moderate amounts of
water, but is not waterproof. This appliance must be en-
closed or covered with nishing material and all joints
sealed to prevent water inltration.
This appliance will not perform as an exterior wall. Mois-
ture penetration must be considered for construction that
places the appliance in a wall or within moisture sensitive
materials.
When installed on exterior walls: Hearth & Home
Technologies recommends that the chase be constructed
outside the structure’s weather envelope. Where the plat-
form meets the wall, use a ashing detail similar to that
required for attached decks. Chase platforms, including
hearths should slope away from the structure at 1/8 in.
to 1/4 in. per foot. The appliance can be shimmed level.
Water Drainage: The Forum is designed to operate out-
doors experiencing rain and other sources of moisture.
The appliance is designed to drain excess moisture out
weep holes lated on the appliance base. When construct-
ing the enclosure, the builder must provide a means of
draining water from under the appliance and out of the
structure. This can be achieved by properly positioned
drain holes, slots or other means for all water to exit at
the lowest grade of the structure. Choosing the location
of the appliance is also important so that an area that
may experience excessive water ow or standing water is
avoided. In some cases a drain pan is needed to ensure
proper drainage. This can be constructed from corrosion
resistant metal, or suitable material for outdoor use with
a water resistant membrane. A slope of 1/4” per foot to-
ward the drain ports of the structure is recommended. A
drain pan can also be purchased (SF-OD43-DP) for the
43 inch appliance or the (SF-OD55-DP) for the 55 inch
appliance.
Flashing
• Flash the appliance in a manner consistent with re-
gional practices to prevent water penetration around
the appliance.
• For brick, stone, stucco and similar construction,
weep screeds should be installed per regional
codes.
• See Figures 4.7 and 4.8 for more information re-
garding wall and enclosure construction required to
prevent moisture penetration into the structure. The
appliance will shed moderate amounts of water but
is not waterproof.
Be sure to plan a drain system for your installation.
NOTICE: If the optional drain pan is not used during
construction ensure any water build-up can escape to
the exterior of the nished enclosure.
Water penetration can occur, and accumulate below the
appliance, and if not taken into consideration can cause
deterioration of materials, and may cause premature
failure of the structure.
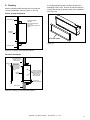
MOUNTING HOLES
RUBBER
BUSHING WASHER
WOOD
SCREW
Figure 4.6
1. Connect to electrical service. Reference Section
4.F.
2. Install the appliance into the opening. Ensure that
weight of appliance is fully supported by oor or bot-
tom framing member. Level with shims if necessary.
Ensure that it is centered left to right, then fasten it
directly to the framing.
3. For recessed installations using the Front Trim, the
appliance should be pushed into the nished open-
ing until the outer edge of the nishing stops are
ush with the nished surface. See Figure 4.8.
4. With the appliance in place, leveled and plum, attach
it to the framing using 4 sets of the provided rubber
bushings, washers, and wood screws through the
appliance mounting holes. See Figure 4.6.
D. Installation

13
SimpliFire • SF-OD43, SF-OD55 • 2047-980 Rev. C • 5/23
FINISHED SURFACE*
OPENING OF
APPLIANCE
*MAX FINISHING MATERIAL
THICKNESS
WITH FRONT FINISHING TRIM:
5/8 in. (16 mm)
WITHOUT FRONT FINISHING TRIM:
NO MAX
FINISHED SURFACE*
Figure 4.7 Finishing Around a Permanent Built-in
FINISHED SURFACE*
FINISHED SURFACE*
OPENING OF
APPLIANCE
FLASHING AND/OR
OPTIONAL DRAINAGE PAN
FINISH TRIM
MOUNTING HOLES MUST BE
USED WITH THE PROVIDED
RUBBER BUSHINGS AND
WASHERS TO ATTACH TO
FRAMING TO MAINTAIN
INGRESS PROTECTION.
APPLIANCE SHOULD
BE PLACED INTO THE
FINISHED OPENING
UNTIL THE OUTER
EDGE OF THE FINISH-
ING STOPS ARE FLUSH
WITH THE FINISHED
SURFACE.
*MAX FINISHING MATERIAL
THICKNESS; 2-1/4 in. (57 mm)
Figure 4.8 Finishing Around a Recessed Appliance
E. Finishing
Maximum nishing differ between built-in overlap and
recessed installations. Refer to Figure 4.7 and 4.8.
SPLATTER GUARD
Figure 4.9
Built-In Overlap Installations
Recessed Installations
A corrugated splatter guard is included as part of the
packaging of the Forum. This may be used to mask the
viewing area during the nishing steps of the installation.
See Figure 4.9.

SimpliFire • SF-OD43, SF-OD55 • 2047-980 Rev. C • 5/23
14
WARNING! Risk of Shock! Label all wires prior to dis-
connection when servicing the appliance. Wiring errors
can cause improper and dangerous operation. Verify
proper operation after servicing.
Note: The appliance must be connected and
grounded in accordance with local codes and /
or the current ANSI/NFPA 70 National Electric
Code or CSA C22.1 Canadian Electrical Code.
This Appliance ships with a GFCI protected power cord
installed. The power cord may be removed from the
junction box enclosure for use with hardwired applica-
tions.
For hardwired installations, a minimum 15 AMP,
120V/60Hz Ground Fault Interupter (GFCI) circuit is
required outdoor only.
Hard Wire Installation:
1. Remove the terminal block housing on the right top
end of the appliance, by removing two phillips
screws. On the underside of the terminal block hous-
ing remove the two remaining phillips screws attach-
ing the cover plate to the housing. See Figure 4.10.
2. Loosen the cord grip on the power cord side of the
housing.
3. Use a 3/32 slotted screwdriver or equivalent
or depress the spring loaded terminals to remove the
power cord.
4. Terminate type NM-B wire to the terminal
block, ensure connections are secure, and tighten
the cord grip. Use 3/32 slotted head screwdriver,
or equivalent, to depress the spring-loaded terminals
for the conductors.
5. Replace terminal block housing and cover plate with
retaining screws.
Figure 4.10
PHILLIPS SCREWS
COVER PLATE SCREWS
CORD GRIP TERMINAL
BLOCK
F. Electrical Connection / Installation
Note: All wiring must be completed prior to nishing
the appliance.
All electrical connections shall be performed by a
qualied electrician.
WARNING! Risk of Fire, Electrical Shock and Injury!
Electrical wiring must comply with local building codes
and other applicable regulations.

15
SimpliFire • SF-OD43, SF-OD55 • 2047-980 Rev. C • 5/23
G. Appliance Final Setup
Glass Removal:
Refer to Section 4.B.
Figure 4.12 Media and Small Logs Installation
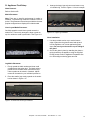
Log Media Placement:
1. Evenly spread the black embers and clear small
crystals across the ember bed. The black embers
provide a more realistic ember look with the logs.
Clear crystals can be mixed in if desired. Adjust-
ments can be made for your individual preference.
2. Place the smaller logs evenly spaced on the ember
bed as shown in Figure 4.12.
Media Placement:
Note: There are no specic requirements for media in-
stallation. Crystal and log media are included, but not re-
quired. The placement instructions provided are the most
popular congurations to display the included media.
Clear Crystal Media Placement:
Carefully spread the small clear crystals across the
ember bed. Then evenly arrange the large crystals on
top of or within the small crystal media. See Figure 4.11.
Figure 4.11 Media Installation
3. Arrange the larger logs so that one end rests on top
of a smaller log. Refer to Figure 4.13 as an example.
Figure 4.13 Larger Log Installation
Glass Installation:
1. Use the provided suction cup to set the bottom
edge of glass into the glass channel and tip back
into the appliance until it rests against the glass
stops. Do not rely on the suction cup for lifting of
the glass!
2. Secure the glass in place by attaching the glass re-
taining bracket to the appliance using the supplied
Phillips screws. Refer to Appliance Preparation Sec-
tion 4.B and gure showing glass removal.

SimpliFire • SF-OD43, SF-OD55 • 2047-980 Rev. C • 5/23
16
WARNING! Risk of Fire, Electrical Shock, and Injury!
Do not operate the appliance if it is damaged or has mal-
functioned. If you suspect the appliance is damaged, call
a qualied service technician to inspect and replace any
part of the electrical system if necessary.
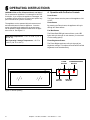
The appliance can be operated by both remote control
and manual buttons located on appliance. Once the
power is supplied to the appicance, the power button
can be pressed a beep should be heard when the appli-
ance turns on. See Figure 5.1.
A. Operation with On-Device Controls
Power Button
The Power button turns the power of the appliance ‘ON
or OFF’.
Flame Button
By pressing the Flame button, the appliance will cycle
through four ame effects.
Fuel Bed Button
The Ember Bed LED light button will turn on the LED
lights and cycle through 14 color themes (13 colors and
a color rotating option).
Flame Brightness Button
The Flame Brightness button will cycle through four
brightness settings. This adjusts Accent/Flame/Fuel Bed
brightness levels simultaneously.
Figure 5.1 Manual Operating
5 5 OPERATING INSTRUCTIONS
POWER
BUTTON
FLAME BRIGHTNESS
BUTTON
FLAME
BUTTON
FUEL BED
BUTTON
Operating Temperatures: +14 °F to +104 °F (-10 °C
to +40 °C)
Non-Operating / Storage Temperatures: -20 °F to
+140 °F (-29 °C to +60 °C)

17
SimpliFire • SF-OD43, SF-OD55 • 2047-980 Rev. C • 5/23
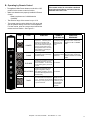
B. Operating by Remote Control
• The appliance Main Power button must be in the “ON”
position for the remote control to function.
• Make sure batteries are properly installed in Remote
Control.
- Battery requirements 2 x AAA batteries
(included).
• The effective range of the remote is up to 16 ft.
• The remote control must be within the 16 ft. range and
also be pointed directly at the face of the appliance.
For best results, point the remote control toward the
remote receiver location. See Figure 5.1.
ICON TITLE FUNCTION REMOTE
LCD DISPLAY
FIREPLACE
RESPONSE
POWER
The POWER button will turn the
replace on. It will also put the
replace in a standby mode.
This will turn off all functions at
once but will hold the settings in
memory except Timer function.
The appliance will turn on at the
same settings by pressing the
power button again.
LCD illuminates
and displays ame
status Icon and
temperature set
point.
Fireplace emits single audible
beep to conrm command to
transition to ON or STANDBY
state.
FLAME
By pressing the FLAME button,
the appliance will cycle through
four ame effects.
LCD illuminates
and displays ame
status icon.
Fireplace emits single audible
beep to conrm command to
transition between four FLAME
states.
FUEL BED
Pressing the Light button changes
the ember bed colors (14 color
themes available - 13 colors and
a color rotating option), and turns
it on/off.
No indicator.
BRIGHTNESS
Pressing the brightness button
toggles 4 brightness settings.
This adjusts all Lighting, Accent/
Flame/Fuel Bed brightness levels
simultaneously.
No Indicator.
TIMER
Pressing the Timer button sets
the time desired for the replace
to run. The Timer can be set from
.5 hour up to nine (9) hours in one
(1) hour increments.
Remote will
display the time
setting selected. If
in Stand-by mode
time will display
but cannot be
adjusted.
This remote control is not outdoor rated and
should be stored indoors and away from the
elements when not in use.

SimpliFire • SF-OD43, SF-OD55 • 2047-980 Rev. C • 5/23
18
A. Maintenance
WARNING! Risk of Shock! Always remove power before
moving or servicing. Do not immerse appliance in water.
• Before cleaning or servicing, always turn off appli-
ance and remove power, by either unplugging from
the wall outlet or shutting off circuit breaker.
• Light accumulated dust may be removed from the ap-
pliance exterior with a soft cloth or vacuum cleaner.
• Wipe the exterior surfaces of the appliance occasion-
ally with a slightly damp micro fiber cloth using a so-
lution of mild detergent and water. Dry thoroughly
before operating the appliance.
• The rotisserie motor is factory lubricated for life and
will not require further lubrication.
WARNING! Risk of Fire! To reduce risk of re, do not
store or use gasoline or any other ammable vapors or
liquids in the vicinity of the appliance.
WARNING! Risk of Electrical Shock! Any other servic-
ing needed must be performed by an authorized service
technician. Do not attempt to service the appliance your-
self.
B. Cleaning
CAUTION! Do not power wash or allow water to run into
the interior of the appliance as this could create a re or
electric shock. Always remove power before moving or
servicing.
Glass
Dust particles can be removed by bufng lightly with a
clean dry cloth. Fingerprints and other marks can be
cleaned with a cloth dampened with a quality household
glass cleaner. The glass should be completely dried with
a lint free cloth or paper towel. Do not use abrasive clean-
ers on glass surface.
Metal Surface
Dust particles can be removed by bufng lightly with a
clean dry cloth. A damp cloth can be used to clean paint-
ed surfaces. Do not use abrasive cleaners or chemical
household cleaners. Do not spray liquids directly on to
any surface.
6 6 MAINTENANCE
C. Servicing
Except for cleaning, an authorized service technician
should perform any other service.
Resetting Appliance GFCI Cord
If the Appliance GFCI power cord is tripped and there is
no power to the appliance, it must be reset by pressing
the “RESET” button on the GFCI plug. See Figure 6.1.
GLASS AND GLASS GASKET
It is normal during temperature changes for condensation
to form on the appliance viewing glass. This may require
the glass to be occasionally removed for cleaning the
interior side of the glass. See section 4.B for glass remov-
al instructions and refer to section 6.B for a suggested
cleaning method.
While removing and replacing the front viewing glass,
caution should be taken to ensure the glass gasket re-
mains in place on the appliance.
Before re-installing the front viewing glass, ensure the
glass gasket is fully seated and not blocking the bottom
glass channel. If the gasket is protruding into the channel
the glass may not fully seat and could cause interference
when re-installing the glass.
If the glass gasket becomes separated from the appliance
gasket channel it must be reinstalled by pressing the gas-
ket back into the glass gasket channel of the appliance. If
the gasket is damaged or becomes unusable contact your
dealer for a replacement.
WARNING! Risk of Electrical Shock! Do Not Open! No
user serviceable parts inside. Always turn appliance off
and disconnect power before performing maintenance,
service, or removal from the framed wall opening.
PRESS TO RESET
GFCI PLUG
Figure 6.1

19
SimpliFire • SF-OD43, SF-OD55 • 2047-980 Rev. C • 5/23
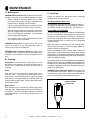
D. SimpliFire Troubleshooting Guide
Symptom Possible Cause Corrective Action
Circuit breaker trips or fuse
blows when appliance is
turned on
Exceeding current rating of the
circuit breaker or fuse, perhaps from
operating other appliances on the
same circuit as the appliance
Install appliance onto a dedicated 15 amp circuit.
Lights in room dim while the
appliance is on
Appliance is drawing close to circuit
current rating Install appliance onto a dedicated 15 amp circuit.
Appliance will not come
on when using the manual
controls on the appliance
Appliance is not plugged into an
electrical outlet Ensure plug is connected to a working outlet.
Hard-wire connections not correct (if
applicable) Review wiring instructions to ensure correct connection.
No incoming power from the electrical
outlet or electrical box Check fuse/breaker panel.
Defect in control board (PCB) Replace the control board (PCB).
Remote control does not work
Low/dead batteries Replace batteries in the remote.
Remote receiver is blocked, or remote
is not pointed directly at the receiver.
Ensure receiver is not blocked. Move closer to the
appliance.
Appliance power switch is in the off
"O" position (if equipped) Turn the power switch on, to the "I" position (if equipped).
Remote control malfunction Replace remote control
Control board (PCB) malfunction Replace control board (PCB).
Flame does not move at all Flame rotisserie motor is stalled or
malfunctioning
Cycle appliance on or off. If problem persists inspect
rotisserie and motor for blockage or interference. If no
interference, replace the control board (PCB).
Flame shudder
Flame rotisserie contacting other
internal components when spinning
Ensure rod is straight and mounted properly and is
spinning freely without spindles hitting other components.
Defective ame rotisserie motor Replace ame rotisserie motor.
Fuel bed does not light up
Fuel bed is turned off Refer to operation section of the user manual.
Loose wiring Check wiring to fuel bed LEDs.
Defective control board (PCB) Replace control board (PCB).
Defective LED lights Replace fuel bed LED lights.
Appliance turns on by itself
Defective control board (PCB) Replace control board (PCB).
Similar infrared signal from another
remote causing appliance to turn on
(pre-2019 manufactured appliances
only)
Some TV remotes may cause the appliance to turn on for
appliances manufactured before 2019. Replace control
board (PCB).
Grinding or rubbing noise Rotisserie hitting or rubbing against
internal components Replace rotisserie.

SimpliFire • SF-OD43, SF-OD55 • 2047-980 Rev. C • 5/23
20
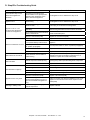
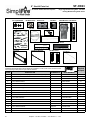
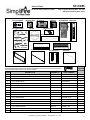
Service Parts SF-OD43
Beginning Manufacturing Date: Feb 2023
Ending Manufacturing Date: Active
IMPORTANT: THIS IS DATED INFORMATION. Parts must be ordered from a dealer or distributor. Hearth
and Home Technologies does not sell directly to consumers. Provide model number and serial number
when requesting service parts from your dealer or distributor. Stocked
at Depot
ITEM DESCRIPTION COMMENTS PART NUMBER
1 SFE Forum Crystal Media (large and small clear crystals) CRYSTAL-OD
2 Black Glass Embers EMBER-SCION
3 SF-OD Remote Reciver RECEIV-OD Y
4Forum Outdoor Motor MOTOR-OD Y
5PCB Board Assembly Main & Button PCB-OD Y
6 Forum Outdoor Electric Remote REMOTE-OD Y
7 SFE Forum OD Log Set LOGS-OD Y
8 Forum OD LED Assembly LED-OD43 Y
9 Power Cord, Forum OD PLUGIN-OD Y
10 Forum OD Accent ACCENT-OD43 Y
11 Forum OD Rotisserie ROTISS-OD43
12 Flame Screen Forum OD FLAME-OD43
13 Front for Forum OD FRONT-OD43
14 Glass Bracket, Forum OD GLABRKT-OD43
15 Forum Outdoor Panels Pkg of 2 PANELS-OD
16 Forum OD Glass Front GLA-OD43 Y
Forum Outdoor Hardware Pack HDWR-OD
12/22
43” Forum Outdoor Electric Fireplace
#1 Crystal Media #3 Receiver #4 Motor #5 PCB Board #6 Remote
#7 Log Assembly #8 LED
#10 Accent LED
#11 Rotisserie #12 Flame Screen
#2 Black Glass
#9 Power Cord
#13 Front #14 Glass Retainer #15 Side Panel #16 Glass
E. Service Parts List
Page is loading ...
Page is loading ...
-
 1
1
-
 2
2
-
 3
3
-
 4
4
-
 5
5
-
 6
6
-
 7
7
-
 8
8
-
 9
9
-
 10
10
-
 11
11
-
 12
12
-
 13
13
-
 14
14
-
 15
15
-
 16
16
-
 17
17
-
 18
18
-
 19
19
-
 20
20
-
 21
21
-
 22
22


Ask a question and I''ll find the answer in the document
Finding information in a document is now easier with AI
Related papers
-
Heat & Glo FORUM User manual
-
-
-
-
-
-
-
-
-
Other documents
-
SimpliFire SF-OD43 Owner's manual
-
SimpliFire Forum Outdoor Electric Fireplace Architect Guide
-
-
SimpliFire SF-OD55 Installation guide
-
-
MONESSEN SimpliFire Built-In Electric Fireplace User manual
-
MONESSEN SF-ALLP72-BK Owner's manual
-
-
-