
Canon ScanFront 220/220P System Software Update
Instructions
ScanFront Version Up Procedure Version 1.0 Page
1
ScanFront 220/220P system software updates are distributed as .bin files. These files
can be downloaded from the Drivers and Downloads area of the Canon USA support web
site (http://www.usa.canon.com/html/download/sf220.html). Before you can download the
update file you will be prompted to input the 17 digit alphanumeric Product Key located on
the underside label of the ScanFront. When entering the Product Key be sure to use upper
case for any alpha characters in the key. Once the file is downloaded the device can be
updated using the same ScanFront Administrator Mode Web Menu that is used for
configuration and day to day management of the device. The following are the procedures for
applying these software updates.
The configured settings of the device should be backed up before performing a system
software update. Applying new system software will not erase configuration settings such as
user accounts, address book entries, job buttons, etc., but it is always advised to perform a
device backup before performing any software update. With that in mind this document starts
with instructions for backing up the configured settings on the ScanFront in the event those
settings need to be restored after the system software has been updated.

Canon ScanFront 220/220P System Software Update
Instructions
ScanFront Version Up Procedure Version 1.0 Page
2
ScanFront 220/220P Configuration Backup Procedure*
1. The IP address assigned to the ScanFront can be obtained at the device by clicking on the
Administrator Settings button on the main menu screen. You will need to enter the
administrator password if one has been assigned, and then click on the Network Setting
button. This will display the IP address, which is needed to connect to the ScanFront 220
Administration Mode Web Menu using a browser on any computer attached to the network;
* The Backup/Restore operation can also be performed at the ScanFront device. For more information please
refer to the detailed instructions on page 3-10 in Chapter 3 “ScanFront Setup” of the ScanFront 220/220P
Instruction manual.

Canon ScanFront 220/220P System Software Update
Instructions
ScanFront Version Up Procedure Version 1.0 Page
3
2. Once the IP address is obtained, launch an Internet Explorer session on a network attached
computer. Type the ScanFront IP address into the Internet Explorer address bar and then
click enter. You will be presented with the ScanFront 220 Web Menu login screen for the
device. Make sure the login screen is in Administrator Mode and not in User Mode.
Switching to Administrator Mode
from User Mode can be done by clicking the To
Administrator Mode>> link in the upper right hand corner of the login page. If the upper
right hand corner link says To User Mode>> you are at the Administrator Mode login page
already. At that point you should enter the administrator password, and then click the Login
button;

Canon ScanFront 220/220P System Software Update
Instructions
ScanFront Version Up Procedure Version 1.0 Page
4
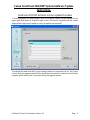
3. After logging in to the ScanFront Administrator Web Menu, click on the System Settings
menu item on the left side of the screen. Then click on the Backup/Restore sub menu item;
4. Click on the Backup All Settings… link. This will bring up the following dialog box
prompting you to Open or Save the file. You should choose the Save option;

Canon ScanFront 220/220P System Software Update
Instructions
ScanFront Version Up Procedure Version 1.0 Page
5
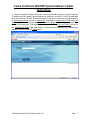
5. After clicking on the Save option you will be presented with a Save As dialog box where
you can specify a location and file name for the backup file;
You now have a file saved to your hard drive containing the ScanFront configured settings.
In the future this file can be applied to the device to restore the settings that existed at the
time the backup was made.

Canon ScanFront 220/220P System Software Update
Instructions
ScanFront Version Up Procedure Version 1.0 Page
6
ScanFront 220/220P Software Version Update Procedure
1. Before beginning you should make a note of the current version number displayed in the
upper right hand corner of ScanFront login screen. This can be compared with the version
displayed after applying the update to verify the update was successful.
You should also make sure that if you are using a laptop it is powered by the AC line. Power
cords to both the computer and ScanFront should be secure and fully inserted so that both the
computer and ScanFront don’t lose power during the upgrade process.

Canon ScanFront 220/220P System Software Update
Instructions
ScanFront Version Up Procedure Version 1.0 Page
7
2. Launch an Internet Explorer session on a network attached computer, type the ScanFront
IP address into the Internet Explorer address bar, and then click enter. You will be presented
with the ScanFront 220 Web Menu login screen for the device. Make sure the login screen is
in Administrator Mode and not in User Mode. Switching to Administrator Mode from User
Mode can be done by clicking the To Administrator Mode>> link in the upper right hand
corner of the login page. If the upper right hand corner link says To User Mode>>
you are at
the Administrator Mode login page already. At that point you should enter the administrator
password, and then click the Login button;

Canon ScanFront 220/220P System Software Update
Instructions
ScanFront Version Up Procedure Version 1.0 Page
8
3. Once logged into the ScanFront Web Menu, click on the System Settings menu item on the
left side of the screen, then click on the Version Up sub menu item;

Canon ScanFront 220/220P System Software Update
Instructions
ScanFront Version Up Procedure Version 1.0 Page
9
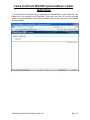
4. Click the Browse button to navigate to the downloaded ScanFront system upgrade .bin file.
Once the update file path location is selected, click on the Version Up button to start
transferring the file to the ScanFront;
5. You will be prompted with a dialog box warning that once the file has been uploaded the
ScanFront will be updated and the process cannot be reverted. Click the OK button to start
the update process;

Canon ScanFront 220/220P System Software Update
Instructions
ScanFront Version Up Procedure Version 1.0 Page
10
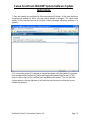
6. It will take several minutes or more depending on the bandwidth of your network for the
update file to be uploaded to the ScanFront. During this time you will see the following
screen. A progress indicator will display the transfer status in the lower part of the Internet
Explorer window;

Canon ScanFront 220/220P System Software Update
Instructions
ScanFront Version Up Procedure Version 1.0 Page
11
7. Once the transfer has completed the following screen will display. At this time the device
is applying the update file, which will take several minutes to complete. The touch screen
display on the ScanFront device will display various messages indicating updating is in
progress;
8. Do not turn the power off or attempt to operate the scanner while the update is in progress.
Once completed the ScanFront will reboot and display the standard logon screen. At that
point it is safe to login to the ScanFront and immediately start using it. You can check the
version number in the top right area of the ScanFront touch screen to confirm the version
number has changed.
-
 1
1
-
 2
2
-
 3
3
-
 4
4
-
 5
5
-
 6
6
-
 7
7
-
 8
8
-
 9
9
-
 10
10
-
 11
11


Canon imageFORMULA ScanFront 220 User manual
- Type
- User manual
- This manual is also suitable for
Ask a question and I''ll find the answer in the document
Finding information in a document is now easier with AI
Related papers
-
Canon imageFORMULA ScanFront 220P Owner's manual
-
-
-
-
Canon imageFORMULA ScanFront 330 User manual
-
-
-
-
-
Canon imageFORMULA ScanFront 400 User manual
Other documents
-
D-Link PC DE-220P User manual
-
Kofax mobiFlow 6.0 Developer's Guide
-
Nokia Lumia 610 User manual
-
Omega EZPLC Series Owner's manual
-
VESTEL 17MB35 User manual
-
Hitachi L26HP03E User manual
-
-
Microchip Technology BM20 User manual
-
-
ACTi ENR-220P ENR-221 ENR-221P ENR-222 Quick Installation guide