Zebra SYMBOL LS7708 Specification
- Category
- Bar code readers
- Type
- Specification
This manual is also suitable for

Symbol LS7708
Quick Reference Guide

2 Symbol LS7708
© 2007-2010 MOTOROLA, INC. All rights reserved.
Motorola reserves the right to make changes to any product to improve reliability,
function, or design.
Motorola does not assume any product liability arising out of, or in connection with, the
application or use of any product, circuit, or application described herein.
No license is granted, either expressly or by implication, estoppel, or otherwise under
any patent right or patent, covering or relating to any combination, system, apparatus,
machine, material, method, or process in which Motorola products might be used. An
implied license exists only for equipment, circuits, and subsystems contained in
Motorola products.
MOTOROLA, the Stylized M Logo and Symbol and the Symbol logo are registered
trademarks of Motorola, Inc. Other product names mentioned in this manual may be
trademarks or registered trademarks of their respective companies and are hereby
acknowledged.
Motorola, Inc.
One Motorola Plaza
Holtsville, N.Y. 11742-1300
http://www.motorola.com/enterprisemobility
Warranty
For the complete Motorola hardware product warranty statement, go to:
http://www.motorola.com/enterprisemobility/warranty

Quick Reference Guide 3
Introduction
This Quick Reference Guide is designed to assist during routine LS7708 operation.
Detailed information about unpacking, installation, performance specifications, and
troubleshooting can be found in the LS7708 Product Reference Guide.
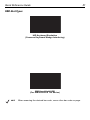
Product Description
The LS7708 high performance omni-directional laser scanner reads bar codes
quickly and accurately with a minimum of effort. The scanner includes an Electriconic
Article Surveillance (EAS) antenna, which allows simultaneous bar code reading and
security tag deactivation.
The LS7708 can rest on top of a counter or be attached to a mounting surface.
Operating the LS7708 Scanner
Power
The LS7708 does not have an on/off switch. It’s ready to scan when connected to a
power supply.
Indicator Lights
The scanner employs an LED with a combination of red and green lights to indicate
operation and decode status. The Standard LED Definitions Table on page 13 lists
the different light combinations and their meanings.
If the scanner is not operating normally, contact the technical person in charge of
scanning, or contact Motorola Enterprise Mobility Support.
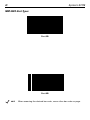
Speaker
Volume Control &
Wakeup Button
LED

4 Symbol LS7708
Controls
The Volume Control & Wakeup button adjusts the volume of the beeper and wakes the
scanner from rest or sleep mode.
When the scanner is operating, depress this button to adjust the volume. Hold down the
button until the desired volume is obtained (approximately five seconds). There are
three volume levels. The scanner beeps twice at each volume level before cycling to
the next.
If the scanner is in a rest or sleep mode, briefly depressing the Volume Control &
Wakeup button also awakens the scanner.
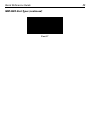
Connections
The scanner’s ports are at the bottom of the scanner. Turning the scanner upside down
allows access to the scanner’s ports.
Routing the Cables
The scanner case has several channels to route the outgoing cables so that they are
organized and don’t hinder the scanner’s placement. After placing the cable connectors
in the appropriate scanner ports, route the cables through the nearest channel.
Secondary Scanner
Power Port
EAS Interlock PortRS-232 Aux Port
Host Port
(Synapse) Port

Quick Reference Guide 5
For a cable with a Y-connector (containing both power and interface connectors):
1.
Connect the power and interface cables to the appropriate ports.
2. Route the cables according to the following diagram.
Mounting the Scanner to a Surface
Caution: The LS7708 requires use of the mounting bracket for proper
operation and saftley. Failure to use the bracket can result in
scanner instability.
The LS7708 is designed to sit on top of a counter or be mounted to a wall. The slot on
the back of the scanner accepts a mounting bracket to secure it to the mounting
surface. This bracket accommodates either configuration.
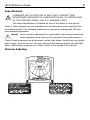
Connections to power and
hand-held scanner ports, side exit:
curl power cable and route it back
towards interface cable.
Connections to power and host
ports, side exit: keep power cable
straight and route it ahead with
interface cable.
Plastic Tab
Rubber Feet

6 Symbol LS7708
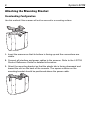
Attaching the Mounting Bracket
Freestanding Configuration
Use this method if the scanner will not be secured to a mounting surface.
1. Invert the scanner so that its bottom is facing up and the connections are
visible.
2. Connect all interface and power cables to the scanner. Refer to the LS7708
Product Reference Guide for detailed information.
3. Orient the mounting bracket so that the plastic tab is facing downward and
toward the slot on the back of the scanner. The square cushion on the
mounting bracket should be positioned above the power cable.

Quick Reference Guide 7
4. Tilt the plastic tab into the slot on the scanner, and rotate the opposite edge
downward. As the bracket rotates, push it toward the slot so that the feet of the
bracket lie flat against the scanner’s bottom (see arrows).
5. When the bracket is flat against the scanner bottom, release pressure so that
the feet slide forward into the front of the scanner.
Mounted Configuration
Use this method if the scanner will be secured to a mounting surface.
1. Determine where the LS7708 is going to be mounted.
2. Use a pencil to mark the four mounting holes. (A mounting template is provided
in the LS7708 Product Reference Guide.)
3. Remove all rubber feet (from the bracket or from the scanner).
4. Place the mounting bracket in position over the drilled holes with its flat surface
facing the mounting surface.

8 Symbol LS7708
5. Insert four screws through the holes and fasten to the mounting surface.
6. Align the slot at the back of the scanner with the plastic tab on the mounting
bracket.
7. Angle the scanner slightly to allow the bracket plastic tab to slide into the slot.
8. Push the scanner towards the plastic tab and rotate it so that it is perpendicular
to the mounting surface.
9. Release the pressure on the scanner. The bracket locks into place.

Quick Reference Guide 9
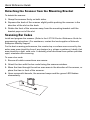
Detaching the Scanner from the Mounting Bracket
To detach the scanner:
1.
Grasp the scanner firmly on both sides.
2. Squeeze the back of the scanner slightly while pushing the scanner in the
direction of the slot on the back.
3. Rotate the front of the scanner away from the mounting bracket until the
bracket pops out of the slot.
Scanning Bar Codes
Install and program the scanner. (Refer to the LS7708 Product Reference Guide for
programming instructions.) For assistance, contact the local supplier or Motorola
Enterprise Mobility Support.
For the best scanning performance, the counter top or surface area covered by the
active scan area should be free of any designs (e.g. stripes or patterns). Ideally, that
area should be a light, solid color. A rastering omni-directional scan pattern provides
rapid, orientation-free scanning.
To scan a bar code:
1. Ensure all cable connections are secure.
2. Orient the item with the bar code facing the scanner window.
3. Move the item through the active scan area in the direction of the arrows, or
place the item in front of the scanner.
4. Upon successful decode, the scanner beeps and the green LED flashes
momentarily.

10 Symbol LS7708
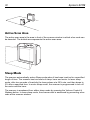
Active Scan Area
The active scan area is the area in front of the scanner window in which a bar code can
be decoded. The dotted area represents the active scan area.
Sleep Mode
The scanner automatically enters Sleep mode when it has been inactive for a specified
length of time. The scanner has two levels of sleep: laser and motor. In laser sleep
mode, after ten seconds of inactivity the laser pulses at a 50% rate, and then drops to
3% after a specified time. In motor sleep mode, the scanner is programmed to turn off
the motor and the laser.
The scanner is awakened from either sleep mode by pressing the Volume Control &
Wakeup button. In laser sleep mode, the scanner also is awakened by presenting a bar
code at the scanner window.

Quick Reference Guide 11
Selecting Beeper Volume
The scanner emits a short beep when it successfully reads a bar code. The volume of
the beep is changed by scanning one of the beeper volume bar codes in the LS7708
Product Reference Guide, or by using the Volume Control & Wakeup button on the front
of the scanner as follows:
1.
Press and hold the button for approximately five seconds. The scanner cycles
through three settings (low, medium, high), emitting a two-beep tone at each
setting.
2. To select a particular setting, release the button after the desired 2-beep tone
is heard.
Beeper Definitions
The scanner communicates with the user by emitting different beeper sequences and
patterns. See the Standard Beeper Definitions table for beeper sequences that occur
during both normal scanning and while programming the scanner.
Beeper Sequence Indication
Standard Use
3 short high beeps Power up.
Short high beep A bar code symbol was decoded (if decode
beeper is enabled).
4 long low beeps A transmission error was detected in a scanned
symbol. The data is ignored. This occurs if the
scanner is not properly configured. Check
option setting.
5 low beeps Conversion or format error.
Hi-hi-hi-lo beep RS-232 receive error on RS-232 host or RS-232
auxiliary port.
Code 39 Buffering
Hi-lo beep New Code 39 data was entered into the buffer.
3 long high beeps Code 39 buffer is full.

12 Symbol LS7708
Lo-hi-lo beep The Code 39 buffer was erased or there was an
attempt to clear or transmit an empty buffer.
Lo-hi beep A successful transmission of buffered data.
Host Specific
USB only
4 short high beeps Scanner has not completed initialization. Wait
several seconds and scan again.
Scanner gives a power-up
beep after scanning a USB
Device Type.
Communication with the bus must be
established before the scanner can operate at
the highest power level.
This power-up beep occurs
more than once.
The USB bus may put the scanner in a state
where power to the scanner is cycled on and off
more than once. This is normal and usually
happens when the PC cold boots.
RS-232 Host only
1 short high beep A <BEL> character is received and Beep on
<BEL> is enabled.
RS-232 Auxiliary Port only
1 short high beep A complete block of data was received and sent
to the host, either due to a carriage return or
because the two-second serial response
timeout has elapsed.
4 long low beeps A data overrun condition has occurred. Abstain
from scanning data from other ports when large
amounts of data are sent to the RS-232
Auxiliary port.
Beeper Sequence Indication

Quick Reference Guide 13
LED Definitions
In addition to beeper sequences, the scanner communicates with the user via an LED
display. The Standard LED Definitions table defines LED indications that display during
scanning.
Maintenance
Cleaning the exit window is the only maintenance required. A dirty or scratched window
may affect scanning activity.
• Remove any dirt particles with a damp cloth.
• Wipe the window with a tissue moistened with ammonia or water.
LED Indication
Off No power is applied to the scanner.
Green The scanner is on and “ready to scan.”
Momentary flash A bar code was successfully decoded.
Slow continuous red flashing,
green on
The scanner is in programming mode.
Fast continuous red flashing,
green on
There is an internal problem; the laser is
shut off for regulatory reasons.
Green on (and laser blinking) Scanner is in Low Power Blink mode.
Red and green on Scanner is in Low Power Motor and Laser
Shutdown mode.

14 Symbol LS7708
Troubleshooting
Problem Possible Causes Possible Solutions
The omni-line scan
pattern does not
display when you
follow the directions
for installing the host
cable.
No power to the
scanner.
Ensure the host has power,
and is on. If the scanner uses
a separate power supply,
ensure it’s connected to a
working AC outlet.
Power-up sequence is
incorrect. Refer to the LS7708
Product Reference Guide for
more information.
Interface cable is not
properly connected.
Check for loose cable
connections.
Scan line(s) display,
but bar code cannot
be read.
Scanner is not
programmed to read
the bar code type.
Ensure scanner is
programmed to read the bar
code type you are scanning.
Bar code is damaged. Try scanning other bar codes
of the same bar code type.
Bar code is too far from
scanner.
Move the bar code closer to
the scanner.
The host has disabled
scanning or overridden
parameter settings.
See the technical person in
charge of scanning.
Bar code is
decoded, but not
transmitted to the
host.
Scanner is not
programmed for the
correct host type.
Scan the appropriate host type
bar code.

Quick Reference Guide 15
Scanned data is
incorrectly displayed
on the host.
Scanner is not
programmed to work
with the host. Check
scanner host type
parameters or editing
options.
Ensure proper host is
selected.
For RS-232, ensure the
scanner’s communication
parameters match the host’s
settings.
For keyboard wedge, ensure
scanner is programmed with
the correct country code and
that the CAPS LOCK key is
off.
Ensure editing options (e.g.,
UPCE-to-UPCA Conversion)
are properly programmed.
Although the green
and red LEDs are
on, the scanner
does not produce
the omni-directional
scan pattern.
The scanner has gone
into the Low Power
“Motor Sleep” Mode.
Press the Volume Control &
Wakeup button to awaken the
unit.
USB or Synapse
host not functioning
properly.
Scanner does not
recognize host.
Remove and reinsert external
power supply to force cable to
autodetect correct host.
NOTE If the symbol still does not scan, contact distributor or call Motorola
Enterprise Mobility Support. See the back cover for contact
information.
Problem Possible Causes Possible Solutions

16 Symbol LS7708
Programming
Generally, the technical person in charge of scanning customizes the scanner for
the particular application using programming bar codes found in the LS7708
Product Reference Guide. If the user is programming the scanner, the LS7708 Product
Reference Guide should be consulted for more information.
Following are some frequently used programming bar codes.
Test
To confirm that your scanner is working properly, scan the UPC-A bar code below.
Verify the Scanner Is Working
NOTE For additional host types, refer to the LS7708 Product Reference
Guide, p/n 72-69531-xx, available at
http://www.motorola.com/enterprisemobility/manuals.
NOTE When scanning the desired bar code, cover other bar code on page.

Quick Reference Guide 17
Set Defaults
Scanning this bar code sets all parameters to their factory default values.
Set Defaults
Host Type Selection
If a Synapse cable (i.e., part number STIxx-xxxx) is used, the scanner autodetects the
type of host, so there is no need to scan host type selection bar codes.
If a USB interface is used, the scanner autodetects the USB and defaults to the HID
keyboard interface. See page 28 to select the IBM Hand-Held host type. Refer to the
LS7708 Product Reference Guide, p/n 72-69531-01, for additional USB host types.
If a Keyboard Wedge, RS-232, Wand Emulation, or IBM 46XX host is used, select that
host type from the programming bar codes that follow. If Keyboard Wedge is selected,
also select a country keyboard type from the following pages.
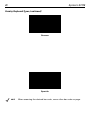
Keyboard Wedge Host Type
IBM PC/AT & IBM PC Compatibles

18 Symbol LS7708
Country Keyboard Types (Country Codes)
Country keyboard options apply to the Keyboard Wedge interface only.
North American
French
NOTE When scanning the desired bar code, cover other bar code on page.

Quick Reference Guide 19
Country Keyboard Types (continued)
French Canadian Win95/98
French Canadian XP/2000
NOTE When scanning the desired bar code, cover other bar code on page.

20 Symbol LS7708
Country Keyboard Types (continued)
German
Spanish
NOTE When scanning the desired bar code, cover other bar code on page.
Page is loading ...
Page is loading ...
Page is loading ...
Page is loading ...
Page is loading ...
Page is loading ...
Page is loading ...
Page is loading ...
Page is loading ...
Page is loading ...
Page is loading ...
Page is loading ...
Page is loading ...
Page is loading ...
Page is loading ...
Page is loading ...
-
 1
1
-
 2
2
-
 3
3
-
 4
4
-
 5
5
-
 6
6
-
 7
7
-
 8
8
-
 9
9
-
 10
10
-
 11
11
-
 12
12
-
 13
13
-
 14
14
-
 15
15
-
 16
16
-
 17
17
-
 18
18
-
 19
19
-
 20
20
-
 21
21
-
 22
22
-
 23
23
-
 24
24
-
 25
25
-
 26
26
-
 27
27
-
 28
28
-
 29
29
-
 30
30
-
 31
31
-
 32
32
-
 33
33
-
 34
34
-
 35
35
-
 36
36


Zebra SYMBOL LS7708 Specification
- Category
- Bar code readers
- Type
- Specification
- This manual is also suitable for
Ask a question and I''ll find the answer in the document
Finding information in a document is now easier with AI
Related papers
-
Zebra LS7708 Reference guide
-
-
Symbol Phaser P460 User manual
-
-
-
 Symbol LS 4208 User manual
-
-
-
-
Zebra PDT Reference guide

Other documents
-
Motorola SYMBOL LS9203i Quick start guide
-
-
-
-
-
-
 Symbol LS 3408 User manual
-
-
-
