Canon D1320 Specification

Category
Multifunctionals
Type
Specification

This manual is also suitable for

1
Preface
Next Page
2
Installing the Machine
P. 6
3
Configuring and
Connecting the Fax
P. 14
4
Appendix
P. A-1
Connecting to a Computer
and Installing the Drivers
P. 18
Read this guide first.
Please read this guide before operating this
product.
The remarks for important safety
instructions are described in "Basic
Operation Guide." Read the guide also.
After you finish reading this guide, store it in
a safe place for future reference.
Starter Guide
//
Illustrations and displays used in this manual are which of D1370 unless specified.
2
Setting Up the Machine to Suit Your Needs
Copy
Media Print
Fax
*
1
Settings from
a Computer
Print
Scan
PC Fax
*
1
Print
Scan
PC Fax*
1
Registering the Sender Information
P. 14
Fax Settings
*1
Settings are now complete.
Selecting the Receive Mode
P. 15
Connecting a Telephone Line
P. 16
Preparing the Toner Cartridges P. 8
Connecting the Power Cord
P. 11
Specify settings related to the Copy, Print, Fax
*1
, PC Fax
*1
, Scan, Remote UI and ,Media Printing functions. Follow the steps in
the flowchart below.
Start settings.
Carrying the Machine to the Installation Site and Removing the Packing Materials
P. 6
Turning the Power ON and
Specifying the Initial Settings
Language Settings
Country and Region Settings
Time Zone Settings
P. 12
Loading Paper
P. 10
Settings for paper sizes and paper types are required after turning the power ON.
P. 13
Remote
UI
Network
Connection
USB
Connection
Settings in a Computer
: available : not available
Copy
Print
(2-sided)
Print
(PS/PCL)
Fax
(PC Fax)
Scan
Send to E-mail/
Store to Shared Folder
Remote UI
ADF
(2-sided)
D1370
D1350
D1320
Available Features
*
1
You may use this function in the D1370/D1350 only.
Required Operations
For Windows
For Macintosh
Connecting to a Network
P. 19
Connecting to a Network
P. 19
Checking the IP Address
P. 20
Checking the IP Address
P. A-3
Installing the Software
P. 25
Installing the Software
P. 22
Connecting a USB Cable
P. 26
Connecting a USB Cable
P. 23
Current Time Settings
3
Checking the Supplied Accessories
1.
Confirm that all the supplied
accessories are contained in the box.
If an item is missing or damaged, please contact our Canon
Authorized Service Facilities or the Canon Customer Care
Center.
The machine unit
The toner cartridge is
already installed.
Telephone cable
*1
Supplied Toner Cartridge
The average yield of the included toner cartridge is as follows.
Canon Cartridge 120 Starter Average yield
*1
: 2,300 sheets
*1
The average yield is on the basis of “ISO/IEC 19752”
*2
when printing A4 size paper with the default print density setting.
*2
"ISO/IEC 19752" is the global standard relating to "Method for the determination of toner cartridge yield for monochromatic electrophotographic printers
and multi-function devices that contain printer components" issued by ISO (International Organization for Standardization).
The average yield of the replacement toner cartridge varies from that of the supplied toner cartridge.
To purchase replacement toner cartridges, see "About Replacement Toner Cartridges" in the e-Manual.
About the LAN cable
The machine does not come with a LAN cable
or a hub. Have cables or a hub ready as needed.
• Use a Category 5 or higher twisted pair cable.
• If you want to connect the machine to a 100BASE-TX
Ethernet network, all the devices to be connected to the
LAN must support 100BASE-TX.
About the USB cable
The machine does not come with a USB cable.
Have cables ready as needed.
Preface
1
Installing the Machine
2
Configuring and Connecting the Fax
3
Connecting to a Computer and
Installing the Drivers
4
Appendix
Power cord
Starter Guide (This manual)
Registration Card
Speed dial label
*1
*1 D1370/D1350 Only
Limited Warranty Notice
Toner cartridge
Basic Operation Guide
User Software CD-ROM
For Windows For Macintosh
4
User Software CD-ROM
About the Drivers and Software
The drivers and software included in the CD-ROM supplied with this machine are as follows.
MF Drivers
Printer driver You can print from an application to the machine once you have the printer driver
installed on your computer.
Printer Drivers:
UFRII LT/UFRII (XPS)PCL5e/PCL6/PS Printer Driver
* The appropriate Printer Driver differs according to your machine.
UFRII (XPS)/PCL5e/PCL6 is for Windows only.
Fax driver
(D1370/D1350 only)
If you install the fax driver on your computer, you can select “Print” from an application,
select the Canon fax driver as a printer, and specify the output destination and options.
The fax driver converts the data into an image that conforms to standard fax protocols so
that the data can be printed or saved using the recipient’s fax machine.
Scanner driver You can use the machine as a scanner once you have the scanner driver installed on your
computer.
Network Scan Utility You need this utility software to use the machine as a network scanner. It is automatically
installed along with the scanner driver.
MF Toolbox
MF Toolbox* The MF Toolbox provides a group of commands for you to open a scanned image in an
application, send it as an e-mail attachment file, store it on the hard disk, etc.
Others
Presto! PageManager You can handle scanned images in many ways using this software.
Canon Font Manager You can manage the fonts for Windows with Canon Font Manager software.
* MF Toolbox for Macintosh and MF Toolbox for Windows may be different in some features.
For details, see the Scanner Driver Guide.
: Supported
: Not supported
Windows 2000/XP Windows Vista/7
Windows Server 2003/
Server 2008
Mac OS X
(version 10.4.9 or later)
Printer driver
2 pt
*
Fax driver
2 pt
*
Scanner driver
Network Scan Utility
2 pt
*
2 pt
*
MF Toolbox
Presto! PageManager
Canon Font Manager
* Supported only over network connections.
Supported Operating Systems
5
About the Supplied Manuals
Read this manual first.
This manual describes the settings for
setting up the machine and installing
the software. Be sure to read this
manual before using the machine.
Starter Guide
Basic Operation Guide
e-Manual
Read this manual next.
This manual describes the basic use of
the machine.
Read the desired chapter
to suit your needs.
The e-Manual is categorized by subject to
find desired information easily.
For details about using the e-Manual, refer
to “Using the e-Manual“ in Appendix.
Preface
Installing the Machine
Configuring and Connecting the Fax*
Connecting to a Computer and Installing the Drivers
Appendix
Before Using the Machine
Document and Paper Handling
Copying
Printing from a Computer
Registering Destinations in the
Address Book*
Using the Fax Functions*
Important Safety
Instructions
Basic Operation
Copy
Fax
*
1
*
2
Print
*
2
Scan
*
2
Network Settings
Security
Setting and Managing from
Computer
Troubleshooting
Maintenance
Setting Menu List
Specifications
Using the Scan Functions
Maintenance
Troubleshooting
Registering/Setting the
Various Functions
Appendix
* The e-Manual is included in the User Software CD-ROM.
*1 The fax function is available only for D1370/D1350.
*2 If you are using Macintosh, see the following Driver Guides or Help for more details on these functions.
You can find the driver guides in the following locations on the User Software CD-ROM.
Mac UFR II Printer Driver Installation Guide [Documents] - [Print] - [Guide] - [index.html]
Mac PS Printer Driver Installation Guide [Documents] - [Print(PS)] - [Guide] - [index.html]
Mac Fax Driver Installation Guide [Documents] - [FAX] - [Guide] - [index.html]
Mac Scanner Driver Guide [Documents] - [Scan] - [Guide] - [index.html]
* The fax function is available only for D1370/D1350.
This manual
Preface
1
Installing the Machine
2
Configuring and Connecting the Fax
3
Connecting to a Computer and
Installing the Drivers
4
Appendix
Send Setting Guide
Read this manual for how
to set Send features.
This manual describes setting for
sending scanned data to E-mail and/
or file servers.
Send to E-mail Function
tore to Shared Folder Function
* The Send Setting Guide is included in the User Software CD-ROM.
6
Determining the Installation Site
Carrying the Machine to the Installation Site
and Removing the Packing Materials
4" (100 mm)
32 1/2"
(824 mm)
52 3/4" (1,341 mm)
25 5/8"
(650 mm)
4" (100 mm)
4" (100 mm)
4" (100 mm)
4" (100 mm)
2.
Remove the packing materials.
* The packing materials may be changed in form or placement, or may be
added or removed without notice.
1.
Take the machine out of the plastic bag, and then carry to the
installation site.
Hold the grips. Carry the machine.
Remove the packing materials.
* D1370/D1350 only.
Remove the unpacking manual.
7
Preface
1
Installing the Machine
2
Configuring and Connecting the Fax
3
Connecting to a Computer and
Installing the Drivers
4
Appendix
Remove the packing materials.
Pull out the paper drawer.
(A)
Open the feeder.
Remove the packing materials
with tape.
Remove the packing materials
with tape.
Close the feeder.
Set the paper drawer.
* Do not remove the cap (A) on the USB port at this stage.
Uncap when installing for USB connection.
Make sure that the following packing
materials are all removed from the machine.
Check!
Tape x 20 (D1370/D1350)
x19 (D1320)
Packing materials with tape x4
Unpacking manual x1
8
Preparing the Toner Cartridges
1.
Open the front cover.
Hold down the open button.
2.
Remove the packing materials from the toner cartridge, and install
the toner cartridge.
Remove the toner cartridge.Remove the packing material. Remove the packing material.
Shake five to six times. Remove the tab.
Place the toner cartridge on a flat surface, and remove
the tab.
Pull the sealing tape completely out.
The full length of the sealing tape is approximately 20
in. (50 cm).
9
Preface
1
Installing the Machine
2
Configuring and Connecting the Fax
3
Connecting to a Computer and
Installing the Drivers
4
Appendix
Protrusion
Protrusion
Insert the toner cartridge.
Fit the protrusions on both sides of the toner cartridge into the guides located on both sides of the machine, and slide the
toner cartridge into the machine until the toner cartridge comes to rest and is held against the back of the machine.
Make sure that the following packing materials are all
removed from the machine.
Check!
Packing materials x2
Sealing tape x1
3.
Close the front cover.
The serial number is located on the rating label centered on
the rear side of the machine (a character string of 3 letters and
a 5-digit number).
Write down the information here (on the
back cover of the Basic Operation Guide).
Rating label
FT5-XXXX (XXX) XXXXXXXXXX © CANON INC. 2011 PRINTED IN xxxxxx
CANON INC.
30-2, Shimomaruko 3-chome, Ohta-ku, Tokyo 146-8501, Japan
CANON MARKETING JAPAN INC.
16-6, Konan 2-chome, Minato-ku, Tokyo 108-8011, Japan
CANON U.S.A., INC.
One Canon Plaza, Lake Success, NY 11042, U.S.A.
CANON EUROPA N.V.
Bovenkerkerweg, 59-61, 1185 XB Amstelveen, The Netherlands
CANON CHINA CO. LTD.
15F Jinbao Building No.89, Jinbao Street, Dongcheng District, Beijing 100005, PRC
CANON SINGAPORE PTE LTD
1 HarbourFront Avenue, #04-01 Keppel Bay Tower, Singapore 098632
CANON AUSTRALIA PTY LTD
1 Thomas Holt Drive, North Ryde, Sydney NSW 2113, Australia
CANON GLOBAL WORLDWIDE SITES
http://www.canon.com/
Serial No.
Date of Purchase
Write down the serial number and purchase date on the back cover of the Basic Operation Guide enclosed in the package.
You need this information when contacting your local authorized Canon dealer or Canon Customer Care Center.
10
1.
Pull out the paper drawer.
Loading Paper
2.
Slide the paper guides, and load the paper.
While holding the lock release lever, adjust the paper guides.
Match the paper guides with the size of the paper that is loaded.
When changing the size of the paper to be loaded
Be sure to set the paper size.
At factory shipment, the machine’s default settings
have LTR for paper size and Plain for paper type.
Proceed to“Setting a Paper Size and Type on p.13.
Load the paper.
Load the paper that it aligns
with the rear side of the paper
drawer .
Set the paper under the hooks.
Make sure that the paper stack does
not go over the line of the load limit
mark.
Check!
Hook
Hook
Hooks
Up to here
11
Preface
1
Installing the Machine
2
Configuring and Connecting the Fax
3
Connecting to a Computer and
Installing the Drivers
4
Appendix
3.
Set the paper drawer.
Connecting the Power Cord
Do not connect the USB cable. Connect the USB cable when installing the software.
Make sure that the machine is
switched OFF.
Plug the power plug into the
power socket.
Plug the power plug into an
AC power outlet.
OFF
ON
12
Turning On the Machine and Specifying the
Initial Settings
1.
Turn ON the machine.
2.
Specify initial settings.
Press [ ] or [ ] to
select, and press [OK].
Read the messages and press [OK].
Open frnt cover; see
if orange packing
material is removed.
Check that tabs/tape
are removed from
toner cartridge.
Check that paper is
loaded in Drawer 1.
Next NextNext
Language
English
French
Spanish
Portuguese
Press [ ] or [ ] to
select, and press [OK].
Select Country/Region
United States (US)
Canada (CA)
Brazil (BR)
Mexico (MX)
Enter the date and time and
press [OK].
Move the cursor with [ ] or [ ].
Press [ ] or [ ] to select the number or
switch to <AM> or <PM>.
Current Time Settings
01/01/2011 12:52 AM
Copy: Press Start
100% LTR
Density: 0
Original Type: Text
...
2-Sided: Off
1
+
-
1
The initial screen appears when
the initial setup is complete.
OFF
ON
• When turning ON the machine for the first time after installation. it
may output a piece of blank paper. This is not a failure.
• The machine enters the Sleep mode to conserver energy when you
do not operate the machine for a certain period of time. To cancel the
Sleep mode, press the [ ] (Energy Saver) key on the operation panel.
Press [ ] or [ ] to select,
and press [OK].
Time Zone Settings
GMT-5:00
GMT-4:00
GMT-3:30
GMT-3:00
13
For D1370/D1350 For D1320
Next, perform the setup to use the fax function. Next, select the connection method to a computer.
Specifying Initial Fax Settings and
Connecting a Telephone Cable
P.14
Selecting the method for
connecting to the machine
P.18
Preface
1
Installing the Machine
2
Configuring and Connecting the Fax
3
Connecting to a Computer and
Installing the Drivers
4
Appendix
Press [ ]
(Select Paper/Settings).
Press [ ] or [ ] to select, and
press [OK].
Press [ ] or [ ] to select, and
press [OK].
Press [ ] or [ ] to select, and
press [OK].
Press [ ] (Select Paper/Settings)
to close <Select Paper> screen.
Press [ ] or [ ] to select, and
press [OK].
Select Paper
MP Tray
LTR:Plain
Paper Settings
1
Paper Settings
Multi-Purpose Tray
Drawer 1
Register Custom Paper
Paper Size
LTR
LGL
EXEC
FOOLSCAP
Paper Type
Plain (16 lb Bond-24
Plain L (16 lb Bond
...
Recycled
Color
Setting a Paper Size and Type
14
Specifying Initial Fax Settings and Connecting
a Telephone Cable
1.
Register the fax number and unit name.
Enter information (text, symbols, and numbers)
using the following keys.
# C
Numeric
keys
OK
Entering text, symbols, and numbers
Enter using the numeric keys or [ ] (SYMBOLS).
Key Entry mode: <A> Entry mode: <a> Entry mode: <12>
@ . - _ / 1
ABC abc 2
DEF def 3
GHI ghi 4
JKL jkl 5
MNO mno 6
PQRS pqrs 7
TUV tuv 8
WXYZ wxyz 9
(Not available) 0
- . * # ! “ , ; : ^ ` _ = / | ‘ ? $ @ % & + \ ( ) [ ] { } < >
~
(Not available)
Deleting text, symbols, or numbers
To delete text, numbers, or symbols, press [ ] (Clear).
To delete all text, numbers, or symbols, press and hold [ ] (Clear).
Press [
].
Press [ ] or [ ] to select,
and press [OK].
Display “Fax Setup Guide” with the following operations to
perform the settings or connections if selecting <Set up Later>.
[ ] (Menu) <Fax TX Settings> <Fax Setup Guide>.
Press [OK]. Enter.
Press [ ] or [ ] to
select <Apply> and press
[OK].
Press [OK].
Enter.
Press [ ] or [ ] to select
<Apply>, and press [OK].
Entering Text
Changing the entry mode
Press [ ] to select <Entry Mode> and press
[OK]. You can also press [ ] (Tone) to change
the entry mode.
Entry mode Text that can be entered
<A> Alphabet (capital letters) and symbols
<a> Alphabet (small letters) and symbols
<12> Numbers
Moving the cursor (entering a space)
Move the cursor by pressing [ ] or [ ]. To enter
a space, move the cursor to the end of the text
and press [ ].
Perform fax setup?
Set up Now
Set up Later
Register the unit
telephone number for
this machine.
*Next Screen: Press OK
Register Unit Tel No.
031234567
<Apply>
+
Register unit name.
(Sender name,
company name, etc.)
*Next Screen: Press OK
Register Unit Name
ABC
<Apply>
Entry Mode: A
What happens with the unit name
Once the information has been registered, it is printed at
the top of each page that you are sending.
Sending Date/Time
Fax/Telephone Number
(FAX No.)
Page Number
Sender Name
(Unit Name)
Telephone Number
Mark
01/01/2011 02:07 PM FAX 123XXXXXXX CANON P.0001
Operate the machine following the on-screen instructions and perform the following settings and connection.
• Registering the fax number and unit name
• Setting the fax receive mode
• Connecting a telephone line
If you are using pulse dialing, change the line type after specifying the settings.
15
2.
Select the fax receive mode.
The receive mode is set to <Auto>.
Proceed to Step 3.
Receive faxes automatically.
The telephone functions do not be used.*
* When the telephone is connected in the auto receive mode, the
telephone rings when receiving a fax or telephone call. You can
answer the telephone while it is ringing. To turn off the telephone
ringer, see “Incoming Ring” in the
e-Manual.
Do you want to use
this machine for fax
only (no telephone)?
Yes
No
Do you want to auto-
receive faxes and
answer phone manually?
Yes
No
Do you want to use
an answering machine
to answer the phone?
Yes
No
The receive mode is set to <Fax/Tel Auto Switch>.
Proceed to Step 3.
Receive faxes automatically.*
Responds to a telephone call
by picking up the handset.
* The telephone rings on incoming calls. To turn off the telephone
ringer, see “Incoming Ring” in the
e-Manual.
The receive mode is set to <Answer>.
Proceed to Step 3.
Receive faxes automatically.
Respond to telephone calls using the built-in answer function.
Ring on incoming calls or faxes.
The receive mode is set to <Manual>.
Proceed to Step 3.
Respond to incoming calls or faxes by picking up the
handset.
Ring on incoming calls or faxes.
You can specify how the machine should operate for a fax call or telephone call.
By answering the prompts that appear on the display, the machine will be set to one of the following four operation modes.
<Auto><Fax/Tel Auto Switch><Answer><Manual>
Yes
Yes
Yes
No
No
No
Preface
1
Installing the Machine
2
Configuring and Connecting the Fax
3
Connecting to a Computer and
Installing the Drivers
4
Appendix
16
3.
Connect the telephone line.
Press [OK].
Connect phone line.
Follow illustrations
on the next screen:
Connect line to A.
*Next : Press OK
Connect phone line.
Follow illustrations
on the next screen
to make connections:
1. Phone line to A
The screen that appears varies, depending on the receive mode selected.
Connect the telephone line using the jack.
Press [ ] to select, and press [OK].
Press [OK] after the
telephone line has been
connected.
Fax settings and connections have been completed.
End Fax Setup
Guide?
NoYes
Restart the machine for the settings to take effect.
Turn OFF the machine, wait for at least 10 seconds, and turn it back ON.
Press [OK].
Turn the main power
OFF and ON to apply
settings.
OK
To connect an external telephone that includes fax functions
Make sure to disable its automatic fax reception feature
so it does not receive faxes automatically.
(B)
(A)
Telephone line
connector
Telephone
17
4.
Change the line type.
By default, the telephone line type is set to tone dialing. Skip the following steps in the procedure below when you
choose to use tone dialing.
Follow the steps in the procedure below to select pulse dialing.
Contact your local telephone company when you are not sure of the line type that you are using.
Press [
] (Menu).
Press [ ] or [ ] to select <Fax Settings> and press [OK].
Press [ ] or [ ] to select <Basic Settings> and press [OK].
Press [ ] or [ ] to select <Select Line Type> and press [OK].
Press [ ] or [ ] to select the line type that you are using and press [OK].
<Pulse>: Pulse dialing
<Tone>: Tone dialing (Default)
Press [ ] (Menu) to close the menu screen.
Preface
1
Installing the Machine
2
Configuring and Connecting the Fax
3
Connecting to a Computer and
Installing the Drivers
4
Appendix
18
Select from the following three methods, depending on your environment and devices.
Connecting to LAN P.19
Connecting via a LAN Cable
Connect them using a LAN cable.
You need this
Router
or
hub
LAN cable
Windows
Installing the USB connection P.22
Macintosh
Installing the software P.25
Connecting via a USB Cable
Connect them using a USB cable.
USB cable
You need this
Use the same procedure for both Window and Macintosh.
* Check to make sure that there is a free port for connecting the machine or the
computer you use to the router or hub.
* Use a Category 5 or higher twisted pair cable for the LAN.
Selecting the method for connecting to the machine
19
Connecting to LAN
Preface
1
Installing the Machine
2
Configuring and Connecting the Fax
3
Connecting to a Computer and
Installing the Drivers
4
Appendix
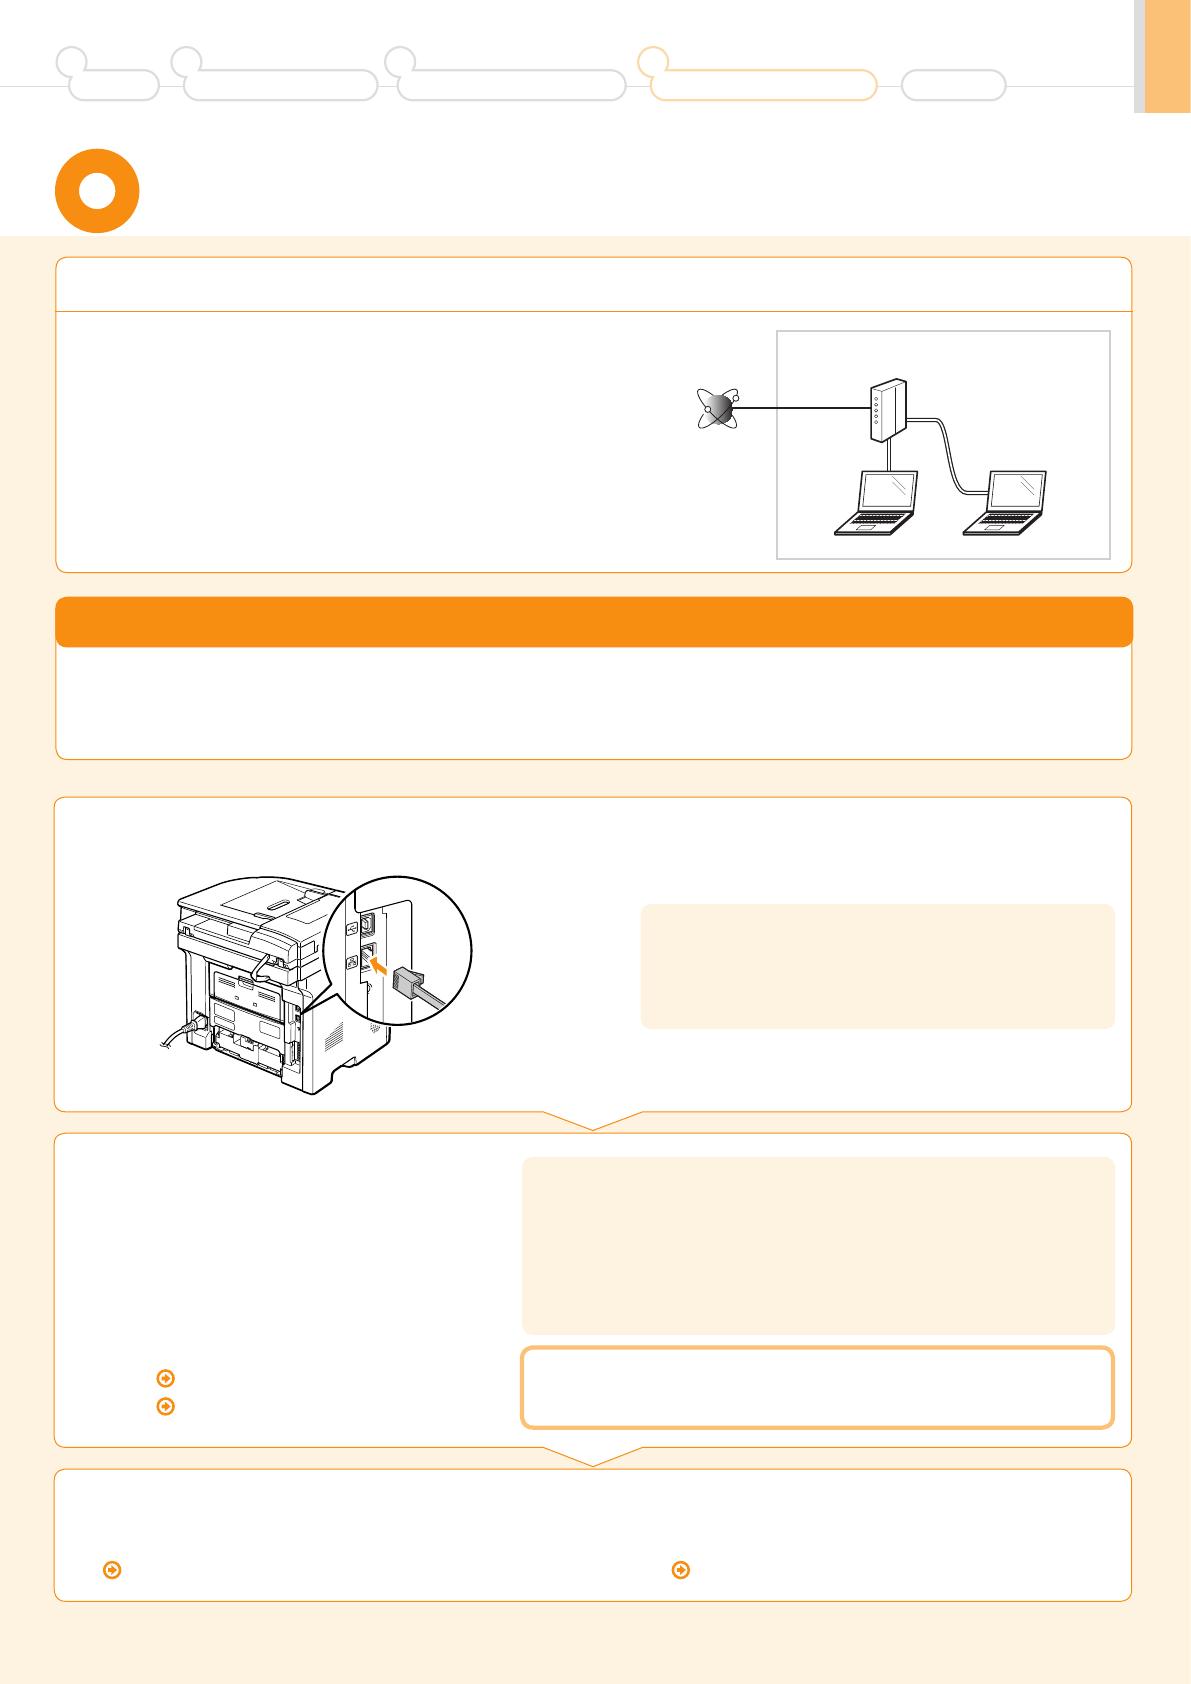
Check to make sure that the computer is connected by a LAN
cable to a router or hub, and that the network setup is completed.
If it is not set up, you will not be able to use the machine on the wired
LAN network even if you perform the following steps.
The structure of your computer or networked device, the existence of router functions,
setting methods and security settings vary depending on your environment.
For more information, see the instruction manual provided with the network
device you are using, or contact the manufacturer.
If using the machine in your office, consult with your network administrator.
Before adding the machine to a wired LAN
Connection procedure
The structure of your computer or networked device, the existence of router functions, setting methods and security settings vary depending on your
environment.
If using the machine in your office, consult with your network administrator.
Internet
Router
or
hub
LAN cable
Precautions when connecting to a wired LAN
About the LAN cable
The machine does not come with a LAN cable or a hub.
Have cables or a hub ready as needed.
Use a Category 5 or higher twisted pair cable for the LAN.
2.
The machine sets the
IP address automatically.
Wait approximately
2 minutes.
If you want to set the IP address manually,
see the following.
e-Manual "Setting IPv4 Address"
e-Manual "Setting IPv6 Address"
If the IP address of the machine is changed
When the machine and computer are on the same subnet, the connection is
maintained.
Installing via Network Connection
For Windows
Installing via Network Connection P. 20
For Macintosh
Installing the Software P. 25
About obtaining the IP address automatically (AutoIP)
<DHCP> or <Auto IP> is enabled in the default setting.
Even if you do not set the IP address manually, this machine can obtain it automatically.
Even if you do not have a dedicated device such as a DHCP server, the IP address is
obtained automatically.
The <DHCP> setting is prioritized over <Auto IP>.
If a fixed IP address is set as the IP address of the computer, set the fixed IP address also
for this machine manually.
1.
Connect the LAN cable.
20
Installing via Network Connection
2.
Turn on the computer, and then log on as a user with
administrative privileges.
3.
Install the MF Drivers and MF Toolbox.
If you have already logged on, exit all applications which are running.
* If you are operating in the IPv6 environment, you may not install the drivers or software following the procedures below.
Refer to “Installing the MF Drivers Via the WSD Network in the e-Manual to install MF Drivers.
* You may not use the scan function in the IPv6 environment.
Insert the CD-ROM.
Click.
Click.
Read the contents of the License
Agreement.
Click.
If the top screen does not appear
Windows 2000, XP, and Server 2003
1. From the [Start] menu, select [Run].
2. Enter "D:\Minst.exe", and then click [OK].
Windows Vista, 7, and Server 2008
1. Enter "D:\Minst.exe" in [Search programs and files] or [Start
Search] under the [Start] menu.
2. Press the [ENTER] key on the keyboard.
* The CD-ROM drive name is indicated as "D:" in this manual. The CD-ROM
drive name may differ depending on the computer you are using.
Click.
If the following dialog box appears
1.
Check the following
points.
•The computer and machine are connected via the network.
•The power of the machine is turned ON.
•IP address is properly set up.
Proceed to P.A-3 “Checking the IP Address”
[Easy Installation] performs the installation of the
following software.
Printer driver
Fax driver (D1370/D1350 only)
Scanner driver
MF Toolbox
To add the following software and manual to the
installation, select [Custom Installation].
Presto! PageManager
e-Manual
e-Manual "Installing the MF Drivers and MF
Toolbox"
Click.
Click.
(For Windows)
  • Page 1 1
  • Page 2 2
  • Page 3 3
  • Page 4 4
  • Page 5 5
  • Page 6 6
  • Page 7 7
  • Page 8 8
  • Page 9 9
  • Page 10 10
  • Page 11 11
  • Page 12 12
  • Page 13 13
  • Page 14 14
  • Page 15 15
  • Page 16 16
  • Page 17 17
  • Page 18 18
  • Page 19 19
  • Page 20 20
  • Page 21 21
  • Page 22 22
  • Page 23 23
  • Page 24 24
  • Page 25 25
  • Page 26 26
  • Page 27 27
  • Page 28 28
  • Page 29 29
  • Page 30 30
  • Page 31 31
  • Page 32 32
  • Page 33 33
  • Page 34 34
  • Page 35 35
  • Page 36 36

Canon D1320 Specification

Category
Multifunctionals
Type
Specification
This manual is also suitable for

Ask a question and I''ll find the answer in the document

Finding information in a document is now easier with AI