Olympus NewPic Zoom 60 Owner's manual
- Category
- Bridge cameras
- Type
- Owner's manual

INSTRUCTIONS
Before using your camera, read this manual carefully to ensure
correct use.

Thank you for purchasing an Olympus camera. Before
you start to use your new camera, please read these
instructions carefully to obtain optimum performance
and a longer service life from the unit.
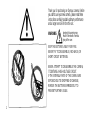
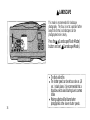
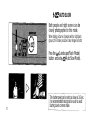
WARNING
Ignoring this warning may
result in the death or serious
injury of the user.
KEEP THE BATTERIES AWAY FROM FIRE.
NEVER TRY TO DISASSEMBLE, RECHARGE, OR
SHORT CIRCUIT BATTERIES.
NEVER ATTEMPT TO DISASSEMBLE THE CAMERA;
IT CONTAINS A HIGH VOLTAGE CIRCUIT.
IF THE INTERNAL PARTS OF THE CAMERA ARE
EXPOSED DUE TO DROPPING OR DAMAGE,
REMOVE THE BATTERIES IMMEDIATELY TO
PREVENT FURTHER USAGE.
2

Before using your camera, read this manual carefully
to ensure correct use.
We recommend that you take test shots to get
accustomed to your camera before taking important
photographs.
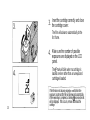
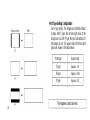
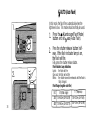
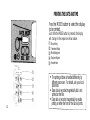
MAIN FEATURES
Built-in 30mm ~ 60mm 2X zoom lens.
Use IX240 cartridge film for simple one-touch film
loading.
Three types of prints (C, H, P) can be obtained by
setting the selector switch.
A magnetic head records important printing data on
the film.
use only processors displaying the
film development and printing.
mark when requesting
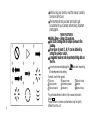
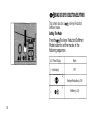
Symbols used in this manual:
Incorrect
Next operation
Manual operation
Operation order
Automatic operation
Indicator on
Indicator blinking
Attention
Depress halfway
Pay particular attention to items in this manual enclosed in
boxes .
Product shown in pictures and illustrations may be slightly
different from this unit.
3

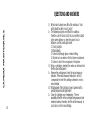
PREPARATIONS
BASIC OPERATIONS
Names and functions of parts ............................................. 6
Viewfinder display/LCD panel ............................................... 8
Cartridge ................................................................................. 9
Using the strap/Soft case .................................................. 11
Outline of operations ........................................................... 12
Loading the battery ............................................................. 15
Checking the battery .......................................................... 16
Points to remember ............................................................. 17
Loading the cartridge film .................................................... 19
Taking pictures ...................................................................... 21
Using the focus lock ............................................................ 24
After shooting ........................................................................ 25
Unloading the cartridge film ................................................ 26
4

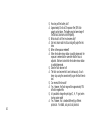
ADVANCED TECHNIQUES
CAMERA MAINTENANCE
Setting the print type ........................................................... 27
Using the landscape/flash modes ...................................... 32
Auto (Auto-flash) .................................................................. 33
Landscape ............................................................................ 34
Flash Off ............................................................................... 35
Fill-in (Forced Activation) ................................................... 36
Auto Slow ............................................................................. 37
Using red-eye reduction/selftimer ...................................... 38
Red-eye reduction .............................................................. 39
Selftimer .............................................................................. 40
Correcting the data .............................................................. 41
Printing the date and time ................................................... 42
Questions and answers ..................................................... 43
Care and storage ................................................................ 45
Battery handling .................................................................. 48
Troubleshooting ................................................................... 50
Specifications ..................................................................... 53
5

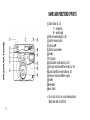
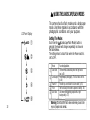
NAMES AND FUNCTIONS OF PARTS
Zoom button (p. 21)
T — telephoto
W —
wide-angle
Mid-roll rewind button (p. 26)
Shutter release button
Light sensor
Autofocus window
Lens
LCD
panel
Quartz date mode buttons (p. 42)
Red-eye reduction/selftimer button (p. 39)
Landscape/flash mode button (p. 32)
Red-eye reduction/selftimer signal
Flash
Viewfinder
Lens barrel
Do not soil as this can cause blurred pictures.
Wipe clean with a soft cloth.
6
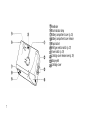
PREPARATIONS

Viewfinder
Flash indicator lamp
Battery compartment cover (p. 15)
Battery compartment cover release
Tripod socket
Print type selector switch (p. 27)
Power switch (p. 19)
Cartridge cover release lever (p. 19)
Strap eyelet
Cartridge cover
7

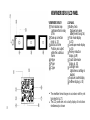
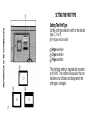
VIEWFINDER DISPLAY
VIEWFINDER DISPLAY/LCD PANEL
LCD PANEL
The viewfinder format changes in accordance with the print
type selected (p. 27).
The LCD panel does not actually display all indications
simultaneously as shown.
Flash indicator lamp
Lights when flash is ready
to fire.
Close-up correction
marks (p. 23)
Autofocus frame
Position your subject
within the autofocus
frame.
H type
P type
C type
Battery check
Displayed only when
battery level is low (p. 16).
Flash mode display
(p. 32)
Landscape mode display
(p. 34)
Red-eye reduction
display (p.39)
Quartz date mode
display (p. 41)
Cartridge mark
Lights when a cartridge is
loaded.
Exposure counter display
Selftimer display (p. 40)
8

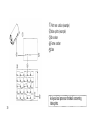
I X 240 Cartridge F ilm
Data disk
Cartridge spool
Lightlock door drive
Lightlock door
Cartridge spool
Cartridge label
Visual Exposure Indicator
Never apply undue force to the cartridge spool, lightlock door
drive or lightlock door because this can result in damage or
exposure of the film. Using a damaged cartridge can cause
camera trouble.
Do not allow the data disk to become soiled because this can
render the cartridge unusable.
9
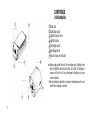
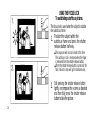
CARTRIDGE

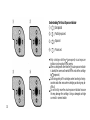
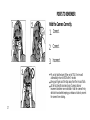
Understanding The Visual Exposure Indicator
Unexposed
Partially exposed
Exposed
Processed
Only cartridges with the (unexposed) visual exposure
indicator can be used with this camera.
When a cartridge with other than the visual exposure indicator
is loaded, the camera will rewind the film and set the cartridge
to (exposed).
Take along plenty of film cartridges when traveling to foreign
countries and other areas where cartridge purchasing may be
difficult.
Do not forcibly move the visual exposure indicator because
this may damage the cartridge. Using a damaged cartridge
can result in camera trouble.
10

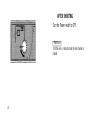
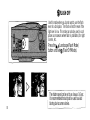
USING THE STRAP/SOFT CASE
Attaching the strap.
The soft case can also be carried on a belt.
11

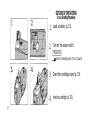
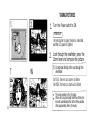
OUTLINE OF OPERATIONS
Basic Shooting Procedures
1.
2.
3.
4.
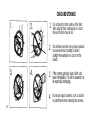
Load a battery (p. 15).
Turn on the power switch.
mark is not displayed on the LCD panel.
Open the cartridge cover (p. 19).
Insert a cartridge (p. 20).
12
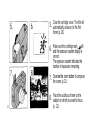
Make sure

5.
6.
7.
8.
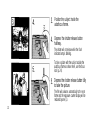
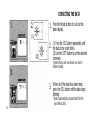
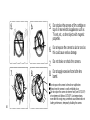
Close the cartridge cover. The film will
automatically advance to the first
frame (p. 20).
Make sure the cartridge mark is lit
and the exposure counter display is
correct.
The exposure counter indicates the
number of exposures remaining.
Operate the zoom button to compose
the scene (p. 21).
Place the autofocus frame on the
subject on which you want to focus
13
(p. 22).

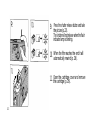
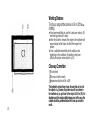
9.
10.
11.
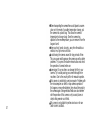
Press the shutter release button and take
the picture (p. 22).
The shutter will not release when the flash
indicator lamp is blinking.
When the film reaches the end it will
automatically rewind (p. 26).
Open the cartridge cover and remove
the cartridge (p. 26).
14

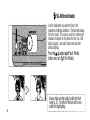
LOADING THE BATTERY
Use one 3V lithium Battery (CR-2)
1.
Open the battery compartment cover.
When replacing the battery, make sure to turn
the power switch OFF before unloading the
batteries.
Take care not to injure your fingernail
when opening the battery cover.
2.
Insert the new battery correctly as
shown and close the battery
compartment cover tightly.
Align the (+) and (-) directions of the batteries
correctly as shown.
Read "Battery Handling" on page 48.
15

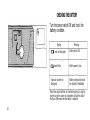
CHECKING THE BATTERY
Turn the power switch ON and check the
battery condition.
Display
Meaning
mark not displayed.
mark blinks.
Exposure counter not
displayed.
Battery level is OK.
Battery power is low.
Battery is dead and should
be replaced immediately.
Note: Keep spare batteries on hand when going on a long trip
or when using the camera in cold weather. Adjust the data of
the Quarz Date every time the battery is replaced.
16

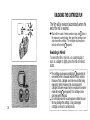
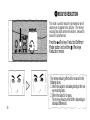
POINTS TO REMEMBER
Hold the Camera Correctly.
1.
2.
3.
Correct.
Correct.
Incorrect.
Try not to hold the barrel. When set to TELE, the lens will
automatically return to WIDE after 3 minutes.
Keep your fingers and the strap away from the lens and flash.
As the focal length becomes larger. Camera shake or
movement becomes more noticeable. Hold the camera firmly
with both hands while keeping your elbows at sides to prevent
the camera from shaking.
17

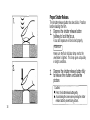
Proper Shutter Release.
The shutter release button has two clicks. Practice
before loading the film.
1.
Depress the shutter release button
halfway to lock the focus.
Focus and exposure will be locked properly.
Make sure the flash indicator lamp next to the
viewfinder is lighted. This lamp goes out quickly
in bright conditions.
2.
Depress the shutter release button fully
to release the shutter and take the
picture.
Cautions:
Press the shutter release button gently.
Avoid shaking the camera when pressing the shutter
release button to prevent blurry pictures.
18
Make sure

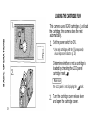
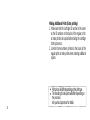
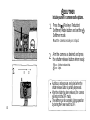
LOADING THE CARTRIDGE FILM
This camera uses IX240 cartridges. Just load
the cartridge; the camera does the rest
automatically.
1.
Set the power switch to ON.
* Use only cartridges with the (unexposed)
visual exposure indicator. (p. 10)
Determine whether or not a cartridge is
loaded by checking the LCD panel
cartridge mark
The LCD panel is not displaying the mark.
Turn the cartridge cover release lever
and open the cartridge cover.
2.
19
Make sure
BASIC OPERATIONS

3.
4.
Insert the cartridge correctly and close
the cartridge cover.
The film will advance automatically to the
first frame.
Make sure the number of possible
exposures are displayed on the LCD
panel.
The mark will blink when no cartridge is
loaded or when other than an unexposed
cartridge is loaded.
If the film does not advance properly, will blink in the
exposure counter and the film will be rewound automatically.
When rewinding is completed, a blinking
(processed) mark
will be displayed. If this occurs, remove and reload the
cartridge.
20
Page is loading ...
Page is loading ...
Page is loading ...
Page is loading ...
Page is loading ...
Page is loading ...
Page is loading ...
Page is loading ...
Page is loading ...
Page is loading ...
Page is loading ...
Page is loading ...
Page is loading ...
Page is loading ...
Page is loading ...
Page is loading ...
Page is loading ...
Page is loading ...
Page is loading ...
Page is loading ...
Page is loading ...
Page is loading ...
Page is loading ...
Page is loading ...
Page is loading ...
Page is loading ...
Page is loading ...
Page is loading ...
Page is loading ...
Page is loading ...
Page is loading ...
Page is loading ...
Page is loading ...
Page is loading ...
Page is loading ...
Page is loading ...
Page is loading ...
-
 1
1
-
 2
2
-
 3
3
-
 4
4
-
 5
5
-
 6
6
-
 7
7
-
 8
8
-
 9
9
-
 10
10
-
 11
11
-
 12
12
-
 13
13
-
 14
14
-
 15
15
-
 16
16
-
 17
17
-
 18
18
-
 19
19
-
 20
20
-
 21
21
-
 22
22
-
 23
23
-
 24
24
-
 25
25
-
 26
26
-
 27
27
-
 28
28
-
 29
29
-
 30
30
-
 31
31
-
 32
32
-
 33
33
-
 34
34
-
 35
35
-
 36
36
-
 37
37
-
 38
38
-
 39
39
-
 40
40
-
 41
41
-
 42
42
-
 43
43
-
 44
44
-
 45
45
-
 46
46
-
 47
47
-
 48
48
-
 49
49
-
 50
50
-
 51
51
-
 52
52
-
 53
53
-
 54
54
-
 55
55
-
 56
56
-
 57
57


Olympus NewPic Zoom 60 Owner's manual
- Category
- Bridge cameras
- Type
- Owner's manual
Ask a question and I''ll find the answer in the document
Finding information in a document is now easier with AI
Related papers
-
Zoom NewPic Zoom 90 Operating instructions
-
 2JANE Olympus I100AF User manual
-
Olympus Stylus 105 DLX User manual
-
-
-
-
-
-
-
