
Safety • Assembly • Operation • Adjustment • Maintenance • Troubleshooting • Warranty
A O AL
ii ii
_i_i_i_ii _ iiii
ii_i_i!i_!ii!II_
Transmatic Lawn Tractor- Models 760=779
iMPORTANT
READ SAFETY RULES AND iNSTRUCTiONS CAREFULLY BEFORE OPERATION
Warning: Thisunitisequippedwithaninternalcombustionengineandshouldnotbeusedon or nearanyunimprovedforest-covered,brush-
coveredor grass-coveredlandunlesstheengine'sexhaustsystemisequippedwitha sparkarrestermeetingapplicablelocalor statelaws(if any).
If a sparkarresterisused,it shouldbemaintainedineffectiveworkingorderbytheoperator.IntheStateofCaliforniatheaboveisrequiredbylaw
(Section4442oftheCaliforniaPublicResourcesCode).Otherstatesmayhavesimilarlaws.Federallawsapplyonfederallands.A sparkarrester
forthemufflerisavailablethroughyournearestengineauthorizedservicedealerorcontacttheservicedepartment,RO.Box361131Cleveland,
Ohio44136-0019.
PRINTEDIN U.S.A.
MTD LLC, P.O. BOX 361131 CLEVELAND, OHIO 44136-0019
FORMNO.769-01598B
01/06/2006

This Operator's Manual is an important part of your new lawn tractor, it will help you assemble,
prepare and maintain the unit for best performance. Please read and understand what it says.
Table of Contents
Slope Gauge ....................................................... 3
Safe Operation Practices ................................... 4
Setting UpYour Lawn Tractor ............................ 8
Operating Your Lawn Tractor ........................... 12
Adjusting Your Lawn Tractor ............................ 20
Maintaining Your Lawn Tractor ........................ 22
Off-Season Storage / Attachments ................. 28
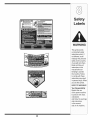
Safety Labels .................................................... 29
Trouble Shooting .............................................. 30
Warranty .............................................. Back Page
Finding and Recording Model Number
BEFOREYOU STARTASSEMBLING
YOURNEW EQUIPMENT,
please locatethe modelplate onthe equipmentand copythe
informationtothe sample modelplate providedtothe right.
Youcan locatethe modelplate by looking beneathethe seat.
Thisinformationwillbe necessaryto usethemanufacturer's
website and/or obtainassistancefromthe CustomerSupport
Departmentoran authorizedservice dealer.
Model Number
www.mtdproducts.com
Serial Number
MTD LLC
P.O= BOX 361131
CLEVELAND, OH 44136
330-220-4683
800-800-7310
Customer Support
Please do NOTretum the unit to the retailer from which it was
purchased, without first contacting Customer Support.
Ifyou have difficultyassemblingthis productor have anyquestionsregardingthe controls, operation,or maintenanceof this
unit,you canseek help fromthe experts.Choosefrom the options below:
1. Visit mtdproducts.com. Click on the Service &Support menuoption.
2. Phonea Customer Support Representative at 1 (800) 800-7310.
3. The engine manufacturer is responsiblefor all engine-relatedissueswith regardsto performance,power-rating,specifica-
tions,warranty and service. Pleasereferto the engine manufacturer'sOwner's/Operator's Manual,packedseparatelywith
your unit,for moreinformation.
MTD/n_er_@_i®a_ Award Wi_n i_g ?rd_s_ts O_r Com?_ay
Product Menu
o_r_,qo_ _ Suppo_±
Product. Registration
?riv®cy Pd_y
2

O
o
1=
o
>:.
(13
O3
(13
(13
O-
O
O
(--
O5
E
O
(13
(13
o3
(13
O-
O
o3
(13
E
(]3
(13
o
(13
C5
('5
O3
O5
(13
t"b
(13
O9
o5
(13
O-
O
O3
-5
O3
O
O
E
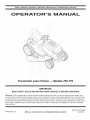
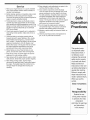
Sightandholdthis levelwith a verticaltree...
also
I
15°

Practices
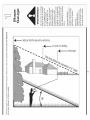
WARNING
Thissymbolpoints
out importantsafety
instructionswhich, if
notfollowed, could
endangerthe personal
safetyand/or property
ofyourself and others.
Readand follow all
I instructionsinthis man-
ualbeforeattemptingto
operatethis machine.
tFailureto complywith
hese instructionsmay
resultin personalinjury.
When youseethis
symbol.
HEED iTS WARNING
Your
Responsibility
Restrictthe use
of this powermachine
to personswho read,
understand
andfollow thewarnings
and instructions
in this manual
WARNING: EngineExhaust,some of itsconstituents,andcertain vehiclecompo-
nentscontain or emitchemicals knownto Stateof Californiato cause cancerand
birth defectsor other reproductiveharm.
DANGER: This machinewas builtto beoperatedaccordingto the rulesfor safe operationin this
manual.As with anytype of powerequipment,carelessnessor error onthe part ofthe operatorcan
result inseriousinjury.This machine iscapableof amputatinghands andfeet andthrowingobjects.
Failureto observethe followingsafety instructionscould resultin serious injury ordeath.
Children
1. Tragicaccidentscanoccuriftheoperatoris not
alerttothepresenceofchildren.Childrenareoften
attractedto themachineandthemowingactivity.
Theydo notunderstandthedangers.Neverassume
thatchildrenwillremainwhereyoulastsawthem.
a. Keepchildrenoutofthemowingareaandin
watchfulcareofa responsibleadultotherthan
theoperator.
b. Bealertandturnmachineoff ifa childenters
thearea.
c. Beforeandwhilebacking,lookbehindand
downforsmallchildren.
d. Nevercarrychildren,evenwiththeblade(s)
shutoff.Theymayfalloffandbeseriously
injuredor interferewithsafemachineoperation.
e. Useextremecarewhenapproachingblind
corners,doorways,shrubs,treesorother
objectsthat mayblockyourvisionofachild
whomayrunintothemachine.
f. Toavoid back-overaccidents, always
disengagethe cuttingblade(s) before
shiftingintoReverse.ifequipped,the
"Reverse CautionMode"shouldnotbe
usedwhenchildrenor others are around.
g. Keepchildrenawayfromhotor running
engines.Theycansufferburnsfroma hot
muffler.
h. Removekeywhenmachineisunattendedto
preventunauthorizedoperation.
2. Neverallowchildrenunder14yearsoldto operate
themachine.Children14yearsoldandovershould
readand understandtheoperationinstructionsand
safetyrulesinthis manualandshouldbetrainedand
supervisedbya parent.
Operation
Safe Handlingof Gasoline:
1. Toavoid personalinjuryor propertydamageuse
extremecareinhandlinggasoline.Gasolineis
extremely flammableand the vapors areexplo-
sive. Seriouspersonalinjurycanoccurwhengasoline
isspilledonyourselfor yourclotheswhichcanignite.
Washyourskinandchangeclothesimmediately.
a. Useonlyanapprovedgasolinecontainer.
b. Neverfillcontainersinsideavehicleor ona
truckor trailerbedwithaplasticliner.Always
placecontainerson thegroundawayfrom
yourvehiclebeforefilling.
c. Whenpractical,removegas-powered
equipmentfromthetruckor trailerand refuelit
ontheground.Ifthis isnotpossible,then
refuelsuchequipmenton atrailerwitha
portablecontainer,ratherthanfromagasoline
dispensernozzle.
d. Keepthenozzlein contactwiththerimof
thefueltankor containeropeningatall
timesuntilfuelingiscomplete.Donotusea
nozzlelock-opendevice.
e. Extinguishallcigarettes,cigars,pipesand
othersourcesofignition.
f. Neverfuelmachineindoors.
g. Neverremovegascaporaddfuelwhilethe
engineishotor running.Allowenginetocool
atleasttwominutesbeforerefueling.
h. Neveroverfillfueltank.Filltanktonomore
than1/2inchbelowbottomoffillerneckto
allowspaceforfuelexpansion.
i. Replacegasolinecapandtightensecurely.
j. If gasolineisspilled,wipeitoff theengine
andequipment.Moveunittoanotherarea.
Wait5 minutesbeforestartingtheengine.
k. Toreducefirehazards,keepmachinefreeof
grass,leaves,orotherdebrisbuild-up.Clean
upoil orfuelspillageand removeanyfuel
soakeddebris.
I. Neverstorethemachineorfuelcontainer
insidewherethereisanopenflame,spark
orpilotlightason a waterheater,space
heater,furnace,clothesdryerorothergas
appliances.
m. Allowa machinetocoolatleastfiveminutes
beforestoring.
4

GeneralOperation:
1. Read,understand,andfollowall instructionsonthe
machineandin themanual(s)beforeattemptingto
assembleandoperate.Keepthismanualina safe
placeforfutureandregularreferenceandforordering
replacementparts.
2. Befamiliarwith allcontrolsandtheirproperoperation.
Knowhowtostopthe machineanddisengagethem
quickly.
3, Neverallowchildrenunder14yearsold tooperate
this machine.Children14yearsoldandovershould
readandunderstandtheoperationinstructionsand
safetyrulesinthis manualandshouldbetrainedand
supervisedbya parent.
4. Neverallowadultstooperatethis machinewithout
properinstruction.
5. Tohelpavoidbladecontactora thrownobjectinjury,
keepbystanders,helpers,childrenand petsat least
75feet fromthemachinewhileitis inoperation.Stop
machineifanyoneentersthearea.
6. Thoroughlyinspecttheareawheretheequipmentisto
be used.Removeall stones,sticks,wire,bones,toys,
andotherforeignobjectswhichcouldbe pickedup
andthrownbytheblade(s).Thrownobjectscancause
seriouspersonalinjury.
7. Planyourmowingpatterntoavoiddischargeof
materialtowardroads,sidewalks,bystandersandthe
like.Also,avoiddischargingmaterialagainstawallor
obstructionwhichmaycausedischargedmaterialto
ricochetbacktowardtheoperator.
8. Alwayswearsafetyglassesor safetygogglesduring
operationandwhileperformingan adjustmentor
repairtoprotectyoureyes.Thrownobjectswhich
ricochetcancauseseriousinjurytotheeyes.
9. Wearsturdy,rough-soledworkshoesandclose-fitting
slacksandshirts.Loosefittingclothesandjewelry
canbecaughtinmovableparts.Neveroperatethis
machinein barefeetor sandals.
10.Beawareofthemowerandattachmentdischarge
directionanddo notpointitatanyone.Donotoperate
themowerwithoutthedischargecoverorentiregrass
catcherin itsproperplace.
11.Donotputhandsor feetnearrotatingpartsor under
thecuttingdeck.Contactwiththeblade(s)can
amputatehandsandfeet.
12.A missingor damageddischargecovercancause
bladecontactorthrownobjectinjuries.
13.Stoptheblade(s)whencrossinggraveldrives,walks,
or roadsandwhilenotcuttinggrass.
14.Watchfortrafficwhenoperatingnearor crossing
roadways.Thismachineisnotintendedforuseon
anypublicroadway.
15.Donotoperatethe machinewhileundertheinflu-
enceofalcoholordrugs.
16.Mowonlyin daylightorgoodartificiallight.
17.Nevercarrypassengers.
18.Disengageblade(s)beforeshiftingintoreverse.
Backupslowly.Alwayslookdownandbehindbefore
andwhilebackingtoavoida back-overaccident.
19.Slowdownbeforeturning.Operatethe machine
smoothly.Avoiderraticoperationandexcessive
speed.
20.Disengageblade(s),setparkingbrake,stopengine
andwaituntiltheblade(s)cometoa completestop
beforeremovinggrasscatcher,emptyinggrass,
uncloggingchute,removinganygrassor debris,or
makinganyadjustments.
21.Neverleavea runningmachineunattended.Always
turnoff blade(s),placetransmissionin neutral,set
parkingbrake,stopengineand removekeybefore
dismounting.
22.Useextracarewhenloadingorunloadingthe
machineintoa trailerortruck.Thisunitshouldnot
bedrivenupor downramp(s),becausethe unit
couldtipover,causingseriouspersonalinjury.The
unitmustbepushedmanuallyon ramp(s)toloador
unloadproperly.
23.Mufflerandenginebecomehotandcancausea
burn.Donottouch.
24.Checkoverheadclearancescarefullybeforedriving
underlowhangingtreebranches,wires,dooropen-
ingsetc.,wheretheoperatormaybe struckorpulled
fromthe unit,whichcouldresultinseriousinjury.
25.Disengageallattachmentclutches,depressthe
brakepedalcompletelyandshiftintoneutralbefore
attemptingtostartengine.
26.Yourmachineisdesignedto cutnormalresidential
grassofa heightno morethan10".Donotattemptto
mowthroughunusuallytall,drygrass(e.g.,pasture)
or pilesofdryleaves.Drygrassor leavesmay
contacttheengineexhaustand/orbuildup onthe
mowerdeckpresentinga potentialfirehazard.
27.Useonlyaccessoriesandattachmentsapprovedfor
thismachinebythemachinemanufacturer.Read,
understandandfollowall instructionsprovidedwith
theapprovedaccessoryor attachment.
28.Dataindicatesthat operators,age60 yearsand
above,are involvedin alargepercentageofriding
mower-relatedinjuries.Theseoperatorsshould
evaluatetheirabilitytooperatethe ridingmower
safelyenoughto protectthemselvesandothersfrom
seriousinjury.
29.If situationsoccurwhicharenotcoveredinthis
manual,usecareandgoodjudgment.Contactyour
customerservicerepresentativeforassistance.
........................................................................................
WARNING
Thissymbolpoints
out importantsafety
instructionswhich, if
notfollowed,could
endangerthe personal
safety and/or property
ofyourself and others.
Readand followall
instructions inthis man-
ual beforeattemptingto
operatethis machine.
Failureto comply with
these instructionsmay
result inpersonalinjury.
Whenyou seethis
symbol.
HEED ITS WARNING
Your
Responsibility
Restrictthe use
ofthis powermachine
to personswho read,
understand
and follow the warnings
and instructions
inthis manual
5

Thissymbolpoints
outimportantsafety
instructionswhich,if
notfollowed,could
endangerthepersonal
isafetyand/orproperty
ofyourselfandothers.
Readandfollowall
instructionsinthisman-
ualbeforeattemptingto
Ioperatethismachine.
I Failuretocomplywith
theseinstructionsmay
i resultinpersonalinjury.
Whenyouseethis
symbol.
i HEED ITSWARNING
Your
i Responsibility
Restrictthe use
of this power machine
to personswho read,
understand
and followthewarnings
and instructions
in this manual
Slope Operation:
Slopesare amajorfactorrelatedtolossofcontroland
tip-overaccidentswhichcanresultin severeinjuryor
death.All slopesrequireextracaution.If youcannot
backuptheslopeor ifyoufeeluneasyonit, donotmow
it.
Foryoursafety,usetheslopegaugeincludedaspartof
thismanualto measureslopesbeforeoperatingthisunit
ona slopedor hillyarea.Iftheslopeisgreaterthan15
degreesasshownon theslopegauge,do notoperate
thisunitonthatareaor seriousinjurycouldresult.
DO:
1. Mowupanddownslopes,notacross.Exercise
extremecautionwhenchangingdirectiononslopes.
2. Watchforholes,ruts,bumps,rocks,orotherhidden
objects.Uneventerraincouldoverturnthe machine.
Tallgrasscanhideobstacles.
3. Useslowspeed.Choosea lowenoughspeed
settingsothatyouwillnothaveto stopor shiftwhile
ontheslope.Tiresmaylosetractiononslopeseven
thoughthebrakesarefunctioningproperly.Always
keepmachineingearwhengoingdownslopesto
takeadvantageofenginebrakingaction.
4. Followthemanufacturer'srecommendationsfor
wheelweightsorcounterweightstoimprovestability.
5. Useextracarewithgrasscatchersorotherat-
tachments.Thesecanchangethestabilityofthe
machine.
6. Keepall movementon theslopesslowand gradual.
Donotmakesuddenchangesin speedor direction.
Rapidengagementor brakingcouldcausethefront
ofthemachineto liftand rapidlyflipoverbackwards
whichcouldcauseseriousinjury.
7. Avoidstartingor stoppingona slope.If tireslose
traction,disengagetheblade(s)andproceedslowly
straightdowntheslope.
Do Not:
1. Donotturnon slopesunlessnecessary;then,turn
slowlyandgraduallydownhill,ifpossible.
2. Donotmowneardrop-offs,ditchesor embankments.
Themowercouldsuddenlyturnoverif awheelisover
theedgeofa cliff,ditch,or ifanedgecavesin.
3. Donottry tostabilizethemachinebyputtingyourfoot
ontheground.
4. Donotusea grasscatcheronsteepslopes.
5. Donotmowonwetgrass.Reducedtractioncould
causesliding.
6. Donotshifttoneutralandcoastdownhill.Over-speed-
ingmaycausetheoperatortolosecontrolofthe
machineresultingin seriousinjuryordeath.
7. Donottowheavypullbehindattachments(e.g.loaded
dumpcart,lawnroller,etc.)on slopesgreaterthan
5 degrees.Whengoingdownhill,theextraweight
tendsto pushthetractorandmaycauseyoutoloose
control.(e.g.tractormayspeedup,brakingandsteer-
ingabilityarereduced,attachmentmayjack-knifeand
causetractortooverturn).
Towing:
1. Towonlywitha machinethathasa hitchdesignedfor
towing.Donotattachtowedequipmentexceptatthe
hitchpoint.
2. Followthemanufacturersrecommendationforweight
limitsfortowedequipmentandtowingon slopes.
3. Neverallowchildrenor othersinoron towedequip-
ment.
4. Onslopes,theweightof thetowedequipmentmay
causelossoftractionandlossofcontrol.
5. Travelslowlyandallowextradistancetostop.
6. Donotshifttoneutralandcoastdownhill.
6

Service
1. Neverrunanengineindoorsorina poorlyventilated
area.Engineexhaustcontainscarbonmonoxide,an
odorless,anddeadlygas.
2. Beforecleaning,repairing,or inspecting,makecertain
theblade(s)andall movingpartshavestopped.
Disconnectthesparkplugwireandgroundagainstthe
engineto preventunintendedstarting.
3. Periodicallychecktomakesurethebladescometo
completestopwithinapproximately(5) fiveseconds
afteroperatingthebladedisengagementcontrol.Ifthe
bladesdo notstopwithinthethis timeframe,yourunit
shouldbe servicedprofessionallybyanauthorized
MTDServiceDealer.
4. Checkbrakeoperationfrequentlyasitissubjectedto
wearduringnormaloperation.Adjustandserviceas
required.
5. Checktheblade(s)andenginemountingboltsat
frequentintervalsforpropertightness.Also,visually
inspectblade(s)fordamage(e.g.,excessivewear,
bent,cracked). Replacetheblade(s)withtheoriginal
equipmentmanufacturer's(O.E.M.)blade(s)only,
listedinthis manual."Useof partswhichdonotmeet
theoriginalequipmentspecificationsmayleadto
improperperformanceandcompromisesafety!"
6. Mowerbladesaresharp.Wrapthebladeor wear
gloves,anduseextracautionwhenservicingthem.
7. Keepallnuts,bolts,andscrewstighttobesurethe
equipmentis insafeworkingcondition.
8. Nevertamperwiththesafetyinterlocksystemor other
safetydevices.Checktheirproperoperationregularly.
9. Afterstrikingaforeignobject,stoptheengine,
disconnectthesparkplugwire(s)andgroundagainst
theengine.Thoroughlyinspectthemachineforany
damage.Repairthedamagebeforestartingand
operating.
10.Neverattempttomakeadjustmentsor repairstothe
machinewhiletheengineisrunning.
11.Grasscatchercomponentsandthedischarge
coveraresubjecttowearanddamagewhichcould
exposemovingpartsor allowobjectstobethrown.
Forsafetyprotection,frequentlycheckcomponents
andreplaceimmediatelywithoriginalequipment
manufacturer's(O.E.M.)partsonly,listedinthis
manual."Useofpartswhichdonotmeettheoriginal
equipmentspecificationsmayleadto improper
performanceandcompromisesafety!"
12.Donotchangetheenginegovernorsettingsor
over-speedtheengine.Thegovernorcontrolsthe
maximumsafeoperatingspeedoftheengine.
13.Maintainor replacesafetyandinstructionlabels,as
necessary.
14.Observeproperdisposallawsand regulationsfor
gas,oil,etc.toprotecttheenvironment.
7
Thissymbolpoints
out importantsafety
instructionswhich, if
notfollowed,could
endangerthe personal
safetyand/or property
of yourselfand others.
Readandfollow all
instructionsin this man-
ual beforeattemptingto
operatethis machine.
Failureto complywith
these instructionsmay
result inpersonalinjury.
When yousee this
symbol.
HEED iTS WARNING
Your
Responsibility
Restrictthe use
ofthis powermachine
to personswho read.
understand
and followthe warnings
and instructions
in this manual

Tractor
Use extreme care
whenhandling
gaso nelGasoline
extremely flammable
and the vapors are
explosive: Never fuel
machine indoors
or while the engine
is hotor running,
Extinguish cigarettes,
cigars, pipes, and
othersourcesof
ignitionl
NOTE: This Operators
Manual Coversa range
ofproduCtspecifications
for VariousmodelS:
Characteristics and
i
featuresdiscussed
and/or illustratedin
s manualmay not
applicabletoall models:
MTD LLC reservesthe
rightto change product
specifications,(Jesigns
andequipment without
notice andwithout incur-
i[ing obligatiOnl
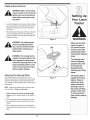
RubberBoot
Figure 1
NOTE:ThisOperatorsManualcoversa rangeofproduct
specificationsforvariousmodels.Characteristicsandfea-
turesdiscussedand/orillustratedinthis manualmaynot
beapplicabletoall models.MTDLLCreservesthe right
tochangeproductspecifications,designsandequipment
withoutnoticeandwithoutincurringobligation.
Attaching the Battery Cables
NOTE:Somemodelsareshippedwiththebatterycables
alreadyconnected.
NOTE:ThepositivebatteryterminalismarkedPos.(+).
Thenegativebatteryterminalis markedNeg.(-).
• Thepositivecable(heavyredwire)issecuredtothe
positivebatteryterminal(+)witha hexboltandhex
nutatthefactory.Makecertainthatthe rubberboot
coverstheterminaltohelpprotectitfromcorrosion.
• Removethehexboltand hexnutfromthenegative
cable.
• Removetheblackplasticcover,ifpresent,fromthe
negativebatteryterminalandattachthenegative
cable(heavyblackwire)tothenegativebattery
terminal(-) withtheboltandnut.
• Makecertainthehold-downstrapisin positionover
thebattery,securingitin place.SeeFigure1.
NOTE:Ifthe batteryis putintoserviceafterthedate
shownontopofbattery,chargethebatteryasinstructed
onpage24ofthis manualpriortooperatingthetractor.
Gas and Oil Fill-up
Thegasolinetankislocatedunderthehoodandhasa
capacityof 1-1/2gallons.Donotoverfill.
WARNING: Use extreme care
when handling gasoline.Gaso-
line is extremely flammable and
the vapors are explosive. Never
fuel machine indoors or while the
engine is hot or running. Extin-
guish cigarettes, cigars, pipes,
and other sources of ignition.
Servicetheenginewithgasolineandoil asinstructedin
theseparateEngineOperator/OwnerManualpackedwith
yourtractor.Readinstructionscarefully.
IMPORTANT:Yourtractorisshippedwithmotoroil inthe
engine.However,youMUSTchecktheoil levelbefore
operating.Becarefulnottooverfill.
8

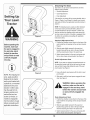
Shipping Brace Removal f
WARNING:Make sure the riding
mower's engineis off, removethe
ignitionkey, and set the parking
brake before removingthe ship-
pingbrace.
• Locatetheshippingbrace,ifpresent,andaccompany-
ingwarningtagfoundon therightsideofthemower,
betweenthedischargechuteand thecuttingdeck.
See Figure2.
• Whileholdingthedischargechutewithyourleft hand,
removetheshippingbracewithyourrighthandby
graspingitbetweenyourthumbandindexfingerand
rotatingitclockwise.
WARNING: The shipping brace,
used for packagingpurposes
only, must be removedand dis-
carded before operating your
riding mower.
WARNING: The mowing deck is
capableof throwing objects. Fail-
ure to operate the ridingmower
without the dischargecover in the
proper operating position could
result inserious personal injury
and/or property damage.
Attaching The Steering Wheel
Ifthesteeringwheelforyourtractordid notcome
attached,thehardwareforattachingit hasbeenpacked
withinthesteeringwheel,beneaththe steeringwheel
cap.Carefullypryoffthesteeringwheelcapand remove
thehardware.
NOTE:Therearetwodifferentstylesof steeringwheel
cap.SeeFigure3.Stylesvary by model.
1. With thewheels of the tractor pointingstraight
forward, placethesteeringwheeloverthesteering
shaft.
2. Placethewasher(withthecuppedsidedown)over
thesteeringshaftandsecurewiththehexbolt.See
Figure3.
3. Placethesteeringwheelcapoverthecenterofthe
steeringwheelandpushdownwarduntilit"clicks"into
place.
Figure 2
Figure 3
TractOr
WARNING
Make surethe riding
mower's engine is
off, removethe igni-
tion key, and set the
parkingbrake before
removingthe shipping
brace.
The shipping brace,
used for packaging
purposes only, must
be removedand
discardedbefore
operatingyour riding
mower.
The mowing deck is
capableofthrowing
objects. Failureto
operate the riding
mower withoutthe
dischargecover in
the properoperating
position could result
in serious personal
injuryand/or property
damage.
9

WARNING
Beforeoperatingthis
machine,makesure
the seat isengaged in
the seatstop;stand
behindthemachine
andpu,backonseat
fu,yengaged
intostop:
NOTE: Forsh pping rea:
s0nsl Seatsareeither
fastenedto the tractor
seat's pivotbraCketWitt
a plastiCtie, or mounted
backwardtothe pivot
bracket. Ineithercase;
free the seatform its
shippingp0sitionand
removethe two Box
screws(or knobsion
models so equipped)
fromthebottom of seat
beforeproceedingwith
applicableinstructions:
Attaching The Seat
Seatstylesvarybytractormodelandtherearethree
differentstylesavailable:
• StandardAdjustment
• QuickAdjustment&
• KnobAdjustment
If theseatforyourtractordid notcomeattached,referto
Figure4, Figure5,and Figure6 toidentifyyourtractor's
seatstyleandfollowtheapplicableinstructionsbelowto
attachit.
Figure 4
NOTE:Forshippingreasons,seatsareeitherfastened
tothetractorseat'spivotbracketwitha plastictie,or
mountedbackwardtothepivotbracket.Ineithercase,
freetheseatformitsshippingpositionand removethe
twohexscrews(or knobs,onmodelssoequipped)from
thebottomof seatbeforeproceedingwithapplicable
instructionsbelow.
Standard Adjustment Seat
1. Positiontheshoulderscrews(foundonthe baseof the
seat)insidetheslotopeningsintheseatpivotbracket.
Figure4.
2. Slidetheseatslightlyrearwardintheseatpivot
bracket,liningupthe rearslotsinthepivotbracket
withtheremainingtwo holesintheseat'sbase.
3. Selectdesiredpositionfortheseat,andsecurewith
thetwohexscrewsremovedearlier.SeeFigure4.
Quick Adjustment Seat
NOTE:Ifyourseatwasshippedmountedbackwardson
theseatpivotbracket,pulloutthetabfoundonthe seat
stopandholditopenwhileslidingtheseatoff theseat
pivotbracket.SeeFigure5.
Figure 5
1. Lineuptheplasticseatspacerswiththeslotsin seat
pivotbracket.
2. Slideseatinuntilfrontseatspacerengagestheseat
stop.SeeFigure5.
WARNING" Before operating this
machine, make sure the seat is
engaged inthe seat stop, stand
behind the machine and pull back
on seat until fully engaged into
stop.
Figure 6
Knob Adjustment Seat
1. Positiontheshoulderscrews(foundonthe baseof the
seat)insidetheslotopeningsintheseatpivotbracket.
Figure6.
2. Slidetheseatslightlyrearwardintheseatpivot
bracket,liningupthe rearslotsinthepivotbracket
withtheremainingtwo holesintheseat'sbase.
3. Selectdesiredpositionfortheseat,andsecurewith
thetwoknobsremovedearlier.SeeFigure6.
10

identifying the Mulch Plug (if so /,f
equipped)
|
On tractormodelssoequipped,a mulchplugcaneither
be foundwithinthecuttingdeck'sdischargeopeningor
packedseparatelywithyourunit.
NOTE:Referto Mulching on page19formoredetailed
information.
Ifyou'dprefertooperatethecuttingdeckwithoutmulch-
ing,simplyremovethemulchplugbyunthreadingthe
plasticwingnutwhichfastensittothecuttingdeck.This
willallowtheclippingstodischargeoutofthedischarge
openingduringoperation.SeeFigure7.
Tire Pressure
,_ WARNING: Maximum tire pres-
sure underany circumstances is
30 psi.Equal tire pressureshould
be maintainedat all times.
Figure 7
Thetiresonyourunitmaybeover-inflatedforshipping
purposes.Reducethetire pressurebeforeoperating
thetractor.Recommendedoperatingtirepressureis
approximately10p.s.iforthereartires& 14p.s.i,forthe
fronttires.Checksidewallof tireformaximump.s.i.
11
WARNING
Maximumtirepres,
sure under any
circumstancesis30
psi, Equaltire pressure
shouldbe maintained
at all times,

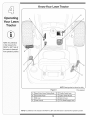
Know Your Lawn Tractor
NOTE:Any reference
in this manualto the
RIGHTor LEFTside of
thetractor isobserved
from operator'sposition.
A
Figure 8
NOTE:Steeringwheelnotshownforclarity
1-If soequipped
A SpeedControlLever/ParkingBrake E ThrottleControlLever
B Clutch-BrakePedal F IgnitionSwitchModule
C ShiftLever G DeckLiftLever
D ChokeControl1- H PTO(BladeEngage)Lever
NOTE:Anyreferencein thismanualto theRIGHTor LEFTsideofthetractoris observedfromoperator'sposition.
12

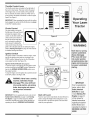
Throttle Control Lever
Thethrottlecontrolleverislocatedon therightsideof
thetractor'sdashpanel.Thislevercontrolsthespeed
oftheengineand,on somemodels,whenpushedall
thewayforward,thechokecontrolalso.Whenset ina
givenposition,thethrottlewill maintaina uniformengine
speed.SeeFigure9.
IMPORTANT:Whenoperatingthetractorwiththecutting
deckengaged,becertainthatthethrottleleverisalways
inthe FAST(rabbit)position.
Choke Control
Onsomemodels,movingthe
throttleleverallthewayforward
activatestheengine'schoke _L._
control.Onall othermodels,the
chokecontrolcanbefoundon
theleftsideofthedashpanel
andisactivatedbypullingthe
knoboutward.Activatingthe
chokecontrolclosesthechoke
plateonthecarburetorandaidsinstartingtheengine.
RefertoStarting The Engineon page16ofthis manual
fordetailedstartinginstructions.
Ignition Switch
Theignitionswitchisactivatedtostarttheengine.Insert
keyintotheignitionswitchandturnclockwiseto the
STARTposition.ReleasethekeyintotheONposition
onceenginehasfired.SeeFigure10A.
ignition Switch Module (if Equipped)
Tostarttheengine,insertthekeyintothe ignitionswitch
andturnclockwisetothe STARTposition.Releasethe
keyintotheNORMALMOWINGMODEpositiononce
theenginehasfired.
Tostoptheengine,turntheignitionkeycounterclockwise
totheOFFposition.SeeFigurelOB.
WARNING: Never leave a running
machine unattended, Always
disengage PTO,move shift lever
intoneutral position, set parking
brake, stop engine and remove
key to prevent unintended
starting,
IMPORTANT:Priortooperatingthetractor,refertoboth
SafetyInterlock Switches on page14and Starting
TheEngine onpage16ofthismanualfordetailed
instructionsregardingthe IgnitionSwitchModuleand
operatingthetractorin REVERSECAUTIONMODE.
FAST--4pm
|l
SLOW __ .,-.--.
SLOW
Figure 9
Off
n/Lights
Start
Position
©
Normal
Mode
Start
Position
Figure 10
Deck Lift Lever
Foundonyourtractor'srightfender,thedeckliftleveris
usedto changetheheightof thecuttingdeck.Touse,
movethelevertotheleft,thenplaceinthenotchbest
suitedforyourapplication.
i _ i : iii iiI ii i_/I
WARNING
lever leave a running
machine unattended,
Alwaysdisengage
PTO,move shift lever
nto neutral position,
set parking ake,stop
engine and remove key
to preventunintended
startingl
IMPORTANT
Priortooperatingthe
tractor, referto both
Safety Interlock
Switchesonpag
14and
Engine 0n page i6
ofthismanualior
regardingthe Ignition
Switch Moduleand
operating the tractor in
REVERIE CAUTION
MODEi
13

NOTE:Theparking
brakemustbesetifthe
operatorleavestheseat
withtheenginerun-
ningortheenginewill
automaticallyshutoff.
NOTE:ThePTO(Blade
Engage)levermustbe
inthedisengaged(PTO
:3FF)positionwhen
startingtheengine.
iMPORTANT
Neverforce theshift
lever.Doingso may
resultin senous
damageto thetractor's
transmission.
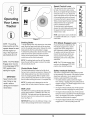
FORWARD
HUETRAL
REVERSE_
Figure 11
Speed Control Lever
Thespeedcontrollever,locatedonthe
left sideofthetractor'sdashconsole,
allowsyouto regulatethegroundspeed
ofthelawntractor.Touse,depressthe
clutch-brakepedalandmovetheleveroul
oftheparkingbrakenotchandforward
toincreasethetractor'sgroundspeed.
Whenadesiredspeedhasbeenreached
releasetheleverintoan appropriate
notchto maintainthatspeed.
Toslowthetractor'sgroundspeed,
depresstheclutch-brakepedaland move
thespeedcontrolleverrearwardand
releaseit intoa notch.
NOTE:Lawntractorsvarybymodeland
areavailablewitheithera 6- or7-speed
controllever.
Parking Brake
Tosettheparkingbrake,fullydepresstheclutch-brake
pedal.Movethespeedcontrolleverallthewaydown
andintotheparkingbrakeposition.Releasetheclutch-
brakepedaltoallowtheparkingbraketoengage.
Toreleasetheparkingbrake,depresstheclutch-brake
pedaland movethespeedcontrolleveroutofthe
notchestothedesiredposition.Releasethespeed
controlleverandtheclutch-brakepedal.
NOTE:Theparkingbrakemustbesetif theoperator
leavestheseatwiththeenginerunningor theengine
willautomaticallyshutoff.
Clutch-Brake Pedal
Theclutch-brakepedalislocatedontheleft sideof
thelawntractor,alongtherunningboard.Depressthe
clutch-brakepedalpartwaydownwhenslowingthe
tractorbychangingspeeds(RefertoSpeedControl
Lever).Depressthepedalall thewaydowntoengage
thedisc brakeand bringthetractortoa completestop.
NOTE:Thepedalmustbedepressedto startthe
engine.Referto SafetyInterlockSwitcheson page14.
Shift Lever
Theshiftleverislocatedon theleftsideof thefender
andhasthreepositions,FORWARD,NEUTRALand
REVERSE.Thebrakepedalmustbedepressedand
thetractormustnotbe inmotionwhenthe movingshift
lever.SeeFigure11.
IMPORTANT:Neverforcetheshiftlever.Doingsomay
resultinseriousdamagetothetractor'stransmission.
PTO (Blade Engage) Lever
Foundon thetractor'srightfender,the
PTO(bladeengage)leveris usedto
engagepowertothecuttingdeckor
other(separatelyavailable)attachments.
Tooperate,movethe leverall theway
forward.Movingtheleverall theway
rearwardintothePTOOFFposition
disengagespowertothecuttingdeck/
attachment.
NOTE:ThePTO(bladeengage)lever
mustbe inthedisengaged(PTOOFF)
positionwhenstartingtheengine.
z
!2
,t
_3
_4
!
_5
o
" #
Safety Interlock Switches
Thistractorisequippedwitha safetyinterlocksystem
fortheprotectionoftheoperator.If theinterlocksystem
shouldevermalfunction,donotoperatethetractor.
ContactanauthorizedMTDservicedealer.
* Thesafetyinterlocksystempreventstheengine
fromcrankingor startingunlesstheparkingbrakeis
engaged,andthe PTO(BladeEngage)leverisinthe
disengaged(OFF)position.
* Theenginewillautomaticallyshutoffif theoperator
leavestheseatbeforeengagingtheparkingbrake.
* Theenginewillautomaticallyshutoffif theoperator
leavesthetractor'sseatwiththePTO(BladeEngage)
leverintheengaged(ON)position,regardlessof
whetherthe parkingbrakeisengaged.
* Theenginewillautomaticallyshutoffif theoperator
engagesthePTOwiththeparkingbrakeON.
14

Models without Reverse Caution Mode
• Theenginewillautomaticallyshutoff ifthePTO
(BladeEngage)leverismovedintotheengaged(ON)
positionwiththeshiftleverin Reverse.
Models with Reverse Caution Mode
• Withtheignitionkeyinthe NORMALMOWING
position,theenginewillautomaticallyshutoff ifthe
PTO(BladeEngage)leverismovedintotheengaged
(ON)positionwiththe shiftleverin Reverse.
,_ WARNING: Do not operate the
tractor if the interlocksystem
ismalfunctioning.This system
was designed for your safety and
protection.
Reverse Caution Mode (if Equipped)
WARNING: Useextreme caution
while operating the tractor in
the REVERSE CAUTIONMODE.
Always lookdown and behind
before and while backing. Do not
operate the tractor when children
or others are around, Stop the
tractor immediatelyif someone
enters the area.
TheREVERSECAUTIONMODEpositionofthe key
switchmoduleallowsthetractortobe operatedin
reversewiththeblades(PTO)engaged.
IMPORTANT:Mowinginreverseisnotrecommended.
Tousethe REVERSECAUTIONMODE:
IMPORTANT:TheoperatorMUSTbe seatedinthe
tractorseat.
1. Starttheengineasinstructedon page16under
Starting The Engine.
2. TurnthekeyfromtheNORMALMOWING(Green)
positiontotheREVERSECAUTIONMODE(Yellow)
positionofthekeyswitchmodule. SeeFigure12.
3. DepresstheREVERSEPUSHBUTTON(Orange,
TriangularButton)atthetop,rightcornerofthekey
switchmodule.Theredindicatorlightat thetop,left
cornerof thekeyswitchmodulewillbe ONwhile
activated.SeeFigure12.
F
Indicator
Light
Stop
Position
©
Reverse
.PushButton
Reverse
CautionMode
Position
Start
Position
Figure 12
4. Onceactivated(indicatorlightON),thetractorcan
bedriveninreversewiththecuttingblades(PTO)
engaged.
5. Alwayslookdownandbehindbeforeandwhile
backingtomakesurenochildrenare around.
6. Afterresumingforwardmotion,returnthekeytothe
NORMALMOWINGposition.
IMPORTANT:TheREVERSECAUTIONMODEwill
remainactivateduntil:
a. ThekeyisplacedineithertheNORMALMOWING
positionor STOPposition.
b.Theoperatorengagestheparkingbrakebyfully
depressingtheclutch-brakepedalandholdingit
downwhilemovingthespeedcontrolleverintothe
PARKBRAKEposition.
Engaging the Parking Brake
Toengagetheparkingbrake:
1. Fullydepresstheclutch-brakepedalandholdit down
withyourfoot.
2. Movethe speedcontrolleverall thewaydownand
intotheparkingbrakeposition.
3. Releasetheclutch-brakepedaltoallowtheparking
braketoengage.
Toreleasetheparkingbrake:
1. Depresstheclutch-brakepedalandmovethespeed
controlleveroutoftheparkingbrakepositionandinto
a desiredspeed.
15
_ _ii ii_i i_iii_ii_ i?_i_i_i_ii_ ii__
WARNING
Do not operatethe
tractor if the interlock
system ismalfunction-
ing. This system was
designed for your
safety and protection.
Use extreme caution
while operating the
tractor inthe REVERSE
CAUTION MODE.
Always look down and
behind beforeand
while backing. Do not
operate the tractor
when children or oth-
ers are around. Stop
the tractor immediately
f someone enters the
area.

YoUr LaWn
i
Tractor
WARNING
Keephandsand feet
awayfrom the dis-
charge opening of the
cuttingdeck.
Donot operate the
tractor if the interlock
system ismalfunction-
ing.This systemwas
designed for your
safety and protection.
if you strike aforeign
object, stopthe
engine, disconnect
the spark plugwire(s)
and groundagainst
the engine.Thoroughly
inspectthe machine
for anydamage. Repair
the damage before
restartingand operat-
ing.
Setting the Cutting Height
1. Selecttheheightpositionofthecuttingdeckby
placingthedeckliftleverinanyofthesixdifferent
cuttingheightnotchesonthe rightsideofthefender.
2. Adjustthedeckwheels,ifequipped,sothattheyare
betweenl_-inchandY2-inchabovethegroundwhen
thetractorisona smooth,flat surfacesuchasa
driveway.
WARNING: Keep hands and feet
away from the discharge open-
ing ofthe cutting deck.
NOTE:Onmodelssoequipped,thedeckwheelsare an
anti-scalpfeatureofthedeckandare notdesignedto
supporttheweightofthecuttingdeck.
Referto Levelingthe Deckonpage20ofthis manual
formoredetailedinstructionsregardingvariousdeck
adjustments.
Starting the Engine
,,__ WARNING" Do not operate the
tractor if the interlocksystem is
malfunctioning. This system was
designed for your safety and
protection.
I G
AVOID SERIOUS INJURY OR DEATH
GO UPAND DOWNSLOPES,NOTACROSS.
AVOIDSUDDENTURNS.
DO NOTOPERATETHEUNITWHEREIT COULDSLIPOR TIE
IF MACHINESTOPSGOINGUPHILL,STOPBLADE(S)AND
BACKDOWNHILLSLOWLY.
DO NOTMOWWHEN CHILDRENOROTHERSAREAROUND.
NEVERCARRYCHILDREN,EVENWITHBLADESOFR
LOOK DOWNANDBEHIND BEFOREANDWHILEBACKING.
KEEPSAFETYDEVICES(GUARDS,SHIELDS,ANDSWITCHES)
IN PLACEANDWORKING.
REMOVEOBJECTSTHATCOULDBE THROWNBYTHE
BLADE(S).
KNOWLOCATIONANDFUNCTIONOFALL CONTROLS.
BE SURE BLADE(S)ANDENGINEARE STOPPEDBEFORE
PLACINGHANDSOR FEETNEAR BLADE(S).
BEFORELEAVINGOPERATOR'SPOSITION,DISENGAGE
BLADE(S), PLACETHE SHIFTLEVERIN NEUTRAL,ENGAGE
BRAKELOCK,SHUTENGINEOFFANDREMOVEKEY.
READ OPERATOR'S MANUAL
Stopping the Engine
NOTE:RefertotheTRACTORSET-UPon page8 of
thismanualforGasolineandOil fill-upinstructions.
1. Insertthetractorkeyintotheignitionswitch.
2. PlacethePTO(BladeEngage)leverinthedisen-
gaged(OFF)position.
3. Engagethetractor'sparkingbrake.
4. Activatethechokecontrol.
5. TurntheignitionkeyclockwisetotheSTARTposi-
tion.Aftertheenginestarts,releasethekey.Itwill
returntotheONposition.
IMPORTANT:DoNOTholdthekeyin theSTART
positionforlongerthantensecondsata time.Doingso
maycausedamagetoyourengine'selectricstarter.
6. Aftertheenginestarts,deactivatethechokecontrol
andplacethethrottlecontrolinthe FASTposition.
__ ARNING: if you strike a foreign
object, stop the engine, discon-
nect the spark plug wire(s) and
ground against the engine. Thor-
oughly inspectthe machine for
any damage. Repair the damage
before restarting and operating
1. If thebladesare engaged,placethe PTO(Blade
Engage)leverinthedisengaged(OFF)position.
2. TurntheignitionkeycounterclockwisetotheSTOP
position.
3. Removethekeyfromtheignitionswitchtoprevent
unintendedstarting.
NOTE:DoNOTleavethechokecontrolonwhileoperat-
ingthetractor.Doingsowillresultina "rich"fuelmixture
andcausetheengineto runpoorly.
16

Driving The Tractor
WARNING: Avoidsudden starts,
e×-cessivespeed and sudden
stops.
WARNING: Do not leave the seat
of the tractor without first plac-
ingthe PTO(Blade Engage) lever
inthe disengaged (OFF) posi-
tion, depressing the brake pedal
and engaging the parking brake.
if leaving the tractor unattended,
also turn the ignition key off and
remove the key.
Always look down and behind
before and while backing up to
avoid a back-over accident.
1. Depressthebrakepedalto releasetheparkingbrake
andletthepedalup.
2. MovethethrottleleverintotheFAST(rabbit)position.
3. Placetheshiftleverin eithertheFORWARDor
REVERSEposition.
IMPORTANT:DoNOTusetheshiftlevertochangethe
directionoftravelwhenthetractorisin motion.Always
usethebrakepedalto bringthetractortoa complete
stopbeforeshifting.
4. Releasetheparkingbrakebydepressingtheclutch-
brakepedalandpositioningthespeedcontrolleverin
desiredposition.
NOTE:Whenoperatingtheunitinitially,therewillbe little
differencebetweenthehighesttwospeedsuntilafterthe
beltshaveseatedthemselvesintothepulleysduringthe
break-inperiod.
_ ARNING: Before leaving the
operator's positionfor any
reason, disengage the blades,
place the shift lever in neutral,
engage the parking brake, shut
engine off and remove the key.
IMPORTANT:Whenstoppingthetractorforanyreason
whileona grasssurface,always:
1. Placetheshiftleverin neutral,
2. Engagetheparkingbrake,
3. Shutengineoff andremovethekey.
Doingsowillminimizethepossibilityofhavingyourlawn
"browned"byhotexhaustfromyourtractor'srunning
engine.
If unit stalls withspeedcontrolin highspeed,orif unit
willnotoperatewithspeedcontrolleverin a lowspeed
position,proceedasfollows:
1. Placeshiftleverin NEUTRAL.
2. Restartengine.
3. Placespeedcontrolleverinhighestspeedposition.
4. Releaseclutch-brakepedalfully.
5. Depressclutch-brakepedal.
6. Placespeedcontrolleverindesiredposition.
7. Placeshiftleverin eitherFORWARDorREVERSE,
andfollownormaloperatingprocedures.
IMPORTANT:First-timeoperatorsshouldusespeed
positions1or2. Becomecompletelyfamiliarwiththe
tractor'soperationandcontrolsbeforeoperatingthe
tractorinhigherspeedpositions.
.
6.
Releaseclutch-brakepedalslowlyto putunitinto
motion.
Thelawntractorisbroughttoa stopbydepressing
theclutch-brakepedal.
WARNING
Avoid sudden starts,
ex-cessive speed and
sudden stops.
Do not leave the seat
of the tractor without
first placingthe PTO
(Blade Engage)lever in
the disengaged (OFF)
position,depressing
the brake pedal and
engaging the parking
brake, if leavingthe
tractor unattended,
also turn the ignition
key off and remove the
key.
Always look down
and behind before
and while backing up
to avoid a back-over
_ccident.
17

WARNING
Donot mow on inclines
with a slopein excess
of 15degrees (a rise
of approximately 2-1/2
feet every 10feet). The
tractor could overturn
and cause serious
injury.
Tohelp avoid blade
;ontact or a thrown
object injury, keep
bystanders, helpers,
;hildren and pets at
least75 feet from the
machine while it is in
operation. Stop ma-
;hine ifanyoneenters
thearea.
Driving On Slopes
RefertotheSLOPEGAUGEon page3tohelpdeter-
mineslopeswhereyoumayoperatethetractorsafely.
,_ WARNING: Do not mow on
inclineswith a slope in excess
of 15degrees(a rise of approxi-
mately 2-1/2 feet every 10feet).
The tractor could overturnand
cause serious injury.
• Mowupanddownslopes,NEVERacross.
• Exerciseextremecautionwhenchangingdirection
on slopes.
• Watchforholes,ruts,bumps,rocks,or otherhidden
objects.Uneventerraincouldoverturnthe machine.
Tallgrasscanhideobstacles.
• Avoidturnswhendrivingona slope.Ifa turnmust
be made,turndowntheslope.Turningupa slope
greatlyincreasesthechanceofa rollover.
• Avoidstoppingwhendrivingupa slope.If itis
necessarytostopwhiledrivingup aslope,startup
smoothlyandcarefullyto reducethepossibilityof
flippingthetractoroverbackward.
Engaging the Blades
EngagingthePTO(BladeEngage)transferspowerto
thecuttingdeckor other(separatelyavailable)attach-
ments.Toengagetheblades,proceedasfollows:
1. MovethethrottlecontrollevertotheFAST(rabbit)
position.
2. GraspthePTO(BladeEngage)leverandpivotit all
thewayforwardintotheengaged(ON)position.
3. Keepthethrottleleverinthe FAST(rabbit)position
forthemostefficientuseofthecuttingdeckorother
(separatelyavailable)attachments
iMPORTANT:Models withReverseCaution Mode:
Theenginewillautomaticallyshutoff ifthePTOis
engagedwiththeshiftleverin positionfor reversetravel
withtheignitionkeyintheNORMALMOWINGposition.
Models withoutReverseCautionMode:
ThePTO(BladeEngage)levermustbein thedisen-
gaged(OFF)positionwhenstartingtheengine,when
travelingin reverse,and iftheoperatorleavestheseat.
RefertoSafetyinterlockSwitcheson page14.
Using the Deck Lift Lever
Toraisethecuttingdeck,movethedecklift levertothe
left,thenplaceitinthenotchbestsuitedforyourapplica-
tion.RefertoSettingTheCuttingHeightearlierinthis
section.
Mowing
WARNING: To help avoid blade
contact or a thrown object injury,
keep bystanders, helpers, children
and petsat least 75feet from the
machine while it is in operation.
Stop machine if anyone enters the
area.
Thefollowinginformationwillbehelpfulwhenusingthe
cuttingdeckwith yourtractor:
WARNING: Planyour mowing
pattern to avoid discharge of
materials toward roads, sidewalks,
bystanders and the like. Also,
avoid discharging material against
a wall or obstruction which may
cause discharged material to
ricochet back toward the operator.
• Donotmowathighgroundspeed,especiallyifa
mulchkit orgrasscollectorisinstalled.
• Forbestresultsitisrecommendedthatthefirsttwo
lapsbe cutwiththedischargethrowntowardsthe
center.Afterthefirsttwolaps, reversethedirectionto
throwthedischargetotheoutsideforthebalanceof
cutting.Thiswillgivea betterappearancetothe lawn.
• Donotcut thegrasstooshort.Shortgrassinvites
weedgrowthandyellowsquicklyindry weather.
• Mowingshouldalwaysbedonewiththeengineat full
throttle.
Underheavierconditionsitmaybenecessarytogo
backoverthecut areaa secondtimetogeta clean
cut.
18

• DoNOTattempttomowheavybrushandweedsand _ _ " --
extremelytallgrass.Yourtractorisdesignedtomow /A I
awns,NOTdearbrush //I
• Keepthebladessharpandreplacethebladeswhen "i.: ....",,, [J
worn.Referto Cutting Bladeson page25ofthis / '
manualforproperbladesharpeninginstructions.
Mulching (If Equipped)
Selectmodelscomeequippedwitha mulchkitwhich
incorporatesspecialblades,alreadystandardonthe
tractor,ina processof recirculatinggrassclippings
repeatedlybeneaththecuttingdeck.Theultra-fine
clippingsarethenforcedbackintothe lawnwherethey
actasa naturalfertilizer.
Observethefollowingpointsforthebestresultswhen
mulching:
• Neverattempttomulchif thelawnisdamp.Wetgrass
tendsto stickto theundersideofthecuttingdeck
preventingpropermulchingoftheclippings.
• DoNOTattempttomulchmorethan1/3thetotal
heightof thegrassor approximately1-1/2inches.
Doingsowillcausetheclippingstoclumpup beneath
thedeckand notbe mulchedeffectively.
• Maintaina slowgroundspeedtoallowthegrass
clippingsmoretimeto effectivelybemulched.
• AlwayspositionthethrottlecontrolleverintheFAST
(rabbit)positionandallowitto remaintherewhile
mowing.Failingtokeeptheengineatfullthrottle
placesstrainon thetractor'sengineand doesnot
allowthebladesto properlymulchgrass.
Figure 13
NOTE:It isnotnecessarytoremovethedischargechute
tooperatethemowerwiththemulchkit installed.
Tooperatethecuttingdeckwithoutmulching,simply
removethemulchplugbyunthreadingtheplasticwing
nutwhichfastensittothecuttingdeck.Thiswillallowthe
clippingstodischargeouttheside.See Figure13.
Headlights
• Onsomemodels,thelampsareONwheneverthe
tractor'sengineisrunning.Onothermodels,the
lampsareONwhenevertheignitionkeyismovedout
oftheSTOPposition.
• Onall models,thelampsturnOFFwhentheignition
keyismovedtotheSTOPposition.
19
Operating
WARNING
Planyour mowing pat-
tern to avoid discharge
of materials toward
roads, sidewalks, by-
standers and the like.
Also, avoid discharging
_aterial against a wall
_robstruction which
may cause discharged
aterial to ricochet
back toward the
operator.

WARNING
Neverattemptto
make any adjust-
ments while the
engine isrunning,
exceptwhere speci-
i fied in the operator's
manual.
iNever attempt to
iadjust the brakes
_whiethe engine
iisrunning. Always
idisengage PTO,move
::shift lever intoneutral
position, stop engine
and remove key to
iprevent unintended
istarting.
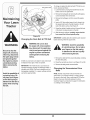
Figure 14
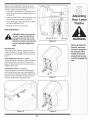
1. Withthetractorparkedona firm,levelsurface,place
thedecklift leverin thetopnotch(highestposition)
androtatethebladenearestthedischargechuteso
thatitisparallelwiththetractor.
2. Measurethedistancefromthefrontofthe bladetipto
thegroundandtherearofthebladetiptotheground.
Thefirstmeasurementtakenshouldbebetween
1/4"and 3/8"lessthanthesecondmeasurement.
Determinetheapproximatedistancenecessaryfor
properadjustmentandproceed,ifnecessary,tothe
nextstep.
3. Locatethejamnutandlocknutonthefrontsideof the
stabilizerbracket.See Figure14.Afterlooseningthe
jamnut:
Tightenthelocknutto raisethefrontofthedeck;
Loosenthelocknuttolowerthefrontofthedeck.
4. Retightenthejamnutloosenedearlierwhenproper
adjustmentisachieved.
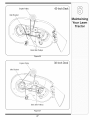
Figure 15
,_ WARNING: Never attempt to
make any adjustments while
the engine isrunning, except
where specified in the operator's
manual.
Leveling the Deck
NOTE:Checkthetractor'stirepressurebeforeperform-
inganydeck levelingadjustments.RefertoTires on
page24 forinformationregardingtirepressure.
Front To Rear
Thefrontofthecuttingdeckissupportedbya stabilizer
barthatcanadjustedtolevelthedeckfromfrontto rear.
Thefrontofthedeckshouldbebetween1/4-inchand
3/8-inchlowerthantherearofthedeck.Adjustif
necessaryasfollows:
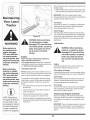
Side to Side
If thecuttingdeckappearsto bemowingunevenly,a side
tosideadjustmentcanbeperformed.Adjustif necessary
asfollows:
1. Withthetractorparkedona firm,levelsurface,place
thedecklift leverin thetopnotch(highestposition)
androtatebothbladessothattheyareperpendicular
withthetractor.
2. Measurethedistancefromtheoutsideoftheleftblade
tiptothegroundandthedistancefromtheoutsideof
therightbladetiptotheground.Bothmeasurements
takenshouldbeequal.Ifthey'renot,proceedtothe
nextstep.
3. Loosen,butdo NOTremove,thehexcapscrewon
theleftdeckhangerbracket.SeeFigure15.
4. Balancethedeckbyusingawrenchtoturnthe
adjustmentgear (foundimmediatelybehindthehex
capscrewjust loosened)clockwise/uporcounter-
clockwise/down.Thedeckis properlybalancedwhen
bothbladetipmeasurementstakenearlierareequal.
5. Retightenthehexcapscrewontheleft deckhanger
bracketwhenproperadjustmentisachieved.
Parking Brake Adjustment
_ ARNING"Never attempt to ad-
just the brakes while the engine is
running. Always disengage PTO,
move shift lever into neutral posi-
tion, stop engine and remove key
to prevent unintended starting.
If thetractordoesnotcometoa completestopwhenthe
brakepedaliscompletelydepressed,or ifthetractor's
rearwheelscanrollwiththeparkingbrakeapplied,the
2O
Page is loading ...
Page is loading ...
Page is loading ...
Page is loading ...
Page is loading ...
Page is loading ...
Page is loading ...
Page is loading ...
Page is loading ...
Page is loading ...
Page is loading ...
Page is loading ...
Page is loading ...
Page is loading ...
Page is loading ...
Page is loading ...
-
 1
1
-
 2
2
-
 3
3
-
 4
4
-
 5
5
-
 6
6
-
 7
7
-
 8
8
-
 9
9
-
 10
10
-
 11
11
-
 12
12
-
 13
13
-
 14
14
-
 15
15
-
 16
16
-
 17
17
-
 18
18
-
 19
19
-
 20
20
-
 21
21
-
 22
22
-
 23
23
-
 24
24
-
 25
25
-
 26
26
-
 27
27
-
 28
28
-
 29
29
-
 30
30
-
 31
31
-
 32
32
-
 33
33
-
 34
34
-
 35
35
-
 36
36


Ask a question and I''ll find the answer in the document
Finding information in a document is now easier with AI
Related papers
-
MTD 13AN771G755 Owner's manual
-
-
-
-
-
-
MTD 600 SERIES User manual
-
Craftsman Lawn Mower 247.28911 User manual
-
MTD 779 Owner's manual
-
Kmart 02969460-1 Owner's manual
Other documents
-
Bolens 13AU616H565 Owner's manual
-
Troy-Bilt 77T Series Owner's manual
-
-
Yard-Man 605 Series User manual
-
-
-
-
-
-
Troybilt 60TP Owner's manual