Page is loading ...

Model/Modèle/Modelo: 820-0072
Part Number: 19000826A2
ITM. / ART. 1902307
This instruction manual contains important information necessary for the proper
assembly and safe use of the appliance.
Read and follow all warnings and instructions before assembling and using the
appliance.
Follow all warnings and instructions when using the appliance.
Keep this manual for future reference.
Cette notice contient des renseignements importants permettant un assemblage
adéquat et à une utilisation sécuritaire de l'appareil.
Lire et suivre toutes les mises en garde et toutes les instructions avant l'assemblage et
l'utilisation de l'appareil.
Suivre toutes les mises en garde et toutes les instructions lors de l'utilisation de
l'appareil.
Conservez cette notice pour consultation ultérieure.
Este manual de instrucciones contiene información importante necesaria para el cor-
recto montaje y el uso seguro del aparato.
Lea y siga todas las advertencias e instrucciones antes de ensamblar y usar el aparato.
Siga todas las advertencias e instrucciones al usar el aparato.
Conserve este manual para futuras referencias.
PARA USO AL AIRE LIBRE SOLAMENTE.
NO PARA USO COMERCIAL.
UTILISER À L'EXTÉRIEUR UNIQUEMENT.
NE PAS UTILISER À DES FINS COMMERCIALES.
FOR OUTDOOR USE ONLY. NOT FOR COMMERCIAL USE.
®
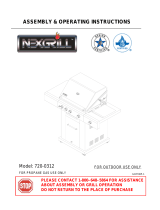
FORTRESS
TM/MC/MR
2.0
2-BURNER CAST ALUMINUM TABLETOP GAS GRILL
BARBECUE DE TABLE AU GAZ EN ALUMINIUM À 2 BRÛLEURS POUR L'EXTÉRIEUR
PARRILLA DE GAS PORTÁTIL DE ALUMINIO FUNDIDO CON 2 QUEMADORES
OWNER'S MANUAL
MANUEL D'UTILISATION
MANUAL DEL PROPIETARIO

1
DANGER: If you smell gas:
1. Shut o gas to the appliance.
2. Extinguish any open flame.
3. Open lid.
4. If odor continues, keep away from the appliance and immediately call your gas supplier
or local fire department.
FAILURE TO FOLLOW THESE INSTRUCTIONS COULD RESULT IN FIRE, EXPLOSION OR
BURN HAZARD, WHICH COULD CAUSE PROPERTY DAMAGE, PERSONAL INJURY OR
DEATH.
IMPORTANT SAFETY INFORMATION
Important Safety Information ...................................................................................................................................... 1
Parts List ..........................................................................................................................................................................3
Assembly Instructions ..................................................................................................................................................4
Connection Instructions .............................................................................................................................................. 8
Operating Instructions ................................................................................................................................................11
Care and Maintenance ..............................................................................................................................................13
Warranty .........................................................................................................................................................................16
Replacement Parts ...................................................................................................................................................... 17
Troubleshooting ...........................................................................................................................................................18
Mises en garde importantes .................................................................................................................................. 19
Liste des pièces ...........................................................................................................................................................21
Instructions d'assemblage .....................................................................................................................................22
Instructions de raccordement ..............................................................................................................................26
Instructions d'utilisation .........................................................................................................................................29
Entretien et nettoyage ............................................................................................................................................. 31
Énoncé de garantie .................................................................................................................................................34
Liste des pièces de rechange ..............................................................................................................................35
Dépannage .................................................................................................................................................................36
Información de seguridad importante .................................................................................................................. 37
Lista de partes .............................................................................................................................................................39
Instrucciones de montaje ......................................................................................................................................... 40
Instrucciones de conneciones ................................................................................................................................44
Instrucciones de funcionamiento ........................................................................................................................... 47
Cuidado y mantenimiento ........................................................................................................................................49
Garantía ........................................................................................................................................................................52
Lista de piezas de reemplazo ....................................................................................................................... 53
Solucion de problemas ................................................................................................................................... 54
CALIFORNIA RESIDENTS ONLY WARNING:
This product and the fuels used to operate this product (liquid propane), and the products of combustion of
such fuels, can expose you to chemicals including benzene, which is known to the State of California to cause
cancer and reproductive harm.
For more information, go to: www.P65Warnings.ca.gov.
EN
FR
ES
DANGER
1. Never operate this appliance unattended.
2. Never operate this appliance within 3.05 m (10 ft) of any structure, combustible material
or other gas cylinder.
3. Never operate this appliance within 7.62 m (25 ft) of any flammable liquid.
4. This appliance is not intended for and should never be used as a heater.
5. If a fire should occur, keep away from the appliance and immediately call your fire
department. Do not attempt to extinguish an oil or grease fire with water.
TABLE OF CONTENTS / TABLE DES MATIÈRES /
TABLA DE CONTENIDOS

2
IMPORTANT SAFETY INFORMATION
1. The installation must conform with local codes or, in the absence of local codes, with the National Fuel Gas Codes, the
National Fuel Gas Code, ANSI Z223.1/NFPA 54, Storage and Handling of Liquefied Petroleum Gases, ANSI/NFPA 58, or
the Standard for Recreational Vehicles, ANSI A119.2/NFPA 1192, and the Recreational Vehicle Code, CSA Z240 RV, as
applicable.
2. Tabletop grill is for outdoor use only. Grill should be operated in a well-ventilated space. Never operate in an enclosed
space, garage or building. Your grill is not intended to be installed in or on recreational vehicles and/or boats .
3. Heated liquids remain at scalding temperatures long after the cooking process. Do not touch the cooking appliance until
liquids have cooled to 46.11 °C (115 °F) or lower.
4. Do not install or use grill within 91.44 cm (36 in) of combustible materials from back and sides of grill. Grill shall not be
located under overhead surfaces (closed carport, garage, porch, patio) that can catch fire.
5. Never attempt to attach this grill to the self-contained LP gas system of a camper trailer or motor home.
6. It is the responsibility of the assembler/owner to assemble, install and maintain gas grill. Do not let children and pets
operate or play near your tabletop grill. Failure to follow these instructions could result in serious personal injury and/or
property damage.
7. Always open lid before lighting grill. When grill is not in use, close the LP gas cylinder valve.
8. Carefully follow instructions in this manual for proper assembly and leak-testing of your grill. Do not use grill until leak
checked. If leak is detected at any time, it must be stopped and corrected before using grill further.
9. Appliance area should be kept clear and free from combustible materials, gasoline, bottled gas in any form and other
flammable vapours and liquids. Do not obstruct flow of combustion and ventilation air.
10. Never try to light grill with lid closed! Buildup of gases is very dangerous and could cause an explosion.
11. Keep any electrical cord or fuel supply hose away from heated surfaces.
12. Propane is a flammable gas and improper handling may result in explosion and/or fire and serious accident or injury.
13. This appliance will be hot during and after use. Use insulated oven mitts or gloves for protection from hot surfaces or
splatter from cooking liquids.
14. Do not leave your grill unattended while in operation.
15. Do not use while under the influence of drugs or alcohol.
16. Do not store any spare LP (propane) cylinder, full or empty, under or near your grill.
17. Appliance is not intended for commercial use or rental.
18. The cylinder must be disconnected when the appliance is not in use.
Read the following instructions carefully before attempting to assemble, operate or install the product. Failure to follow these instructions
may result in serious bodily injury and/or property damage. If you have questions regarding the product, please call our customer service
department at: 1-866-984-7455 (USA), 1-800-648-5864 (Canada), or 1-909-718-1945 (International). Languages spoken: English, French,
and Spanish 8 a.m.-5 p.m. PST Monday-Friday. You can also reach us by email at: [email protected].
LP gas supply cylinder to be used must be constructed and marked in accordance with the specifications for LP gas cylinders of the U.S.
Department of Transportation (DOT) or the National Standard of Canada, CAN-B339, Cylinders, Spheres and Tubes for the Transportation
of Dangerous Goods.
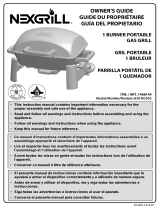
Operate the grill only on a tabletop, no higher than 81.28 cm (32 in) and no lower than
60.96 cm (24 in).
Place the propane tank on the ground adjacent to the tabletop and with a minimum
clearance of 30.48 cm (12 in) and no further than 60.96 cm (24 in) from the grill.
Failure to follow these instructions could cause the propane tank to overheat and
vent propane, which could ignite, causing serious personal injuries or property
damage and/or a tripping hazard over the gas hose or propane tank, pulling the grill
o the tabletop, causing serious personal injuries or property damage.
81.28 CM
32 IN
30.48 CM
12 IN MIN
60.96 CM
24 IN MAX
WARNING:
Hose is a trip
hazard
THE FUEL SYSTEM: Gas grills are used safely by millions of people when following simple safety precautions.
The items in the fuel system are designed for operation with this grill. They must not be replaced with any other brand. (See parts list for
replacement items.)
GAS BURNER: The gas burner is constructed of stainless steel and should not require maintenance other than inspection for insects/nests
inside the air intake slots.
LP GAS REGULATOR CAUTION: The gas pressure regulator provided with this appliance must be used. This regulator is equipped with
the required orifice and is set for the required outlet pressure for this appliance. This combination of orifice size and pressure regulation
specifications provides the intended cooking performance.
FUEL SUPPLY HOSE: The hose-connected regulator provided with this appliance is 91.44 cm (3 ft) length. Keep the fuel hose away from any
heated surface(s).
PROPANE FUEL WARNING:
Propane is a flammable gas. Improper handling may result in an explosion and/or fire and serious accident or injury. Your grill is designed to
operate with propane (LP) gas only and is equipped with the proper orifice for propane gas.
CAUTION: Do not connect this grill with any gas supply other than propane. Propane gas is heavier than air and settles in lower areas.
Make certain adequate ventilation is available when using your grill. The gas cylinder must only be stored outside in a well-ventilated area out
of the reach of children when the grill is not in use.
OUTDOOR GRILL SAFETY

4
PREPARATION
Before beginning assembly, installation or operation of product, make sure all parts are present and
undamaged. Compare parts with package contents list and diagram above. If any part is missing or damaged,
do not attempt to assemble, install or operate the product. Contact customer service for replacement parts.
READ ALL SAFETY WARNINGS, ASSEMBLY AND INSTALLATION INSTRUCTIONS CAREFULLY BEFORE
ATTEMPTING TO ASSEMBLE.
ASSEMBLY INSTRUCTIONS
TOOLS NEEDED (NOT INCLUDED)
ASSEMBLY STEPS
QUESTIONS, PROBLEMS, MISSING PARTS? Before returning to your retailer, call our Customer Service Department
at: 1-866-984-7455 (USA), 1-800-648-5864 (Canada), or 1-909-718-1945 (International) from 8 a.m. to 5 p.m. PST
Monday-Friday. Languages spoken: English, Spanish and French. You can also reach us by email at:
Phillips head screwdriver
1
A
BX2

8
CONNECTION INSTRUCTIONS
LIQUID PROPANE CYLINDER REQUIREMENTS
9 KG 20 LB CYLINDER
A dented or rusty liquid propane cylinder may be hazardous and should be checked by your
supplier. Never use a cylinder with a damaged valve. The liquid propane cylinder must be
constructed and marked in accordance with the specifications for liquid propane cylinders by
the United States Department of Transportation (DOT) or the National Standard of Canada, CAN/
CSA-B339, Cylinders, Spheres and Tubes for Transportation of Dangerous Goods Commission.
The 9 kg (20 lb) cylinder must have a shut-o valve terminating in a valve outlet specified, as
applicable, for connection type QCC1 in the standard for compressed gas cylinder valve outlet and
inlet connection ANSI/CGA-V-1.
Storage of an outdoor cooking gas appliance indoors is permissible only if the cylinder is
disconnected and removed from the outdoor cooking gas appliance. The cylinder system must be
arranged for vapour withdrawal. The cylinder must include a collar to protect the cylinder valve.
Manifold pressure: (operating) 27.9 cm (11 in) water column, (non-operating) 28.4 cm (11.2 in) water
column.
The liquid propane cylinder must be fitted with an overfill protection device (OPD).
If fitted, remove the plastic valve cover from the liquid propane cylinder. Make sure the grill's
gas hose does not contact the grease pan or grill firebox when the liquid propane cylinder is
positioned.
GAS HOOKUP
Only the pressure regulator and hose assembly supplied with the grill should be used. Any replacement pressure regulator
and hose assembly must be specified by the grill manufacturer. This grill is configured for liquid propane. Do not use a
natural gas supply.
Total gas consumption (per hour) with all burners set on “HIGH”:
EACH BURNER 6,750 BTU/HR
TOTAL 13,500 BTU/HR
The installation of this appliance must conform with local codes or, in the absence of local codes, with either the National
Fuel Gas Code, ANSI Z223.1/NFPA 54, National Gas Propane Installation Code, CSA B149.1, or Propane Storage and Handling
Code, B149.2,or the Standard for Recreation Vehicles, ANSI A119.2/NFPA 1192, and CSA Z240 RV Series, Recreation Vehicle
Code, as applicable.
WARNING:
NEVER ATTEMPT TO USE DAMAGED OR OBSTRUCTED EQUIPMENT. SEE YOUR LOCAL LIQUID PROPANE
DEALER FOR REPAIR.
REPLACING THE LIQUID PROPANE CYLINDER
Turn the grill burner knobs clockwise to “OFF” () and make sure the grill is cool.
Turn the liquid propane cylinder valve to the CLOSED position by turning clockwise until it stops.
Detach the regulator assembly from the cylinder valve by turning the quick-coupling nut counterclockwise. Cover the regulator
connector with the protective plug.
Place dust cap on cylinder valve outlet whenever the cylinder is not in use. Only install the type of dust cap on the cylinder valve
outlet that is provided with the cylinder valve. Other types of caps or plugs may result in leakage of propane.
CONNECTING THE LIQUID PROPANE CYLINDER

9
LEAK TEST
WARNING:
CHECK ALL GAS SUPPLY FITTINGS FOR LEAKS BEFORE EACH USE. DO NOT USE THE GRILL UNTIL ALL
CONNECTIONS HAVE BEEN CHECKED AND DO NOT LEAK. DO NOT SMOKE WHILE LEAKTESTING. NEVER
LEAKTEST WITH AN OPEN FLAME.
GENERAL
Although gas connections on the grill are leak-tested prior to shipment, a complete leak test must be performed at the
installation site. Before each use, check all gas connections for leaks using the procedures listed below. If the smell of gas is
detected at any time, you should immediately check the entire system for leaks.
BEFORE TESTING
Make sure all packing materials have been removed from the grill, including the burner tie-down straps.
CREATE THE SOAPY WATER
Prepare a 50/50 solution of water and ammonia-free dish
detergent, to be applied using a spray bottle or brush.
STEP 1
CONNECTING THE LIQUID PROPANE CYLINDER
The cylinder valve should be in the CLOSED position. If not, turn
the valve clockwise until it stops.
Make sure the cylinder valve has the proper type-1 external
male thread connections per latest ANSI Z21.81 standard.
Make sure the burner valves are in the “OFF” () position.
Inspect the valve connections and regulator assembly.
Remove debris and inspect the hose for damage. Remove the
protective plug from the regulator connector. When connecting
the regulator assembly to the valve, use your hand to tighten
the nut clockwise until it stops. Use of a wrench could damage
the quick-coupling nut and result in a hazardous situation. Open
the cylinder valve fully by turning the valve counterclockwise.
STEP 2

10
TO TEST
1. Make sure the burner valves are in the "OFF" () position.
2. Turn the liquid propane cylinder valve counterclockwise to
open the valve.
3. Apply the soap solution to all gas fittings. Soap bubbles will
appear where a leak is present.
4. If a leak is present, immediately turn the liquid propane
cylinder valve to the CLOSED position and tighten leaky
fittings.
5. Turn the liquid propane cylinder valve back to the OPEN
position and recheck.
6. Should the gas continue to leak from any of the fittings,
turn the liquid propane cylinder valve to the CLOSED
position and contact our Customer Service Department
at: 1-866-984-7455 (USA), 1-800-648-5864 (Canada),
or 1-909-718-1945 (International). Languages spoken:
English, French, and Spanish 8 a.m.-5p.m. PST Monday-
Friday. Or email us at: [email protected].
7. If there is evidence of excessive abrasion or wear, or the
hose is cut, it must be replaced prior to the outdoor cooking
gas appliance being put into operation.
STEP 3
WARNING:
DO NOT STORE GRILL INDOORS UNLESS THE CYLINDER IS DISCONNECTED. DO NOT STORE CYLINDER
IN A BUILDING, GARAGE, OR ANY OTHER ENCLOSED AREA, AND KEEP OUT OF REACH OF CHILDREN
AT ALL TIMES.
INSTALLER FINAL CHECK
Maintain specified clearance of 91.44 cm (36 in) from combustible materials and construction.
1. All internal packaging has been removed.
2. The hose and regulator are properly connected to the liquid propane cylinder.
3. The unit has been tested and is free of leaks.
4. The gas supply shuto valve has been located.
WARNING:
1. THE GRILL AND ITS INDIVIDUAL SHUTOFF VALVE MUST BE DISCONNECTED FROM THE GAS
SUPPLY PIPING SYSTEM DURING ANY PRESSURE TESTING OF THAT SYSTEM AT TEST PRESSURE
IN EXCESS OF 3.5 KPA 0.5 PSI.
2. THE OUTDOOR COOKING GAS APPLIANCE MUST BE ISOLATED FROM THE GAS SUPPLY PIPING
SYSTEM BY CLOSING ITS INDIVIDUAL MANUAL SHUTOFF VALVE DURING ANY PRESSURE TESTING
OF THE GAS SUPPLY PIPING SYSTEM AT TEST PRESSURE EQUAL TO OR LESS THAN 3.5 KPA 0.5
PSI.
WARNING:
1. DO NOT STORE SPARE LIQUID PROPANE CYLINDERS UNDER OR NEAR THIS APPLIANCE.
2. NEVER FILL THE CYLINDER BEYOND 80 PERCENT CAPACITY.
3. IF THE INFORMATION IN ITEMS 1 AND 2 IS NOT FOLLOWED EXACTLY, A FIRE CAUSING DEATH OR
SERIOUS INJURY MAY OCCUR.

11
OPERATING INSTRUCTIONS
PREPARING TO LIGHT YOUR GRILL
THIS COOKING APPLIANCE IS FOR OUTDOOR USE ONLY AND SHALL NOT BE USED IN A BUILDING,
GARAGE OR ANY OTHER ENCLOSED AREA.
FIND A LEVEL SURFACE ON WHICH TO PLACE THE GRILL.
STEP 1
MOVING INSTRUCTIONS
Caution: Never move the grill with burners lit or the grill is still hot.
Make sure control knob is in the “OFF” () position. Disconnect the propane cylinder from the regulator.
Remove the regulator from the propane tank. Be sure the grill has completely cooled for at least 30 minutes.
Close the lid. Use the side handles to carry the grill.
NOTE: It is best to leave the grease tray in place attached to the bottom of the grill; some grease may
continue to drip from drain hole during transport.
REMOVE HOSE FROM THE CLIPS ON THE FRONT OF THE
GRILL.
CONNECT TO TANK.
STEP 2
STEP 3

12
OPEN THE LID AND TURN KNOB TO IGNITE.
If ignition does not occur within 3-5 seconds, turn the control knob "OFF" (). Wait 5 minutes before
attempting to re-light the grill. If the grill fails to ignite after the second attempt, call our Customer Service
Department at: 1-866-984-7455 (USA), 1-800-648-5864 (Canada), or 1-909-718-1945 (International).
Languages spoken: English, French, Spanish 8 a.m.-5 p.m. PST Monday-Friday. You can also reach us by
email at: [email protected] for assistance.
With burner lit, gently close the lid and allow the grill to warm up for 5-10 minutes prior to use.
STEP 4
LIGHTING YOUR GRILL
IMPORTANT - FIRST TIME USE:
It is important that the grill be lit and allowed to heat up for at least 10 minutes before any food is placed on the
cooking grid. It is normal for some smoke to appear during the initial operation of the grill. After initial heating,
the grill is ready for use. A cooking spray may be used on the cooking grids to allow easier clean up.
If the knob won't spark, insert a match into the lighting rod.
Ignite the match and insert through the cooking grids to the
burner.
1. Allow the grill to warm up with the lid closed for 5 minutes prior to cooking.
2. You may cook on the grill in any weather. If the ambient temperature is extremely cold or hot, the cooking
times will be slightly increased or decreased. Keep the grill out of excessive winds when operating.
3. The cooking times listed below are only suggestions. Cooking times vary depending on thickness of meats
and the desired degree of preparation.
Steak – (T-Bone), thick cut, medium doneness: grill 10 minutes on each side on MED setting.
Chicken – (Quarters): grill 30 minutes per side on MED setting. Check for doneness.
Pork – (Ribs/chops): grill 10-20 minutes per side on MED setting. Check for doneness.
Fish – grill 20-30 minutes on LOW setting.
Turkey – (Breast): grill 10 minutes per 0.5 kg or per pound or until internal temperature reaches 76 °C (170 °F)
on MED setting.
USING YOUR GRILL

13
TURNING OFF YOUR GRILL
1. Turn knob to “OFF” () position.
2. Turn the propane cylinder valve to the CLOSED
position.
CAUTION: Do not attempt to re-light the grill without
following all the lighting instructions.
3. Allow the grill body to cool at least 30 minutes before
attempting to move or transport.
NATURAL HAZARD SPIDERS AND OTHER INSECTS
FACT: Sometimes spiders and other small insects climb into the burner tube. The spiders spin webs, build
nests and lay eggs. The webs or nests can be very small, but they are very strong and can block the flow
of gas, causing an unsafe situation. Clean burner prior to use after storing, at the beginning of grilling
season or after a period of one month not being used.
SPIDER WEB INSPECTION
STORAGE AND TRANSPORTATION REQUIREMENTS
Cover the regulator connector with the protective plug and
place the hose onto the clips located in front of grill before
transporting and storing.
THERE IS VERY LITTLE CARE AND MAINTENANCE NEEDED.
The tabletop grill is designed and made of materials that will last many years with normal use. Following these instructions
will improve the longevity of the grill and quality of cooking. To ensure safe operation of your grill, the area of cooking should
always be kept free of combustible materials of any type, such as gasoline or other flammable vapours or liquids.
OUTSIDE GRILL PARTS: This is cast aluminum and plastic. It can be cleaned easily with warm soapy water.
COOKING GRID AND GREASE TRAY: The cooking grids are made of coated cast iron. They should be scrubbed with a grill
brush immediately after cooking, while the grill is still warm. The grease tray can be cleaned easily with warm soapy water.
CAUTION: The grease tray must be kept clean and free of heavy buildup for the grill to perform properly and to eliminate
flare-ups.
CARE AND MAINTENANCE

14
To remove the burners for cleaning:
1. Remove the heat tent located between the burners.
2. Locate the burner screws at the front and rear of the firebox.
3. Remove the screws and slightly lift the burners out of the
firebox.
4. Remove ignitors from burners.
BURNERS – Extreme care should be taken when removing and replacing a burner. It must be correctly centred on the orifice
before any attempt is made to relight the grill. Frequency of cleaning will depend on how often you use the grill.
Failure to properly place the burner over the orifice could cause a fire to occur behind and beneath the valve panel, thereby
damaging the grill and making it unsafe to operate. Before cleaning, make sure the gas supply is CLOSED and control knobs are
in the "OFF" () position and the burners have cooled. Disconnect the hose and regulator from the gas cylinder.
CLEANING
STEP 1
To clean the grill burners:
1. Clean the exterior of the burner with a wire brush. Use a metal scraper for stubborn stains or debris.
2. Clear clogged ports with a straightened paper clip. Never use a wooden toothpick as it may break o and clog the port.
3. Check and clean burners / venturi tubes for insects and insect nests. A clogged tube can lead to a fire beneath, and behind
the main control panel.
STEP 2
WHEN TO LOOK FOR SPIDERS
You should inspect the burners at least twice a year or immediately after any of the following conditions occur:
1. Gas can be smelled in conjunction with burner flames appearing yellow.
2. The grill does not reach temperature.
3. The grill heats unevenly.
4. The burners make popping noises.

15
FIREBOX
Use warm soapy water to clean this area. Do not allow grease to build up.
DRAIN HOLE
The drain hole must be kept clear of grease and food particles to allow drippings to drain properly into the grease tray. This must
be done to maintain proper operation of your grill.
This grill, like all equipment, will look better and last longer if kept out of the weather when not in use.
To reinstall the burners:
1. Assemble ignitors to the burners.
2. Insert the burners onto the main burner gas valves.
3. Make sure the orifice tip (A) is inside the burner venturi (B).
4. Align the burner screws holes with the firebox holes, insert
screws and tighten.
5. Install heat tent on top of the firebox hole located in between
the burners.
CAUTION: Do not store propane cylinders in enclosed areas. When using a cover or moving the grill, always
wait until the grill has cooled for at least 30 minutes.
- Do not obstruct the flow of combustion and ventilation air.
- A clogged tube can lead to a fire beneath the appliance.
STEP 3
STORAGE
This unit must be kept in an area free from combustible materials, gasoline and other flammable vapors and
liquids. Make sure all openings into the grill body are free of blockages or debris and there are no objects or
materials blocking the flow of combustion or ventilation. Make sure the legs are in the up position when using
the grill. Check burner air inlet openings (behind the inlet guard on the right end of the grill body) for insect
nests or blockages. Make sure the slots in the burner tube are clear.
When the grill is not in use, turn the control knobs to the “OFF” () position. Close the propane cylinder valve
and detach regulator. If stored indoors, detach and leave the propane cylinder outdoors. Propane cylinders
must be stored out of reach of children.
A
B

16
Nexgrill warrants to the original consumer-purchaser only that this product (Model #820-0072) shall be free from defects in workmanship
and materials after correct assembly and under normal and reasonable home use for the periods indicated below beginning on the date
of purchase. The manufacturer reserves the right to require photographic evidence of damage, or the return of defective parts, postage
and or freight pre-paid by the consumer, for review and examination.
MAIN BURNERS: 5 year LlMlTED warranty against perforation.
COOKING GRID: 5 year LIMITED warranty; does not cover dropping, chipping, scratching, or surface damage.
ALL OTHER PARTS: 2 year LIMITED warranty (Includes, but is not limited to, valves, frame, housing, control panel, igniter, regulator, hoses)
*Does not cover chipping, scratching, cracking surface corrosion, scratches or rust.
Upon consumer supplying proof of purchase as provided herein, Manufacturer will repair or replace the parts that are proven defective
during the applicable warranty period. Parts required to complete such repair or replacement shall be free of charge to you except for
shipping costs, as long as the purchaser is within the warranty period from the original date of purchase. The original consumer-purchaser
will be responsible for all shipping charges of parts replaced under the terms of this limited warranty. This limited warranty is applicable
in the United States and Canada, is only available to the original owner of the product and is not transferable. Manufacturer requires
reasonable proof of your date of purchase. Therefore, you should retain your sales receipt and/or invoice. If the unit was received as a
gift, please ask the gift-giver to send in the receipt on your behalf, to the below address. Defective or missing parts subject to this limited
warranty will not be replaced without registration or proof of purchase. This limited warranty applies to the functionality of the product
ONLY and does not cover cosmetic issues such as scratches, dents, corrosions or discolouring by heat, abrasive and chemical cleaners or
any tools used in the assembly or installation of the appliance, surface rust, or the discolouration of stainless-steel surfaces. Surface rust,
corrosion, or powder paint chipping on metal parts that does not aect the structural integrity of the product is not considered a defect in
workmanship or material and is not covered by this warranty. This limited warranty will not reimburse you for the cost of any inconvenience,
food, personal injury or property damage. If an original replacement part is not available, a comparable replacement part will be sent. You
will be responsible for all shipping charges of parts replaced under the terms of this limited warranty.
ITEMS MANUFACTURER WILL NOT PAY FOR:
• Service calls to your home.
• Repairs when your product is used for other than normal, single-family household or residential use.
• Damage resulting from accident, alteration, misuse, lack of maintenance/cleaning, abuse, fire, flood, acts of God, improper installation,
and installation not in accordance with electrical or plumbing codes or use of products not approved by the manufacturer.
• Any food loss due to product failures.
• Replacement parts or repair labour costs for units operated outside the United States or Canada.
• Pickup and delivery of your product.
• Postage fees or photo processing fees for photos sent in as documentation.
• Repairs to parts or systems resulting from unauthorized modifications made to the product.
• The removal and/or reinstallation of your product.
• Shipping cost, standard or expedited, for warranty/non-warranty and replacement parts.
DISCLAIMER OF IMPLIED WARRANTIES; LlMlTATlON OF REMEDIES
Repair or replacement of defective parts is your exclusive remedy under the terms of this limited warranty. Manufacturer will not be
responsible for any consequential or incidental damages arising from the breach of either this limited warranty or any applicable implied
warranty, or for failure or damage resulting from acts of God, improper care and maintenance, grease fire, accident, alteration, replacement
of parts by anyone other than Manufacturer, misuse, transportation, commercial use, abuse, hostile environments (inclement weather, acts
of nature, animal tampering), improper installation or installation not in accordance with local codes or printed manufacturer instructions.
THlS LIMITED WARRANTY IS THE SOLE EXPRESS WARRANTY GIVEN BY THE MANUFACTURER. NO PRODUCT PERFORMANCE
SPECIFICATION OR DESCRIPTION WHEREVER APPEARING IS WARRANTED BY MANUFACTURER EXCEPT TO THE EXTENT SET FORTH
IN THlS LIMITED WARRANTY. ANY IMPLIED WARRANTY PROTECTION ARISING UNDER THE LAWS OF ANY STATE OR PROVINCE ,
INCLUDING IMPLIED WARRANTY OF MERCHANTABILITY OR FITNESS FOR A PARTICULAR PURPOSE OR USE, IS HEREBY LIMITED IN
DURATION TO THE DURATION OF THlS LIMITED WARRANTY.
Neither dealers nor the retail establishment selling this product has any authority to make any additional warranties or to promise remedies
in addition to or inconsistent with those stated above. Manufacturer’s maximum liability, in any event, shall not exceed the documented
purchase price of the product paid by the original consumer. This warranty only applies to units purchased from an authorized retailer and
or re-seller. NOTE: Some states and provinces do not allow an exclusion or limitation of incidental or consequential damages, so some of
the above limitations or exclusions may not apply to you; this limited warranty gives you specific legal rights as set for herein. You may also
have other rights, which vary from province to province.
If you wish to obtain performance of any obligation under this limited warranty, you should write to:
Nexgrill Customer Relations
14050 Laurelwood Place,
Chino, CA 91710
All consumer returns, parts orders, general questions, and troubleshooting assistance can be acquired by calling
customer service department at: 1-866-984-7455 (USA), 1-800-648-5864 (Canada), or 1-909-718-1945 (International).
Languages spoken: English, French, and Spanish 8 a.m.-5 p.m. PST Monday-Friday.
WARRANTY STATEMENT

18
NO.
PART
DESCRIPTION
WARRANTY
COVERAGE
QTY NO.
PART
DESCRIPTION
WARRANTY
COVERAGE
QTY
1
Main lid
5 years
*
▲
(Material)
2 years
▲
(Paint)
1
15
Control knob 2 years 2
2
Temperature gauge 2 years 1
16
Grease cup heat shield 2 years 1
3
Main lid screw 2 years 2
17
Main gas valve 2 years 2
4
Main lid handle seat,
left
2 years 1
18
Main manifold bracket 2 years 1
5
Main lid handle seat,
right
2 years 1
19
Lighting rod screw 2 years 2
6
Main lid handle 2 years 1
20
Lighting rod 2 years 1
7
Lid stopper 2 years 2
21
Regulator 2 years 1
8
Flame tamer 2 years 2
22
Cart leg heat insulator,
front right
2 years 1
9
Main burner, left 5 years 1
23
Cart leg heat insulator,
rear right
2 years 1
10
Main burner, right 5 years 1
24
Cart leg heat insulator,
front left
2 years 1
11
Cooking grid 5 years 2
25
Cart leg heat insulator,
rear left
2 years 1
12
Firebox
5 years
*
▲
(Material)
2 years
▲
(Paint)
1
26
Grease box 2 years 1
13
Control panel heat
shield
2 years 1
27
Grease box support
base
2 years 1
14
Main control panel 2 years 1
28
Cart leg 2 years 2
TROUBLESHOOTING
PROBLEMS WHAT TO DO
Grill will not light
Burner flame is
yellow or orange
in conjunction with
gas odor.
Low heat with the
control knob on
the "HIGH" setting.
1. Check for spiders and insects.
2. Call our customer service department at: 1-866-984-7455 (USA), 1-800-648-5864 (Canada), or
1-909-718-1945 (International). Languages spoken: English, French, and Spanish 8 a.m.-5 p.m. PST
Monday-Friday. You can also reach us by email at: [email protected]
1. Make sure the grill area is clear of dust.
2. Make sure the burner and orifice are clean.
3. Check for spiders and insects.
4. Is there adequate gas supply available?
5. Is the grill being preheated for 5-10 minutes?
1. Check to see if the liquid propane cylinder is empty.
2. Check burner ports for any blockage. Use a paper clip to clear plugged ports.
3. Check the gas orifice on the burner for an obstruction. If orifice is blocked, clean with a needle.
*
NO RUSTTHROUGH OR BURNTHROUGH OF ALUMINUM CASTING.
▲
EXCLUDING FADING OR DISCOLORATION.

29
INSTRUCTIONS D'UTILISATION
AVANT L'ALLUMAGE
CET APPAREIL DE CUISSON EST CONÇU POUR UN USAGE EXTÉRIEUR UNIQUEMENT ET NE DOIT
PAS ÊTRE UTILISÉ DANS UN BÂTIMENT, UN GARAGE OU TOUT AUTRE ENDROIT FERMÉ.
TROUVER UNE SURFACE PLANE OÙ PLACER LE GRIL.
ÉTAPE 1
CONSIGNES DE DÉPLACEMENT
Attention : Ne jamais déplacer le gril lorsque les brûleurs sont allumés ou le gril est encore chaud.
Vérifier que les brûleurs sont éteints (position O). Débrancher la conduite de gaz de la bouteille de propane
et du gril. Attendre au moins 30 minutes que le gril refroidisse complètement. Fermer et verrouiller le
couvercle. Fermez le couvercle. Transporter le gril par les poignées latérales.
N.B. : Il est recommandé de laisser le plateau à graisse en place, au bas du gril, puisque de la graisse
pourrait encore s’égoutter de l’orifice de vidange pendant le transport.
RETIRER LA CONDUITE DES ATTACHES À L'AVANT DU
BARBECUE.
CONNECTER À UN RÉSERVOIR.
ÉTAPE 2
ÉTAPE 3

Distributed by:
Costco Wholesale Corporation
P.O. Box 34535
Seattle, WA 98124-1535
USA
1-800-774-2678
www.costco.com
©2019 NEXGRILL INDUSTRIES, INC.
CHINO, CA. 91710
WWW.NEXGRILL.COM
18009138999
Made In Taiwan / Fabriqué en Taïwan / Hecho en Taiwán
®
/