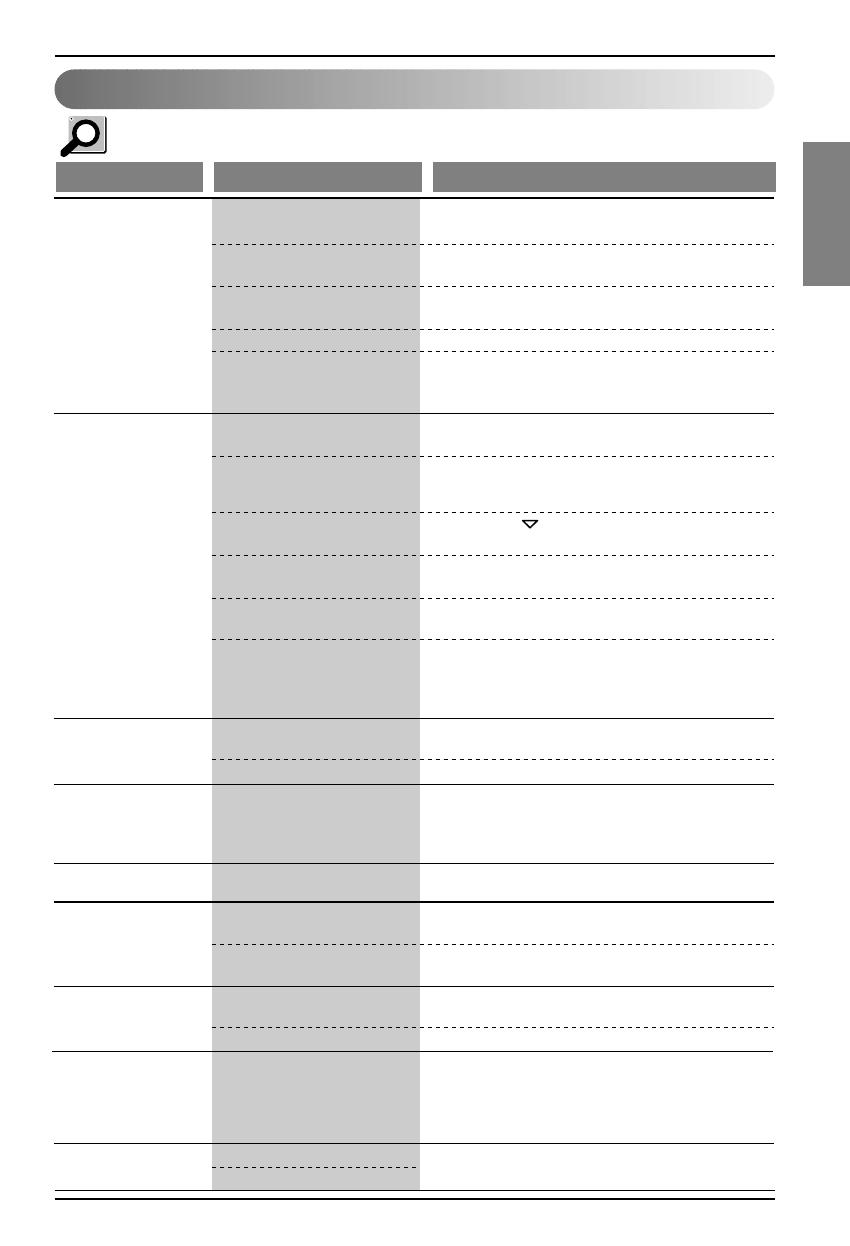
LG LD651EBL Owner's manual

Category
Dehumidifiers
Type
Owner's manual
OWNER’S MANUAL
DEHUMIDIFIER
Please read this manual carefully before operating
your set and retain it for future reference.
P/NO:MFL63261215
www.lgappliances.com
MODEL: LD651EBL
2 Dehumidifier
Dehumidifier Owner’s Manual
TABLE OF CONTENTS
FOR YOUR RECORDS
Write the model and serial numbers here:
Model #
Serial #
You can find them on a label on the side of each unit.
Dealer's Name
Date Purchased
Staple your receipt to this page in the event you need
it to prove date of purchase or for warranty issues.
READ THIS MANUAL
Inside you will find many helpful hints on how to use
and maintain your dehumidifier properly. Just a little
preventive care on your part can save you a great deal
of time and money over the life of your dehumidifier.
You'll find many answers to common problems in the
chart of troubleshooting tips. If you review our chart of
Troubleshooting Tips first, you may not need to call
for service at all.
PRECAUTION
Contact the authorized service technician for
repair or maintenance of this unit.
• Contact the installer for installation of this unit.
The dehumidifier is not intended for use by young
children or invalids without supervision.
Young children should be supervised to ensure
that they do not play with the dehumidifier.
When the power cord is to be replaced, replacement
work shall be performed by authorized personnel
only using only genuine replacement parts.
Safety Precautions .......................3
Prior to Operation .........................7
Instruction .....................................8
Electrical Safety ............................9
Operating Instructions ...............11
Installation...................................13
Maintenance ................................14
Safety Precautions
Owner’s Manual 3
ENGLISH
Read all instruction bef
ore using
ore using
To prevent injury to the user or other people and property damage, the following instructions must be followed.
Incorrect operation due to ignoring instructions will cause harm or damage; the seriousness is classified by the
following indications.
Meanings of symbols used in this manual are as shown below.
WARNING
This symbol indicates the possibility of death or serious injury.
CAUTION
This symbol indicates the possibility of injury or damage to property only.
Be sure not to do.
Be sure not to do.
Be sure to f
Be sure to f
ollo
ollo
w the instruction.
w the instruction.
W
W
ARNING
ARNING
Plug in the power plug
properly.
• Otherwise, it will cause electric
shock or fire.
Do not operate or stop the unit
by inserting or pulling out the
power plug.
• It will cause electric shock or fire.
Do not damage or use an
unspecified power cord.
• It will cause electric shock or fire.
Safety Precautions
Installation
Operation
Do not place the power cord
near a heater.
• It may cause fire and electric
shock.
Do not use the power cord near
flammable or combustibles
materials such as gasoline,
benzene,paint thinner, etc.
• It may cause explosion or fire.
Do not disassemble or modify
products.
• It may cause electric shock and
failure.
NO
Gasolin
B
u
c
k
e
tf
u
ll
B
u
c
k
et
f
ull
4 Dehumidifier
Safety Precautions
Do not modify power cord
length.
• It will cause electric shock or fire.
Do not share the outlet with
other appliances.
• It will cause electric shock or fire.
Always plug into a grounded
outlet.
• No grounding may cause electric
shock.
Unplug the unit if strange
sounds, odors, or smoke come
from it.
• Otherwise it may cause a fire or
an electric shock.
Do not use the socket if it is
loose or damaged.
• It may cause fire and electric
shock.
Do not operate with wet hands
or in damp environment.
• It may cause electric shock.
Ventilate before operating
defumidifier when gas goes out.
• It may cause explosion, fire, and
burn.
Do not clean the dehumidifier
with water.
• Water may enter the unit and
degrade the insulation. It may
cause an electric shock.
Turn off the power and breaker
first when cleaning the unit.
• Since the fan rotates at high
speed during operation, it may
cause injury.
If water enters the product, turn off the
dehumidifier's power switch. Contact service
center after taking the power-plug out from the
socket.
• It will cause machine failure or electric shock.
Hum
di
ty
C
o
n
t
r
ol
B
u
c
k
etf
ull
Auto
i
H
u
m
i
dit
y
C
o
n
t
r
ol
B
u
c
k
e
t
f
u
ll
A
u
to R
es
t
H
u
mi
di
t
y
C
on
trol
B
u
c
k
e
tf
u
ll
B
u
c
k
e
tf
u
ll
H
u
mi
di
t
y
C
on
trol
B
u
c
k
e
tf
u
ll
Fan
Speed
Timer
H
i
g
h
Lo
w
4hr. O
n
/Of
f
/
Off
H
u
mi
di
t
y
C
on
trol
B
u
c
k
et
f
ull
2hr. O
n
/
Safety Precautions
Owner’s Manual 5
Installation
Never touch the metal parts of the
unit when removing the filter.
• They are sharp and may cause
injury.
Do not block the inlet or outlet.
• It may cause failure of appliance or
performance deterioration.
Hold the plug by the head when
taking it out.
• It may cause electric shock and
damage.
Turn off the main power switch
when not using the dehumidifier
for a long time.
It will waste power consumption in
vain and it may cause an accident.
Secure wheels with blocks to
prevent unit from falling when
installed on a table or shelf.
• It may damage the dehumidifier
or cause other damage or injury.
Make sure the dehumidifier is
the correct size for the area you
want to dehumidify.
• It is not designed to dehumidify
the entire house.
Install the dehumidifier properly on a
floor, table, or shelf that is level and
strong enough to support it when the
water collection bucket is full.
• It should withstand around
90 lbs (40kg) of weight.
Close all doors, windows and
other outside openings to the
room.
• The dehumidifier must be
operated in an enclosed area to
be most effective.
B
u
cket
ful
l
Timer
4 hr. On
/O
ff
2h
r.O
n/Off
Fan
Speed
Timer
H
i
g
h
L
o
w
4hr. O
n
/
O
f
f
/
Off
2hr. O
n
/
Fan
Speed
Timer
H
i
g
h
Lo
w
4hr. O
n
/
O
f
f
/
O
f
f
H
u
mi
di
t
y
C
on
trol
B
u
c
k
e
t
f
u
ll
2hr. O
n
/
ENGLISH
CA
CA
UTION
UTION
6 Dehumidifier
Safety Precautions
Do not put a pet or house plant
where it will be exposed to
direct air flow.
• This could injure the pet or plant.
Do not use this appliance for
special purposes such as pets,
foods, precision machinery, or
art objects.
• It is a general use appliance not
precision equipment.
Do not use the water collected
in the bucket for drinking
purposes.
• It is not sanitary and could cause
illness or personal injury.
Always insert the filter securely.
Clean it every two weeks.
• Operation without filters will cause
failure.
Ti
m
e
Fan
Spee
d
Timer
H
i
g
h
L
o
w
4hr. O
n
/
O
f
f
/
O
f
f
2
hr. O
n
/
Operation
Use a soft cloth to clean. Do not
use wax, thinner, or a strong
detergent.
• The appearance of the
dehumidifier may deteriorate,
change color, or develop surface
flaws.
Be sure to replace the bucket
properly after emptying to
prevent water from collecting
on the floor.
• Otherwise, it will cause property
damage.
• Low temperatures could cause
coils to frost.
W
ax
Thinner
4
hr. O
n
/
O
f
f
/
O
f
f
2
hr. O
n
/
H
u
m
i
di
t
y
C
o
n
t
ro
l
B
u
c
k
et
f
u
l
l
The normal
model may not operate
efficiently if the room temperature
is below 65°F(18°C).
The Low Temperature model may
not operate efficiently if the room
temperature is below 42°F(6°C).
ENGLISH
Owner’s Manual 7
Prior to Operation
Prior to Operation
1. Consult an installation specialist for installation.
2. Plug in the power plug properly.
3. Use a dedicated circuit.
4. Do not use an extension cord.
5. Do not start/stop operation by plugging/unplugging the power cord.
6. If the cord/plug is damaged, only replace it with an authorized replacement part.
1. Being exposed to direct airflow for an extended period of time could be hazardous to your
health. Do not expose occupants, pets, or plants to direct airflow for extended periods of time.
2. Ventilate the room when the dehumidifier is used with other heating devices. Otherwise the
oxygen supply may be inadequate.
3. Do not use this dehumidifier for non-specified special purposes (e.g. preserving precision
devices, food, pets, plants, and art objects). Such usage could damage the items.
1. Do not touch the metal parts of the unit when removing the filter. Injuries can occur when
handling sharp metal edges.
2. Do not use water to clean inside the dehumidifier. Exposure to water can destroy the insulation,
leading to possible electric shock.
3. When cleaning the unit, first make sure that the power and breaker are turned off. The fan
rotates at a very high speed during operation. There is a possibility of injury if the unit’s power
is accidently turned on while the interior of the unit is being cleaned.
For repair and maintenance, contact your authorized service dealer.
Preparing for operation
Usage
Cleaning and maintenance
Service
8 Dehumidifier
Instruction
Instruction
This symbol alerts you to the risk of electric shock.
This symbol alerts you to hazards that could cause harm to the
dehumidifier.
This symbol indicates special notes.
NOTICE
WARNING: This appliance should be installed in accordance with national
wiring regulations. This guide acts as a guide to help to explain product
features.
Features
Symbols used in this Manual
Rear Grille
Control Panel
Front Grille
Handle
Cabinet
Power Cord
A
uto Restart
Air Filter
Water Bucket
Electrical Safety
WARNING: This appliance must be properly grounded.
The power cord of this appliance is equipped with a three-prong grounding plug.
To minimize the risk of electric shock, use the plug with a standard three-slot
grounding wall power outlet. If the power outlet does not include a grounding slot,
have a qualified electrician replace the outlet before you use the dehumidifier.
WARNING: Do not cut or remove the grounding prong from the
power plug.
WARNING: Attaching the adapter ground terminal to the wall
receptacle cover screw does not ground the appliance unless the
cover screw is metal and not insulated, and the wall receptacle is
grounded through the house wiring.
WARNING: If you have any doubt whether the dehumidifier is
properly grounded, have the wall receptacle and circuit checked by
a qualified electrician.
Preferred method
Ensure proper ground
exists before use
TEST BEFORE EACH USE!
1.PRESS RESET BUTTON.
2.PLUG LCDI INTO POWER
RECEPTACLE.
3.PRESS TEST BUTTON,
RESET BUTTON SHOULD
POP UP.
4.PRESS RESET BUTTON
FOR USE.
DO NOT USE IF ABOVE
TEST FAILS.WHEN
GREEN LIGHTISON,
ITIS WORKING
PROPERLY!
WARNING:
RESET
TEST
ENGLISH
Owner’s Manual 9
Electrical Safety
Temporary Use of an Adapter
We strongly discourage the use of an adapter due to potential safety hazards.
For temporary connections, use only a UL-listed adapter, available from most local
hardware stores. To disconnect the power cord from the adapter, use one hand on
each to avoid damaging the ground terminal. Avoid frequently unplugging the power
cord as this can lead to eventual ground terminal damage.
WARNING: Never use the appliance with a broken adapter.
We strongly discourage the use of an extension cord due to potential safety
hazards.
Temporary Use of an Extension Cord
Temporary method
Adapter Plug
Receptacle Cover
Metal Screw
10 Dehumidifier
Electrical Safety
Operating Instructions
Owner’s Manual 11
CONTROL PANEL HAS FOLLOWING
1. POWER key
--- Pressing this key once turns the dehumidifier "ON" and pressing again turns the
dehumidifier "OFF".
2. HUMIDITY keys --- Are used to select the desired humidity setting.
• : Used to raise the desired humidity setting.
• : Used to lower the desired humidity setting.
• The desired humidity can be selected within a range of 35% to 70% RH in increments of 5%.
• If you press the key once again at 35%RH, "On" mode is selected. In "On" mode the unit operates
continuously, regardless of humidity conditions.
3. HUMIDITY SETTING display --- Displays the selected humidity setting.
4. SPEED key --- Is used to set the fan speed as "High" or "Low".
• Pressing this key changes the fan speed from High Low High.
• The selected fan speed is indicated by indicator lights marked "High" and "Low".
5. TIMER key --- It is used to select the type of operation.
• Select either 2 or 4 hr. On/Off for cycled operation.
In this case the unit will run for 2 or 4 hours, and then shut off completely for 2 or 4 hours. The cycle will
repeat until you change the setting.
• When TIMER key is pressed, the TIMER indicator lights shift from 2hr.On/Off to 4hr.On/Off.
6. BUCKET FULL Indicator --- This light glows when the bucket is full and needs to be emptied. It also
glows, when the bucket is not properly positioned. When bucket full indicator light glows, the compressor
and fan will turn "OFF".
7. AUTO RESTART --- Once the power is restored after a power outage, the unit begins to operate at its
previous operation setting. The fan will run by default for 3 minutes. After 3 minutes both fan and
compressor will be ON or OFF depending on the humidity conditions.
TO OPERATE THE DEHUMIDIFIER:
1. Plug the power cord into the electrical outlet. Press the POWER key.
2. Set the Humidity control anywhere between 35% to 70% for normal operation.
• For less humidity, press the HUMIDITY CONTROL key.
• For higher humidity, press the HUMIDITY CONTROL key.
3. Press the TIMER key, to set the amount of time for which you want the unit to cycle On and Off. The time
can be set for 2 hours or 4 hours.
4. If you want to change the fan speed, press the FAN SPEED key. Each time the FAN SPEED key is
pressed the fan speed changes as High Low High.
5. Press the POWER key to stop the unit manually.
Water bucket must be properly installed.
• The dehumidifier will not run if the bucket is not properly installed.
• The dehumidifier shuts off when the desired humidity setting is reached.
NOTICE
5
4
3
7
2
6
1
Auto Restart
12 Dehumidifier
Operating Instructions
Water level
control switch
Automatic shut off
Disposing of collected water
The dehumidifier will turn off automatically when the bucket is full,
or when the bucket is removed or not replaced in the proper
position.
The bucket must be replaced in the proper position for the
dehumidifier to work. The light will be on and the
dehumidifier will not run if the bucket is not in the proper
position.
1. Empty the bucket manually.
When the bucket is full, pull out by
grasping the handle and empty it
into a large sink or tub and then
replace it properly.
Do not remove while
operating the dehumidifier.
It can cause water to drop on the
base pan or the floor.
Empty the bucket when the indicator
light turns on.
It is advisable to carry the
bucket by supporting it from the
bottom as well as by the handle.
Carrying by only the handle may
cause the handle or bucket cover to
break.
NOTICE
NOTICE
2. Attach a length of garden hose to the threaded drain hose
connection to carry water to the drain.
2. Remove the drain-hole cover.
(Fig2)
1. Connect a garden hose to the
threaded drain hose connector.
(Fig1)
4. Press the hose down and make
sure the “Arrow” is pointing upward.
(Fig4-1,4-2)
The hose attachment will
accept a standard garden hose
fitting.
Do not over tighten the hose when
connecting it to the hose connector,
use a rubber washer and tighten by
hand firmly without stripping the
plastic threads.
NOTICE
When being attached to hose connector drain hose connection, do not bend or kink the hose.
The hose should lie flat from the dehumidifier to the drain.
3. Push hose connector tightly into
the drain-hole on Rear Grille.
Remove the bucket to ensure the
hose connector connecting with
the drain pipe on the drain pan.
(Fig3-1,3-2)
5.The connection should be resemble
Fig5 when complete.
HOSE
CONNECTOR
Fig1
DRAIN HOLE COVER
Fig2
Fig3-2
Fig3-1
Fig4-1
Fig4-2
Fig5
TAKE OUT
INSERT STOPPER
INTO SLOT
HOSE
CONNECTOR
DRAIN
PAN
Auto Restart
Auto Restart
Auto Resta
rt
Auto Restart
ENGLISH
Owner’s Manual 13
Installation
1. Allow at least 12 inches of space on all sides of the unit for good air circulation.
2. Install your dehumidifier on a floor, table, or shelf. When installing the dehumidifier
on a table or shelf, make sure the table or shelf is strong enough to support the weight
of the dehumidifier with a full bucket. Do not sit or stand on the dehumidifier.
Secure wheels with blocks to prevent unit from falling when installed on a table or shelf.
The height of a table or shelf might provide a better position from
which to handle the bucket and help prevent icing of the coils due to
colder air near the floor (such as in a basement.)
3. Lift the bucket and place it in the dehumidifier, making sure the slots on
the bottom side of the bucket are positioned correctly.
4. Rollers let you move the dehumidifier easily.
1. Pull out the bucket cover. 2.
Brush off the residue in the bucket.
Clean the bucket by
wiping with a cloth dampened
in a mild detergent solution.
3. Close the cover.
Push the tabs on the top
of the bucket when installing
the bucket.
NOTICE
NOTICE
Use the dehumidifier in a
basement to help prevent
moisture damage.
Use the dehumidifier in laundry
drying, bathing, and dishwashing
areas which have excessive
moisture.
Use the dehumidifier to prevent
moisture damage where books
are stored.
Installation
Installing the dehumidifier properly
Choosing the proper location for your dehumidifier
The cleaning of bucket
12"
12"
Auto Restart
A
uto Restart
NOTICE
14 Dehumidifier
Maintenance
Your dehumidifier is designed to serve you year-
round. It needs practically no attention. However,
you should check your dehumidifier annually.
You may want an Authorized Service Center to
perform this annual checkup. (Cost of the inspection
is the owner’s responsibility.)
Cleaning the front case, bucket
and cabinet
Clean the front case and the cabinet with a soft
cloth, warm water, and a mild detergent.
Clean the grille with a vacuum attachment or brush.
Do not use bleach or abrasives.
Cleaning the air filter
1. Remove water bucket from the cabinet.
Pull out the air filter as shown above.
2. Wash air filter with warm water and a mild
detergent. Rinse and dry it.
Replace it in place.
Electrical Shock Hazard
Disconnect power supply cord from receptacle
before performing any maintenance.
Be careful when cleaning the coils.
Fins are sharp.
Failure to follow the above precautions could result
in electrical shock or personal injury.
Maintenance
Auto Restart
Maintenance and Service
ENGLISH
Owner’s Manual 15
Water bucket is full.
Bucket is not installed.
Airflow is restricted.
Doors and windows are open.
Make sure the dehumidifier plug is pushed
completely into the outlet.
Check the house fuse or circuit breaker box
and replace the fuse or reset the breaker.
The dehumidifier automatically turns off
when this occurs. Empty the bucket.
Make sure the bucket is in the right place.
When first installed, allow at least 3 or 4
days to maintain the desired dryness.
Make sure there are no curtains, blinds or
furniture blocking the front or back of the
dehumidifier.
Press the Humidity Control button to
lower the humidity.
Check that all doors, windows and other
openings are securely closed.
Install the dehumidifier away from the dryer.
The dryer should be vented to the outside.
The unit will not operate satisfactorily if the
The low temperature model will continuously
cycle up to temperature of 42°F(6°C).
room temperature is below 65°F(18 °C).
Check with your dealer to see if the capacity
is adequate.
Close all doors and windows to the outside.
This is normal. Frost will usually disappear
within 60 minutes.
This is normal.
Check the hose if one is attached.
See Removing and Emptying The Water
Bucket.
Dehumidifier
does not start
Dehumidifier
does not dry the
air as it should
Dehumidifier runs
too much
Frost appears on
the coils
Fan noise
Water on floor
In case the Room
humidity is less than
selected humidity setting.
The dehumidifier power
cord is unplugged.
The fuse is blown or circuit
breaker is tripped.
Did not allow enough time
to remove the moisture.
The Humidity Control may not
be set to low Humidity.
Doors and windows may
not be closed tightly.
Clothes dryer may be blowing
moisture-laden air into the room.
Room temperature is too
low.
Area to be dehumidified is
too large.
Air is moving through the
dehumidifier.
Drain hose connection
may be loose.
Water bucket is not in all
the way.
Dehumidifier has been
recently turned on or room
temperature is below 65°F
(18°C).
Change the humidity set to lower limits.
Dehumidifier
operates
continuously
Check if the unit is
operating in "ON" mode.
Room Humidity is high
Change the humidity setting.
Humidity Key not
operates or
Dehumidifier powers
on automatically after
power off
Room temperature is
below 32°F(0°C).
Keep room temperature above 32°F(0°C).
Display show"67,24"
Fan motor failure
Inlet air is blocked.
Make sure the dehumidifier powers off,then
contact with LG Customer Information Center.
oD oT tahWsesuaC elbissoPmelborP
The dehumidifier may be operating abnormally when:
Troubleshooting
16 Deshumidificador
Manual de Instalación & Operación Deshumidificador
ÍNDICE
PARA SUS REGISTROS
Escriba aquí el número de modelo y serie:
Modelo #
Serie #
Puede encontrarlos en la etiqueta situada en el lateral de cada unidad.
Nombre del distribuidor
Fecha de compra
Grape su recibo en esta página por si lo necesita para comprobar la
fecha de compra o temas relacionados con la garantía.
LEA ESTE MANUAL
En su interior encontrará muchos consejos útiles sobre la utilización
y el mantenimiento adecuado de su deshumidificador. Una simple
atención preventiva por su parte puede ahorrarle mucho tiempo y
dinero a lo largo de la vida de su deshumidificador.
Encontrará muchas respuestas a los problemas más comunes en el
cuadro de consejos para la solución de problemas. Si en primer lugar
revisa nuestro cuadro de consejos para la solución de problemas,
es posible que no tenga necesidad de llamar al servicio técnico.
PRECAUCIÓN
• Póngase en contacto con un técnico del servicio
autorizado para las reparaciones o el mantenimiento
de esta unidad.
• Póngase en contacto con un instalador para la
instalación de esta unidad.
• El deshumidificador no está diseñado para que lo
utilicen sin supervisión niños o personas con las
facultades mentales mermadas.
• Debe vigilarse a los niños para asegurarse de que no
juegan con el deshumidificador.
• Cuando haya que sustituir el cable de alimentación,
debe realizar el trabajo de sustitución personal
autorizado utilizando únicamente piezas de recambio
originales.
Precauciones de seguridad .......17
Antes de la utilización ................21
Instrucción...................................22
Seguridad eléctrica.....................23
Instrucciones de
funcionamiento ...........................25
Instalación ...................................27
Mantenimiento .............................28
Precauciones de seguridad
Manual de usuario 17
LEA EST
LEA EST
AS INSTR
AS INSTR
UCCIONES ANTES DE USAR
Para evitar lesiones al usuario o a otras personas y daños materiales, debe seguir las siguientes instrucciones.
El uso incorrecto ocasionado al ignorar las instrucciones puede causar lesiones o daños. La gravedad se
clasifica mediante las siguientes indicaciones.
A continuación se muestran los significados de los símbolos utilizados en este manual.
ADVERTENCIA
Este símbolo indica la posibilidad de muerte o lesiones graves.
ATENCIÓN Este símbolo indica la posibilidad de lesiones o daños sólo materiales.
No lo haga.
Siga las instrucciones.
AD
AD
VER
VER
TENCIA
TENCIA
Enchufe la clavija
correctamente.
De lo contrario, puede ocasionar
un incendio o una descarga
electrica.
No encienda ni apague la
unidad insertando o retirando
la clavija.
• Causará una descarga eléctrica
o incendio
No dañe el cable ni utilice un
cable de alimentación no
especificado.
• Podría producirse una descarga
eléctrica o incendio.
No coloque el cable de
alimentación cerca de una
estufa.
• Podría producirse un incendio y
una descarga eléctrica.
No utilice el cable de alimentación
cerca de gas inflamable o
combustibles, como gasolina,
benceno, disolvente, etc.
• Podría producirse una explosión o
incendio.
No desmonte ni modifique los
productos.
• Puede causar una descarga
eléctrica
Instalación
Funcionamiento
Gasolin
B
uc
k
e
t
f
ul
l
Bu
c
k
et
f
ul
l
NO
Precauciones de Seguridad
ESPAÑOL
18 Deshumidificador
Precauciones de seguridad
No modifique la longitud del
cable de alimentación.
• Causará una descarga eléctrica o
incendio.
No comparta el enchufe con
otros aparatos.
• Causará una descarga eléctrica o
incendio.
Realice siempre la conexión a
un enchufe con toma de tierra.
• Si no hay toma de tierra, podría
producirse una descarga
eléctrica.
Desenchufe la unidad si emite un
sonido extraño, olores o humo.
De lo contrario, puede ocasionar un
incendio o una descarga electrica.
No utilice el enchufe si está
flojo o dañado.
• Podría producirse una descarga
eléctrica o incendio.
No utilice la unidad con las manos
mojadas o en un entorno húmedo.
• Puede causar una descarga
eléctrica o incendio.
Si observa que entra agua en el producto, apague
el interruptor de contacto del deshumidificador.
Después de retirar la clavija del enchufe, póngase
en contacto con el centro de servicio técnico.
• Causara fallo de la maquina o descarga electrica.
Si hay una fuga de gas, ventile
la habitación antes de utilizar el
deshumidificador.
• Podría producirse una explosión,
incendio y quemaduras.
No limpie el deshumidificador
con agua.
• El agua podría introducirse en la
unidad y degradar el aislamiento.
Podría producirse una descarga
eléctrica.
Apague el aparato y el diferencial
primero al limpiar la unidad.
• Como el ventilador gira a alta
velocidad durante el
funcionamiento, podrían
producirse lesiones.
Hum
di
ty
C
on
t
r
ol
B
u
c
k
e
tf
u
l
l
Au
to
i
H
u
m
i
d
it
y
C
o
n
t
r
o
l
B
u
c
k
et
fu
l
l
A
u
t
o
Rest
H
u
mi
d
i
t
y
C
o
n
tr
o
l
B
u
c
k
e
t
f
u
ll
Buck
e
tf
u
l
l
H
u
m
i
di
t
y
C
o
n
tro
l
B
u
cket
f
u
ll
F
a
n
S
p
eed
T
imer
H
i
g
h
Lo
w
4
hr. O
n
/
O
f
f
/
O
ff
H
um
i
d
it
y
C
o
n
t
r
o
l
Buck
e
t
f
u
l
l
2hr. O
n
/
Precauciones de seguridad
Manual de usuario 19
ESPAÑOL
A
A
TENCIÓN
TENCIÓN
Instalación
No toque nunca las partes
metálicas de la unidad cuando
retire el filtro.
• Son afiladas y pueden producir
lesiones.
No bloquee la entrada ni la
salida.
• Puede causar fallas de aplicación
o deterioro en su rendimiento.
Sujete la clavija por la cabeza
cuando la saque.
• Podría producirse una descarga
eléctrica o daños.
Apague el interruptor de contacto
cuando no vaya a utilizar el
deshumidificador durante un
largo periodo de tiempo.
• Se gastará el consumo eléctrico
en vano y puede causar
accidentes.
Asegure las ruedas con bloques
para evitar que la unidad se
caiga cuando esta instalada
sobre una mesa o estanteria.
• Podría dañarse el
deshumidificador o producir otros
daños o lesiones.
Asegúrese de que el
deshumidificador tiene la
capacidad adecuada para la
zona que desea deshumidificar.
• No está diseñado para enfriar la
casa entera
Instale el deshumidificador
correctamente sobre el suelo, una
mesa o una estanteria lo
suficientemente nivelada y fuerte
como para soportar su peso cuando
la cubeta colectora de agua este llena.
• El peso a soportar es de
aproximadamente 90 libras
(40 kg).
Cierre todas las puertas,
ventanas y aberturas al exterior
de la habitación.
• Para una mayor eficacia, el
deshumidificador debe utilizarse
en una zona cerrada.
Bu
c
ke
t ful
l
Ti
mer
4
hr
.
O
n
/
O
ff
2
h
r
.O
n
/Of
f
Fa
n
S
p
e
ed
T
i
me
r
H
i
g
h
L
o
w
4
hr. O
n
/
O
f
f
/
O
f
f
H
u
m
i
d
i
t
y
C
o
n
t
rol
B
u
c
k
e
t
f
u
l
l
2hr
. O
n
/
Fa
n
Sp
eed
Tim
e
r
H
i
g
h
L
o
w
4
hr.
O
n
/
O
f
f
/
Of
f
2hr. O
n
/
20 Deshumidificador
Precauciones de seguridad
No coloque ningún animal o
planta expuestos al flujo de aire
directo.
• Esto podria lesionar al animal o
danar la planta.
No utilice este aparato para una
finalidad especial como la
deshumidificación de alimentos,
animales, maquinaróa de
precisión u objetos artisticos.
• Es un aparato de uso general, no
un equipo de precision.
No utilice el agua acumulada en
la cubeta para beber.
• No es salubre y podría causar
enfermedades o poner en riesgo
su salud.
Inserte siempre el filtro
correctamente. Límpielo una
vez cada dos semanas.
• La utilización sin filtros podría
producir un mal funcionamiento.
Ti
m
e
Fa
n
S
p
e
e
d
Tim
e
r
H
i
g
h
L
o
w
4
hr. O
n
/
O
f
f
/
O
f
f
2
hr
.
O
n
/
Funcionamiento
Utilice un paño suave para
limpiar la unidad. No utilice
cera, disolvente ni un
detergente fuerte.
• Podría deteriorarse el aspecto del
deshumidificador, cambiar el
color o producirse desperfectos
en su superficie.
Asegurese de reemplazar la
cubeta debidamente cuando vaya
a vaciarla para evitar que el agua
caiga al suelo.
• De lo contrario, se causaran
danos a la propiedad.
• Las bajas temperaturas podrían
producir escarcha en los
serpentines.
W
ax
Thinner
4
hr. O
n
/
O
f
f
/
O
f
f
2hr. O
n
/
H
u
mi
d
i
t
y
C
on
t
r
o
l
B
u
c
k
e
t
f
u
ll
El modelo normal tal vez no funcione con
eficiencia si la temperatura de la sala
está por debajo de los 65°F(18°C).
El modelo de baja temperatura tal
vez no funcione con eficiencia si
la temperatura de la sala está por
debajo de los 42°F(6°C).
1 / 1

LG LD651EBL Owner's manual

Category
Dehumidifiers
Type
Owner's manual

Ask a question and I''ll find the answer in the document

Finding information in a document is now easier with AI

Ask the document

in other languages