Grundig M 2300 DAB+ NFC Owner's manual
- Category
- Home audio sets
- Type
- Owner's manual
This manual is also suitable for

EN
MINI HIFI SYSTEM
M 2300 DAB+

ENGLISH
2
CONTENTS
----------------------------------------------------------------------------------------------------------------------------------
3 SETUP AND SAFETY
3 Caution: high-frequency radiation
4 OVERVIEW
4 The hi-fi system controls
7 The remote control
9 The hi-fi system displays
10 CONNECTION AND PREPARATION
10 Connecting the loudspeakers
10 Connecting the antenna
10 Connecting an MP3 player or a USB
memory stick
11 Connecting external devices
11 Connecting the headphones
11 Connecting an external recording device
12 Connecting the power cord
12 Inserting batteries into the remote control
13 SETTINGS
13 Tuning and storing DAB radio stations
14 Tuning and storing FM radio stations
14 Setting the time automatically
15 Setting the time manually
16 GENERAL FUNCTIONS
16 Switching on and off
16 ECO mode
16 Automatic switch-off
16 Adjusting the volume
16 Selecting sound settings
16 Changing the bass or treble
16 Loudness
16 Muting
16 Displaying the time
16 Setting the brightness of the display
17 TUNER MODE
17 DAB tuner mode
18 FM tuner mode
19 EXTERNAL DATA MEDIA MODE
19 Using CDs
19 Operation with an MP3 player or USB
memory stick
19 Inserting/connecting music data media
20 Playback
20 Displaying track information (for MP3/
WMA)
21 Repeat functions
21 Playing back tracks in random order
(Random)
21 Playing the start of each track (intro)
22 Creating a playlist
23 BLUETOOTH MODE
23 Compatible with the following devices
23 Selecting the Bluetooth input source
23 Finding and connecting a Bluetooth auxil-
iary device
23 Activating a Bluetooth auxiliary device
that is logged on
23 Playback from the Bluetooth auxiliary
device
23 Logging out the Bluetooth auxiliary device
24 NFC MODE
24 USING EXTERNAL DEVICES
24 Listening to the audio signal from an
external device
24 Recording on an external recording
device
25 TIMER MODE
25 Timer
25 Sleep timer
26 SPECIAL FUNCTIONS
26 Delete settings (Reset)
26 Selecting the software version
27 INFORMATION
27 Cleaning the hi-fi system
27 Cleaning the CD unit
27 Technical data
28 Environmental note
28 General information on laser devices
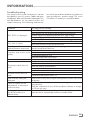
29 Troubleshooting

3
ENGLISH
SETUP AND SAFETY
-----------------------------------------------------------------------------
Please note the following instructions:
7
The hi-fi system is designed for the playback
of audio signals. All other uses are expressly
prohibited.
7
If you want to set up the hi-fi system on wall
shelves or in cupboards, please ensure that it
is adequately ventilated. There must be at least
10 cm of space at the side, above and behind
the hi-fi system.
7
Do not cover the hi-fi system with newspapers,
table cloths, curtains, etc.
7
When setting up the hi-fi system, remember
that furniture is often coated with various types
of varnish and plastic, which often contain
chemical additives. These additives may cause
corrosion to the feet of the unit. This may leave
stains on the surface of the furniture which can
be difficult or impossible to remove.
7
If the hi-fi system is exposed to sudden changes
in temperature, for example when taken from
the cold into a warm room, wait at least two
hours before using it.
7
The hi-fi system is designed for use in dry
rooms. If you do use it outdoors, make sure it
is protected from moisture such as dripping or
splashing water.
7
Only use the hi-fi system in a moderate climate.
7
Do not place the hi-fi system close to heating
units or in direct sunlight, as this will impair cool-
ing.
7
Do not place any vessels containing liquids,
such as vases, on the hi-fi system. Do not insert
any foreign objects in the CD compartment.
7
Do not place any objects such as burning can-
dles on the hi-fi system.
7
If malfunctions occur due to brief mains over-
loads or static electricity charges, reset the de-
vice. To do this, pull out the power plug and
connect it again after a few seconds.
7
Do not open the hi-fi system casing under any
circumstances. Warranty claims are excluded
for damage resulting from improper handling.
7
Thunderstorms are a danger to all electrical
devices. Even if the hi-fi is switched off, it can
be damaged by a lightning strike to the mains.
Always remove the power plug during a thun-
der storm.
7
Prolonged listening with the
headphones at loud volumes can
damage your hearing.
Note:
7
Do not connect any other equipment while
the device is switched on. Also switch off the
other equipment before connecting it.
7
Only plug the device into the mains socket
after you have connected the external de-
vices. Make sure the mains plug is freely
accessible.
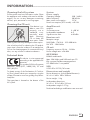
Caution: high-frequency
radiation
7
The device must be registered and operated
in accordance with this operating manual.
The device has an integrated antenna; it
must be operated with other antennas or
transmitters.

ENGLISH
4
OVERVIEW
-------------------------------------------------------------------------------------------------------
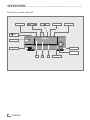
The hi-fi system controls
8
SOURCE
U
AUDIO IN
●
A B
7
.
V
NFC

5
ENGLISH
The front of the device
NFC
Position for NFC registration
(Near Field Communication) of
mobile phones and tablet PCs.
8 Press briefly to switch the device
in and out of standby mode.
Press and hold down to activate
ECO mode.
USB port type A for connecting
a USB memory stick or an MP3
player.
● Infrared sensor for remote con-
trol signals.
A
The hi-fi system displays.
B
CD compartment.
V
Adjusts the audio volume.
AUDIO IN
Audio signal input (3.5 mm) for
connecting an external device.
U Headphone jack for connecting
a stereo headphone set with a
jack plug (3.5 mm).
This automatically switches off
the loudspeakers.
The top of the device
SOURCE
Switches the device on from
standby mode.
Selects the input sources FM
Tuner, DAB Tuner, Bluetooth,
Aux, Audio In, Disc and USB.
In tuner mode: press and hold
down to start the reverse or for-
wards frequency search;
press briefly to change the fre-
quency backwards or forwards
in steps.
In external data media mode:
forward or reverse track selec-
tion;
press and hold down to search
for a certain passage forwards
or backwards.
In standby and timer mode: to
set hours/minutes.
In external data media mode:
starts and pauses playback.
7 In external data media mode:
ends playback.
. Opens and closes the CD com-
partment.
OVERVIEW
-------------------------------------------------------------------------------------------------------

ENGLISH
6
AC
~
Socket for mains cable.
Note:
7
The only way to completely
disconnect the hi-fi system
from the mains supply is to
pull out the plug.
SPEAKER OUT
Terminals for connecting the
+ R– + L – loudspeaker cables.
R = right channel, L = left
channel.
LINE OUT Audio signal output for con-
necting an external recording
device.
AUX IN Audio signal input (3.5 mm) for
connecting an external device,
e.g. an MP3 player.
DAB/FM
AERIAL
Antenna socket for the roof ana-
tenna or the auxiliary antenna
supplied.
OVERVIEW
-------------------------------------------------------------------------------------------------------
The back of the device
AC
~
SPEAKER OUT
+ R– + L –
LINE OUT AUX IN DAB/FM AERIAL

7
ENGLISH
OVERVIEW
----------------------------------------------------------------------------------------------------------------------------------
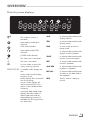
The remote control
8 Switches the hi-fi system to standby
mode and from standby mode to the
last input source selected.
. Opens and closes the CD compart-
ment.
FM/DAB
Selects the FM tuner and DAB tuner
input sources.
Selects the Bluetooth input source.
CD Selects the CD input source.
USB
Selects the USB input source.
AUDIO IN
Selects the Audio In and Aux
AUX
input sources for use with an external
data medium.
In tuner mode: switches between FM
stereo and mono reception.
R
Changes the brightness of the display.
RDS
Opens RDS information.
INTRO
In external data media mode: for
playing brief introductions to tracks.
In external data media mode: plays
back tracks in random order.
b In external data media mode: to re-
peat a track, the CD, the album or the
playlist.
INFO
In DAB tuner mode: displays DAB sta-
tion information.
In external data media mode: switch-
es the display between the current
track number and the elapsed play-
ing time and displays the ID3 tag in-
formation, if available.
¥ In standby: activates the settings for
the time.
≈ Activates the settings for timer mode.
MENU
/ OK

ENGLISH
8
OVERVIEW
----------------------------------------------------------------------------------------------------------------------------------
56 In DAB tuner mode: for selecting DAB
radio stations from the presets.
In external data media mode: select
tracks forwards or backwards.
In standby and timer mode: for setting
the hours/minutes.
3 4 In DAB tuner mode: for selecting DAB
radio stations from the station list;
for setting the frequency/channel of a
DAB radio station.
In FM tuner mode: press and hold
down to start the reverse or forwards
frequency search;
press briefly to change the frequency
backwards or forwards in steps.
In external data media mode: search
for a certain passage forwards or
backwards.
OK In menu mode: confirms entries.
In tuner mode: press and hold down
to adopt the RDS time.
In external data media mode: starts
playback;
pauses playback.
SLEEP
Activates sleep timer mode, sets the
time for the sleep timer.
MENU
In tuner mode: opens the menu of
7 the device.
In external data media mode:
ends playback.
In Bluetooth mode: disconnect the
connection to the Bluetooth auxil-
iary device.
+ – In external data media mode: select
albums.
Switches the hi-fi system speakers to
and from mute mode.
–
V
+ Adjust the volume.
– BASS +
For tuning to radio stations.
DSC
Selects different sounds settings.
LOUDNESS
The loudness function provides better
sound at lower audio volumes.
– TREBLE +
For tuning to radio stations.
1 ... 0
In FM and DAB tuner mode: select
preset channels.
10 +
In FM and DAB tuner mode: selects
the tens for presets.
PROG
In FM and DAB tuner mode: pressing
briefly activates the memory function;
saves radio stations to presets.
In FM and DAB tuner mode: press
and hold down start searching for
new radio stations.
In external data media mode: acti-
vates the Create playlist function;
stores the track when creating a play-
list.

9
ENGLISH
OVERVIEW
----------------------------------------------------------------------------------------------------------------------------------
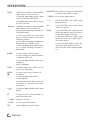
The hi-fi system displays
)
)
)
The loudness function is
activated
Data medium mode (disc)
selected.
AUX mode selected.
Data media mode (USB)
selected.
Ä
TUNER mode selected.
Z
Z
The sleep timer is activated.
w
The timer is activated.
)
In tuner mode: a stereo FM
station is being received.
88888:88:88
In standby mode: displays the
time.
In any mode: briefly displays
the input source;
briefly displays the volume and
the sound settings.
In tuner mode: displays the
station name and RDS infor-
mation or the waveband and
frequency.
In external data media mode:
displays the total number of
albums and tracks and the
elapsed playing time and, if
available, the ID3 tag informa-
tion (ticker text).
ALB In external data media mode:
displays albums.
TRK In external data media mode:
displays tracks.
PRG In tuner mode: a station is
being stored.
In external data media mode:
a playlist is being created
SHUF In external data media mode:
random function activated.
REP In external data media mode:
a track is repeated.
ALB REP In external data media mode:
an album is repeated.
REP ALL In external data media mode:
all tracks on the data medium
are repeated.
RDS An RDS station is being re-
ceived.
888888
:
88
:
88
ALB TRK PRG SHUF REP ALL RDS
Ä
)
w
Z
Z
)
)
)

ENGLISH
10
CONNECTION AND PREPARATION
---------------------------------------
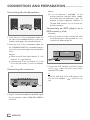
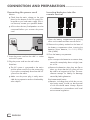
Connecting the loudspeakers
1 Insert the wires of the loudspeaker cable into
the side of the threaded fasteners on the loud-
speakers and tighten the threaded fasteners.
2 Insert the wires of the loudspeaker cable into
the »SPEAKER OUT R L« threaded fasteners
on the hi-fi system and tighten the threaded fas-
teners.
Notes:
7
Observe the left and right channels (L = left
channel, R = right channel).
7
Connect each of the red sockets (+) on the
hi-fi to the red sockets (+) on the loudspeak-
ers.
Connecting the antenna
1 Plug the roof antenna cable (FM and DAB signal)
into the antenna socket »DAB/FM AERIAL«
on the hi-fi.
Note:
7
If no roof antenna is available, use the
auxiliary antenna supplied. When suitably
positioned and with adequate signal, this
antenna provides adequate reception of
FM and DAB channels. Do not shorten the
auxiliary antenna.
Connecting an MP3 player or a
USB memory stick
Caution:
7
The hi-fi system must be switched off while
the USB connection is being made. If it is not
switched off, data can be lost.
1 Connect the USB interface of the MP3 player
to the » « socket of the hi-fi system with a
standard USB cable;
or
insert the USB plug of the USB memory stick
into the USB interface » « of the hi-fi sys-
tem.

11
ENGLISH
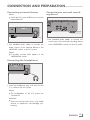
Connecting external devices
Note:
7
Switch the hi-fi system off before you connect
external devices.
1 Use standard audio cables to connect the
audio outputs of the external device to the
»AUX IN« sockets on the hi-fi system.
Note:
7
If possible, connect MP3 players to the
»AUDIO IN« socket.
Connecting the headphones
1 Insert the headphone plug (3.5 mm) into the
»U« socket on the hi-fi system.
Note:
7
The loudspeakers of the hi-fi system are
switched off.
Caution:
7
Excessive volume levels when using head-
phones or earphones can damage your
hearing.
CONNECTION AND PREPARATION
---------------------------------------
Connecting an external record-
ing device
1 Use standard audio cables to connect the
sound inputs of the external recording device
to the »LINE OUT« sockets on the hi-fi system.

ENGLISH
12
CONNECTION AND PREPARATION
---------------------------------------
Connecting the power cord
Notes:
7
Check that the mains voltage on the type
plate (on the bottom of the hi-fi system) cor-
responds to your local mains supply. If this is
not the case, contact your specialist dealer.
7
All the other devices/loudspeakers must be
connected before you connect the power
cord.
1 Insert the power cord into the »AC
~
« socket
on the hi-fi system.
2 Plug the power cord into the wall socket.
Caution:
7
The hi-fi system is connected to the mains
with the power cord. Pull out the power plug
if you want to completely disconnect the hi-fi
system from the mains.
7
Make sure the power plug is easily acces-
sible during operation and not hindered by
other objects.
Inserting batteries into the
remote control
1 Open the battery compartment by pressing
down on the catch and then remove the lid.
2 Observe the polarity marked on the base of
the battery compartment when inserting the
batteries (micro batteries, 2 x 1.5 V, R 03/
UM 4/AAA).
3 Close the battery compartment.
Notes:
7
Do not expose the batteries to extreme heat,
caused for example by direct sunlight, heat-
ers or fire.
7
Remove the batteries when they are flat or
when you know that the hi-fi system will not
be used for a long period of time. The man-
ufacturer accepts no liability for damage
caused by leaking batteries.
Environmental note:
7
Batteries, including those which do not con-
tain heavy metal, should not be disposed
of with household waste. Always dispose
of used batteries in accordance with local
environmental regulations.

13
ENGLISH
SETTINGS
---------------------------------------------------------------------------------------------------------------------------------------
Tuning and storing DAB radio
stations
Note:
7
Make the settings with the buttons on the re-
mote control.
Initial setup
When the device is connected to the mains for
the first time or after a reset, the device starts an
automatic station search for DAB radio stations
and then stores them in the station list.
1 Switch on the hi-fi system by pressing »FM/
DAB«.
– Display: »Hello« briefly, followed by
»DAB« and then »SCANNING«.
– The automatic station search starts and finds
and stores DAB radio stations.
– Then the device switches to the first station in
the station list.
Note:
7
If there is no antenna signal, »OFF AIR« is
displayed.
Storing DAB radio stations as presets
After the automatic station search, all the DAB
radio stations in are stored in the station list. You
can store your favourite DAB radio stations on
the presets 1 to 40.
1 Select a DAB radio station by pressing »3«
or »4«.
2 Save a DAB radio station as a preset by press-
ing »PROG«, selecting the preset with »5« or
»6« and then press »PROG« to save.
– Display: »P01 STORED«.
Note:
7
You can also select the preset with the number
buttons »1 ... 0«.
For two-digit preset numbers, first press
»10+« or select the preset double-digit with
the numeric buttons.
3 To save more DAB radio stations, repeat steps
1 and 2.
Add DAB radio stations after a
change of location
You can restart the automatic station search. This
is useful if you want to operate the device at a
new location or if you want to search for new
DAB radio stations.
1 Switch on the hi-fi system by pressing »FM/
DAB«.
– Display: the name of the radio station, such
as »
B5 AKTUELL
«.
2 Open the menu by pressing »MENU
7
«.
3 Select the »
FULL SCAN
« menu item with
»3« or »4« and press »eII OK« to con-
firm.
– Display: »SCANNING«, the automatic sta-
tion search starts, then finds and stores radio
stations in the station list.
Setting and storing DAB radio
manually
1 Switch on the hi-fi system by pressing »FM/
DAB«.
2 Open the menu by pressing »MENU
7
«.
3 Select the »
MANUAL
« menu item with »3«
or »4« and press »eII OK« to confirm.
– Display: e.g. »5A I74.928« (channel and
frequency of a DAB radio station).
4 Set the frequency/channel by pressing »3«
or »4« on the remote control.
5 Confirm the frequency/channel with »eII
OK«.
– The reception level is displayed.
6 Confirm the setting with »eII OK«.
– The DAB radio stations are stored in the sta-
tion list.

ENGLISH
14
SETTINGS
---------------------------------------------------------------------------------------------------------------------------------------
7 Set the radio station by pressing and holding
down »3« or »4«.
– The radio station search starts and stops at
the next station with a good reception signal;
or
keep pressing »3« or »4« until you reach
the frequency you want.
– Each time you press the button, the frequen-
cy changes by 50 Hz.
8 Save the FM radio station on a preset, to do
this press »PROG«. Select preset with »5«
oder »6« and confirm with »PROG«.
Setting the time automatically
The time is updated automatically if a DAB or
RDS radio station transmits a time signal.
Note:
7
The time must be reset after a power failure
or after disconnecting from the mains.
1 Select the DAB input source by pressing
»SOURCE« on the device or »FM/DAB« on
the remote control.
2 Select a DAB radio station by pressing » « or
» « on the device »5« or »6« on the remote
control.
3 Press »INFO« on the remote control to switch
to the time display for the DAB radio station
and confirm the time with »eII OK«.
– Display: »CT SYNC«, the time is adopted.
Note:
7
Some RDS stations (FM radio stations) trans-
mit an RDS time signal. If the selected RDS
station transmits time information, the time
can be updated automatically.
In FM tuner mode, press »RDS« repeat-
edly until the time is displayed. If »DATE/
CLOCK« is displayed, the time signal has
not yet been received. Please wait until the
time is displayed.
If the correct time is displayed, press
»eII OK« to confirm it.
Tuning and storing FM radio
stations
You can store up to 40 FM radio stations on pre-
set channels.
1 Switch on the hi-fi system by pressing »8«,
»SOURCE« on the device or »FM/DAB« on
the remote control.
2 Select the FM TUNER input source by pressing
»SOURCE« on the device or »FM/DAB« on
the remote control.
Setting and storing FM radio
stations automatically
The device searches for up to 40 stations with
strong reception and stores them automatically.
After the search has finished, you will hear the
station stored at preset 01.
1 Activate the station search by pressing
»PROG« until the frequency display changes
to rapid run-through.
– Display: »AUTO«.
Setting and storing FM radio
stations manually
1 Switch on the hi-fi system by pressing »FM/
DAB«.
2 Select the FM input source by pressing »FM/
DAB«.
3 Open the menu by pressing »MENU
7
«.
4 Select the »
SCAN SET
« menu item with
»3« or »4« and press »eII OK« to con-
firm.
– Display: »
ALL
«.
Note:
7
You can select whether it searches for ra-
dio stations with strong reception (display
»
STRONG
«) or all radio stations (display:
»
ALL
«).
5 Select the option with »3« or »4«.
6 Press »MENU
7
« to close the menu.

15
ENGLISH
SETTINGS
---------------------------------------------------------------------------------------------------------------------------------------
Setting the time manually
The time can also be set manually.
1 Switch off the hi-fi by pressing »8«.
2 To set the time in standby mode, press and
hold »¥« for about 2 seconds.
– Display: »CLOCK SET« and then
»CLOCK 24 HR«.
2 Select the hour format (12 or 24 hours) by
pressing »VOLUME« on the device or by
pressing »5« or »6« on the remote control
and confirm with »¥«.
– The hours flash.
3 Set the hours by pressing »VOLUME« on the
device or by pressing »5« or »6« on the re-
mote control and confirm with »¥«.
– The minutes flash.
4 Set the minutes by pressing »VOLUME« on the
device or by pressing »5« or »6« on the re-
mote control and confirm with »¥«.
– Display: the current time.

ENGLISH
16
Switching on and off
The only way to disconnect the hi-fi system from
the mains supply is to pull out the plug.
1 Switch on the hi-fi by pressing »8« or
»SOURCE« on the device.
– The last input source used is automatically
selected.
Note:
7
The hi-fi system can also be switched on by
pressing »FM/DAB«, » «, »CD«, »USB« or
»AUX« on the remote control.
2 Switch the hi-fi system to clock mode mode by
pressing »8«.
– Display: the clock time.
ECO mode
To reduce the power consumption to less than
0.5 W, the hi-fi system is switching during stand-
by into ECO mode.
In ECO mode, the time display disappears; it can
be displayed by pressing »¥«.
1 In ECO mode, press »¥« button one time
– The clock time can be displayed 90 sec-
onds.
2 In ECO mode, long press »8« button about 2
seconds.
– The unit will be switched to standby mode
and clock time will be displayed meanwhile.
– The Unit will enter ECO mode again after 15
minutes.
Automatic switch-off
The device switches off automatically after 15
minutes in clock mode and 1 minute later to the
ECO mode if:
– the device is in the stop position;
– there is no disc insert;
– there is no plug connected to the »AUX IN«
or »AUDIO IN« socket;
– the Bluetooth auxiliary devices is not sending
an audio signal;
– There is no external data media connected on
» «
socket.
To use the device, switch it back on.
GENERAL FUNCTIONS
---------------------------------------------------------------------------------------
Adjusting the volume
1 Press » VOLUME« on the hi-fi or »– VOL +«
on the remote control to change the volume.
Selecting sound settings
You can choose between preset sound settings.
1 Select the sound setting using »DSC« on the
remote control.
Changing the bass or treble
1 Change the bass using » – BASS +« on the
remote control.
2 Change the treble using » – TREBLE +« on the
remote control.
Loudness
The loudness function provides better sound at
lower audio volumes.
1 Switch loudness on and off using »LOUD-
NESS« on the remote control.
Note:
7
If you select a sound setting, this cancels
your adjustment of the bass, treble or loud-
ness.
Muting
You can switch the hi-fi speakers to and from
mute mode with this function.
1 Activate mute with » « on the remote control.
2 Deactivate mute with » « on the remote con-
trol.
Displaying the time
1 Display the time with »¥« on the remote con-
trol.
2 Switch off the time with »¥« on the remote
control.
Setting the brightness of the dis-
play
1 Adjust the brightness of the display (3 stages)
with »
R
« on the remote control.

17
ENGLISH
TUNER MODE
------------------------------------------------------------------------------------------------------------------------
DAB tuner mode
Selecting the DAB tuner input
source
1 Select the FM TUNER input source by pressing
»SOURCE« on the device or »FM/DAB« on
the remote control.
– Display: »DAB«, followed by the name of a
DAB station.
Selecting stored stations
1 Select a DAB radio station from the station list
by pressing »3« or »4« on the remote
control or » « or » « on the device.
2 Select a preset for a DAB radio station by press-
ing »5« or »6« on the remote control.
Note:
7
You can also select the preset with the number
buttons »1 ... 0«.
For two-digit preset numbers, first press
»10+« or select the preset double-digit with
the numeric buttons.
Displaying DAB station information
1 To briefly display information on the current
DAB station, press »INFO« repeatedly.
– Name of the radio station, the Dynamic
Label Segment, the signal strength, the pro-
gramm type, the ensemble (e.g. BR for Bay-
ern), the frequency, the reference to signal
errow, the bit rate of the transmission stand-
ard, the DAB type, time and date.
Setting Dynamic Range Control
(DRC) for DAB stations
When you activate Dynamic Range Control, you
can hear quiet sounds better in a loud environ-
ment.
1 Open the menu by pressing »MENU
7
«.
2 Select the »
DRC
« menu item with »3« or
»4« and press »eII OK« to confirm.
– Display: »
DRC HIGH
«.
3 Select »
DRC HIGH
« or »
DRC LOW
« option
with »3« or »4« and press »eII OK« to
confirm.
4 Press »MENU
7
« to close the menu.
Note:
7
The DAB station must support DRC.

ENGLISH
18
TUNER MODE
------------------------------------------------------------------------------------------------------------------------
FM tuner mode
Selecting the FM tuner input source
1 Select the FM TUNER input source by pressing
»SOURCE« on the device or »FM/DAB« on
the remote control.
– The most recently selected station is played
(Last Station Memory).
Selecting presets
1 Select a preset by pressing » « or » « on the
device or »5« or »6« on the remote control.
Stereo/mono reception
When the hi-fi system receives stereo channels,
»!« appears in the display. If the signal from
the stereo channel is weak, you can improve the
sound quality by switching to mono reception.
1 Press »!« on the remote control to switch to
mono reception.
2 To switch back to FM stereo, press »!« on
the remote control.
Displaying RDS station information
If the device receives an RDS station, the station
name appears in the display together with »RDS«. If
no information is available, the reception frequency
appears in the display.
Additional information can be displayed.
1 To display information on the current RDS sta-
tion, press »RDS« repeatedly.
– The following displays appear in sequence:
The name of the radio station.
The current programme type (PTY), e.g.
»Pop music«. »[No PTY]« appears if infor-
mation is not available.
The radio text.
The time.
The frequency.

19
ENGLISH
EXTERNAL DATA MEDIA MODE
-------------------------------------------------------
Using CDs
The device is suitable for
music CDs displaying the
logo shown here (CD-
DA) and for CD-Rs and
CD-RWs with audio data.
7
The device cannot play CD-ROM, CD-I, CDV,
VCD, DVD or computer CDs.
7
In MP3/WMA mode, the terms "album" and
"file" are very important. "Album" corresponds
to a folder on a PC, "file" to a file on a PC or
a CD-DA track. An MP3/WMA CD may not
contain more than 999 tracks/folders in total.
7
When burning CD-R and CD-RWs with audio
files, various problems may arise which could
lead to problems with playback. This can be
caused by faulty software or hardware set-
tings or by the CD being used. Should such
problems arise, contact the customer services
of your CD burner or software manufacturer
or look for relevant information, for example
on the Internet.
7
When you are making audio CDs, observe all
legal guidelines and ensure that the copyright
of third parties is not infringed.
7
Always keep the CD compartment closed to
prevent dust from collecting on the laser op-
tics. The CD compartment closes automatically
after a short time.
7
Do not attach adhesive labels to CDs. Keep
the surfaces of CDs clean.
7
You can play standard 12 cm CDs as well as
8 cm CDs on your device. An adapter is not
necessary.
Operation with an MP3 player
or USB memory stick
7
The » « socket is not compatible with
USB hubs and cannot be connected directly
to a PC.
7
The USB interface of this device is a stand-
ard interface. All currently-known MP3 chip
concepts were taken into account when it
was developed. Due to rapid progress in
MP3 technology and new manufacturers
appearing every day, the compatibility of
MP3 players/USB memory sticks can only
be partially guaranteed.
If USB operation is impaired or is not pos-
sible, this does not indicate a malfunction of
the device.
7
Bi-directional data transfer as defined for ITE
devices in EN 55022/EN 555024 is not
possible.
7
USB transfer is not in itself an operating
mode. It is only an additional function.
7
Never remove a MP3 player/USB memo-
ry stick during playback. This can result in
damage to the data and the devices.
No warranty claims are accepted for dam-
age incurred as a result of this.
Inserting/connecting music data
media
Inserting the disc
1 Press ».« to open the CD compartment.
– The CD compartment opens.
2 Put in the disc with its label facing upwards.
3 Press ».« to close the CD compartment.
– The disc is read.
– Display in MP3/WMA mode: the total
number of albums and tracks.
– Display in CD-DA mode: the total number of
tracks and the total playing time.

ENGLISH
20
EXTERNAL DATA MEDIA MODE
-------------------------------------------------------
Connecting an MP3 player or a USB
memory stick
1 Switch the device to standby mode by pressing
»8«.
2 Connect the USB interface of the MP3 player
to the » « socket of the hi-fi system with a
standard USB cable;
or
insert the USB plug of the USB memory stick
into the USB interface » « of the hi-fi sys-
tem.
3 Switch on the device from standby by pressing
»8«.
– Display: the total number of albums and
tracks.
Selecting the input source
1 Select the input source (»CD« or »USB«) by
pressing »CD« or »USB«.
Playback
Starting playback
When you play music CDs, you can select the
track; when you play MP3/WMA files, you can
also select folders.
1 Playback starts automatically, if necessary press
»eII« on the hi-fi system or »eII OK« on the
remote control to start playback;
or
select the folder by pressing »+ –«, then se-
lect the track with »5« or »6«.
– Playback starts automatically.
– Display: number of folders and tracks, the
name of the track and the elapsed playing
time.
Note:
7
If no data medium is inserted/connected,
the message »NO DISC« or »NO USB«
appears.
Pausing and resuming playback
1 Press »eII« on the hi-fi system or »eII OK« on
the remote control to pause playback.
– Display: the playing time flashes.
2 Press »eII« on the hi-fi system or »eII OK« on
the remote control to resume playback.
Pausing and resuming playback
1 To pause playback, press »MENU
7
« once.
– If you select the data medium again, play-
back continues from the point at which it
stopped.
Stopping playback
1 To stop playback, press »MENU
7
« twice.
– When playback starts again, it begins from
the first track.
Repeating the current track
1 Press »5« briefly during playback.
Selecting another track
1 Press »5« or »6« repeatedly during playback
until the number of the track you want appears
in the display.
– Playback of the selected track starts auto-
matically.
Searching for a passage within a
track
1 During playback, press »3« or »4« and
hold down until the passage has been found.
2 Playback begins if you release »3« or
»4«.
Displaying track information
(for MP3/WMA)
If information about the artist, album and track
are available on the data medium, this is dis-
played after 6 seconds automatically (ID3 tag).
1 Press »INFO« to enter or exit the ID3 mode.
Page is loading ...
Page is loading ...
Page is loading ...
Page is loading ...
Page is loading ...
Page is loading ...
Page is loading ...
Page is loading ...
Page is loading ...
Page is loading ...
-
 1
1
-
 2
2
-
 3
3
-
 4
4
-
 5
5
-
 6
6
-
 7
7
-
 8
8
-
 9
9
-
 10
10
-
 11
11
-
 12
12
-
 13
13
-
 14
14
-
 15
15
-
 16
16
-
 17
17
-
 18
18
-
 19
19
-
 20
20
-
 21
21
-
 22
22
-
 23
23
-
 24
24
-
 25
25
-
 26
26
-
 27
27
-
 28
28
-
 29
29
-
 30
30


Grundig M 2300 DAB+ NFC Owner's manual
- Category
- Home audio sets
- Type
- Owner's manual
- This manual is also suitable for
Ask a question and I''ll find the answer in the document
Finding information in a document is now easier with AI
Related papers
-
Grundig Vertiga Hifi Stereo Micro System UMS 4600 DEC User manual
-
-
-
-
Grundig Music 61 User manual
-
-
-
Grundig RCD 1440 USB User manual
-
-
Other documents
-
Goodmans GMR1990DABT User manual
-
Lenco BT-9000B Datasheet
-
Philips MCB2305 User manual
-
Exibel BDX600-UK User manual
-
Sony CMT-FX250 Operating instructions
-
Philips BTB3370 User manual
-
Sandstrom SHFTPPH10 User manual
-
Sony CMT-BX7DAB User manual
-
 WOERLEIN Elite line DAB1000 User manual
-
Bush WOW DAB MICRO SYSTEM User manual
