Page is loading ...
Page is loading ...
Page is loading ...
Page is loading ...

T
Ø ? lo - Ø line
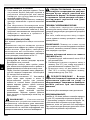
2,4 mm (0.09 in.)
2,7 mm (0,11 in.)
3,0 mm (0,12 in.)
(0.14 in.)
Ø testina -
Ø head
130 mm
=
=
=
=
1
2
3
4
19
22 23
24
BPMR7A
1
2
3
4
6
5
7
8
20
21
14
61250208D
2920 QM ULTRA DESTRUCTIBLE
113
11
10
9
1311
12
2017
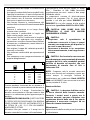
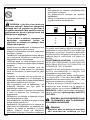
0,5 mm
25
T
B
A

Italiano 3
English 23
Français 42
Deutsch 63
Español 84
Nederlands 104
Português 125
Ελληνικα 146
Česky 167
Slovensky 187
Pуccкий / Українська 207
Polski 228
Magyar 249
Latviski 269
Eesti keel 288
Lietuvių k. 307
Română 327
Page is loading ...
Page is loading ...
Page is loading ...
Page is loading ...
Page is loading ...
Page is loading ...
Page is loading ...
Page is loading ...
Page is loading ...
Page is loading ...
Page is loading ...
Page is loading ...
Page is loading ...
Page is loading ...
Page is loading ...
Page is loading ...
Page is loading ...
Page is loading ...
Page is loading ...
Page is loading ...

23
GB
TRANSLATION OF ORIGINAL INSTRUCTIONS
INTRODUCTION
For correct use of the machine and to avoid
accidents, do not start working until you have
read this manual carefully. You will find
explanations concerning the operation of the
various parts plus instructions for necessary
checks and relative maintenance.
NOTE: The descriptions and illustrations
contained in this manual are not binding. The
manufacturer reserves the right to
undertake any modifications it deems
necessary without revising this manual.
In addition to the operating instructions, this
manual contains paragraphs that require your
special attention. Such paragraphs are marked
with the symbols described below:
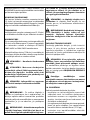
WARNING: where there is a risk of an accident
or personal, even fatal, injury or serious damage
to property.
CAUTION: where there is a risk of damaging the
machine or its individual components.
WARNING
RISK OF HEARING DAMAGE
IN NORMAL CONDITIONS OF USE, THIS
MACHINE MAY EXPOSE THE OPERATOR TO A
PERSONAL DAILY NOISE LEVEL EQUAL TO OR
HIGHER THAN
85 dB (A)
CONTENTS
1. SAFETY PRECAUTIONS (precautions
for using the machine safety)
23
2. SYMBOLS AND SAFETY WARNINGS
(explanations on how to identify the
machine and the meaning of the
symbols)
25
3. MAIN COMPONENTS (position of the
main parts that make up the machine)
25
4. ASSEMBLY (explanations on how to
remove the packaging and assemble
detached parts)
25
5. STARTING 26
6. STOPPING THE ENGINE 28
7. USING THE MACHINE 28
8. TRANSPORTING 32
9. MAINTENANCE (all information
required to keep the machine at peak
efficiency)
33
10. STORAGE 35
11. ENVIRONMENTAL PROTECTION
(advice on using the machine in ways
that respect the environment)
36
12. TECHNICAL DATA (a summary of the
main specifications of the machine)
37
13. DECLARATION OF CONFORMITY 40
14. WARRANTY CERTIFICATE (a summary
of the warranty conditions)
40
15. TROUBLESHOOTING (helps you to
quickly solve any problems you may en-
counter while using the machine)
41
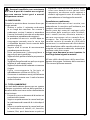
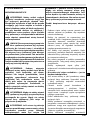
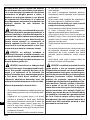
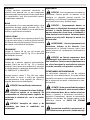
1. SAFETY PRECAUTIONS
WARNING
- The machine, when used correctly, is a
useful and effective tool; if used
incorrectly or without the necessary
precautions, it can be dangerous. To
ensure your safety and comfort, always
observe the safety instructions given here
below and throughout this manual.
- Exposure to vibrations through
prolonged use of combustion engine-
driven tools could cause blood vessel or
nerve damage in the fingers, hands, and
wrists of people prone to circulation
disorders or abnormal swellings.
Prolonged use in cold weather has been
linked to blood vessel damage in
otherwise healthy people. If symptoms
occur such as numbness, pain, loss of
strength, change in skin colour or texture,
or loss of feeling in the fingers, hands, or
wrists, discontinue the use of this tool and
seek medical attention.
- The ignition system of your machine
produces an electromagnetic field of very
low intensity. This field could interfere
with certain pacemakers. To reduce the
risk of serious or fatal injury, persons with
pacemakers should consult their doctor or
the manufacturer of the pacemaker
before using this machine.

24
GB
the table.
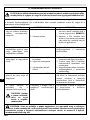
16 - All labels with health hazards must be kept
in good conditions. In case of damage or
deterioration, immediately substitute them
(Fig. 28).
17 - Do not utilize the machine for uses
different from the ones specified in the
manual (see pag. 28).
18 - Never leave the machine unattended with
the engine running.
19 - Do not start the engine with the arm not
mounted.
20 - Check the brush cutter daily to be sure that
components and safety devices are full
functioning properly.
21 - Do not attempt to carry out operations
or repairs that are not part of the normal
maintenance. See the authorised dealer.
22 - When disposing of the machine at the
end of its useful life, think of the
environment. Take your old unit to your
dealer who will be able to dispose of it in
a proper manner.
23 - Only experienced persons who are
familiar with the operation and safe use of
this machine should use it. If you lend the
blower to someone, also give them the
instruction manual and ensure that they
read it before using the machine.
24 - All saw service, other than the operations
shown in the present manual, should be
performed by competent personnel.
25 - Keep this manual on hand and consult it
before each use of the tool.
26 - Please note that the owner or the user is
responsible for any accidents or damage to
third parties or their property.
WARNING
- Never use a machine with faulty safety
equipment. The machine’s safety
equipment must be checked and
maintained as described in this section. If
your machine fails any of these checks
contact an Authorised Service Centre to
get it repaired.
- Any use of the machine not expressly
envisaged in this manual is to be
WARNING: National regulations may limit
the use of the machine.
1 - Do not operate the machine unless you
have received specic instruction on its use.
First time users must familiarise themselves
thoroughly with the operation of the
machine before working in the eld.
2 - The machine must only be used by adults
in good physical condition who are familiar
with the operating instructions.
3 - Never use the brush cutter when you are
tired or fatigued or if you have taken alcohol,
drugs or medication.
4 - Wear appropriate clothing and safety articles
such as: boots, heavy-duty trousers, gloves,
protective eyewear, ear protection and
protective helmet. Use clothing which is
close-tting but comfortable.
5 - Do not allow children to use the brush cutter.
6 - Do not allow other people to remain within
15 metres during brush cutter use .
7 - Before using the brush cutter, make sure
that the blade xing bolt is well-tightened.
8 - The brush cutter must be equipped with
the cutting accessories recommended by
the manufacturer (look pag. 38).
9 - Never use the brush cutter without the blade
guard or the head.
10 - Before starting the engine, make sure that
the blade is free to move and is not in contact
with any foreign objects.
11 - Every now and then while working, stop
the engine and check the blade. Replace it
at the rst sign of cracks or breaks.
12 - Only use the machine in well-ventilated
places, do not use in explosive or ammable
atmospheres or in closed environments.
13 - Never touch the blade or attempt any
maintenance work while the engine is
running.
14 - It is prohibited to t any device other than
that supplied by the manufacturer.
15 - Do not use a machine that has been
damaged, badly repaired, improperly
assembled or modied. Do not attempt to
remove or bypass any of the safety devices.
Only use cutting attachments indicated in

25
GB
considered improper and therefore a
source of risk to people and property.
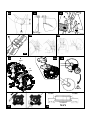
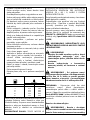
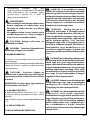
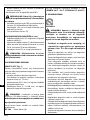
2. SYMBOLS AND SAFETY WARNINGS (Fig.24)
1 - Read operator’s instruction book before
operating this machine.
2 - Wear head, eye and ear protection.
3 - Wear strong boots and gloves when cutting
with metal or plastic blades.
4 - Be aware that objects can be thrown.
5 - Keep bystanders away 15 m.
6 - WARNING! – The surface can be hot!
7 - Warning! Kickback it’s danger.
8 - Purge Bulb.
9 - Type of machine: BRUSH CUTTER.
10 - Guaranteed sound power level.
11 - CE conformity marking.
12 - Serial number.
13 - Year of manufacture.
14 - Max. speed of output shaft, RPM
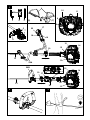
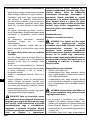
3. MAIN COMPONENTS (Fig.1)
1÷3 - Tools supplied
4 - Harness
5 - Bevel gear
6 - Curved guard
7 - Nylon line head
8 - Fuel tank cap
9 - Purge Bulb
10 - Carburettor adjustment screws
11 - Muer guard
12 - Spark plug
13 - Air lter
14 - Starter Handle
15 - Choke Lever
16 - Throttle trigger lockout
17 - STOP button
18 - Throttle lever
19 - Harness attachment
20 - Handle
21 - Shaft arm
22 - Button half-throttle
4. ASSEMBLY
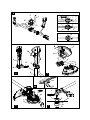
FITTING THE SAFETY GUARD (Fig.7)
Fit the blade guard (A) to the shaft arm with screws
in a position allowing the operator to work safely (B).
NOTE: use the guard (C) only with nylon head.
Secure the guard (C) to the protection (A) by
means of the screw (D).
FITTING THE NYLON LINE HEAD (Fig. 8)
Put the upper (F) ange in place. Put the head xing
pin (H) in the appropriate hole (L) and tighten the
head (N) anti-clockwise by hand.
FITTING THE DISK (Fig. 9)
Fix the blade (R) onto the upper ange (F) making
sure that the rotation direction is correct.
Fix the lower ange (E), the cup (D) and tighten bolt
(A) anti-clockwise.
Put the pin provided in the appropriate hole (L)
to block the blade and allow the bolt (A) to be
tightened to 2.5 kgm (25 Nm).
WARNING – Collar (see arrows C, Fig.9)
must locate in blade’s mounting hole.
FITTING THE HANDLE (Fig. 2)
Fit the handle onto the shaft arm and secure it
using screws (A). The handle position is calculated
depending on the requirements of the operator.
ASSEMBLING THE SAFETY BOOM (Fig. 9A)
When using the disc instead of nylon line head, it
is necessary to set up the “safety boom”. Fix the
boom (A) under the attachment (C) of handle (20B,
Fig. 1) by means of the screws (B). Taking care to
verify the “safety boom” being on the left side of
the brushcutter.
ASSEMBLING THE BIKE HANDLE (Fig. 4)
WARNING!:The handle must be fixed
between the two notches (M) indicated on the
drive shaft tube.
- Place the bike handle (A) in the lower hub (B1).
CAUTION: The bike handle (A) must be
xed onto the hub (B) inside the two notches
(C) indicated on the bike handle.

26
GB
WARNING: Gasoline is an extremely
ammable fuel. Use extreme caution when
handling gasoline or fuel mix. Do not smoke
or bring any re or ame near the fuel or the
unit.
· To reduce the risk of fire and burn injury,
handle fuel with care. It is highly flammable.
· Mix and store fuel in a container approved for
gasoline.
· Mix fuel outdoors where there are no sparks or
flames.
· Select bare ground, stop engine, and allow to
cool before refueling.
· Loosen fuel cap slowly to release pressure and
to keep fuel from escaping around the cap.
· Tighten fuel cap securely after refueling. Unit
vibration can cause an improperly tightened
fuel cap to loosen or come off and spill
quantities of fuel.
· Wipe spilled fuel from the unit. Move 3 metre
away from refueling site before starting
engine.
· Never attempt to burn off spilled fuel under
any circumstances.
· Do not smoke while handling fuel or while
operating the unit.
· Store fuel in a cool, dry, well ventilated place.
· Never place the machine in a combustible
area such as dry leaves, straw, paper, etc.
· Store the unit and fuel in an area where fuel
vapors cannot reach sparks or open flames
from water heaters, electric motors or
switches, furnaces, etc.
· Never take the cap off the tank when the
engine is running.
- Place the upper hub (B2) in position and tighten
the 4 screws (D), without nally tighten yet.
- Line up the handlebar at a right angle to the
drive tube.
MOUNTING THE CONTROL HANDLES (Fig. 6)
- Loosen the screw (G, Fig.6). The nut (H) remains
in the control handle (L).
- Push the control handle (L) (throttle trigger M
must point toward the gearbox) onto the bike
handle (N) so that the holes (P) line up.
- Insert screw (G) and tighten down rmly.
WARNING: Make sure that all
components are connected properly and all
screws tightened.
PREPARING TO WORK
HARNESS (4S-T, Fig. 1)
Correct adjustment of the harness permits the
brush cutter to be properly balanced and at an
appropriate height from the ground (Fig. 10-14A).
- Put on the single or double harness.
- Hook the brush cutter to the harness using the
hook (A, Fig. 12).
- Position the hook (B, Fig. 12) to obtain the best
brush cutter balance.
- Position the buckle (C, Fig. 13-14B) to obtain
the correct brush cutter height.
WARNING! – When using wood-cutting
blades (22-60-80 teeth) a double harness with
quick-release mechanism must be worn.
APPROVED POWER TOOL ATTACHMENTS
The following Emak attachments may be mounted
to the basic power tool:
EP 100 Pole pruner (1)
(1) Not approved for use with bike handle units
(SPARTA 381 T - 441 T - STARK 3810 T - 4410 T).
5. STARTING
FUELING
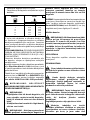
OIL
2%-50 : 1
1
5
10
15
20
25
GASOLINE
l
0,02 (20)
0,10 (100)
0,20 (200)
0,30 (300)
0,40 (400)
0,50 (500)
l
A
(cm
3
)

27
GB
different density than normal fuel. Therefore
engines, set with normal fuel, need different
H jet regulation to avoid critical issues. For
this operation it’s necessary turned at a
Licensed Service Dealer.
Filling the tank
stir the mixture well before refuelling.
STARTING
Before starting the engine, make sure
that the blade is free to move and is not in
contact with any foreign objects.
The cutting attachment must not rotate
when the engine is idling. Otherwise contact
an Authorized Service Center to carry out a
check and x the problem.
WARNING: Hold the brush cutter rmly
with both hands. Always keep your body is to
the left of tube. Never use a cross-handed grip.
Left-handers should follow these instructions
too.
Keep a proper cutting stance.
Over exposure to vibrations can result in
blood-vessel or nerve injury to persons
suering with blood circulation problems. Seek
medical attention if you experience physical
symptoms such numbness, lack of feeling,
reduction in normal strength, changes in the
colour of the skin. These symptoms normally
appear in the fingers, hands or wrists.
Before starting the engine, make sure that the
throttle lever works freely.
WARNING: Follow safety instruction for
fuel handling. Always shut off engine before
fuelling. Never add fuel to a machine with a
running or hot engine. Move at least 3 m from
refuelling site before starting engine. DO
NOT SMOKE!
1. Clean surface around fuel cap to prevent
contamination.
2. Loosen fuel cap slowly.
· Never use fuel for cleaning operations.
· Take care not to get fuel on your clothing
This product is powered by a 2-cycle engine and
requires pre-mixing gasoline and 2-cycle oil.
Pre-mix unleaded gasoline and 2-cycle engine
oil in a clean container approved for gasoline.
RECOMMENDED FUEL: THIS ENGINE IS
CERTIFIED TO OPERATE ON UNLEADED
GASOLINE INTENDED FOR AUTOMOTIVE USE
WITH AN OCTANE RATING OF 89 ([R + M] / 2) OR
HIGHER.
Mix 2-cycle engine oil with gasoline according to
the instructions on the package.
We strongly recommend the use of 2% (1:50)
Efco - Oleo-Mac two cycle engine oil, which is
specifically formulated for all air-cooled two-
stroke engines.
The correct oil / fuel proportions shown in the
table (Fig. A) are suitable when using the
PROSINT 2 and EUROSINT 2 or an equivalent
high-quality engine oil (JASO specification FD
or ISO specification L-EGD).
CAUTION: DO NOT USE AUTOMOTIVE
OIL OR 2-CYCLE OUTBOARD OIL.
CAUTION:
- Match your fuel purchases to your
consumption; don’t buy more than you will
use in one or two months;
- Store gasoline in a tightly-closed container
in a cool, dry place.
CAUTION - For the mixture, never use a
fuel with an ethanol percentage higher than
10%; gasohol (mixture of gasoline and
ethanol) up to 10% ethanol or E10 fuel are
acceptable.
NOTE - Prepare only the quantity of mixture
required for immediate use; do not leave fuel in
the tank or a container for a long time. Were
commend the use of the additive Emak ADDITIX
2000 code 001000972 if the mixture is to be
stored for 12 months.
Alkylate gasoline
CAUTIONS – Alkylate fuels have

28
GB
hand.
- When pulling the starter rope, do not
use the full extent of the rope as this can
cause the rope to break.
- Do not let starter rope snap back. Hold the
starter handle (14, Fig.1) and let the rope
rewind slowly.
WARNING: Once the engine is warmed
up do not use the choke to start up again.
WARNING: Use the semi-acceleration
device only in the phase of starting the engine
to cold.
BREAKING-IN THE ENGINE
The engine reaches the maximum power after
5÷8 hours of activity.
During this period of breaking-in do not use the
engine at wide open throttle without load, to avoid
excessive functioning stress.
WARNING! - During the breaking-in
period do not vary the carburetion to obtain a
presumed power increment; the engine can be
damaged.
NOTE: It is normal for smoke to be emitted
from a new engine during and after first use.
6. STOPPING THE ENGINE
Set the throttle lever to idle position (18, Fig. 1)
and wait a few seconds to let the engine cool o.
Turn o the engine, pushing the ON/OFF switch
(17).
7. USING THE MACHINE
PROHIBITED USE
WARNING: Avoid kickout which can
result in serious injury. Kickout is the
sideward or sudden forward motion of the
machine occurring when the blade contacts
any object such as a log or stone, or when the
wood closes in and pinches the saw blade in
the cut. Contacting a foreign object can also
result in loss of brush cutter control.
3. Carefully pour fuel mixture into the tank.
Avoid spillage.
4. Prior to replacing the fuel cap, clean and
inspect the gasket.
5. Immediately replace fuel cap and hand
tighten. Wipe up any fuel spillage.
WARNING: Check for fuel leaks, if any
are found, correct before use. Contact a
Servicing Dealer if necessary.
Engine is Flooded
- Engage a suitable tool in the spark plug boot.
- Pry off the spark plug boot.
- Unscrew and dry off the spark plug.
- Open the throttle wide.
- Pull the starter rope several times to clear the
combustion chamber.
- Refit the spark plug and connect the spark
plug boot, press it down firmly.
- Set the choke lever to OPEN position – even
if engine is cold.
- Now start the engine.
STARTUP PROCEDURE
1) Slowly push the purge bulb 4 times (9, Fig.1).
2) Pull the choke lever (15, Fig.1) in the CLOSE
position (A, Fig.15)
3) Pull the throttle lever (18, Fig. 1) and stop it
at half-throttle by pressing the button (22),
then release the lever (18).
4) Place the brush cutter on the ground in a
stable position. Check that the blade is free.
Holding the brush cutter down (Fig.15A), pull
the starter rope until the rst kick over of the
engine is heard (no more than 3 pulls). A new
unit may require additional pulls.
5) Push the choke lever (15, Fig.1) in OPEN
position (B, Fig.15).
6) Pull the starter cord to start the engine. Once
the machine is started, warm up the machine
for about few seconds, without touch the
throttle lever. The machine could need more
seconds to warm up with cold weather or at
high altitudes. Finally, push the throttle lever
(18, Fig.1) for deactivate the half-throttle.
CAUTION:
- Never wrap the starter cord around your

29
GB
operation for professionals.
• Cut only when visibility and light are adequate
for you to see clearly.
• Do not cut from a ladder, this is extremely
dangerous.
• Stop the brush cutter if the blade strikes a
foreign object. Inspect the blade and brush
cutter; repair parts as necessary.
• Keep the blade out of dirt and sand. Even a
small amount of dirt will quickly dull a blade
and increase the possibility of kickout.
• Stop the engine before setting the brush
cutter down.
• Be particularly cautious and alert while
wearing hearing protection because such
equipment may restrict your ability to hear
sounds indicating danger (calls, signals,
warnings, etc).
• Be extremely cautious when working on
slopes or uneven ground.
WARNING: Never use rigid blades when
cutting in stony areas. Thrown objects or
damaged blades may result in serious or fatal
injury to the operator or bystanders. Watch
out for thrown objects. Always wear approved
eye protection. Never lean over the cutting
attachment guard. Stones, rubbish, etc. can
be thrown up into the eyes causing blindness
or serious injury. Keep unauthorised persons
at a distance. Children, animals, onlookers
and helpers should be kept outside the safety
zone of 15 m. Stop the machine immediately
if anyone approaches. Never swing the
machine around without first checking
behind you to make sure no-one is within the
safety zone.
Working Techniques
General Working Instructions
WARNING: This section describes the
basic safety precautions for working with
clearing saws and trimmers. If you encounter
a situation where you are uncertain how to
proceed you should ask an expert. Contact
your dealer or your service workshop. Avoid
all usage which you consider to be beyond
WARNING! - Always follow the safety
precautions. The brush cutter must only be
used to trim grass material. Cut wood only with
appropriate saw blade. Do not cut metal,
plastics, masonry, or non-wood building
materials. Do not use the brush cutter as a lever
to lift, move or break objects, nor lock it on
xed supports. It is forbidden to apply tools or
applications that are not the ones indicated by
the manufacturer onto the brush cutter’s power
take-o.
WARNING: When using rigid blades,
avoid cutting close to fences, sides of
buildings, tree trunks, stones or other such
objects that could cause the brush cutter to
kick out or could cause damage to the blade.
We recommends use of the nylon line heads
for such jobs. In addition, be alert to an
increased possibility of ricochets in such
situations.
WARNING: Never use of a brush cutter
with the cutting attachment perpendicular to
the ground. Never use the brushcutter for
trimming hedges.
WARNING: If the blade loosens after
being properly tightened, stop work
immediately. The retaining nut may be worn
or damaged and should be replaced. Never
use unauthorized parts to secure the blade. If
the blade continues to loosen, see your
dealer. Never use the brushcutter for
trimming hedges.
Work Area Precautions
• Always cut with both feet on solid ground to
prevent being pulled off balance.
• Make sure you can move and stand safely.
Check the area around you for possible
obstacles (roots, rocks, branches, ditches, etc.)
in case you have to move suddenly.
• Do not cut above chest height, as a brush
cutter held higher is difficult to control against
kickout forces.
• Do not work near electrical wires. Leave this

30
GB
could get burnt if you touch it.
WARNING: Sometimes branches or
grass get caught between the guard and
cutting attachment. Always stop the engine
before cleaning.
Check before starting
• Check the blade to ensure that no cracks have
formed at the bottom of the teeth or by the
centre hole. Discard a blade if cracks are
found.
• Check that the support flange is not cracked
due to fatigue or due to being tightened too
much. Discard the support flange if it is
cracked.
• Ensure the locking nut has not lost its captive
force. The tightening torque of the locking nut
should be 25 Nm.
• Check that the blade guard is not damaged or
cracked. Replace the blade guard if it is
cracked.
WARNING: Never use the machine
without a guard or with a defective guard.
Never use the machine without the
transmission shaft.
Forestry clearing
• Before you start clearing, check the clearing
area, the type of terrain, the slope of the
ground, whether there are stones, hollows etc.
• Start at whichever end of the area is easiest,
and clear an open space from which to work.
• Work systematically to and fro across the area,
clearing a width of around 4-5 m on each pass.
This exploits the full reach of the machine in
both directions and gives the operator a
convenient and varied working area to work
in.
• Clear a strip around 75 m long. Move your fuel
can as work progresses.
• On sloping ground you should work along the
slope. It is much easier to work along a slope
than it is to work up and down it.
• You should plan the strip so that you avoid
going over ditches or other obstacles on the
ground. You should also orient the strip to
your capability. You must understand the
difference between forestry clearing, grass
clearing and grass trimming before use.
Basic safety rules
1. Look around you:
• To ensure that people, animals or other things
cannot affect your control of the machine.
• To ensure that people, animals, etc., do not
come into contact with the cutting attachment
or loose objects that are thrown out by the
cutting attachment.
WARNING: Do not use the machine
unless you are able to call for help in the
event of an accident.
2. Do not use the machine in bad weather, such
as dense fog, heavy rain, strong wind, intense
cold, etc. Working in bad weather is tiring and
often brings added risks, such as icy ground,
etc.
3. Make sure you can move and stand safely.
Check the area around you for possible
obstacles (roots, rocks, branches, ditches, etc.)
in case you have to move suddenly. Take great
care when working on sloping ground.
4. Switch off the engine before moving to
another area.
5. Never put the machine down with the engine
running.
• Always use the correct equipment.
• Make sure the equipment is well adjusted.
• Organise your work carefully.
• Always use full throttle when starting to cut
with the blade.
• Always use sharp blades.
WARNING: Neither the operator of the
machine nor anyone else may attempt to
remove the cut material while the engine is
running or the cutting equipment is rotating,
as this can result in serious injury. Stop the
engine and cutting equipment before you
remove material that has wound around the
blade as otherwise there is a risk of injury.
The bevel gear can get hot during use and
may remain so for a while afterwards. You

31
GB
• The cord can easily remove grass and weeds
up against walls, fences, trees and borders,
however it can also damage sensitive bark on
trees and bushes, and damage fence posts.
• Reduce the risk of damaging plants by
shortening the cord to 10-12 cm and reducing
the engine speed.
Clearing
• The clearing technique removes all unwanted
vegetation. Keep the trimmer head just above
the ground and tilt it. Let the end of the cord
strike the ground around trees, posts, statues
and the like.
CAUTION: This technique increases the
wear on the cord.
• The cord wears quicker and must be fed
forward more often when working against
stones, brick, concrete, metal fences, etc., than
when coming into contact with trees and
wooden fences.
• When trimming and clearing you should use
less than full throttle so that the cord lasts
longer and to reduce the wear on the trimmer
head.
Cutting
• The trimmer is ideal for cutting grass that is
difficult to reach using a normal lawn mower.
Keep the cord parallel to the ground when
cutting. Avoid pressing the trimmer head
against the ground as this can ruin the lawn
and damage the tool.
• Do not allow the trimmer head to constantly
come into contact with the ground during
normal cutting. Constant contact of this type
can cause damage and wear to the trimmer
head.
Sweeping
• The fan effect of the rotating cord can be used
for quick and easy clearing up. Hold the cord
parallel to and above the area to be swept and
move the tool to and fro.
• When cutting and sweeping you should use
full throttle to obtain the best results.
WARNING: Never cut, when visibility is
take advantage of wind conditions, so that
cleared stems fall in the cleared area of the
stand.
Grass clearing using a grass blade
• Grass blades and grass cutters must not be
used on woody stems.
• A grass blade is used for all types of tall or
coarse grass.
• The grass is cut down with a sideways,
swinging movement, where the movement
from right-to-left is the clearing stroke and the
movement from left-to-right is the return
stroke. Let the left-hand side of the blade
(between 8 and 12 o’clock) do the cutting.
• If the blade is angled to the left when clearing
grass, the grass will collect in a line, which
makes it easier to collect, e.g. by raking.
• Try to work rhythmically. Stand firmly with
your feet apart. Move forward after the return
stroke and stand firmly again.
• Let the support cup rest lightly against the
ground. It is used to protect the blade from
hitting the ground.
• Reduce the risk of material wrapping around
the blade by following these instructions:
1. Always work at full throttle.
2. Avoid the previously cut material during the
return stroke.
• Stop the engine, unclip the harness and place
the machine on the ground before you start to
collect the cut material.
Grass trimming with a trimmer head
CAUTION: Do not work with mowing
line longer than the intended diameter. With
a properly mounted guard, the built-in cutter
will automatically adjust the line to its proper
length. Overly long lines can overload the
engine, resulting in damage to the clutch
mechanism and nearby parts.
Trimming
• Hold the trimmer head just above the ground
at an angle. It is the end of the cord that does
the work. Let the cord work at its own pace.
Never press the cord into the area to be cut.

32
GB
poor or in very high or low temperatures or in
freezing weather.
Forestry clearing using a saw blade
• The risk of kickout increases with increasing
stem size. You should therefore avoid cutting
with the area of the blade between 12 o’clock
and 3 o’clock (Fig.16).
• To fell to the left, the bottom of the tree should
be pushed to the right. Tilt the blade and bring
it diagonally down to the right, exerting firm
pressure. At the same time push the stem using
the blade guard. Cut with the area of the blade
between 3 o’clock and 5 o’clock. Apply full
throttle before advancing the blade.
• To fell to the right, the bottom of the tree
should be pushed to the left. Tilt the blade and
bring it diagonally up to the right. Cut with the
area of the blade between 3 o’clock and 5
o’clock so that the direction of rotation of the
blade pushes the bottom of the tree to the left.
• To fell a tree forwards, the bottom of the tree
should be pulled backwards. Pull the blade
backwards with a quick, firm movement.
• If the stems are tightly packed, adapt your
walking pace to suit.
• If the blade jams in a stem, never jerk the
machine free. If you do this the blade, bevel
gear, shaft or handlebar may be damaged.
Release the handles, grip the shaft with both
hands and gently pull the machine free.
Using the circular saw blade
WARNING: Circular saw blades are suitable
for thinning brush and cutting small trees up
to a diameter of 5 cm. Do not attempt to cut
trees with larger diameters, since the blade
may catch or jerk the clearing saw forward.
This may cause damage to the blade or loss of
control of the clearing saw which may result
in serious injury.
WARNING: A saw blade can only be used in
connection with the proper guard (see table
pag.38) a twin handle and double harness
with release mechanism.
Brush cutting with a saw blade
• Thin stems and brush are mown down. Work
with a sawing movement, swinging sideways.
• Try to cut several stems in a single sawing
movement.
• With groups of hardwood stems, first clear
around the group. Start by cutting the stems
high up around the outside of the group to
avoid jamming. Then cut the stems to the
required height. Now try to reach in with the
blade and cut from the centre of the group. If it
is still difficult to gain access, cut the stems
high up and let them fall. This will reduce the
risk of jamming.
8. TRANSPORTING
TRANSPORTION
Carry the brush cutter with the engine o and with
the protective blade cover on (Fig. 3).
ATTENTION: Fit the disk protection p.n.
4196086 as shown (Fig. 3) before transporting or
storing the brushcutter.

33
GB
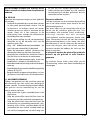
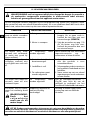
9. MAINTENANCE
Please note that the following maintenance intervals apply for normal operating conditions only. If your daily work
requires longer than normal or harsh cutting conditions are present, then the suggested intervals should be shortened
accordingly.
Complete Machine
Inspect (Leaks, Cracks, and Wear) x
x
x
x
x
x
x
x
xx
x
x
x
x
x
x
x
x
x
x
x
x
x
x
x
x
x
x
x
x
x
xClean after finishing daily work
Check Operation
Inspect (Leaks, Cracks, and Wear)
Inspect
Inspect (Damage, Sharpness, and Wear)
Inspect (Damage, Wear and Grease Level)
Clean
Controls (STOP button, Choke Lever, Throttle
Trigger, Trigger interlock)
Fuel Tank
Fuel Filter and tube
Cutting Attachments
Cutting Attachments Guard
All Accessible Screws and Nuts (Not Adjusting Screws)
Air Filter
Before Each Use
Monthly
As Required
1 year or 100 hrs.
Cylinder Fins
Starter System Vents
Carburetor
Spark Plug
Vibration Mounts
Cutting Attachments nuts and screws
Clean, Replace Filter Element
Check Tension
Replace
Inspect
Retighten
Clean
Clean
Clean after finishing daily work
Replace
Check Electrode Gap
Inspect (Damage, and Wear)
Replace by Dealer
Check that the locking nut of the cutting
equipment is tighten correctly
Replace
Check Idle (Cutting Attachments must not
rotate at idle)
Replace
Inspect (Damage, and Wear)
x
Maintenance Chart
Sharpen
Bevel Gear
x
Inspect (Damage, and Wear)
Starter Rope
x
If Damaged or
Faulty

34
GB
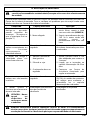
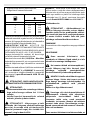
NYLON LINE HEAD
Only use line of the same diameter as the original
to avoid overloading the engine (Fig. 18).
In order to get more line out of the cutting head,
tap it lightly on the ground while working.
Note: Never hit the nylon head against hard spots
such as concrete or stones, it could be dangerous.
Replacing the nylon line on the LOAD&GO
trimmer head (Fig.19)
1. Cut 6.0 m of nylon line Ø 3.0 mm.
2. Align the arrows and insert the line into the
trimmer head (Fig. 19.1) until it is released from
the opposite side (Fig.19.2).
3. Divide the line into two equal parts (Fig. 19.3)
and then load the trimmer head by turning the
knob (Fig. 19.4).
WARNING! – Always wear protective
gloves during maintenance operations. Do not
carry out maintenance with the engine hot.
Never use fuel for cleaning operations.
AIR FILTER
Every 8-10 working hours, remove the cover (A,
Fig. 22), clean the lter (B).
Blow with compressed air, at a distance.
Replace if dirty or damaged. The engine runs
irregularly if the lter is clogged, with consequent
higher consumption and lower performance.
FUEL FILTER
Check fuel lter periodically. A dirty lter can cause
dicult starting and lower engine performance.
To clean lter proceed as follows: remove it from
fuel lling hole. Replace it (Fig. 21) if too dirty.
ENGINE
Clean cylinder ns with a brush or compressed
air periodically. Dangerous overheating of engine
may occur due to impurities on the cylinder.
SPARK PLUG
Clean spark plug and check electrode distance
periodically (Fig. 23). Use Champion NGK BPMR7A
or of other brand with the same thermal grade.
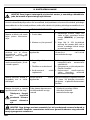
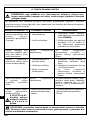
BLADE SHARPENING 234 TOOTH
1. Blades are reversible: when one side is no
longer sharp, the blade can be turned over
and used on the other side (Fig. 17).
2. Blades are sharpened using a at single-cut
le (Fig. 17).
3. To maintain the correct balance, le all cutting
edges uniformly.
4. If the blades are not sharpened correctly, this
can set up abnormal vibrations in the machine
and cause the blades themselves to break
ultimately.
BLADE SHARPENING (8 TOOTH
Always check the general condition of the blade.
Correct sharpening permits the maximum
performance of the brush cutter. To sharpen the
teeth, use a le or grindstone and proceed with
light touches, respecting the corners and the
dimensions shown in Fig. 11.
SHARPENING THE SAW BLADE
• See the cutting attachment packaging for
correct sharpening instructions.
A correctly sharpened blade is essential for
working efficiently and to avoid unnecessary
wear to the blade and clearing saw.
• Make sure that the blade is well supported
when you file it. Use a 5.5 mm round file.
• The filing angle is 15°. File alternate teeth to
the right and those in between to the left. If
the blade has been heavily pitted by stones it
may be necessary to dress the top edges of
the teeth with a flat file, in exceptional cases. If
so, this should be done before filing with a
round file. The top edges must be filed down
by the same amount for all the teeth.
WARNING! – The wrong type of cutter or
an incorrectly sharpened blade will increase the
risk of kickback. Check mower blades for
deterioration or cracks, and replace if damaged.
WARNING: Never repair damaged
cutting attachments by welding,
straightening or modifying the shape. This
may cause parts of the cutting tool to come
off and result in serious or fatal injuries.

35
GB
becomes blocked, this could be an indication that
the efficiency of the catalytic converter is limited.
WARNING: Do not operate your brush
cutter if the muffler is damaged, missing or
modified. An improperly maintained muffler
will increase the risk of fire and hearing loss.
EXTRA MAINTANANCE ADVISABLE
It is advisable to inspect the machine by a
specialized technician at an authorized service
network at the end of season, if used
intensively, and every two years if with normal
use.
ATTENTION: All maintenance operations
not reported in this manual must be carried
out by an authorized Service Center.
To ensure steady and regular brush cutter
operation, remember that parts must only be
replaced with ORIGINAL SPARES.
Any unauthorized changes and/or use
of non-original replacement parts may result
in serious injury or death to the operator or
third parties.
10. STORAGE
If the machine is to be stored for long periods:
- Drain and clean the fuel tank in a well-ventilated
area. To drain the tank, start the engine and
wait until the fuel is exhausted and the engine
stops (leaving fuel mixture in the carburettor
could damage the membranes).
- The procedures for returning the machine to
service following winter storage are the same as
for starting up during everyday use (page 26).
- Follow all the maintenance regulations
previously described.
- Clean the brush cutter completely and lubricate
the metallic parts.
- Remove, clean and lubricate the blade to
prevent rusting.
- Remove the blade xing anges, clean, dry
and lubricate the bevel gear seat.
- Empty the fuel tank and put the cap back on.
- Thoroughly clean the cooling slots and the air
lter (B, Fig. 22).
GEAR HOUSING
Every 30 working hours, remove screw (D, Fig. 8)
on the gear housing and check the quantity of
grease. Do not use more than 10 grams. Use high
quality molybdenum bisulde grease.
TRASMISSION
Grease the joints of the rigid tube (D, Fig. 25) every
30 working hours with molybdenum disulde.
CARBURETOR
Before adjusting the carburetor, clean the air lter
(B, Fig. 22) and warm up the engine. This engine
is designed and manufactured in order to comply
with the applicable 97/68/EC, 2002/88/EC and
2004/26/EC Directive.
Idle screw T (Fig. 20) is adjusted in order to ensure
a good safety margin between idle running and
clutch engagement.
WARNING: Don’t tamper the carburetor.
WARNING: With the engine idling (2800
rpm), the blade should not rotate. We
recommend that you have your nearest
authorised dealer or service workshop carry
out any carburettor adjustments.
WARNING: Weather conditions and
altitude may aect carburation.
MUFFLER
WARNING! - This muer is tted with a
catalytic converter needed for the engine to be in
compliance with the emissions requirements.
Never modify or remove the catalytic converter:
failure to do so is a violation of law.
WARNING! - Muers tted with catalytic
converters get very hot during use and remain
so for some time after stopping. This also
applies at idle speed. Contact can result in burns
to the skin. Remember the risk of re!
CAUTION! -
If the muffler is damaged, it
must be replaced. If the muffler frequently

36
GB
- Store the brush cutter in a dry place, preferably
not in direct contact with the oor and away
from heat sources.
11. ENVIRONMENTAL PROTECTION
Environmental protection should be a priority of
considerable importance when using the
machine, for the benefit of both social cohesion
and the environment in which we live.
- Try not to cause any disturbance to the
surrounding area.
- Scrupulously comply with local regulations
and provisions for the disposal of waste
materials after mowing.
- Scrupulously comply with local regulations
and provisions for the disposal of oils, petrol,
batteries, filters, deteriorated parts or any
elements which have a strong impact on the
environment. This waste must not be
disposed of as normal waste, it must be
separated and taken to specified waste
disposal centres where the material will be
recycled.
Demolition and disposal
When the machine reaches the end of its service
life, do not dispose of it into the environment;
instead take it to a waste disposal centre.
Most materials used in the manufacture of the
machine are recyclable; all metals (steel,
aluminium, brass) can be delivered to a normal
recycling station. For information contact your
local waste recycling service. Waste disposal
must be carried out with respect for the
environment, avoiding soil, air and water
pollution.
In all cases, applicable local legislation must
be complied with.
When the machine is scrapped also the CE mark
label must be destroyed together with this
manual.

37
GB
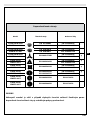
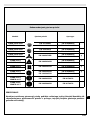
12. TECHNICAL DATA
Displacement
Power
Cutting width
Engine
Min. rpm
Fuel tank capacity
Primer carburetor
Antivibration system
Weight without cutting tool
and guard
cm
3
2 stroke EMAK
36.2
2800
11.700
Yes
38
kW
min
-1
cm
3
cm
kg
1.3
min
-1
Engine speed at maximum
output spindle speed
Maximum speed of output
spindle
8.500
min
-1
SPARTA 381S
STARK 3810S
7.2 7.3
Yes
870 (0.87 l)
SPARTA 381T
STARK 3810T
SPARTA 441S
STARK 4410S
SPARTA 441T
STARK 4410T
40.2
1.6
7.9 8.0

38
GB
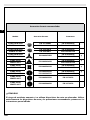
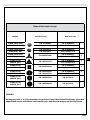
WARNING!!!
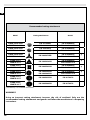
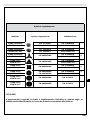
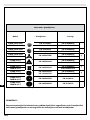
Using an incorrect cutting attachment increases the risk of accidents! Only use the
recommended cutting attachments and guards and follow the manufacturer’s sharpening
instructions.
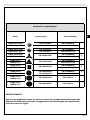
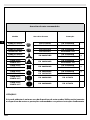
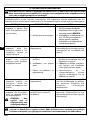
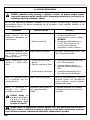
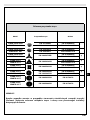
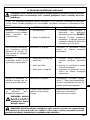
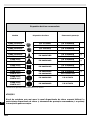
Recommended cutting attachments
Model Cutting attachments Guards
STARK 3810-4410
SPARTA 381-441
P.N. 63129003
P.N. 63129004
P.N. 4192048CR
P.N. 61042011CR
STARK 3810-4410
SPARTA 381-441
P.N. 63019018
P.N. 63019017
P.N. 4192048CR
P.N. 61042011CR
STARK 3810-4410
SPARTA 381-441
P.N. 4095673BR
P.N. 4192048CR
P.N. 61042011CR
*
STARK 4410T
SPARTA 441T
P.N. 4095638AR
P.N. 4192048CR
P.N. 61042011CR
*
STARK 4410T
SPARTA 441T
P.N. 4095563AR
P.N. 4192048CR
P.N. 61042011CR
*
STARK 4410T
SPARTA 441T
P.N. 4095565AR
P.N. 4095065AR
P.N. 4192048CR
P.N. 61042011CR
*
STARK 4410T
SPARTA 441T
P.N. 4095635AR P.N. 4174279
STARK 4410T
SPARTA 441T
P.N. 4095066AR P.N. 4174279
* protection p. n. 4174283AR not needed

39
GB
SPARTA 381 S
STARK 3810 S
SPARTA 381 T
STARK 3810 T
SPARTA 441 S
STARK 4410 S
SPARTA 441 T
STARK 4410 T
Pressure
level
dB (A)
Uncertainty
Measured
sound
power
level
Uncertainty
Guaranteed
sound
power
evel
Vibration
level
Uncertainty
dB (A)
dB (A)
dB (A)
dB (A)
m/s
2
m/s
2
L
pA
av
EN 11806
EN 22868
2000/14/EC
EN 22868
EN ISO 3744
L
WA
2000/14/EC
EN 22868
EN ISO 3744
EN 11806
EN 22867
EN 12096
EN 12096
98.1 96.1 98.1 99.3 99.396.1 97.3 97.3
*
*
*
- Weighted average values: 1/2 minimum rpm, 1/2 at full load (head) or 1/2 racing (blade).
2.0 2.0 2.0 2.0 2.02.0 2.0 2.0
111.1 108.1 111.1 112.1 112.1108.1 109.6 109.6
2.0 2.0 2.0 2.0 2.02.0 2.0 2.0
113.0 110.0 113.0 112.0 114.0110.0 114.0 112.0
6.8 (sx)
5.9 (dx)
6.1 (sx)
7.2 (dx)
6.3 (sx)
7.5 (dx)
6.8 (sx)
5.9 (dx)
6.3 (sx)
7.5 (dx)
5.8 (sx)
6.6 (dx)
6.1 (sx)
7.2 (dx)
5.8 (sx)
6.6 (dx)
1.8 (sx)
1.6 (dx)
2.7 (sx)
2.8 (dx)
2.2 (sx)
1.8 (dx)
1.8 (sx)
1.6 (dx)
2.2 (sx)
1.8 (dx)
1.6 (sx)
1.6 (dx)
2.7 (sx)
2.8 (dx)
1.6 (sx)
1.6 (dx)

40
GB
This machine has been designed and manufactured using the
most modern techniques. The manufacturer guarantees its
products for 24 months from the date of purchase, for private
and hobby use. The warranty is limited to 12 months in case
of professional use.
Limited warranty
1) The warranty period starts on the date of purchase. The
manufacturer, acting through the sales and technical
assistance network, shall replace free of charge any parts
proven defective in material, machining or
manufacturing. The warranty does not affect the
purchaser’s rights as established under legislation
governing the consequences of defects in the machine.
2) Technical personnel will undertake the necessary repairs
in the minimum time possible, compatible with
organisational needs.
3) To make any claim under the warranty, this certificate
of warranty, fully completed, bearing the dealer’s
stamp and accompanied by the invoice or receipt
showing the date of purchase, must be displayed to
the personnel authorised to approve work.
4) The warranty shall be null and void if:
- the machine has evidently not been serviced correctly
- the machine has been used for improper purposes or has
been modified in any way,
- unsuitable lubricants and fuels have been used
- non-original spare parts and accessories have been fitted
- work has been done on the machine by unauthorised
personnel
5) The warranty does not cover consumables or parts
subject to normal wear.
6) The warranty does not cover work to update or improve
the machine.
7) The warranty does not cover any preparation or
servicing work required during the warranty period.
8) Damage incurred during transport must be immediately
brought to the attention of the carrier: failure to do so
shall render the warranty null and void.
9) Engines of other manufacturers (Briggs & Stratton,
Subaru, Honda, Kipor, Lombardini, Kohler, etc.) fitted to
our machines are covered by the warranties of the
engine manufacturer.
10) The warranty does not cover injury or damage caused
directly or indirectly to persons or things by defects in
the machine or by periods of extended disuse of the
machine resulting from the said defects.
14. WARRANTY CERTIFICATE
13. DECLARATION OF CONFORMITY
The undersigned, Emak spa via Fermi, 4 - 42011 Bagnolo in
Piano (RE) ITALY declares under its own responsibility that
the machine:
1. Category: brushcutter/grass trimmer
2. Brand Efco, Type Stark 3810 S - Stark 3810 T - Stark 4410 S -
Stark 4410 T
Brand Oleo-Mac, Type Sparta 381 S - Sparta 381 T - Sparta
441 S - Sparta 441 T
3. Serial ID 860 XXX 0001 ÷ 860 XXX 9999 (Stark 3810 - Sparta
381) - 861 XXX 0001 ÷ 861 XXX 9999 (Stark 4410 - Sparta
441)
conforms to the requirements of Directives:
2006/42/CE - 2000/14/CE - 2014/30/EU - 97/68/CE - 2004/26/
CE, conforms to the provisions of the following harmonized
standards:
EN 55012 - EN ISO 11806
Procedures for evaluation of conformity followed:
Annex V - 2000/14/CE
Measured sound power level: 111.1 dB (A) (Stark 3810 -
Sparta 381) - 112.1 dB (A) (Stark 4410 - Sparta 441)
Guaranteed sound power level: 113.0 dB (A) (Stark 3810 -
Sparta 381) - 114.0 dB (A) (Stark 4410 - Sparta 441)
Technical Documentation deposited with Administrative
Headquarters: Technical Department
Signed in Bagnolo in Piano (RE) Italy - via Fermi, 4
Date: 01/02/2017
Fausto Bellamico - President
s.p.a.
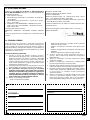
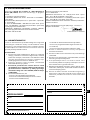
MODEL
BOUGHT BY Mr.
SERIAL No
DATE
DEALER
Do not send! Only attach to requests for technical warranties.
Page is loading ...
Page is loading ...
Page is loading ...
Page is loading ...
Page is loading ...
Page is loading ...
Page is loading ...
Page is loading ...
Page is loading ...
Page is loading ...
Page is loading ...
Page is loading ...
Page is loading ...
Page is loading ...
Page is loading ...
Page is loading ...
Page is loading ...
Page is loading ...
Page is loading ...
Page is loading ...
Page is loading ...
Page is loading ...
Page is loading ...
Page is loading ...
Page is loading ...
Page is loading ...
Page is loading ...
Page is loading ...
Page is loading ...
Page is loading ...
Page is loading ...
Page is loading ...
Page is loading ...
Page is loading ...
Page is loading ...
Page is loading ...
Page is loading ...
Page is loading ...
Page is loading ...
Page is loading ...
Page is loading ...
Page is loading ...
Page is loading ...
Page is loading ...
Page is loading ...
Page is loading ...
Page is loading ...
Page is loading ...
Page is loading ...
Page is loading ...
Page is loading ...
Page is loading ...
Page is loading ...
Page is loading ...
Page is loading ...
Page is loading ...
Page is loading ...
Page is loading ...
Page is loading ...
Page is loading ...
Page is loading ...
Page is loading ...
Page is loading ...
Page is loading ...
Page is loading ...
Page is loading ...
Page is loading ...
Page is loading ...
Page is loading ...
Page is loading ...
Page is loading ...
Page is loading ...
Page is loading ...
Page is loading ...
Page is loading ...
Page is loading ...
Page is loading ...
Page is loading ...
Page is loading ...
Page is loading ...
Page is loading ...
Page is loading ...
Page is loading ...
Page is loading ...
Page is loading ...
Page is loading ...
Page is loading ...
Page is loading ...
Page is loading ...
Page is loading ...
Page is loading ...
Page is loading ...
Page is loading ...
Page is loading ...
Page is loading ...
Page is loading ...
Page is loading ...
Page is loading ...
Page is loading ...
Page is loading ...
Page is loading ...
Page is loading ...
Page is loading ...
Page is loading ...
Page is loading ...
Page is loading ...
Page is loading ...
Page is loading ...
Page is loading ...
Page is loading ...
Page is loading ...
Page is loading ...
Page is loading ...
Page is loading ...
Page is loading ...
Page is loading ...
Page is loading ...
Page is loading ...
Page is loading ...
Page is loading ...
Page is loading ...
Page is loading ...
Page is loading ...
Page is loading ...
Page is loading ...
Page is loading ...
Page is loading ...
Page is loading ...
Page is loading ...
Page is loading ...
Page is loading ...
Page is loading ...
Page is loading ...
Page is loading ...
Page is loading ...
Page is loading ...
Page is loading ...
Page is loading ...
Page is loading ...
Page is loading ...
Page is loading ...
Page is loading ...
Page is loading ...
Page is loading ...
Page is loading ...
Page is loading ...
Page is loading ...
Page is loading ...
Page is loading ...
Page is loading ...
Page is loading ...
Page is loading ...
Page is loading ...
Page is loading ...
Page is loading ...
Page is loading ...
Page is loading ...
Page is loading ...
Page is loading ...
Page is loading ...
Page is loading ...
Page is loading ...
Page is loading ...
Page is loading ...
Page is loading ...
Page is loading ...
Page is loading ...
Page is loading ...
Page is loading ...
Page is loading ...
Page is loading ...
Page is loading ...
Page is loading ...
Page is loading ...
Page is loading ...
Page is loading ...
Page is loading ...
Page is loading ...
Page is loading ...
Page is loading ...
Page is loading ...
Page is loading ...
Page is loading ...
Page is loading ...
Page is loading ...
Page is loading ...
Page is loading ...
Page is loading ...
Page is loading ...
Page is loading ...
Page is loading ...
Page is loading ...
Page is loading ...
Page is loading ...
Page is loading ...
Page is loading ...
Page is loading ...
Page is loading ...
Page is loading ...
Page is loading ...
Page is loading ...
Page is loading ...
Page is loading ...
Page is loading ...
Page is loading ...
Page is loading ...
Page is loading ...
Page is loading ...
Page is loading ...
Page is loading ...
Page is loading ...
Page is loading ...
Page is loading ...
Page is loading ...
Page is loading ...
Page is loading ...
Page is loading ...
Page is loading ...
Page is loading ...
Page is loading ...
Page is loading ...
Page is loading ...
Page is loading ...
Page is loading ...
Page is loading ...
Page is loading ...
Page is loading ...
Page is loading ...
Page is loading ...
Page is loading ...
Page is loading ...
Page is loading ...
Page is loading ...
Page is loading ...
Page is loading ...
Page is loading ...
Page is loading ...
Page is loading ...
Page is loading ...
Page is loading ...
Page is loading ...
Page is loading ...
Page is loading ...
Page is loading ...
Page is loading ...
Page is loading ...
Page is loading ...
Page is loading ...
Page is loading ...
Page is loading ...
Page is loading ...
Page is loading ...
Page is loading ...
Page is loading ...
Page is loading ...
Page is loading ...
Page is loading ...
Page is loading ...
Page is loading ...
Page is loading ...
Page is loading ...
Page is loading ...
Page is loading ...
Page is loading ...
Page is loading ...
Page is loading ...
Page is loading ...
Page is loading ...
Page is loading ...
Page is loading ...
Page is loading ...
Page is loading ...
Page is loading ...
Page is loading ...
Page is loading ...
Page is loading ...
Page is loading ...
Page is loading ...
Page is loading ...
Page is loading ...
Page is loading ...
Page is loading ...
Page is loading ...
Page is loading ...
Page is loading ...
Page is loading ...
Page is loading ...
Page is loading ...
Page is loading ...
Page is loading ...
Page is loading ...
Page is loading ...
Page is loading ...
Page is loading ...
Page is loading ...
Page is loading ...
Page is loading ...
Page is loading ...
Page is loading ...
Page is loading ...
Page is loading ...
Page is loading ...
Page is loading ...
Page is loading ...
Page is loading ...
Page is loading ...
Page is loading ...
Page is loading ...
-
 1
1
-
 2
2
-
 3
3
-
 4
4
-
 5
5
-
 6
6
-
 7
7
-
 8
8
-
 9
9
-
 10
10
-
 11
11
-
 12
12
-
 13
13
-
 14
14
-
 15
15
-
 16
16
-
 17
17
-
 18
18
-
 19
19
-
 20
20
-
 21
21
-
 22
22
-
 23
23
-
 24
24
-
 25
25
-
 26
26
-
 27
27
-
 28
28
-
 29
29
-
 30
30
-
 31
31
-
 32
32
-
 33
33
-
 34
34
-
 35
35
-
 36
36
-
 37
37
-
 38
38
-
 39
39
-
 40
40
-
 41
41
-
 42
42
-
 43
43
-
 44
44
-
 45
45
-
 46
46
-
 47
47
-
 48
48
-
 49
49
-
 50
50
-
 51
51
-
 52
52
-
 53
53
-
 54
54
-
 55
55
-
 56
56
-
 57
57
-
 58
58
-
 59
59
-
 60
60
-
 61
61
-
 62
62
-
 63
63
-
 64
64
-
 65
65
-
 66
66
-
 67
67
-
 68
68
-
 69
69
-
 70
70
-
 71
71
-
 72
72
-
 73
73
-
 74
74
-
 75
75
-
 76
76
-
 77
77
-
 78
78
-
 79
79
-
 80
80
-
 81
81
-
 82
82
-
 83
83
-
 84
84
-
 85
85
-
 86
86
-
 87
87
-
 88
88
-
 89
89
-
 90
90
-
 91
91
-
 92
92
-
 93
93
-
 94
94
-
 95
95
-
 96
96
-
 97
97
-
 98
98
-
 99
99
-
 100
100
-
 101
101
-
 102
102
-
 103
103
-
 104
104
-
 105
105
-
 106
106
-
 107
107
-
 108
108
-
 109
109
-
 110
110
-
 111
111
-
 112
112
-
 113
113
-
 114
114
-
 115
115
-
 116
116
-
 117
117
-
 118
118
-
 119
119
-
 120
120
-
 121
121
-
 122
122
-
 123
123
-
 124
124
-
 125
125
-
 126
126
-
 127
127
-
 128
128
-
 129
129
-
 130
130
-
 131
131
-
 132
132
-
 133
133
-
 134
134
-
 135
135
-
 136
136
-
 137
137
-
 138
138
-
 139
139
-
 140
140
-
 141
141
-
 142
142
-
 143
143
-
 144
144
-
 145
145
-
 146
146
-
 147
147
-
 148
148
-
 149
149
-
 150
150
-
 151
151
-
 152
152
-
 153
153
-
 154
154
-
 155
155
-
 156
156
-
 157
157
-
 158
158
-
 159
159
-
 160
160
-
 161
161
-
 162
162
-
 163
163
-
 164
164
-
 165
165
-
 166
166
-
 167
167
-
 168
168
-
 169
169
-
 170
170
-
 171
171
-
 172
172
-
 173
173
-
 174
174
-
 175
175
-
 176
176
-
 177
177
-
 178
178
-
 179
179
-
 180
180
-
 181
181
-
 182
182
-
 183
183
-
 184
184
-
 185
185
-
 186
186
-
 187
187
-
 188
188
-
 189
189
-
 190
190
-
 191
191
-
 192
192
-
 193
193
-
 194
194
-
 195
195
-
 196
196
-
 197
197
-
 198
198
-
 199
199
-
 200
200
-
 201
201
-
 202
202
-
 203
203
-
 204
204
-
 205
205
-
 206
206
-
 207
207
-
 208
208
-
 209
209
-
 210
210
-
 211
211
-
 212
212
-
 213
213
-
 214
214
-
 215
215
-
 216
216
-
 217
217
-
 218
218
-
 219
219
-
 220
220
-
 221
221
-
 222
222
-
 223
223
-
 224
224
-
 225
225
-
 226
226
-
 227
227
-
 228
228
-
 229
229
-
 230
230
-
 231
231
-
 232
232
-
 233
233
-
 234
234
-
 235
235
-
 236
236
-
 237
237
-
 238
238
-
 239
239
-
 240
240
-
 241
241
-
 242
242
-
 243
243
-
 244
244
-
 245
245
-
 246
246
-
 247
247
-
 248
248
-
 249
249
-
 250
250
-
 251
251
-
 252
252
-
 253
253
-
 254
254
-
 255
255
-
 256
256
-
 257
257
-
 258
258
-
 259
259
-
 260
260
-
 261
261
-
 262
262
-
 263
263
-
 264
264
-
 265
265
-
 266
266
-
 267
267
-
 268
268
-
 269
269
-
 270
270
-
 271
271
-
 272
272
-
 273
273
-
 274
274
-
 275
275
-
 276
276
-
 277
277
-
 278
278
-
 279
279
-
 280
280
-
 281
281
-
 282
282
-
 283
283
-
 284
284
-
 285
285
-
 286
286
-
 287
287
-
 288
288
-
 289
289
-
 290
290
-
 291
291
-
 292
292
-
 293
293
-
 294
294
-
 295
295
-
 296
296
-
 297
297
-
 298
298
-
 299
299
-
 300
300
-
 301
301
-
 302
302
-
 303
303
-
 304
304
-
 305
305
-
 306
306
-
 307
307
-
 308
308
-
 309
309
-
 310
310
-
 311
311
-
 312
312
-
 313
313
-
 314
314
-
 315
315
-
 316
316
-
 317
317
-
 318
318
-
 319
319
-
 320
320
-
 321
321
-
 322
322
-
 323
323
-
 324
324
-
 325
325
-
 326
326
-
 327
327
-
 328
328
-
 329
329
-
 330
330
-
 331
331
-
 332
332
-
 333
333
-
 334
334
-
 335
335
-
 336
336
-
 337
337
-
 338
338
-
 339
339
-
 340
340
-
 341
341
-
 342
342
-
 343
343
-
 344
344
-
 345
345
-
 346
346
-
 347
347
-
 348
348
-
 349
349
-
 350
350
-
 351
351
-
 352
352


Ask a question and I''ll find the answer in the document
Finding information in a document is now easier with AI
in other languages
- italiano: Oleo-Mac SPARTA 441 S Manuale del proprietario
- français: Oleo-Mac SPARTA 441 S Le manuel du propriétaire
- español: Oleo-Mac SPARTA 441 S El manual del propietario
- Deutsch: Oleo-Mac SPARTA 441 S Bedienungsanleitung
- русский: Oleo-Mac SPARTA 441 S Инструкция по применению
- Nederlands: Oleo-Mac SPARTA 441 S de handleiding
- português: Oleo-Mac SPARTA 441 S Manual do proprietário
- slovenčina: Oleo-Mac SPARTA 441 S Návod na obsluhu
- polski: Oleo-Mac SPARTA 441 S Instrukcja obsługi
- čeština: Oleo-Mac SPARTA 441 S Návod k obsluze
- eesti: Oleo-Mac SPARTA 441 S Omaniku manuaal
- română: Oleo-Mac SPARTA 441 S Manualul proprietarului
Related papers
-
 Oleo-Mac BC 530 T Owner's manual
-
Oleo-Mac DS 3000 D Owner's manual
-
Oleo-Mac DS 2410 D - Engine unit Owner's manual
-
 Oleo-Mac BC220S User manual
-
Oleo-Mac BCF 550 Owner's manual
-
Bertolini 195 S Owner's manual
-
Oleo-Mac HC265XP User manual
-
 Oleo-Mac DS 2700 User manual
-
Oleo-Mac DS 3500 S Owner's manual
-
Oleo-Mac BCF 430 Owner's manual


