Repotec RP-1008W Owner's manual
- Category
- Network switches
- Type
- Owner's manual

- 0 -
8 Port Nway Fast Ethernet
Web Smart Switch
User’s Manual

- 1 -
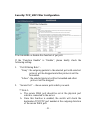
Web Smart Switch Configure
Please follow the steps to configure this Web Smart switch.
Step 1: Use a twisted pair cable to connect this switch to your PC.
Step 2: Set your PC’s IP to 192.168.2.xx.
Step 3: Open the web browser (like IE…), and go to 192.168.2.1
Then you will see the login screen.
ID and the password: admin

- 2 -
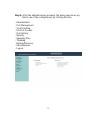
Step 4: After the authentication procedure, the home page shows up.
Select one of the configurations by clicking the icon.
- Administrator
- Port Management
- VLAN Setting
- Per Port Counter
- QoS Setting
- Security
- Spanning Tree
- Trunking
- Backup/Recovery
- Miscellaneous
- Logout

- 3 -
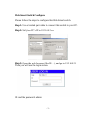
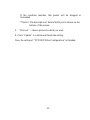
Administrator: Authentication Configuration
1. Change the user name and the password.
2. Click “Update” to confirm the new change.
Now, you can use the new user name and the password.

- 4 -
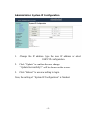
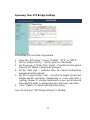
Administrator: System IP Configuration
1. Change the IP address: type the new IP address or select
DHCP IP configuration.
2. Click “Update” to confirm the new change.
“Update Successfully!!” will be shown on the screen.
3. Click "Reboot" to use new setting to login
Now, the setting of “System IP Configuration” is finished.

- 5 -
Administrator: System Status
MAC address and system version will be shown on the screen.
1. Change the new comment of this switch by typing the new
comment.
2. Click “Update” to confirm the new change.
“Update Successfully!” will be shown on the screen.
3. Click "Reboot" to use new setting to login
Now, the setting of “System Status” is finished.

- 6 -
Administrator: Load Default Setting
1. Click “Load” to back to the factory default setting.
**Note: Recover switch default setting excluding the IP address,
User name and Password.
Now, the default is loaded.

- 7 -
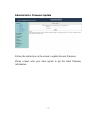
Administrator: Firmware Update
Follow the instruction on the screen to update the new firmware.
Please contact with your sales agents to get the latest firmware
information.

- 8 -
Administrator: Reboot Device
1. Click “Confirm” to reboot the device.
Now, the setting of “Reboot Device” is finished.

- 9 -
Port Management: Port Configuration
Select the “Port No.” - configure the mode below:
1. “Auto” - enable/disable Auto-Negotiation.
2. “Speed” - 10M or 100M mode for the selected port.
2. “Duplex” - Full or Half-Duplex mode for the selected port.
4. “Pause” - enable/disable for the selected port.
5. “Backpressure” - enable/disable for the selected port.
6. “Tx Capability (Cap) ” - enable/disable for the selected port.
7. “Addr. Learning” - enable/disable for the selected port.
Now, the setting of “Port Configuration” is finished.

- 10 -
Port Management: Port Mirroring
Port Mirroring is used to mirror traffic, RX, TX or TX&RX, from
Source port to Destination port for analysis.
1. Select the Destination port: you can choose port 1 to port 8
2. Select the Source port: by clicking the checking box of the
port.
3. Click “Update” to save the setting.
Now, the setting of “Port Mirroring” is finished.

- 11 -
Port Management: Bandwidth Control
1. Select the “Port No.”: you can choose port 1 to port 8
2. “TX Rate Value”: set the transmission rate of the selected port.
(0:Full speed; 1~255:Specified bandwidth.)
3. “RX Rate Value”: set the receiving rate of the selected port. (0:
Full speed; 1~255: Specified bandwidth.)
4. “Resolution” : Low: 32 kbps / High: 512 kbps
5. Click “Update” to confirm the setting or “LoadDefault”.
Now, the setting of “Bandwidth Control” is finished.

- 12 -
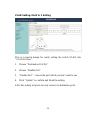
Port Management: Broadcast Storm Control
1. “Threshold” - Set the threshold from 1~63.
2. “Enable Port” - per port to define the status of broadcast packets.
3. Click “Update” to confirm the setting.
Now, the setting of “Broadcast Storm Control” is finished.

- 13 -
VLAN Setting: VLAN Mode
There are two VLAN modes : Port Based VLAN and Tagged VLAN.
Click “Change VLAN mode” to select the mode.
**If the Port Based VLAN function is enabled, Multi to 2 setting and
tag Based VLAN will be disabled automatically.
Now, the setting of “VLAN Mode” is finished.

- 14 -
VLAN Setting: VLAN Member Setting (Tag Based)
You can select a port group.
1. Click the port numbers: which you want to put them into the
selected VLAN group.
2. Click “Update” to confirm and finish the setting.
3. Click “LoadDefualt” to back to the original factory setting.
Now, the setting of “VLAN Member Setting” is finished.

- 15 -
VLAN Setting: Multi to 2 Setting
This is a special design for easily setting the switch VLAN into
“VLAN Per Port“.
1. Choose “Destination Port No”.
2. Choose “Disable Port”
3. “Disable Port” – choose the port which you don’t want to use
4. Click “Update” to confirm and finish the setting.
After this setting, all ports can only connect to destination ports.

- 16 -
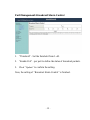
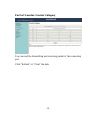
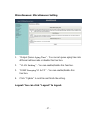
Per Port Counter: Counter Category
You can read the transmitting and receiving packet of the connecting
port.
Click “Refresh” or “Clear” the data.

- 17 -
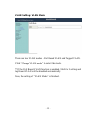
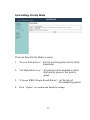
QoS Setting: Priority Mode
There are three Priority Modes to select.
1. “First-in-First-Service” - the first receiving packet will be firstly
transmitted.
2. “All-High-before-Low” – All packets will be assigned to either
high priority queue or low priority
queue.
3. “4 Queue WRR (Weight-Round-Robin)” - set the ratio of
the transmitting packet.
4. Click “Update” to confirm and finish the setting.

- 18 -
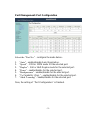
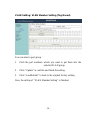
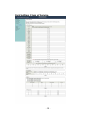
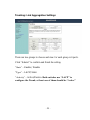
QoS Setting: Class of Service

- 19 -
You can set QoS mode of per port by different bases.
TCP/UDP > TP TPS/DS > 802.1P > Physical port
1. “TCP/UDP Port” – Q1 ~ Q4 options are effective for the
selected physical port only. “Drop” option is the global setting
for all physical ports.
The packet queue will be transferred based on the number of “4
Queue WRR” on QoS Setting: Priority Mode.
**WRR –Q1/Q2/Q3/Q4
**“Drop” - packets will be dropped.
2. “IP TOS/DS” – “Priority Setting”: Q1 ~ Q4; “IP TOS/DS Port
Setting” - It means the packets with special IP will be
firstly transmitted.
3. “802.1p” – Priority mapping table as the screen shown.
4. “Physical port” - you can select the port which you want to
configure as Q1~Q4 priority.
5. Click “Update” to confirm and finish the setting.
Now, the setting of “Class of Service” is finished.
Page is loading ...
Page is loading ...
Page is loading ...
Page is loading ...
Page is loading ...
Page is loading ...
Page is loading ...
Page is loading ...
-
 1
1
-
 2
2
-
 3
3
-
 4
4
-
 5
5
-
 6
6
-
 7
7
-
 8
8
-
 9
9
-
 10
10
-
 11
11
-
 12
12
-
 13
13
-
 14
14
-
 15
15
-
 16
16
-
 17
17
-
 18
18
-
 19
19
-
 20
20
-
 21
21
-
 22
22
-
 23
23
-
 24
24
-
 25
25
-
 26
26
-
 27
27
-
 28
28


Repotec RP-1008W Owner's manual
- Category
- Network switches
- Type
- Owner's manual
Ask a question and I''ll find the answer in the document
Finding information in a document is now easier with AI
Related papers
Other documents
-
Digitus DN-95311 Owner's manual
-
Allnet ALL8089WPoE Owner's manual
-
-
 Cerio CS-2224-14P User manual
-
MicroNet SP6026P User manual
-
-
Intellinet 8-Port Fast Ethernet PoE Web-Smart Switch User manual
-
Eneo EPS-1016 Full Manual
-
Messoa POE008 User manual
-
AirLive POE-FSH2422G-390 User manual
