Page is loading ...

FOR OUTDOOR USE ONLY
THIS IS YOUR ASSEMBLY, CARE & USE MANUAL
WITH IMPORTANT WARNING & SAFETY INFORMATION.
PLEASE SAVE THESE INSTRUCTIONS.
CUSTOMER SERVICE: 1-866-475-5180 (Monday–Friday, 8:30 am–4:30 pm, CST)
www.olp-inc.com
PRO SERIES
Charcoal Grill
Owner’s Manual
Model
SH3618CW

CALIFORNIA PROPOSITION 65
1. COMBUSTION BYPRODUCTS PRODUCED WHEN USING THIS PRODUCT CONTAIN CHEMICALS
KNOWN TO THE STATE OF CALIFORNIA TO CAUSE CANCER, BIRTH DEFECTS, AND OTHER
REPRODUCTIVE HARM.
2. THIS PRODUCT CONTAINS CHEMICALS, INCLUDING LEAD AND LEAD COMPOUNDS, KNOWN
TO THE STATE OF CALIFORNIA TO CAUSE CANCER, BIRTH DEFECTS OR OTHER REPRODUCTIVE
HARM. WASH YOUR HANDS AFTER HANDLING THIS PRODUCT.
WARNING
THIS MANUAL CONTAINS IMPORTANT INFORMATION NECESSARY FOR THE PROPER AND SAFE
USE OF THIS UNIT. READ AND FOLLOW ALL WARNINGS AND INSTRUCTIONS BEFORE USING
GRILL AND DURING USE.
FAILURE TO FOLLOW THESE WARNINGS AND INSTRUCTIONS PROPERLY
COULD RESULT IN FIRE OR EXPLOSION THAT COULD CAUSE PROPERTY
DAMAGE, PERSONAL INJURY OR DEATH.
WARNING
Congratulations
on your purchase of your new
Smoke Hollow® Charcoal Grill.
With proper set-up, operation and maintenance, this appliance will
provide you with years of delicious food and cooking enjoyment.
PRO SERIES
2

IMPORTANT SAFEGUARDS
• For outdoor use only. Do not operate grill indoors or in an enclosed area.
• Only use this grill on a hard, level, non-combustible, stable surface (concrete, ground, etc.) capable of supporting
the weight of the grill. Never use on wooden or other sur faces that could burn.
• Do not leave grill unattended when in use.
• Proper clearance of 10 feet between the grill and combustible material (bushes, trees, wooden decks, fences,
buildings, etc.) or construction should be maintained at all times when grill is in use. Do not place grill under a
roof overhang or other enclosed area..
• Do not use gasoline, kerosene or alcohol for lighting charcoal, use of any of these or similar products may cause
an explosion possibly leading to severe bodily injury.
• Never add charcoal lighting fluid to hot or even warm coals as flashback may occur causing severe burns.
• When using charcoal lighting fluid, allow charcoal to burn with grill lid open until covered with a light ash
(approximately 20 minutes). This will allow charcoal lighting fluid to burn off. Failure to do this could trap fumes
from charcoal lighting fluid in grill and may result in a flash fire or explosion when lid is opened.
• Place grill in an area where children and pets cannot come into contact with unit. Close supervision is necessary
when grill is in use.
• We recommend the use of a Charcoal Chimney Starter to avoid the dangers associated with charcoal lighting
fluid. If you choose to use charcoal lighting fluid, only use lighting fluid approved for lighting charcoal. Carefully
read manufacturer’s warnings and instructions on the charcoal lighting fluid and charcoal prior to the use of
their product. Store charcoal lighting fluid safely away from grill.
• Do not store lighter fluid or other flammable liquids or material under the grill.
• Grill is hot when in use. To avoid burns:
• DO NOT attempt to move the grill when in used.
• Brace grill so the unit does not accidentally move.
• Wear protective gloves or oven mitts.
• DO NOT touch any hot grill surfaces.
• DO NOT wear loose clothing to come in contact with grill.
• When grilling, grease from meat may drip into the charcoal and cause a grease fire. If this should happen, close
the lid and dampers to suffocate the flame. Do not use water to extinguish grease fires.
• In windy weather, place grill in an outdoor area that is protected from the wind.
• Never leave coals and ashes in grill unattended. Before grill can be left unattended, remaining coals and ashes
must be removed from grill. Use caution to protect yourself and property. Carefully place remaining coals and
ashes in a non-combustible metal container and saturate completely with water. Allow coals and water to remain
in metal container 24 hours prior to disposing.
• When opening the lids, keep hands, face and body a safe distance from hot steam and flame flare-ups.
• Do not store or use grill near gasoline or other flammable liquids, gases or where flammable vapors may be present.
• Be sure all charcoals are cold before emptying, if necessary pour water on coals before moving grill.
• Store the grill out of reach of children and in a dry location when not in use.
• Extinguished coals and ashes should be placed a safe distance from all structures and combustible materials.
• Do not allow charcoal and or wood to rest on the firebox side wall. Doing so will greatly reduce the life of the
metal and finish of your grill.
• Use caution when lifting or moving grill to prevent strains and back injuries.
• Properly dispose of all packaging material.
IMPORTANT SAFETY WARNINGS
WARNING
USE CAUTION AND COMMON SENSE WHEN OPERATING YOUR GRILL.
FAILURE TO ADHERE TO SAFETY WARNING IN THIS MANUAL COULD
RESULT IN BODILY INJURY OR PROPERTY DAMAGE.
3

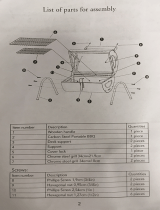
Parts and Tool List
Hardware Pack
Quantity Description
44 M6x15 Phillips/Slotted Head Screw
8 M6x52 Hex Phillips/Slotted Head Screw
12 M5x10 Flat Head Screw
4 M5x8 Shoulder Screw
6 M6 KEPS Nut
1 M6x21 Shoulder Screw
2 M10 Nut
IMPORTANT
When you un-pack your grill, remove all parts and packaging material from
the box and inside the grill. Make sure you have all the items on the parts list.
Carefully check the unit and make sure there is no damage.
IF YOU HAVE ANY PROBLEMS WITH THIS PRODUCT OR THERE ARE
MISSING OR DAMAGED PARTS , PLEASE CALL CUSTOMER SERVICE
TOLL FREE 1-866-475-5180 (Monday–Friday, 8:30 am–4:30 pm, CST).
NOTE : DO NOT RETURN UNIT TO THE STORE BEFORE CALLING THE TOLL FREE NUMBER.
Do not dispose of your cartons until you are completely satised with your new Smoke Hollow grill.
Parts and Tool List
Hardware Pack
Quantity Description
44 M6x15 Phillips/Slotted Head Screw
8 M6x52
Hex Phillips/Slotted Head Screw
12 M5x10 Flat Head Screw
4 M5x8 Shoulder Screw
6 M6 KEPS Nut
1 M6x21 Shoulder Screw
2 M10 Nut
3 Cotter Pin
2 M8 Nut for Axle
2 Bushing for Axle
2 #8 Washer
2 #10 Lock Washer
2
Door Hinge Pin
IMPORTANT
When you un-pack your grill, remove all parts and packaging material from
the box and inside the grill. Make sure you have all the items on the parts list.
Carefully check the unit and make sure there is no damage.
IF YOU HAVE ANY PROBLEMS WITH THIS PRODUCT OR THERE ARE
MISSING OR DAMAGED PARTS , PLEASE CALL CUSTOMER SERVICE
TOLL FREE 1-866-475-5180 (Monday–Friday, 8:30 am–4:30 pm, CST).
NOTE : DO NOT RETURN UNIT TO THE STORE BEFORE CALLING THE TOLL FREE NUMBER.
Do not dispose of your cartons until you are completely satised with your new Smoke Hollow grill.
Need image of
Hardware Pack
4
Quantity Description
3 Cotter Pin
2 M8 Nut for Axle
2 Bushing for Axle
2 #8 Washer
2 #10 Lock Washer
2
Door Hinge Pin
4
Quantity Description
3 Cotter Pin
2 M8 Nut for Axle
2 Bushing for Axle
2 #8 Washer
2 #10 Lock Washer
2
Door Hinge Pin
4

Parts and Tool List
5
Hardware Pack
Quantity Description
44 M6x15 Combo Truss Head Bolt, Black Nickel Plated
8 M6x52 Combo Truss Head Bolt, Black Nickel Plated
12 M5x10 Flat Head Bolt, Black Nickel Plated
6 M6 KEPS Nut, Black Nickel Plated
1 M6x21 Shoulder Bolt, Black Nickel Plated
2 M10 Nut
3 R Pin
4 M5x8 Shoulder Bolt, Black Nickel Plated
SH3618CW Parts List
Note: For assistance, including missing or damaged parts, call toll free - 866-475-5180
from 8:30 am - 4:30 pm Central Time, Monday - Friday
2 M8 Nuts for Axle
2
Bushings for Axle
2 Φ8 Washer
2 Φ10 Spring Washer
2 Shaft for Charcoal Door
1
2
3
4
5
6
7
8
9
10
11
12
13
14
15
16
17
18
19
20
21
22
23
24
25
26
27
28
29
30
31
32
33
34
35
36
Tools needed for assembly:
8-inch long Phillips head screwdriver,
Pliers or Adjustable Wrench
Item #
Quantity
Description Part No.
1 1 Cooking Grid Rear Frame SH3618CW-01
2 3 Cooking Grid SH3618CW-02
3 1
Cooking Grid Front Frame
w/ Handle
SH3618CW-03
4 2 Smoke Stack Cap SH3618CW-04
5 2 Smoke Stack SH3618CW-05
6 1 Temperature Gauge TR041
7 2 Lid Handle Stand O HC4518L-07A
8 1 Lid Handle SH3618CW-08
9 2 Side Shelf SH3618CW-09
10 1 Slotted Adjustment Panel SH3618CW-10
11 1 Charcoal Tray Linkage Assembly SH3618CW-11
12 1 Charcoal Tray Linkage Knob TR036
13 1 Lid and Firebox Assembly SH3618CW-13
14 1 Left Rear Leg #3 SH3618CW-14
15 1 Left Front Leg #4 SH3618CW-15
16 1 Right Rear Leg #1 SH3618CW-16
17 1 Right Front Leg #2 SH3618CW-17
18 2 Wheel Cap HC4518L-46B
19 1 Wheel Axle HC4518L-44
Item #
Quantity
Description Part No.
20 2 Wheel HC4518L-46A
21 1 Cart Bottom Shelf SH3618CW-21
22 1 Cart Front Panel SH3618CW-22
23 1 Cart Rear Panel SH3618CW-23
24 1 Ash Tray SH3618CW-24
25 1 Firebox Right Lower Panel SH3618CW-25
26 2 Damper SH3618CW-26
27 1 Ash Tray Handle SH3618CW-27
28 1 Firebox Left Lower Panel SH3618CW-28
29 2 Charcoal Door Hinge SH3618CW-29
30 1 Charcoal Door SH3618CW-30
31 2 Charcoal Door Handle SH3618CW-31
32 2 Charcoal Door Handle Washer SH3618CW-32
33 2 Charcoal Door Locking Latch SH3618CW-33
34 1 Charcoal Tray Lift Assembly SH3618CW-34
35 1 Charcoal Tray SH3618CW-35
36 2 Cooking Grid Side Frame SH3618CW-36
37 1 Hardware Blister Pack SH3618CW-37
38 1 Instruction Manual SH3618CW-38
5

Grill Assembly
Step 2:
Attach each leg to the the cart bottom shelf with (4) M6 x 15 screws. (Fig. 2)
Step 1:
Attach the Firebox Left Lower Panel to the Left Rear Leg #3 and Left Front Leg #4 using (2) M6 x 15 screws. (Fig. 1A)
Attach the Firebox Right Lower Panel to the Right Rear Leg #1 and Right Front Leg #2 using (2) M6 x 15 screws. (Fig. 1B)
7
Fig. 3
7
Fig. 3
7
Fig. 3
Cart Bottom Shelf
Leg #3
Leg #3
Leg #4
Leg #4
Leg #2
Leg #2
Leg #1
Leg #1
Firebox Left
Lower Panel
Firebox Right
Lower Panel
Fig. 2
Fig. 1A Fig. 1B
6

Grill Assembly
Step 3:
Attach the Cart Rear Panel
to the Firebox Left Lower
Panel and Firebox Right
Lower Panel using (4)
M6x15 screws. (Fig.3)
Step 4:
Attach the Cart Front
Panel to the Left Front
Leg #4 and Right Front
Leg #2 using (4) M6x15
screws. (Fig.4)
Step 5:
Insert the Wheel Axle through the Left Rear Leg #3 and Left Front
Leg #4. Then attach (2) Axle Bushings and (2) Wheels to each end of
the Axle. Use (2) #8 Washers and (2) M8 Nuts to secure the Wheels to
the Axle. Attach Wheel Caps to each Wheel. (Fig.5)
7
Assembly
Note: Carefully cut the tape holding the carton together. Cut the carton so that it can lay flat on
the ground to provide a clean surface for assembling your Grill. Remove the packing materials
and all the parts from inside the Cabinet. After unpacking all the parts, check to make sure you
HAVE all the parts. If anything is damaged or missing, contact our toll free number: 866-475-
5180. Discard all packing material in a safe and recyclable manner. Save this Assembly Manual
for future reference.
Tools Required: Phillips Head Screwdriver, Adjustable Wrench or Pliers
Step 3
Step 2: Assemble Firebox Left/Right
Lower Panel
Locate: Firebox Left Lower Panel, Firebox
Right Lower Panel and (4) M6x15 bolts
Procedure:
Refer to Fig. 2, attach the Firebox Left Lower
Panel to the Left Rear Leg #3 and Left Front
Leg #4 using (2) M6x15 bolts; Attach the Fire-
box Right Lower Panel to the Right Rear Leg
#1 and Right Front Leg #2 using (2) M6x15
bolts.
Step 2
Step 1
Step 1: Assemble four Legs to Cart Bot-
tom Panel
Locate: (4) Legs, Bottom Panel and (4) M6x15
bolts. Note- each leg will have an identification
label on it.
Procedure:
Refer to Fig. 1, attach (4) Legs to Cart Bottom
Panel using (4) M6x15 bolts.
Step 3: Attach Cart Rear Frame
Locate: Cart Rear Frame and (4) M6x15 bolts
Procedure: Refer to Fig. 3, attach the Cart
Rear Frame to the Firebox Left Lower Panel
and Firebox Right Lower Panel using (4)
M6x15 bolts.
Fig. 3
Fig. 2
Fig. 1
Leg #2
Leg #1
Leg #4
Leg #3
Leg #2
Leg #1
Leg #4
Leg #3
Cart Rear Panel
Leg #2
8
Assembly
Step 4
Step 5
Step 6
Fig. 5
Step 5: Assemble Wheels
Locate: Wheel Axle, (2) Bushings for Axle, (2)
M8 Nuts for Axle, (2) Wheels, (2) Wheel Caps
(2) Φ8 Washers
Procedure: Refer to Fig. 5, insert the Wheel
Axle through the Left Rear Leg #3 and Left
Front Leg #4. Then attach (2) Axel Bushings
and (2) Wheels to the Axle end. Fix the Axle by
(2) Φ8 washers and (2) M8 nuts. Note: Need
two people to attach (2) washers and (2)
nuts synchronously. Lastly cover the Wheels
by the Wheel Caps as shown.
Step 4: Assemble Cart Front Frame
Locate: Cart Front Frame and (4) M6x15 bolts
Procedure: Refer to Fig. 4, attach the Cart
Front Frame to the Left Front Leg #4 and
Right Front Leg #2 using (4) M6x15 bolts.
Fig. 4
Fig. 6
Step 6: Assemble Dampers
Locate: (2) Damper, (4) M5x8 shoulder bolts
Procedure: Refer to Fig. 6, attach (2)
Damper to the both sides of Cart Front
Frame using (4) M5x8 shoulder bolts.
Leg #2
Leg #4
Leg #4
Leg #3
Leg #4
Cart Front Panel
Fig. 4
Fig. 3
Wheel
Washer
Nut
Cap
Axle
Leg
Axle
Bushing
Fig. 5
7

8
Assembly
Step 4
Step 5
Step 6
Fig. 5
Step 5: Assemble Wheels
Locate: Wheel Axle, (2) Bushings for Axle, (2)
M8 Nuts for Axle, (2) Wheels, (2) Wheel Caps
(2) Φ8 Washers
Procedure: Refer to Fig. 5, insert the Wheel
Axle through the Left Rear Leg #3 and Left
Front Leg #4. Then attach (2) Axel Bushings
and (2) Wheels to the Axle end. Fix the Axle by
(2) Φ8 washers and (2) M8 nuts. Note: Need
two people to attach (2) washers and (2)
nuts synchronously. Lastly cover the Wheels
by the Wheel Caps as shown.
Step 4: Assemble Cart Front Frame
Locate: Cart Front Frame and (4) M6x15 bolts
Procedure: Refer to Fig. 4, attach the Cart
Front Frame to the Left Front Leg #4 and
Right Front Leg #2 using (4) M6x15 bolts.
Fig. 4
Fig. 6
Step 6: Assemble Dampers
Locate: (2) Damper, (4) M5x8 shoulder bolts
Procedure: Refer to Fig. 6, attach (2)
Damper to the both sides of Cart Front
Frame using (4) M5x8 shoulder bolts.
Leg #2
Leg #4
Leg #4
Leg #3
9
Assembly
Step 7
Fig. 7
Step 8: Attach the Lid and Firebox
Assembly to the Cart Assembly
Locate: Lid and Firebox Assembly, Cart As-
sembly and (6) M6x15 bolts
WARNING: This step requires two peo-
ple at least to lift the Lid and Firebox
Assembly. Failure to do so may result in
personal injury or damage to the grill.
Procedure: Refer to Fig. 8, place the Lid
and Firebox Assembly on top of the Cart
Assembly. Attach the Firebox to the Cart
Assembly using (6) M6x15 bolts.
Step 7: Assemble Charcoal Door
Hinges
Locate: (2) Charcoal Door Hinges and (8)
M5x10 Flat bolts
Procedure: Refer to Fig. 7, attach (2) Char-
coal Door Hinge to the both sides of Cart
Front Frame using (8) M5x10 Flat bolts.
Step 8
Fig. 8
Grill Assembly
Step 6:
Attach (2) Dampers to both sides of Cart Front Panel using (4) M5x8 shoulder screws. (Fig.6)
Step 7:
Attach (2) Charcoal Door Hinges to each side of Cart Front Panel using (8) M5x10 at screws. (Fig.7)
Step 8:
With the help of a friend
to help avoid an injury,
place the Lid and Firebox
Assembly on top of the
Cart Assembly. Attach
the Firebox to the Cart
Assembly using (6) M6x15
screws. (Fig.8) You will need
to open the lid to be able
to view and access the
screw locations.
Cart Front Panel
Cart Front Panel
Firebox Assembly
Cart Assembly
Door Hinge
Door Hinge
Damper
Damper
Fig. 8
Fig. 7
Fig. 6
8

Grill Assembly
10
Assembly
Step 9
Fig. 11
Step 9: Assemble Lid Handle and Lid
Handle Stand-offs
Locate: Lid Handle and (2) Lid Handle
Stand-offs
Procedure: Refer to Fig. 9, attach (2) Lid
Handle Stand-offs to the Lid Handle.
Step 11: Assemble Heat Indicator
Locate: Heat Indicator
Procedure: Unscrew the nut from the Heat
Indicator, then place the Heat Indicator
into the area in the center of the Lid and
fasten in place with the nut as shown in
Fig.11.
Fig. 9
Step 11
Step 10
Step 10: Assemble Lid Handle Set
Locate: Lid Handle Set, (4) M6x15 bolts
Procedure: Refer to the Fig. 10, attach the
Lid Handle Set to the Lid using (4) M6x15
bolts.
Fig. 10
Step 9:
Attach Lid Handle Stand-os to
the Lid Handle. Then attach to
Lid using (4) M6x15 screws. (Fig.9)
Step 10:
Unscrew the nut from the Temp Gauge, then
place the Temp Gauge into the area in the
center of the Lid and fasten in place with the
nut as shown. (Fig.10)
Step 12:
Screw the Smoke Stack Caps into the Smoke
Stacks in a clockwise motion. The Smoke
Stack cap is adjustable to allow more or less
smoke to exit the grill. (Fig.12)
Step 11:
Insert Smoke Stacks through the Lid from the inside. Align
(3) holes in the Smoke Stacks with the holes in the Lid rst.
Then attach the Smoke Stacks to the Lid with (6) M6x15
screws inserted through the Lid from the outside. Fasten
the Smoke Stacks to the Lid with (6) KEPS nuts securely from
inside the Lid. (Fig.11)
Lid
Lid Handle
Stand-os
Lid Handle
10
Assembly
Step 9
Fig. 11
Step 9: Assemble Lid Handle and Lid
Handle Stand-offs
Locate: Lid Handle and (2) Lid Handle
Stand-offs
Procedure: Refer to Fig. 9, attach (2) Lid
Handle Stand-offs to the Lid Handle.
Step 11: Assemble Heat Indicator
Locate: Heat Indicator
Procedure: Unscrew the nut from the Heat
Indicator, then place the Heat Indicator
into the area in the center of the Lid and
fasten in place with the nut as shown in
Fig.11.
Fig. 9
Step 11
Step 10
Step 10: Assemble Lid Handle Set
Locate: Lid Handle Set, (4) M6x15 bolts
Procedure: Refer to the Fig. 10, attach the
Lid Handle Set to the Lid using (4) M6x15
bolts.
Fig. 10
Lid
Temperature
Gauge
11
Assembly
Step 13: Assemble Smoke Stack
Caps
Locate : (2) Smoke Stack Caps
Procedure: Refer to Fig. 13, screw
clockwise the Smoke Stack Caps into
the Smoke Stacks. The smoke stack
cap is adjustable to allow more (anti-
clockwise) or less (clockwise) smoke
to exit the grill.
Note: Always
wear protective gloves
or mitts when turn the smoke stack
caps while in use.
Fig. 13
Step 14
Step 13
Step 14: Assemble Side Shelves
Locate: (2) Side Shelves and (8) M6x52
bolts
Procedure: Refer to Fig. 14, attach (2)
Side Shelves to the each Legs using (8)
M6x52 bolts.
Fig. 14
Step 12
Fig. 12
Step 12: Assemble Smoke Stacks
Locate: (2) Smoke Stacks, (6) M6x15
bolts and (6) M6 KEPS nuts
Procedure: Refer to Fig. 12, insert (2)
Smoke Stacks through the Lid from the
inside. Align (3) holes in the Smoke
Stacks with the holes in the Lid first. Then
attach the Smoke Stacks to the Lid with
(6) M6x15 bolts inserted through the Lid
from the outside. Fasten the Smoke
Stacks to the Lid with (6) KEPS nuts se-
curely inside the Lid as shown in Fig.12.
Fig. 9
Fig. 10
Fig . 11
Fig. 12
Smoke Stack Caps
Smoke Stacks
Lid
9

Grill Assembly
11
Assembly
Step 13: Assemble Smoke Stack
Caps
Locate : (2) Smoke Stack Caps
Procedure: Refer to Fig. 13, screw
clockwise the Smoke Stack Caps into
the Smoke Stacks. The smoke stack
cap is adjustable to allow more (anti-
clockwise) or less (clockwise) smoke
to exit the grill.
Note: Always
wear protective gloves
or mitts when turn the smoke stack
caps while in use.
Fig. 13
Step 14
Step 13
Step 14: Assemble Side Shelves
Locate: (2) Side Shelves and (8) M6x52
bolts
Procedure: Refer to Fig. 14, attach (2)
Side Shelves to the each Legs using (8)
M6x52 bolts.
Fig. 14
Step 12
Fig. 12
Step 12: Assemble Smoke Stacks
Locate: (2) Smoke Stacks, (6) M6x15
bolts and (6) M6 KEPS nuts
Procedure: Refer to Fig. 12, insert (2)
Smoke Stacks through the Lid from the
inside. Align (3) holes in the Smoke
Stacks with the holes in the Lid first. Then
attach the Smoke Stacks to the Lid with
(6) M6x15 bolts inserted through the Lid
from the outside. Fasten the Smoke
Stacks to the Lid with (6) KEPS nuts se-
curely inside the Lid as shown in Fig.12.
Step 13:
Attach both side shelves to
the Legs using (8) Hex Phillips
M6x52 Hex Head Phillips screws
as shown here. (Fig.13)
12
Assembly
Step 15
Step 16: Assemble Gear Panel
Locate: Gear Panel and (2) M6x15 bolts
Procedure: Refer to Fig. 16, attach the Gear
Panel to the Left Front Leg #4 using (2)
M6x15 bolts.
Fig. 16
Step 15: Assemble Charcoal Tray Ad-
justable System
Locate: Charcoal Tray Adjustable System
and (4) M6x15 bolts
Procedure: Refer to Fig. 15A, insert the bar
of Charcoal Tray Adjustable System
through the hole in the left side of the Fire-
box Assembly.
Attach the Charcoal Tray Adjustable Tray to
the strengthening panel in the rear of the
Firebox Assembly using (4) M6x15 bolts as
shown in Fig. 15B.
Fig. 15A
Step 16
Fig. 15B
Step 14:
Insert the rod of the Charcoal Tray Lift Assembly through the hole in the
left side of the Firebox Assembly. (Fig.14A)
Attach the Charcoal Tray Lift Assembly to the panel in the rear of the
Firebox Assembly using (4) M6x15 screws as shown in (Fig. 14B)
Step 15:
Attach the Slotted Adjustment
Panel to the Left Front Leg #4
using (2) M6x15 screws (Fig. 15)
Fig. 15
Fig. 14B
Fig. 14A
Fig. 13
Slotted
Adjustment
Panel
Charcoal Tray Lift
Assembly
Left side shelf assembly
shown here. Repeat
procedure to assemble
Right side shelf.
10

Grill Assembly
13
Assembly
Step 17: Assemble Charcoal Tray Ad-
justable Handle Assembly and Knob
Locate: Charcoal Tray Adjustable Handle
Assembly, Charcoal Tray Adjustable Knob,
(1) R Pin and (1) M6x21 shoulder bolt
Procedure: Refer to Fig. 17A, insert the bar
of the Charcoal Tray Adjustable Handle As-
sembly through the Gear Panel.
Refer to Fig. 17B, insert the bar of the Char-
coal Tray Adjustable System through the
hole in the Handle Assembly.
Refer to Fig. 17C, insert (1) R pin through
the hole in the bar of the Charcoal Tray Ad-
justable System.
Refer to Fig. 17D, attach the bar of the
Charcoal Tray Adjustable Handle Assembly
to the Left Rear Leg #3 using (1) M6x21
shoulder bolt.
Refer to Fig. 17E, screw clockwise the Char-
coal Tray Adjustable Knob onto the Bar of
Charcoal Tray Adjustable Rod Assembly.
Step 17
Fig. 17A
Fig. 17B
Fig. 17C
Fig. 17E
Fig. 17D
Step 16:
Insert the Charcoal Tray Linkage
Rod through the Adjustment
Panel.
(Fig. 16A)
Then insert the rod of the
Charcoal Tray Lift Assembly
through the hole in the Linkage
Assembly.
(Fig. 16B) Insert Cotter
pin through the hole in the
Charcoal Tray Lift Assembly.
(Fig. 16C)
Fig. 16A
Fig. 16B
Fig. 16C
13
Assembly
Step 17: Assemble Charcoal Tray Ad-
justable Handle Assembly and Knob
Locate: Charcoal Tray Adjustable Handle
Assembly, Charcoal Tray Adjustable Knob,
(1) R Pin and (1) M6x21 shoulder bolt
Procedure: Refer to Fig. 17A, insert the bar
of the Charcoal Tray Adjustable Handle As-
sembly through the Gear Panel.
Refer to Fig. 17B, insert the bar of the Char-
coal Tray Adjustable System through the
hole in the Handle Assembly.
Refer to Fig. 17C, insert (1) R pin through
the hole in the bar of the Charcoal Tray Ad-
justable System.
Refer to Fig. 17D, attach the bar of the
Charcoal Tray Adjustable Handle Assembly
to the Left Rear Leg #3 using (1) M6x21
shoulder bolt.
Refer to Fig. 17E, screw clockwise the Char-
coal Tray Adjustable Knob onto the Bar of
Charcoal Tray Adjustable Rod Assembly.
Step 17
Fig. 17A
Fig. 17B
Fig. 17C
Fig. 17E
Fig. 17D
Attach the bar of the Charcoal Tray Linkage
Assembly to the Left Rear Leg #3 using (1)
M6x21 Shoulder screw (Fig. 16D)
Screw the Charcoal Tray Lift Knob clockwise
onto the Charcoal Tray Linkage Rod. (Fig. 16E)
Fig. 16D
Fig. 16E
Charcoal Tray
Linkage Assembly
Charcoal Tray
Lift Assembly
Charcoal Tray
Linkage Assembly
Charcoal Tray
Linkage Assembly
Charcoal Tray
Linkage Rod
Charcoal Tray
Lift Knob
Charcoal Tray
Linkage Rod
11

Grill Assembly
14
Assembly
Step 18: Assemble Charcoal Tray
Locate: Charcoal Tray and (4) M6x15 bolts
Procedure: Refer to Fig. 18, attach the Charcoal
Tray to the Adjustable System using (4) M6x15
bolts.
Step 19
Step 20: Assemble Charcoal Door Han-
dles and Locking Brackets
Locate: (2) Charcoal Door Handles, (2) Char-
coal Door Handle Washers, (2) Charcoal Door
Locking Brackets, (2) Φ10 spring washers and
(2) M10 nuts
Procedure: Attach (2) Charcoal Door Handles
and (2) Charcoal Door Locking Brackets to the
Charcoal Door using (2) Charcoal Door Handle
washers, (2) Φ10 spring washers and (2) M10
nuts as shown in Fig. 20.
Note: Do not over tighten the nuts to the end,
make sure the Handles can be turned properly.
Step 18
Step 20
Step 19: Assemble Charcoal Door to the
Grill
WARNING: This step requires two people
to handle it. Failure to do so may result in
personal injury or damage to the grill.
Locate: Charcoal Door, (2) R pins and (2) shafts
for Charcoal Door
Procedure: Attach the Charcoal Door Assembly
to the Charcoal Door Hinges using (2) shafts
and (2) R pins as shown as Fig. 19.
Fig. 18
Fig. 19
Fig. 20
Step 17:
Attach the Charcoal Tray to the
Charcoal Tray Lift Assembly
using (4) M6x15 screws
(Fig. 17)
Step 18:
With help from a friend to
avoid injury or damage to
grill, attach the Charcoal Door
Assembly to the Charcoal Door
Hinges using (2) Door Hinge
Pins and (2) Cotter pins as
shown here. (Fig. 18)
Step 19:
Attach (2) Charcoal Door
Handles and (2) Charcoal
Door Locking Brackets to
the Charcoal Door using
(2) Charcoal Door Handle
Washers, (2) #10 Spring
Washers, and (2) M10 nuts
as shown. (Fig. 19)
Note: Do not over tighten the nuts
making sure the Handles can be
turned properly.
Fig. 17
Fig. 18
Fig. 19
Charcoal Tray
Charcoal Door
Assembly
Door
Hinge Pins
Charcoal
Door
Handle
Washer
Spring
Washer
Locking Bracket
Nut
Cotter
Pin
Cotter
Pin
12

Grill Assembly
15
Assembly
Step 21: Assemble Cooking Grid
Locate: (3) Cooking Grids, Cooking Grid
Front Frame, Cooking Grid Rear Frame, (2)
Cooking Grid Side Frames and (4) M5x10
Flat bolts
Procedure: Refer to Fig. 21A, Cooking Grid
Front Frame and (2) Side Frames together
using (2) M5x10 Flat bolts.
Refer to Fig. 21B, attach (3) Cooking Grids
and Cooking Grid Rear Frame to the Side
Frames using (2) M5x10 Flat bolts.
Note: the Flat side of the Cooking Grids
and the bevel of the Frames should be
towards the same direction as shown in
Fig. 21C.
Refer to Fig. 21D, put the Cooking Grid As-
sembly onto the Grill. Note: the flat side of
the Cooking Grids should be towards up.
Fig. 21D
15
Assembly
Step 21: Assemble Cooking Grid
Locate: (3) Cooking Grids, Cooking Grid
Front Frame, Cooking Grid Rear Frame, (2)
Cooking Grid Side Frames and (4) M5x10
Flat bolts
Procedure: Refer to Fig. 21A, Cooking Grid
Front Frame and (2) Side Frames together
using (2) M5x10 Flat bolts.
Refer to Fig. 21B, attach (3) Cooking Grids
and Cooking Grid Rear Frame to the Side
Frames using (2) M5x10 Flat bolts.
Note: the Flat side of the Cooking Grids
and the bevel of the Frames should be
towards the same direction as shown in
Fig. 21C.
Refer to Fig. 21D, put the Cooking Grid As-
sembly onto the Grill. Note: the flat side of
the Cooking Grids should be towards up.
Step 21
Fig. 21A
Fig. 21D
Flat Side
Bevel
Fig. 21C
Fig. 21B
Assembly
Step 22: Assemble Ash Tray
Locate: Ash Tray, Ash Tray Handle and (2)
M6x15 bolts
Procedure: Refer to Fig. 22A, attach the Ash
Tray Handle to the Ash Tray using (2) M6x15
bolts.
Refer to Fig. 22B, slide the Ash Tray Assem-
bly into the bottom of Firebox.
Fig. 22B
Assembly
Step 22: Assemble Ash Tray
Locate: Ash Tray, Ash Tray Handle and (2)
M6x15 bolts
Procedure: Refer to Fig. 22A, attach the Ash
Tray Handle to the Ash Tray using (2) M6x15
bolts.
Refer to Fig. 22B, slide the Ash Tray Assem-
bly into the bottom of Firebox.
Fig. 22B
Step 20:
Attach Cooking Grid Front Frame with Handle and (2) Side
Frames together using (2) M5x10 Flat screws (Fig. 20A)
Attach (3) Cooking Grids and Cooking Grid Rear Frame to the
Side Frames using (2) M5x10 Flat screws.
Note: The at side of the Cooking Grids and the bevel of the Frames should be
towards the same direction as shown in (Fig. 20B).
Place the Cooking Grid Assembly onto the Grill. (Fig. 20D)
Note: The at side of the Cooking Grids should be facing upward.
Step 21:
Attach the Ash Tray Handle with (2) M6x15 screws (Fig. 21A). Slide the Ash Tray Assembly below the Firebox (Fig. 21B).
Fig. 20A
Fig. 20B
Fig. 21A Fig. 21B
Fig. 20C
Flat Side
Bevel
Side
13

ASSEMBLY OF YOUR GRILL IS NOW COMPLETE.
FOR YOUR SAFETY, FOLLOW ALL SAFE GUARDS
AND INSTRUCTIONS.
Grill Assembly
14

Operating Instructions
Step 1: Lightly coat ALL INTERIOR surfaces (including interior of lids, cooking grids and area
below the cooking surface) with vegetable oil or vegetable oil spray.
Step 2: Start a charcoal fire using 3-4 lbs. of briquette or lump charcoal. Keeping the lids open
until the flames have burned down.
Step 3: After flames have burned down, close lids and all dampers and maintain fire at 300 to
400 degrees Fahrenheit for one hour.
Step 4: Let the fire burn out and grill cool completely before use.
WARNING:
• Do not do any cleaning or maintenance on any grill parts until all parts are cool!
• After every cooking session, set the Charcoal Coals into the HIGH position to burn off any
food residue, keeping the residue from building up.
CLEANING:
• Use only mild dishwashing detergents, hot water, a nylon scrub pad and a BBQ wire brush
cleaning tool.
• Always rinse all surfaces thoroughly after cleaning.
• Handle Porcelain coated surfaces gently and carefully- they are made from high temperature
glass and can chip easily.
• Note: Grease drip pan should be emptied and cleaned after each use to prevent are-ups
and/or grease res.
(The re and the food are in the Charcoal Cooking Chamber.) Follow these steps:
1. For best results, use a metal charcoal starter and ll the starter with about 2lbs. of charcoal
and light the charcoal.
2. After 30 minutes, dump the charcoal into the bottom of the Charcoal Cooking Chamber on the
charcoal grates, which should be at the lowest adjustment height.
3. Adjust the Charcoal Cooking Chamber dampers to 1/4 to 1/3 open.
4. Immediately and carefully place another 2lbs. of charcoal on top of the burning coals in the
Charcoal Cooking Chamber.
5. Once the temperature reaches your desired level, food can be placed on the cooking grates.
Tip: The adjustable charcoal grate in the Charcoal Cooking Chamber allows the charcoal grate to be moved to within a few
inches of the cooking grate allowing you to sear your meat and lock in the juices. Searing takes only a few minutes on each
side. Don’t allow the meat or food to burn. After searing, crank the charcoal grate back to the bottom and cook the food to your
personal preference.
CARE AND CLEANING
! IMPORTANT ! CURING PROCESS
TO COOK USING CHARCOAL AND DIRECT HEAT
FOR YOUR SAFETY, FOLLOW ALL SAFEGUARDS AND INSTRUCTIONS.
15

Limited Warranty
This Smoke Hollow ® grill is guaranteed against broken or
damaged parts at time of purchase. All parts carry a 1-year
limited warranty. Paint is guaranteed to be free of defects for
90 days except for rust, which may appear after repeated use.
This warranty does not cover damage or issues related to neglect, abuse, or modications to the product.
Repair labor is not covered.
All parts that meet the warranty requirements will be shipped at no-charge via the discretion of the Customer
Service Department (ground shipments, US Mail, or Parcel Post Only). Any special handling charges (i.e. Second
Day, Overnight, etc.) will be the responsibility of the consumer.
All warranty claims apply only to the original purchaser and require a proof of purchase verifying purchase
date. Do not return parts to our address without rst obtaining a return authorization number from our
customer service.
This service is available by calling 866-475-5180, 8:30am to 4:30pm, Central Time, Monday through Friday, or
write to Outdoor Leisure Products, Inc., 5400 Doniphan Drive, Neosho, MO 64850.
This warranty may give you specic legal rights that vary by state.
Outdoor Leisure Products, Inc
5400 Doniphan Drive
Neosho, MO 64850
www.olp-inc.com
PRO SERIES
© 2016 Outdoor Leisure Products, Inc. No part of this work may be reproduced, modied, distributed, or otherwise used without prior written permission. Smoke
Hollow is a trademark of Outdoor Leisure Products, Inc.
20161010
/