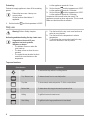
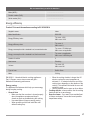
Neue BIDO2SS
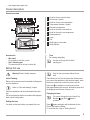
Below you will find brief product information for Neue BIDO2SS. The Neue BIDO2SS is an oven with a variety of functions to help you cook your food to perfection. With both a top oven and a main oven, you can cook multiple dishes at once. The top oven is perfect for smaller dishes or for grilling, while the main oven is ideal for larger dishes or for baking. Both ovens have their own temperature controls and heating elements, so you can cook different dishes at different temperatures at the same time.
Neue BIDO2SS
Below you will find brief product information for Neue BIDO2SS. The Neue BIDO2SS is an oven with a variety of functions to help you cook your food to perfection. With both a top oven and a main oven, you can cook multiple dishes at once. The top oven is perfect for smaller dishes or for grilling, while the main oven is ideal for larger dishes or for baking. Both ovens have their own temperature controls and heating elements, so you can cook different dishes at different temperatures at the same time.


-
 1
1
-
 2
2
-
 3
3
-
 4
4
-
 5
5
-
 6
6
-
 7
7
-
 8
8
-
 9
9
-
 10
10
-
 11
11
-
 12
12
-
 13
13
-
 14
14
-
 15
15
-
 16
16
-
 17
17
-
 18
18
-
 19
19
-
 20
20


Neue BIDO2SS
Below you will find brief product information for Neue BIDO2SS. The Neue BIDO2SS is an oven with a variety of functions to help you cook your food to perfection. With both a top oven and a main oven, you can cook multiple dishes at once. The top oven is perfect for smaller dishes or for grilling, while the main oven is ideal for larger dishes or for baking. Both ovens have their own temperature controls and heating elements, so you can cook different dishes at different temperatures at the same time.
Ask a question and I''ll find the answer in the document
Finding information in a document is now easier with AI