Page is loading ...

PROCOLOR LED-WALL
Installation Manual
Model PROCOLOR LED-WALL Electric Lift Stand
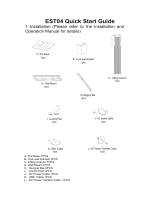
For using this product properly and safely, please follow the contents of the Installation
Manual before installation.
It is suggested that this Electric Lift Stand applies to the 55-86 inch intelligent panel.
This stand can carry a maximum weight of 100KG.

BOM
A -
The Base
C-
Lifting Column
1pcs
D-
Wall Mount
1pcs
H-Hanging Bar
2pcs
I -Control Pad
J- AC power cable
K- USB Cable
L- AC Power Transfer Cable
1pcs
1pcs 1pcs
1pcs
B-
Lock wall bracket
1pcs
1pcs

1
Other Accessories
Hexagon socket head screw
Cross recessed pocket
hex head screw
Cross recessed pocket
hex head screw
Cross recessed pocket
hex head screw
Plastic bolt cover
Allen key
Adjustable wrench (self-provided)
Phillips screwdriver
(self-provided)
Expanded rubber stopper
Wall lock screw
Lock wall gasket
Hammer (self-provided)
Electric drill (self-provided)
Lock floor expansion bolt
with nut
5
6
7
10
11
12
13

2
<16mm
(5/8")
Max.
16"(406mm)
Min. Wood Stud Size:
nominal 2"(51mm)
actual 1 1/2"(38mm)
Min. Wood Stud Size:
nominal 4"(102mm)
actual 3 1/2"(89mm)
Centre line
2.5"(64mm)
7/32"
(5.5mm)
658mm
Common wall specifications
Step 1: Install the Lock Wall Bracket
A. Operation of Drilling Wood wall

3
B.Operation of Drilling Concrete Wall
DANGER
Concrete Wall
Anchor
Min .
8"( 203mm )
2.5"(64mm)
3/8"
(10mm)
658mm
Hummer
Drill

4
Fix The Base
Step
2 :
77.5mm
220mm
320mm
Diameter=10m m
Depth=60m m
2.Positioning line
3.Drilling
4.Fix the base with expansion studs and nuts
5.Reassemble the base
1.Disassemble the Base

Attention: When drilling, it is necessary to ensure that the position of the
center of the lock wall bracket and the base hole are the same.
Attention: The size of the floor line should be based on the wall surface.
5
A Centreline
B Centreline

Step 3: Place the column in the base and the lock wall bracket, and lock
the corresponding bolt.
Step 4: Place the column in the base and the lock wall bracket, and lock
the corresponding bolt
6

Step 5: When using the stand, connect the hand controller and the
appropriate power cord to the stand and connect the power
supply.
7
Step 6: Please select the appropriate screw ( 2 or 7 ) to assemble
the whole machine and the wall hanging strip E according to
the actual machine requirements.
H
Suitable size
Recommended mounting
hole position
55"Machine
K==>ALL
65"Machine
K==>8 - 18
The specific installation hole position can
be adjusted according to the actual needs
and with reference to the installation height
of the whole machine.
1
8
15
18
70"Machine
K==>15 -18
75"Machine
K==>18
K
K
Hole Position K
2
2
or
or
I
J

Step 8: Plug in the AC Power Transfer Cable and USB adapter
cable to interact with the whole machine.
Step 7: Hang the whole machine through the wallmount to the stand and lock
with safety screws.
8

9
Refer to the following figure after assemble.

/