Page is loading ...

SPECIFICATIONS
Battery: 2 each AA alkaline batteries
included (see battery replacement section)
ABOUT THE MEMORY
Minimum and maximum memories are
NOT programmable (see Alarms).
The minimum humidity, temperature, and dew-point
recorded into memory are the minimum humidity,
temperature, and dew-point achieved since the
last time the memory was cleared. The maximum
humidity, temperature, and dew-point recorded into
memory are the maximum humidity, temperature,
and dew-point achieved since the last time the
memory was cleared. The minimum and maximum
memories are maintained over the period since the
memory was cleared.
VIEWING THE MIN/MAX MEMORY
To view the maximum humidity, temperature, and
dew-point memory, press the MIN/MAX button once
on the side of the unit. The maximum humidity,
temperature, and dew-point reading achieved will be
displayed (“MAX” will appear on the display).
Press the MIN/MAX button a second time, within
16 seconds, to view the minimum humidity,
temperature, and dew-point achieved (“MIN” will
appear on the display).
Note: Sixteen (16) seconds after pressing the MIN/
MAX button, the unit automatically returns to the
current humidity, temperature, and dew-point reading.
Press the MIN/MAX button a third time, within
16 seconds, to return to the current humidity,
temperature, and dew-point reading.
CLEARING THE MAXIMUM MEMORY
The maximum humidity, temperature, and dew-point
memory may be cleared. To clear the maximum
memory, press and hold the RESET button on the
side of the unit while the maximum memory value
is being displayed (see the “Viewing the Memory”
section). The display will show “- -” for approximately
5 seconds and will then display the current reading.
CLEARING THE MINIMUM MEMORY
The minimum humidity, temperature, and dew-point
memory may be cleared. To clear the minimum
memory, press and hold the RESET button on the
side of the unit while the minimum memory value
is being displayed (see the “Viewing the Memory”
section). The display will show “- -” for approximately
5 seconds and will then display the current reading.
SELECTING °C OR °F
To display the temperature/dew-point reading in
Fahrenheit or Celsius, slide the °C/°F switch, located
on the back of the unit, to the desired position.
ALARMS
Alarm may be set for humidity only within the range
of three RH values 55%, 60% and 65%. To set the
unit to alarm when the ambient humidity increases
to 55% RH and above, slide the switch located on
the back of the unit to 55%. To set the unit to alarm
when the ambient humidity increases to 60% RH and
above, slide the switch located on the back of the unit
to 60%. To set the unit to alarm when the ambient
humidity increases to 65% RH and above, slide the
switch located on the back of the unit to 65%.
VISUAL ALARM INDICATOR
The unit will visually indicate an increase in ambient
humidity above set alarm points when the switch
located on the back of the unit is set to AL. OFF. A
red LED on the front of the unit will ash if conditions
rise above a set alarm point. When the ambient
conditions fall below the set alarm point the LED will
no longer ash.
AUDIBLE ALARM INDICATOR
To set the unit to audibly alarm at set points. Slide the
switch located on the back of the unit to AL. ON. An
alarm will sound and the LED will ash if the current
ambient humidity is above the set alarm point. When
ambient conditions fall below the set alarm point, the
audible alarm will no longer sound and the LED will no
longer ash.
WALL MOUNTING THE UNIT
Set a screw into the wall at the desired location. Do
not set the screw ush to the wall, the head of the
screw will need to slip into the receptacle on the back
of the unit. Once the screw has been properly set,
hang the unit in place by sliding the receptacle on the
back of the unit over the head of the screw.
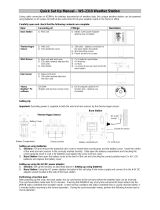
USING THE SUPPLIED
BENCH STAND
When standing the unit on
a desk or lab bench, use the
supplied BENCH STAND
(see Fig 1).
Place the stand on the desk
and afx the unit as shown.
Fig 1.

TRACEABLE
DIGITAL
HUMIDITY
TEMPERATURE/
DEW POINT
METER
INSTRUCTIONS
®
ALL OPERATIONAL DIFFICULTIES
If this unit does not function properly for any reason,
replace batteries with new high-quality batteries (see
“Battery Replacement” section). Low battery power
can occasionally cause any number of “apparent”
operational difculties. Replacing the batteries with
new fresh batteries will solve most difculties.
BATTERY REPLACEMENT
Erratic readings, a faint display or no display are
all indicators that the batteries must be replaced.
To remove the battery cover, place nger in the slot
at the bottom of the cover, slide down and lift up.
Remove the exhausted batteries and replace with two
new AA alkaline batteries. Replace the battery cover
on front of unit.
WARRANTY, SERVICE, OR RECALIBRATION
For warranty, service, or recalibration, contact:
CONTROL COMPANY
12554 Old Galveston Rd. Suite B230
Webster, Texas 77598 USA
Ph. 281 482-1714 • Fax 281 482-9448
E-mail [email protected]
www.traceable.com
Control Company is ISO 9001:2008 Quality-Certied
by DNV and ISO/IEC 17025:2005 accredited as a
Calibration Laboratory by A2LA.
Control Company Cat. No. 4800
Traceable
®
is a registered trademarks of Control Company.
©
2016 Control Company. 92-4800-00 Rev. 1 061616
/