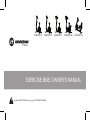
Horizon Fitness Comfort 3 Owner's manual
- Type
- Owner's manual

EXERCISE BIKE OWNER’S MANUAL
Read the BIKE GUIDE before using this OWNER’S MANUAL.
Comfort 5Comfort 3 Comfort 7Comfort 8
i
Comfort R


3
IMPORTANT PRECAUTIONS
SAVE THESE INSTRUCTIONS
When using an exercise product, basic precautions should always be followed, including the following: Read all instructions
before using this exercise bike. It is the responsibility of the owner to ensure that all users of this exercise bike are adequately
informed of all warnings and precautions. If you have any questions after reading this owner’s manual, contact your local dealer.

4
READ AND SAVE ALL INSTRUCTIONS BEFORE ASSEMBLING OR USING THIS
EXERCISE BIKE. IT IS STRONGLY RECOMMENDED TO TAKE THE FOLLOWING SAFETY
INSTRUCTIONS.
• CAUTION: If you experience chest pains, nausea, dizziness or shortness of breath, stop exercising immediately and consult your
physician before continuing.
• Use this exercise bike for its intended purpose as described in this manual. Do not use attachments that have not been
recommended by the manufacturer.
• Never operate the exercise bike if it is not working properly, or if it has been damaged. Contact the authorized dealers for
examination and repair.
• Do not use the exercise bike without proper footwear. NEVER operate the exercise bike with bare feet.
• Do not wear any clothing that might catch on any moving parts of this exercise bike.
• Keep hands and feet clear at all times from moving parts to avoid injury. Never turn the pedal cranks by hand.
• Do not dismount the exercise bike until the pedals are at a complete STOP.
• Do not attempt to ride the exercise bike in a standing position at high RPMs until you have practiced at slower speeds.
• Do not insert any object, hands or feet into any openings, or expose hands, arms or feet to the drive mechanism or other potentially
moving part of the exercise bike.
• Do not operate where aerosol (spray) products are being used or when oxygen is being administered.
• Close supervision is necessary when used near children, invalids or disabled people.
• When the exercise bike is in use, young children and pets should be kept at least 3 meters / 10 feet away.
• Ensure that adjustment levers (seat and handlebar fore-and-aft) are properly secured and do not interfere with range of motion
during exercise.
WARNING

5
ASSEMBLY
There are several areas during the assembly process that special attention must be paid. It is very important to follow the assembly
instructions correctly and to make sure all parts are firmly tightened. If the assembly instructions are not followed correctly, the
exercise bike could have parts that are not tightened and will seem loose and may cause irritating noises. To prevent damage to
the exercise bike, the assembly instructions must be reviewed and corrective actions should be taken.
Before proceeding, find your exercise bike’s serial number located on
the front stabilizer tube and enter it in the space provided below.
ENTER YOUR SERIAL NUMBER AND MODEL NAME IN THE BOX BELOW:
» Refer to the SERIAL NUMBER and MODEL NAME when calling for service.
WARNING
SERIAL NUMBER LOCATION
SERIAL NUMBER:
MODEL NAME: HORIZON

6
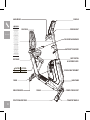
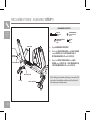
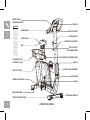
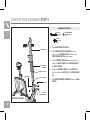
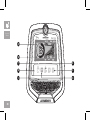
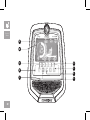
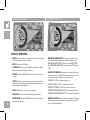
HANDLEBARS
SEAT BACK
SEAT BASE
CRANK
REAR STABILIZER
FRONT STABILIZER TUBE
CONSOLE
CONSOLE MAST
PULSE GRIP HANDLEBARS
WATER BOTTLE HOLDER
SEAT POSITION
ADJUSTMENT LEVER
CONSOLE MAST GROMMET
MAIN FRAME
POWER CORD SOCKET
TRANSPORT WHEELS
PEDALS
CAUTION
ACHTUNG
KEEP HANDS AND FEET AWAY
FROM THE MOVING PARTS.
HALTEN SIE HÄNDE UND FÜSSE
VON BEWEGLICHEN TEILEN FERN.
WARNING
Consult a physician prior to
using any exercise equipment.
Possibility of serious injury if
equipment is used improperly.
Heart rate monitoring systems
may be inaccurate. Over
exercise may result in serious
injury or death. Stop exercising
if you feel pain, faint, dizzy or
short of breath. Read Owner’s
Manual before using. Keep
children off and away from this
equipment. This machine is
designed for Home-use only, do
not use for club or therapeutic
purposes.
Konsultieren Sie einen Arzt,
bevor Sie mit dem Training
beginnen. Bei unsachgemäßem
Gebrauch kann es zu
ernsthaften Verletzungen
kommen. Herzfrequenzüberwa-
chungssysteme können
ungenau sein. Übermäßiges
Training kann zu ernsthaften
Verletzungen oder zum Tod
führen. Beenden Sie Ihr
Training, wenn Sie Schmerzen,
Übelkeit, Schindel oder
Atemnot verspüren. Lesen Sie
vor der Erstbenutzung die
Bedienungsanleitung. Halten
Sie Kinder vom Trainingsgerät
fern. Nur für den Heimgebrauch.
Comfort R

7
TOOLS REQUIRED:
F13/15mm Flat Wrench/Screwdriver
F5mm L-Wrench
F6mm L-Wrench
PARTS INCLUDED:
F1 Main Frame
F1 Console
F1 Console Mast
F1 Console Mast Grommet
F1 Water Bottle Holder
F1 Front Stabilizer Tube
F1 Rear Stabilizer Tube
F1 Seat Base
F1 Seat Back
F1 Seat Frame
F1 Seat Frame Cover
F1 Pulse Grip Handlebars
F2 Pedals with Straps
F1 Audio Adapter Cable
F1 Power Cord
F1 Hardware Kit
UNPACKING
Unpack the product where you will be using it. Place the bike carton on a level
flat surface. It is recommended that you place a protective covering on your floor.
Never open box when it is on its side.
IMPORTANT NOTES
During each assembly step, ensure that ALL nuts and bolts are in place and
partially threaded. It is recommended you complete the full assembly of your unit
before completely tightening any ONE bolt.
Several parts have been pre-lubricated to aid in assembly and usage. Please do
not wipe this off. If you have difficulty, a light application of lithium bike grease is
recommended.
If you have questions or if there are any missing parts, contact your local dealer.
Contact information may be located on the back panel of your manual or on
the warranty card.
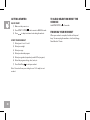
NEED HELP?
RECUMBENT BIKE PRE ASSEMBLY
Comfort
Recumbent
Bike

8
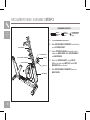
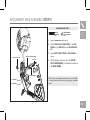
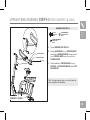
RECUMBENT BIKE ASSEMBLY STEP 1
A Open HARDWARE FOR STEP 1.
B Attach the REAR STABILIZER to the MAIN FRAME
using 2 BOLTS (A), 2 FLAT WASHERS (B), 2
SPRING WASHERS (C) and 2 NUTS (D).
C Attach the FRONT STABILIZER to the MAIN
FRAME using 2 BOLTS (A), 2 FLAT WASHERS (B),
2 SPRING WASHERS (C) and 2 NUTS (D).
HARDWARE FOR STEP 1 :
Comfort
Recumbent
Bike
MAIN FRAME
NUT (D)
FLAT WASHER (B)
SPRING
WASHER (C)
BOLT (A)
REAR STABILIZER
FRONT STABILIZER
BOLT (A)
M8x56 mm
Qty: 4
NUT (D)
M8
Qty: 4
FLAT WASHER (B)
Φ9xΦ18x2.0T mm
Qty: 4
SPRING WASHER (C)
M8x2.0T mm
Qty: 4
Note: Lifting up the machine will help your assembly. First
put in place the stabilizer and then insert the bolts will
also make your assembly easier.

9
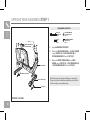
RECUMBENT BIKE ASSEMBLY STEP 2
A Open HARDWARE FOR STEP 2.
B Slide WATER BOTTLE HOLDER up CONSOLE
MAST and align screw holes in WATER BOTTLE
HOLDER with holes in CONSOLE MAST.
C Attach the WATER BOTTLE HOLDER using 2
SCREWS (E).
HARDWARE FOR STEP 2 :
Comfort
Recumbent
Bike
CONSOLE MAST
WATER BOTTLE HOLDER
SCREW (E)
SCREW (E)
M4x12 mm
Qty: 2

10
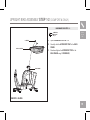
RECUMBENT BIKE ASSEMBLY STEP 3
A Open HARDWARE FOR STEP 3.
B Slide CONSOLE MAST GROMMET from the bottom
up the CONSOLE MAST .
C Attach CONSOLE CABLES and carefully tuck all
cables into MAIN FRAME. Slide CONSOLE MAST
into MAIN FRAME.
D Attach the CONSOLE MAST using 2 BOLTS
(G) from the sides and 4 BOLTS (F) and 4 FLAT
WASHERS (B) from the front.
E Slide CONSOLE MAST GROMMET down over
MAIN FRAME.
HARDWARE FOR STEP 3 :
BOLT (F)
BOLT (G)
FLAT WASHER (B)
CONSOLE CABLES
MAIN FRAME
CONSOLE MAST GROMMET
CONSOLE MAST
Comfort
Recumbent
Bike
FLAT WASHER (B)
Φ9xΦ18x2.0T mm
Qty: 4
BOLT (F)
M8x60 mm
Qty: 4
BOLT (G)
M8X18 mm
Qty: 2

11
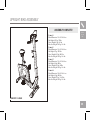
RECUMBENT BIKE ASSEMBLY STEP 4
A Open HARDWARE FOR STEP 4.
B Attach SEAT FRAME to the MAIN FRAME using 6
SOCKET HEAD CAP SCREWS (I) and 6 SPRING
WASHERS (C) as shown.
HARDWARE FOR STEP 4 :
BOLT (I)
SPRING
WASHER (C)
SEAT FRAME
MAIN FRAME
Comfort
Recumbent
Bike
SPRING WASHERS (C)
M8x2.0T mm
Qty: 6
BOLT (I)
M8X18 mm
Qty: 6

12
A Open HARDWARE FOR STEP 5.
B Attach SEAT BASE to SEAT FRAME using 4 BOLTS
(J) and 4 FLAT WASHERS (B).
C Attach SEAT BACK to SEAT FRAME using 4 BOLTS
(J) and 4 FLAT WASHERS (B).
HARDWARE FOR STEP 5 :
BOLT (J)
FLAT WASHER (B)
SEAT FRAME
SEAT BASE
SEAT BACK
RECUMBENT BIKE ASSEMBLY STEP 5
Comfort
Recumbent
Bike
BOLT (J)
M8x45 mm
Qty: 8
FLAT WASHER (B)
Φ9xΦ18x2.0T mm
Qty: 8

13
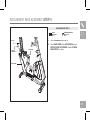
A Open HARDWARE FOR STEP 6.
B Attach PULSE GRIP HANDLEBARS to the SEAT
FRAME using 2 BOLTS (K) and 2 ARC WASHERS
(H).
C Attach SEAT FRAME COVER to MAIN FRAME as
shown.
D Attach the heart rate wires from the PULSE
GRIP HANDLEBARS to the heart rate wires on
the MAIN FRAME.
HARDWARE FOR STEP 6 :
BOLT (K)
SEAT FRAME COVER PULSE GRIP HANDLEBARS
MAIN FRAME
SEAT FRAME
ARC WASHERS (H)
RECUMBENT BIKE ASSEMBLY STEP 6
Comfort
Recumbent
Bike
BOLT (K)
M10x65 mm
Qty: 2
ARC WASHER (H)
Φ10.5xΦ20x2.0T mm
Qty: 2
Note: Before assembly the handle make sure the handle
is in right position with heart rate grip facing up and cable
down.

14
A HARDWARE FOR STEP 7 is pre-installed.
B Attach the RIGHT PEDAL to the RIGHT CRANK
ARM, tightening it clockwise with the provided
13mm/15mm flat wrench.
C Attach the LEFT PEDAL onto the left crank arm,
tightening it counter-clockwise with the provided
13mm/15mm flat wrench. (NOTE: The left crank
arm is reversed threaded so it is very important that
it is tightened counter-clockwise. Tightening it the
opposite way can damage the pedal or the crank arm
or both.)
D Connect the CONSOLE CABLE and carefully tuck
into the CONSOLE MAST.
E Attach the CONSOLE to the CONSOLE MAST using
4 PRE-ASSEMBLED SCREWS.
HARDWARE FOR STEP 7 :
PRE-ASSEMBLED
SCREW
LEFT PEDAL
RIGHT PEDAL
RIGHT CRANK ARM
CONSOLE
CONSOLE CABLE CONSOLE MAST
RECUMBENT BIKE ASSEMBLY STEP 7
Comfort
Recumbent
Bike
PRE-ASSEMBLED SCREW
M5X10 mm
Qty: 4
Note: You may need a 15mm wrench to assemble the
pedal. Please be care not to pinch yourself when
assembling.

15
Comfort R
Overall Dimension: 165 x 64 x 135 cm
Net Weight: 47 kg / 103 lbs
Gross Weight: 54 kg / 119 lbs
Max. User Weight: 136 kg / 300 lbs
Comfort
Recumbent
Bike
RECUMBENT BIKE ASSEMBLY
ASSEMBLY COMPLETE!

16
Comfort
Upright
Bike
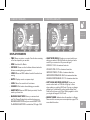
SEAT HEIGHT ADJUSTMENT KNOB
SEAT
TOWEL HOOK
HANDLEBARS
SEAT POST TUBE
ACCESSORY TRAY
(COMFORT 8I ONLY)
FRONT STABILIZER TUBE
REAR STABILIZER
POWER CORD SOCKET
SMART DEVICE
AND READING RACK CONSOLE
TRANSPORT WHEELS
( COMFORT 8i SHOWN )
CRANK
PEDALS
MAIN FRAME
CONSOLE MAST GROMMET
SEAT POSITION
ADJUSTMENT KNOB
WATER BOTTLE HOLDER
CONSOLE MAST
HEART RATE GRIP
WARNING
Consult a physician prior to
using any exercise equipment.
Possibility of serious injury if
equipment is used improperly.
Heart rate monitoring systems
may be inaccurate. Over
exercise may result in serious
injury or death. Stop exercising
if you feel pain, faint, dizzy or
short of breath. Read Owner’s
Manual before using. Keep
children off and away from this
equipment. This machine is
designed for Home-use only, do
not use for club or therapeutic
purposes.
Konsultieren Sie einen Arzt,
bevor Sie mit dem Training
beginnen. Bei unsachgemäßem
Gebrauch kann es zu
ernsthaften Verletzungen
kommen. Herzfrequenzüberwa-
chungssysteme können
ungenau sein. Übermäßiges
Training kann zu ernsthaften
Verletzungen oder zum Tod
führen. Beenden Sie Ihr
Training, wenn Sie Schmerzen,
Übelkeit, Schindel oder
Atemnot verspüren. Lesen Sie
vor der Erstbenutzung die
Bedienungsanleitung. Halten
Sie Kinder vom Trainingsgerät
fern. Nur für den Heimgebrauch.

17
Comfort
Upright
Bike
TOOLS REQUIRED:
F13/15mm Flat Wrench/Screwdriver
F5mm L-Wrench
PARTS INCLUDED:
F1 Main Frame
F1 Console
F1 Console Mast
F1 Console Mast Grommet
F1 Water Bottle Holder
F1 Front Stabilizer
F1 Rear Stabilizer
F1 Seat
F1 Seat Post Tube
F2 Pedals with Straps
F1 Audio Adapter Cable
F1 Power Cord
F1 Hardware Kit
F1 Accessory Tray (Comfort 8i Only)
UNPACKING
Unpack the product where you will be using it. Place the bike carton on a level
flat surface. It is recommended that you place a protective covering on your floor.
Never open box when it is on its side.
IMPORTANT NOTES
During each assembly step, ensure that ALL nuts and bolts are in place and
partially threaded. It is recommended you complete the full assembly of your unit
before completely tightening any ONE bolt.
Several parts have been pre-lubricated to aid in assembly and usage. Please do
not wipe this off. If you have difficulty, a light application of lithium bike grease is
recommended.
If you have questions or if there are any missing parts, contact your local dealer.
Contact information may be located on the back panel of your manual or on
the warranty card.
NEED HELP?
UPRIGHT BIKE PRE ASSEMBLY

18
UPRIGHT BIKE ASSEMBLY STEP 1
A Open HARDWARE FOR STEP 1.
B Attach the REAR STABILIZER to the MAIN FRAME
using 2 BOLTS (A), 2 FLAT WASHERS (B), 2
SPRING WASHERS (F) and 2 NUTS (C).
C Attach the FRONT STABILIZER to the MAIN
FRAME using 2 BOLTS (A), 2 FLAT WASHERS (B),
2 SPRING WASHERS (F) and 2 NUTS (C).
HARDWARE FOR STEP 1 :
NUT (C)
MAIN FRAME
FRONT STABILIZER
REAR STABILIZER
FLAT WASHER (B)
BOLTS (A)
SPRING WASHER (F)
Comfort
Upright
Bike
BOLT (A)
M8x56 mm
Qty: 4
NUT (C)
M8
Qty: 4
FLAT WASHER (B)
Φ9xΦ20x2.0T mm
Qty: 4
SPRING WASHER (F)
M8x2.0T mm
Qty: 4
COMFORT 3 SHOWN
Note: Lifting up the machine will help your assembly.
First put in place the stabilizer and then insert the bolts
will also make your assembly easier.

19
SCREW (D)
ACCESSORY TRAY
MAIN FRAME
UPRIGHT BIKE ASSEMBLY STEP 1-2 (COMFORT 8i ONLY)
A Open HARDWARE FOR STEP 1-2.
B Carefully slide the ACCESSORY TRAY to the MAIN
FRAME.
C Attach and tighten the ACCESSORY TRAY to the
MAIN FRAME using 2 SCREWS (D).
HARDWARE FOR STEP 1-2 :
Comfort
Upright
Bike
SCREW (D)
M4x12 mm
Qty: 2
COMFORT 8i SHOWN

20
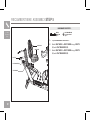
UPRIGHT BIKE ASSEMBLY STEP 2
Note: There is no hardware needed at this step.
A Attach the SEAT to the SEAT POST TUBE and
tighten the SEAT NUTS by using 13mm wrench.
(You may need additional 13mm wrench to make the
seat assembly more easier.)
B Loosen the SEAT HEIGHT ADJUSTMENT KNOB by
turning it two half turns counter-clockwise.
C Then pull the SEAT HEIGHT ADJUSTMENT KNOB
outward while sliding the SEAT POST TUBE into the
MAIN FRAME.
SEAT
SEAT POST TUBE
SEAT HEIGHT
ADJUSTMENT KNOB
MAIN FRAME
COMFORT 3 SHOWN
Comfort
Upright
Bike
Note: While assembling the SEAT please make sure the
seat is in right position. Tilt up the front of the SEAT
might help you gain a more stable riding experience.
Page is loading ...
Page is loading ...
Page is loading ...
Page is loading ...
Page is loading ...
Page is loading ...
Page is loading ...
Page is loading ...
Page is loading ...
Page is loading ...
Page is loading ...
Page is loading ...
Page is loading ...
Page is loading ...
Page is loading ...
Page is loading ...
Page is loading ...
Page is loading ...
Page is loading ...
Page is loading ...
Page is loading ...
Page is loading ...
Page is loading ...
Page is loading ...
Page is loading ...
Page is loading ...
Page is loading ...
Page is loading ...
Page is loading ...
Page is loading ...
Page is loading ...
Page is loading ...
Page is loading ...
Page is loading ...
Page is loading ...
Page is loading ...
Page is loading ...
Page is loading ...
Page is loading ...
Page is loading ...
Page is loading ...
Page is loading ...
Page is loading ...
Page is loading ...
Page is loading ...
Page is loading ...
Page is loading ...
Page is loading ...
Page is loading ...
Page is loading ...
Page is loading ...
Page is loading ...
Page is loading ...
Page is loading ...
-
 1
1
-
 2
2
-
 3
3
-
 4
4
-
 5
5
-
 6
6
-
 7
7
-
 8
8
-
 9
9
-
 10
10
-
 11
11
-
 12
12
-
 13
13
-
 14
14
-
 15
15
-
 16
16
-
 17
17
-
 18
18
-
 19
19
-
 20
20
-
 21
21
-
 22
22
-
 23
23
-
 24
24
-
 25
25
-
 26
26
-
 27
27
-
 28
28
-
 29
29
-
 30
30
-
 31
31
-
 32
32
-
 33
33
-
 34
34
-
 35
35
-
 36
36
-
 37
37
-
 38
38
-
 39
39
-
 40
40
-
 41
41
-
 42
42
-
 43
43
-
 44
44
-
 45
45
-
 46
46
-
 47
47
-
 48
48
-
 49
49
-
 50
50
-
 51
51
-
 52
52
-
 53
53
-
 54
54
-
 55
55
-
 56
56
-
 57
57
-
 58
58
-
 59
59
-
 60
60
-
 61
61
-
 62
62
-
 63
63
-
 64
64
-
 65
65
-
 66
66
-
 67
67
-
 68
68
-
 69
69
-
 70
70
-
 71
71
-
 72
72
-
 73
73
-
 74
74


Horizon Fitness Comfort 3 Owner's manual
- Type
- Owner's manual
Ask a question and I''ll find the answer in the document
Finding information in a document is now easier with AI
Related papers
-
Horizon Fitness HZ SERIES R51 User manual
-
-
-
-
-
-
-
-
-
Other documents
-
AFG 3.0AH User manual
-
-
BodyCraft R200 Assembly Manual
-
Spirit CR800 Owner's manual
-
-
True Fitness ES900 Recumbent Bike Owner's manual
-
-
-
-
Matrix RB209 Owner's manual