
1
Projector
CP-X809W
User's Manual (detailed)
Network Guide
Thank you for purchasing this projector.
This projector has the network function that brings you the following main features.
►Before using this product, be sure to read all manuals for this
product. After reading them, store them in a safe place for future reference.
WARNING
• The information in this manual is subject to change without notice.
• The manufacturer assumes no responsibility for any errors that may appear in
this manual.
• The reproduction, transfer or copy of all or any part of this document is not
permitted without express written consent.
NOTE
Trademark acknowledgment
ü Live Mode
This projector can project your PC images on screen through wireless or wired
network, which can erase a signal cable from your desk.
ü Quick connection to your network
No expert knowledge is required any more. Various options for network setting
give you a quick and simple connection to the network.
ü Web control
The projector can be controlled and monitored by a web browser software on
your PC, which can help you to setup and maintain the projector.
ü PC-LESS Presentation
This projector can project images stored in an SD memory or a USB memory
on screen, which allow you not to bring your PC with you.
This manual is only intended to explain Network functions only.
For safety, operations or any other issues, refer to the Safety Guide and User’s
Manual (concise and detailed).
• Microsoft and Internet Explorer, Windows, Windows NT, Windows Me, Windows
Vista are registered trademark of Microsoft Corporation.
•
PowerPC is a registered trademark of International Business Machines Corporation.
• VESA and DDC are trademarks of the Video Electronics Standard Association.
• Apple and Macintosh, Mac, Mac OS are registered trademarks of Apple Inc.
• Pentium is a registered trademark of Intel Corporation.
• JavaScript is a registered trademark of Sun Microsystems, Inc.
• DVI is a trademark of Digital Display Working Group.
• HDMI, the HDMI logo and High-Denition Multimedia Interface are trademarks
or registered trademarks of HDMI Licensing LLC.
• is a trademark of SRS Labs, Inc. WOW technology is incorporated under
license from SRS Labs, Inc.
All other trademarks are the properties of their respective owners.

2
Content
Content
Content . . . . . . . . . . . . . . . . . . . 2
Caution . . . . . . . . . . . . . . . . . . . 3
1. Main functions . . . . . . . . . . . 5
1.1
Live Mode (Project images from PC)
. . 5
1.2
Quick connection to your network
. . 6
1.3
Conguring and controlling via a web browser
. . 7
1.4 PC-LESS Presentation
(Display the images stored in SD memory card/USB memory.)
. . 8
2.
Equipment connection and network setting
. . 10
2.1
Required equipment preparation
. . 10
2.2 Quick connection ...........10
2.3
Manual network connection setting - Wired LAN -
. . 11
2.3.1. Equipments connection . . . 11
2.3.2. Network settings ......... 11
2.3.3 “Internet Option” setting ....14
2.3.4 Check connection . . . . . . . . 15
2.4
Manual network connection setting –Wireless LAN
. . 16
2.4.1
Preparation for wireless LAN connection
. . 16
2.4.2
Wireless LAN connection set up
. . 17
3. Using the Live Mode ......20
3.1 Outline of the Live Mode ......21
3.1.1 Display mode ............21
3.1.2 Presenter mode ..........22
3.1.3 Display User Name .......22
3.2 Install “Live Viewer 3” . . . . . . . . 23
3.2.1
Minimum PC hardware and software requirement
. . 23
3.2.2
Software Installation Procedure
. . 24
3.2.3
Version of the “Live Viewer” software
. . 25
3.3
Quick connection to the network
. . 26
3.3.1
Starting the “Live Viewer 3”
. . 26
3.3.2
Selecting the network connection mode
. . 27
3.3.3 Connecting to the network . . 31
3.4 Passcord connection .........32
3.4.1 Getting the Passcode . . . . . 32
3.4.2 Entering the Passcode . . . . 34
3.4.3 Conguring manually ......37
3.5 Manual conguration .........41
3.5.1 Prole connection . . . . . . . . 41
3.5.2 History connection ........42
3.5.3 Conguring manually ......43
3.6
Conrm the connection to your destination
. . 50
3.6.1
Connection and transmission
. . 50
3.6.2 Connection error . . . . . . . . . 52
3.6.3 Setting the Live Mode . . . . . 53
3.7 Start the “Live Viewer 3” ......54
3.7.1
Main menu and Operating buttons
. . 54
3.7.2 Displaying the status ......56
3.7.3
Switching the display mode
. . 57
3.7.4 Option menu . . . . . . . . . . . . 58
3.8 Prole data . . . . . . . . . . . . . . . . 60
3.8.1 Outline of Prole data . . . . . 60
3.8.2 Making Prole data . . . . . . . 60
3.8.3 Editing Prole data . . . . . . . 61
3.8.4 Registering My Connection . 62
4.
Management with Web browser software
. . 64
4.1
Conguring and controlling the projector via a web browser
. . 65
4.1.1 Logon . . . . . . . . . . . . . . . . . 67
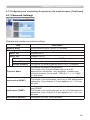
4.1.2 Network Information . . . . . . 68
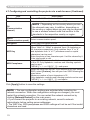
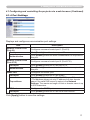
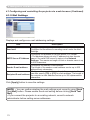
4.1.3 Network Settings .........69
4.1.4 Port Settings . . . . . . . . . . . . 71
4.1.5 Mail Settings . . . . . . . . . . . . 72
4.1.6 Alert Settings ............73
4.1.7 Schedule Settings ........75
4.1.8 Date/Time Settings . . . . . . . 77
4.1.9 Security Settings .........79
4.1.10 Projector Control ........81
4.1.11 Remote Control .........86
4.1.12 Projector Status .........88
4.1.13 Network Restart .........89
4.1.14 Logoff . . . . . . . . . . . . . . . . 89
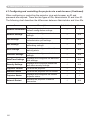
4.2 E-mail Alerts . . . . . . . . . . . . . . . 90
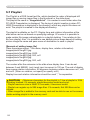
4.3
Projector Management using SNMP
. . 92
4.4 Event Scheduling . . . . . . . . . . . 93
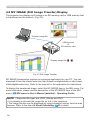
4.5
MY IMAGE (Still Image Transfer) Display
. . 96
4.6
Command Control via the Network
. . 97
5. PC-LESS Presentation. . . . 102
5.1
Outline of the PC-LESS Presentation
. . 102
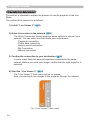
5.2 Thumbnail mode ...........104
5.2.1
Starting the Thumbnail mode
. . 104
5.2.2
Operating by buttons or keys
. . 106
5.2.3
Operation on the Thumbnail menu
. . 107
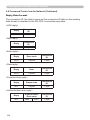
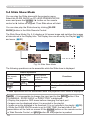
5.3 Full Screen Mode . . . . . . . . . . 108
5.4 Slide Show Mode . . . . . . . . . . 110
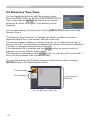
5.5 Directory Tree View ......... 112
5.6
“PC-LESS Presentation” error message
. . 115
5.7 Playlist ................... 116
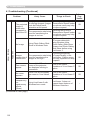
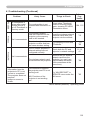
6. Troubleshooting . . . . . . . . 117
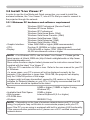
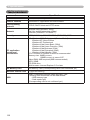
7. Specications ..........120
8.
Warranty and after-sales service
. . 121

3
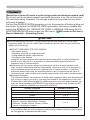
CAUTION
Caution
Caution
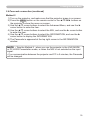
[Restriction in terms of inserts or pulls storage media and wireless network card]
Do not pull out the wireless network card while the power is on. Do not touch the
SD card while being accessed. The storage media can be pulled out only while
not being accessed.
Perform the REMOVE MEDIA procedure or turn the projector off before pulling out
the media. To perform the REMOVE MEDIA procedure, choose an suitable item
among the REMOVE ALL, REMOVE SD CARD or REMOVE USB using the PC-
LESS PRESENTATION menu under the MIU menu. (MIU menu in the User’s
Manual (detailed) – Operating Guide)
l
DO NOT USE NEAR THE FOLLOWING!
• Microwave ovens
• Industrial, scientic or medical devices
• Designated low power radio stations
• Premises radio stations
Using the wireless network card near the above may result in radio interference,
which in turn may result in a decrease in communication speed and even a
complete loss of communication.
l
Depending on the location where you attempt to use the wireless network card,
there may be interference with the radio waves, which may result in a decrease in
communication speed and even a complete loss of communication. In particular,
please be aware that using the wireless network card in locations where there is
reinforced steel, other metals and concrete may interfere with radio communication.
l
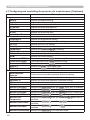
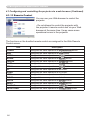
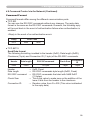
Available Channels
The wireless network card uses the 2.4GHz radio frequency band, but depending on
the country or region you are in, you might be limited to the channels you can use.
Please refer to the following table for conrming where and with what channels you
may use the accompanying IEEE802.11b/g wireless network card. Please consult
with your dealer for countries not included in the table.
Country or Region Available Channel
Japan 1 to 11
USA 1 to 11
Taiwan 1 to 11
Canada 1 to 11
UK, Spain, Germany, Italy, Austria, Switzerland,
Belgium, Sweden, Netherlands, Portugal,
Denmark, Finland, Greece, Norway, France,
Ireland, Luxembourg, Iceland
1 to 11
n
The accompanying IEEE802.11b/g wireless network card uses the 2.4GHz radio
frequency band. You do not need a radio license to use this card, but you should be
aware of the following:
l
You may not bring the wireless network card into countries not listed above as there
is a possibility that use of the wireless network card in those countries could lead to
an infringement of established radio laws.

4
Caution
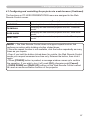
0560
!
The manufacturer (Gemtek) hereby declare that this equipment (the wireless
network card), model SD-Link11g is in compliance with the essential requirements
and other relevant provisions of Directive 1999/5/EC.

5
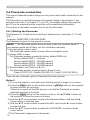
1. Main functions
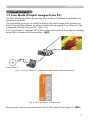
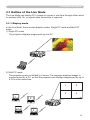
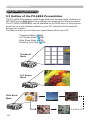
1.1 Live Mode (Project images from PC)
1. Main functions
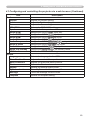
The MIU (Multi Information processing Unit) enables “Wireless presentation” by
choosing Live Mode.
The Live Mode gives you an ability to display the same image that is shown on
the PC through the network by using an application program “Live Viewer 3” that
is required to install into your PC. (Fig.1.1.a)
The “Live Viewer 3” captures PC screen image and sends to the projector through
wired LAN or wireless LAN connection. (20)
Fig. 1.1.a “Live Viewer 3” outlines (through wireless LAN connection)
Fig. 1.1.b “Live Viewer 3” Main menu
One projector can be connected with up to 4 PCs using “Live Viewer 3”. (54)
Live Viewer 3

6
1. Main functions
1.2 Quick connection to your network
The “Live Viewer 3” brings you very quick and simple connection to your network.
The “Live Viewer 3” prepares some options for you to match your requirement.
1) Quick connection by the Passcode
The Passcode is a code that includes SSID and IP address and other information
that are required for the network connection. The Passcode is given on screen by
the projector, and then all you need to do is to input the code to the “Live Viewer 3”
in your PC. (26)
Fig.1.2 PASSCODE on the projector screen
2) Connection by the prole for the network
You can set the information to connect the projector to your network as a prole
data in the “Live Viewer 3” in your PC. After that, you just select the prole data on
the “Live Viewer 3” to connect the projector to your network.
3) Connection by the history record for the network
Once you connect the projector to your network with the “Live Viewer 3”, the
“Live Viewer 3” stores the history. You just select a history record to connect the
projector to your network.

7
1. Main functions
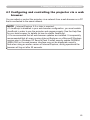
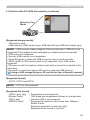
1.3 Conguring and controlling via a web browser
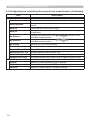
You can adjust or control the projector via a network from a web browser on a PC
that is connected to the same network.
Logon the network from the web browser and it offers the menus to congure
the network settings, monitor the projector and so on. The Web Remote Control,
one of the menus of web browser, allows you to control the projector like bundled
remote control including operating the “Live Mode” and “PC-LESS Presentation”.
(64)
Fig. 1.3. Web Remote Control

8
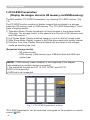
1. Main functions
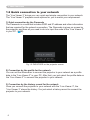
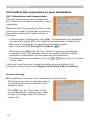
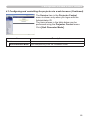
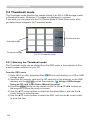
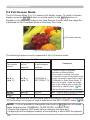
1.4 PC-LESS Presentation
(Display the images stored in SD memory card/USB memory.)
The MIU enables “PC-LESS Presentation” by choosing PC-LESS function. (Fig.
1.4)
The PC-LESS function enables to display images that are stored in a storage
media like SD memory card or USB memory. The “PC-LESS Presentation” has 4
types of display modes.
1) Thumbnail Mode: Display thumbnails of stored images in the storage media.
(After this, “the storage media” is the general term for both of SD memory card
and USB memory.)
2) Full Screen Mode: Display selected image or movie on the full screen mode.
3) Slide Show Mode: Display images in the Slide show mode with certain interval.
4) Directory Tree View: Display les and folders that are stored in the storage
media as directory tree view.
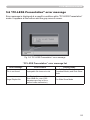
Fig. 1.4 “PC-LESS Presentation” outlines
“PC-LESS Presentation” can be controlled via keypad on the projector or remote
control (102).
• USB memory reader (adapter) is not supported (if the adapter
acknowledges as multiple devices connected).
• The supported formats are FAT 12, FAT 16(FAT) and FAT 32.
NTFS is not supported.
• USB hub is not supported.
NOTE
[Supported storage media]
- SD memory card
- USB memory (USB memory type, USB hard disk and USB card
reader type)

9
1. Main functions
1.4 PC-LESS Presentation
(Display the images stored in SD memory card/USB memory.) (continued)
• There are several naming limitations for the folders and les.
(1) Alphanumeric and Japanese characters are supported if the language
setting is Japanese.
(2) Alphanumeric and Latin-1 characters are supported if the language setting
is NOT Japanese.
• The les may not be able to access depending on the type of USB hard disk,
USB memory and USB card reader.
• It is recommended to use external power supply cable if the USB hard disk
drive has the power cable.
NOTE

10
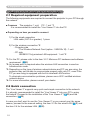
2. Equipment connection and network setting
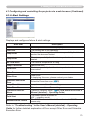
2.1 Required equipment preparation
2. Equipment connection and network setting
The following equipments are required to connect the projector to your PC through
the network.
■ Common The projector: 1 unit, PC : 1 set *1
It is recommended to install the “Live Viewer 3” into the PC.
■ Depending on how you want to connect
1) For the wired connection
*1: For the PC, please refer to the item 3.2.1 Minimum PC hardware and software
requirement. (
23)
*2: An access point is required when the wireless LAN connection is used as
Infrastructure mode.
*3: Depending on the type of wireless network device and PC you are using, the
projector may not be able to communicate properly with your PC, even if the
PC you are using is equipped with built-in wireless LAN function.
To eliminate communication problems, please use a Wi-Fi certied wireless
network device.
*4: For more information, please consult your dealer.
LAN cable (CAT-5 or greater): 1 piece
2) For the wireless connection *2
- Projector side
The Wireless Network Card (option : VA0833x *4) : 1 unit
- PC side
IEEE802.11b/g wireless LAN equipment: 1 unit *3
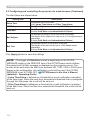
2.2 Quick connection
The “Live Viewer 3” supports very quick and simple connection to the network.
It is strongly recommended to install the “Live Viewer 3” into your PC to enjoy
the feature. Proceed to the installation of the “Live Viewer 3” (23) and the
connection. (26)
In case you don’t want to use the “Live Viewer 3” or you cannot use it by some
reason, proceed to the manual setting, the item 2.3 for the wired LAN (11) and
the item 2.4 for the wireless LAN. (16)

11
2. Equipment connection and network setting
2.3 Manual network connection setting - Wired LAN -
If you don’t use the “Live Viewer 3”, you need to set up your network connection
manually.
This section explains how to set it up manually.
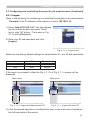
2.3.1 Equipments connection
Connect the projector and PC with a LAN cable.
* Before connecting with an existing network, contact the network administrator.
Next, please check the PC setting as explained below.
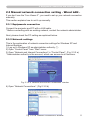
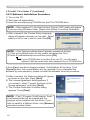
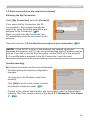
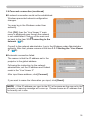
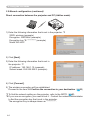
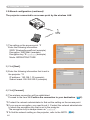
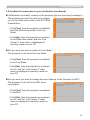
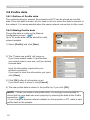
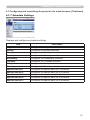
2.3.2 Network settings
This is the explanation of network connection settings for Windows XP and
Internet Explorer.
1) Log on to Windows XP as administrator authority. (*)
2) Open “Control Panel” from “Start” menu.
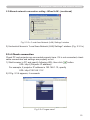
3) Open “Network and Internet Connections” in “Control Panel”. (Fig. 2.3.2.a)
* Administrator authority is the account, which can access to all functions.
4) Open “Network Connections”. (Fig.2.3.2.b)
Fig. 2.3.2.a “Network and Internet Connections” window
Fig. 2.3.2.b “Network Connections” window

12
2. Equipment connection and network setting
2.3 Manual network connection setting - Wired LAN - (continued)
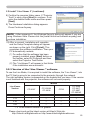
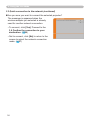
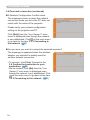
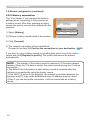
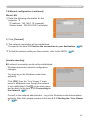
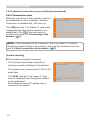
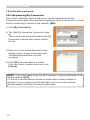
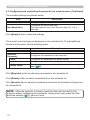
7) Set IP address, subnet mask and default gateway for PC.
Fig. 2.3.2.d “Internet Protocol (TCP/IP) Properties” window
5) Open “Local Area Connection Properties” window you use for network device.
(Fig. 2.3.2.c)
6) Set used protocol as “TCP/IP” and open “Internet Protocol (TCP/IP) Properties”
window.
Fig. 2.3.2.c “Local Area Connection Properties” window

13
2. Equipment connection and network setting
2.3 Manual network connection setting - Wired LAN - (continued)
[About IP address]
■ Setting manually
The Network address portion included in the IP address set into your PC should
be common with projector’s one. And the entire IP address in the PC should not
be overlapped with other equipments in the same network, including the projector.
The projector’s initial settings are as follows.
IP address: 192.168.1.10
Subnet mask: 255.255.255.0
(Network address: 192.168.1 in this case)
Therefore, specify PC’s IP address as follows.
IP address: 192.168.1.xxx (xxx shows decimal number.)
Subnet mask: 255.255.255.0
(Network address: 192.168.1 in this case)
For example
Select from 1 to 254 for “xxx” not duplicating with any other equipments.
In this case, projector has “192.168.1.10” IP address, specify from 1 to 254
except 10 for PC.
• “0.0.0.0” cannot be set to the IP address.
• The projector’s IP address can be changed by using the conguration utility
via a web browser. (65)
• If the projector and PC exist in the same network (i.e. network address is
common), default gateway can be blank.
• When the projector and PC exist in different networks, default gateway setting
is necessary. Contact the network administrator in detail.
NOTE
■ Setting automatically
When DHCP server exists in network, it is possible to assign IP address to the
projector and PC automatically.
* DHCP is abbreviation for “Dynamic Host Conguration Protocol” and has the
function to provide necessary setting for network like IP address from server to
client. A server that has DHCP function is called DHCP server.

14
2. Equipment connection and network setting
2.3 Manual network connection setting - Wired LAN - (continued)
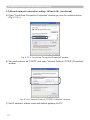
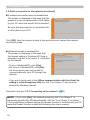
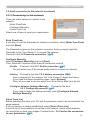
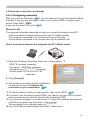
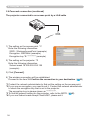
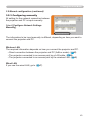
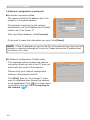
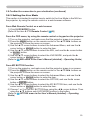
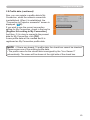
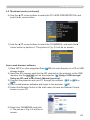
2) Click “Connections” tab and then click [LAN Settings] button to open “Local
Area Network (LAN) settings”. (Fig. 2.3.3.c)
Fig. 2.3.3.b “Internet Properties” window
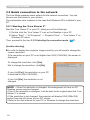
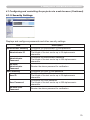
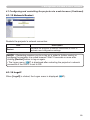
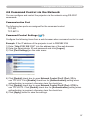
2.3.3 “Internet Option” setting
1) Click “Internet Options” in “Network and Internet Connections” window
(Fig. 2.3.3.a) to open “Internet Properties” window. (Fig.2.3.3.b)
Fig. 2.3.3.a “Network and Internet Connections” window
Click
Click

15
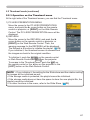
2. Equipment connection and network setting
2.3 Manual network connection setting - Wired LAN - (continued)
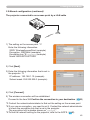
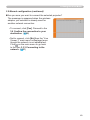
Fig. 2.3.4 “Logon menu”
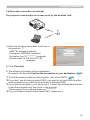
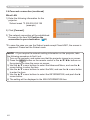
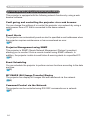
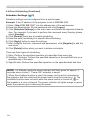
2.3.4 Check connection
Check PC and projector are connected properly here. If it is not connected, check
cable connections and settings are properly or not.
1) Start browser in PC and specify following URL, then click “
” button.
Fig. 2.3.3.c “Local Area Network (LAN) Settings” window
3) Uncheck all boxes in “Local Area Network (LAN) Settings” window. (Fig. 2.3.3.c)
URL: http://(Projector IP address)/
For example, if projector IP address is 192.168.1.10, specify
2) If Fig. 2.3.4 appears, it succeeds.
URL: http://192.168.1.10/

16
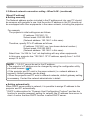
2. Equipment connection and network setting
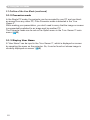
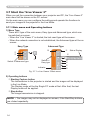
2.4 Manual network connection setting –Wireless LAN
The projector and PC can communicate in both of Ad-Hoc and Infrastructure
modes, using the designated wireless network card (option) on the projector.
This section is intended to explain how to set up wireless LAN connection
manually.
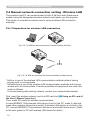
2.4.1 Preparation for wireless LAN connection
First, insert the wireless network card into SD card slot (
Using an SD card of
the User’s Manual (concise) ).
Then, make PC ready for wireless communication.
In case IEEE802.11b/g wireless LAN device is built-in the PC, make it valid and
make other network connections invalid. If wireless LAN device is not built-in the
PC, connect IEEE802.11b/g wireless LAN device and install device driver. (Refer
to the user guide for PC and wireless LAN device for detail.)
* Ad-Hoc is one of the wireless LAN communication methods without having
access point to communicate.
* Infrastructure is one of the wireless LAN communication methods with having
access point to communicate. If certain quantities of equipments are used, this
mode is efcient.
If communicating with existing network, contact your network administrator.
Fig. 2.4.1.a Without an access point communication (Ad-Hoc)
Fig. 2.4.1.b With an access point communication (Infrastructure)

17
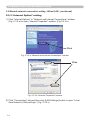
2. Equipment connection and network setting
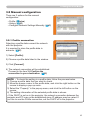
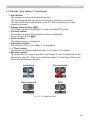
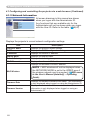
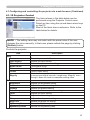
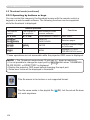
2.4.2 Wireless LAN connection set up
Using wireless LAN utility for Windows XP standard.
Wireless LAN initial settings for the projector is as follows.
2.4 Manual network connection setting –Wireless LAN (continued)
Connection Control : Ad-Hoc
SSID : wireless
Channel : 1ch
Encryption rating : None
Communication speed : AUTO
IP address : 192.168.1.10
* You can change these settings as you want via a web browser on your PC or the
menu on the projector. Refer to the item 4.1.3 Network Settings (
69) or
MIU menu in the User's Manual (detailed) – Operating Guide.
1) Open ”Network Connections”. (Fig. 2.4.2.a)
2) Open “Wireless Network Connection Properties”. (Fig. 2.4.2.b)
Fig. 2.4.2.a “Network Connections”
Fig. 2.4.2.b “Wireless Network Connection Properties” window (1)

18
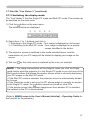
2. Equipment connection and network setting
3) Set used protocol as “TCP/IP” and open TCP/IP property. Set IP address and
other settings as same as wired LAN connection set up. (12)
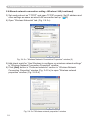
4) Open “Wireless Networks” tab. (Fig. 2.4.2.c)
2.4 Manual network connection setting –Wireless LAN (continued)
5) Add check mark for “Use Windows to congure my wireless network settings”
in “Wireless Network Connection Properties” window.
6) Click [Add] button in “Preferred networks” section in “Wireless Network
Connection Properties” window (Fig. 2.4.2.c) to open “Wireless network
properties” window. (Fig. 2.4.2.d)
Fig. 2.4.2.c “Wireless Network Connection Properties” window (2)
Fig. 2.4.2.d “Wireless network properties” window

19
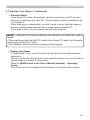
2. Equipment connection and network setting
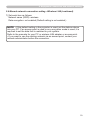
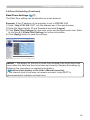
• If the default setting in the projector is used, set the data as above
into your PC. If an access point is used or any encryption mode is used, it is
required to set the data that is matched to your system.
Refer to the manuals for your PC or wireless LAN adapter or access point.
• If you want to use the existing network via an access point, contact your
network administrator before the connection.
NOTE
7) Set each item as follows.
Network name (SSID): wireless
Data encryption: not enabled (Default setting is not enabled.)
2.4 Manual network connection setting –Wireless LAN (continued)

20
3. Using the Live Mode
3. Using the Live Mode
The section is intended to explain the process to use the projector in the Live
Mode.
The outline of the process is as follows.
1) Install “Live Viewer 3” (
23)
The Quick Connection feature prepares some options to connect your
network. You can select one that meets your requirement.
2) Quick Connection to the network (
26)
- Passcode connection
- Prole data connection
- History record connection
- My Connection
- Manual connection
In some case, there are several projectors connected to the same
network. Before you send your image, conrm that the right projector is
selected.
3) Conrm the connection to your destination (
50)
The “Live Viewer 3” main menu will be on screen.
Now, you can send your images to the projector through the network.
4) Start the “Live Viewer 3” (
54)
Fig. 3 “Live Viewer 3” Main menu
Page is loading ...
Page is loading ...
Page is loading ...
Page is loading ...
Page is loading ...
Page is loading ...
Page is loading ...
Page is loading ...
Page is loading ...
Page is loading ...
Page is loading ...
Page is loading ...
Page is loading ...
Page is loading ...
Page is loading ...
Page is loading ...
Page is loading ...
Page is loading ...
Page is loading ...
Page is loading ...
Page is loading ...
Page is loading ...
Page is loading ...
Page is loading ...
Page is loading ...
Page is loading ...
Page is loading ...
Page is loading ...
Page is loading ...
Page is loading ...
Page is loading ...
Page is loading ...
Page is loading ...
Page is loading ...
Page is loading ...
Page is loading ...
Page is loading ...
Page is loading ...
Page is loading ...
Page is loading ...
Page is loading ...
Page is loading ...
Page is loading ...
Page is loading ...
Page is loading ...
Page is loading ...
Page is loading ...
Page is loading ...
Page is loading ...
Page is loading ...
Page is loading ...
Page is loading ...
Page is loading ...
Page is loading ...
Page is loading ...
Page is loading ...
Page is loading ...
Page is loading ...
Page is loading ...
Page is loading ...
Page is loading ...
Page is loading ...
Page is loading ...
Page is loading ...
Page is loading ...
Page is loading ...
Page is loading ...
Page is loading ...
Page is loading ...
Page is loading ...
Page is loading ...
Page is loading ...
Page is loading ...
Page is loading ...
Page is loading ...
Page is loading ...
Page is loading ...
Page is loading ...
Page is loading ...
Page is loading ...
Page is loading ...
Page is loading ...
Page is loading ...
Page is loading ...
Page is loading ...
Page is loading ...
Page is loading ...
Page is loading ...
Page is loading ...
Page is loading ...
Page is loading ...
Page is loading ...
Page is loading ...
Page is loading ...
Page is loading ...
Page is loading ...
Page is loading ...
Page is loading ...
Page is loading ...
Page is loading ...
Page is loading ...
-
 1
1
-
 2
2
-
 3
3
-
 4
4
-
 5
5
-
 6
6
-
 7
7
-
 8
8
-
 9
9
-
 10
10
-
 11
11
-
 12
12
-
 13
13
-
 14
14
-
 15
15
-
 16
16
-
 17
17
-
 18
18
-
 19
19
-
 20
20
-
 21
21
-
 22
22
-
 23
23
-
 24
24
-
 25
25
-
 26
26
-
 27
27
-
 28
28
-
 29
29
-
 30
30
-
 31
31
-
 32
32
-
 33
33
-
 34
34
-
 35
35
-
 36
36
-
 37
37
-
 38
38
-
 39
39
-
 40
40
-
 41
41
-
 42
42
-
 43
43
-
 44
44
-
 45
45
-
 46
46
-
 47
47
-
 48
48
-
 49
49
-
 50
50
-
 51
51
-
 52
52
-
 53
53
-
 54
54
-
 55
55
-
 56
56
-
 57
57
-
 58
58
-
 59
59
-
 60
60
-
 61
61
-
 62
62
-
 63
63
-
 64
64
-
 65
65
-
 66
66
-
 67
67
-
 68
68
-
 69
69
-
 70
70
-
 71
71
-
 72
72
-
 73
73
-
 74
74
-
 75
75
-
 76
76
-
 77
77
-
 78
78
-
 79
79
-
 80
80
-
 81
81
-
 82
82
-
 83
83
-
 84
84
-
 85
85
-
 86
86
-
 87
87
-
 88
88
-
 89
89
-
 90
90
-
 91
91
-
 92
92
-
 93
93
-
 94
94
-
 95
95
-
 96
96
-
 97
97
-
 98
98
-
 99
99
-
 100
100
-
 101
101
-
 102
102
-
 103
103
-
 104
104
-
 105
105
-
 106
106
-
 107
107
-
 108
108
-
 109
109
-
 110
110
-
 111
111
-
 112
112
-
 113
113
-
 114
114
-
 115
115
-
 116
116
-
 117
117
-
 118
118
-
 119
119
-
 120
120
-
 121
121


Ask a question and I''ll find the answer in the document
Finding information in a document is now easier with AI
Related papers
-
Hitachi CPX4 - CP X4 XGA LCD Projector User manual
-
-
-
-
-
Hitachi CP-X267 User manual
-
-
-
Hitachi CPHD9950B Network Guide
-
Hitachi CP-X306 User manual
Other documents
-
Infocus IN5100 User manual
-
3M X62w User manual
-
Maxell MPJW3501 Network Guide
-
Planar PR9020 User manual
-
-
Casio XJ-F11X, XJ-F21XN, XJ-F101W, XJ-F211WN User manual
-
Casio YW-2L User manual
-
Sanyo PLC-XL51 - 2700 Lumens Owner's manual
-
 Blackbox-av Mediascreen 32|43|50|55|65″ Owner's manual
-
Sanyo PLC-WXU30 Owner's manual
