Garmin GPSMAP 60CSX Reference guide

Category
Navigators
Type
Reference guide

This manual is also suitable for

Garmin GPSMAP 60CSX is a versatile and feature-rich color map navigator that combines ease of use with exceptional functionality and rugged durability. With its high-sensitivity GPS receiver, barometric altimeter, and electronic compass, the GPSMAP 60CSX provides accurate navigation and essential data for a wide range of outdoor activities. Explore topographic maps, create and follow routes, mark waypoints, and navigate to your destination with ease.

Garmin GPSMAP 60CSX is a versatile and feature-rich color map navigator that combines ease of use with exceptional functionality and rugged durability. With its high-sensitivity GPS receiver, barometric altimeter, and electronic compass, the GPSMAP 60CSX provides accurate navigation and essential data for a wide range of outdoor activities. Explore topographic maps, create and follow routes, mark waypoints, and navigate to your destination with ease.

color map navigator
quick start guide
GPSMAP
®
60Cx
GPS Antenna
Power/Backlight Key
Color LCD Display
In/Out (Zoom) Keys
Page Key
Rocker Key
Find Key
Mark Key
Quit Key
Enter Key
Menu Key
Marking Your Location as a Waypoint
A waypoint is a geographic location that you specify, it can be
your current location, a point on the Map Page or any item from
the Find Feature database. Waypoints are saved to the Find Menu.
Finding a Destination (Waypoint)
You can search for a destination using the Find Menu. A destina-
tion can be any map item such as a Waypoint, City, or Point of
Interest (restaurant, museum, etc.) available from the map database.
Without downloaded detailed map data from Garmin MapSource
®
,
only waypoints, cities, interstate exits, and geocache points can be
used as destinations.
1. Press the FIND key to display the Find Menu.
2. Use the
ROCKER key to select the Waypoints icon and
then press
ENTER to display the list of waypoints. By de-
fault, the list shows only those nearest to your current
location. Press the
MENU key to view the options list.
3. Use the
ROCKER key to scroll through the list until the
desired waypoint is highlighted. Then press
ENTER to
display the information page for that waypoint.
4. Use the
ROCKER key to select the Go To button at the
bottom of the page. Then press
ENTER to begin navigation
to the waypoint.
Navigating to a Waypoint
When using “Go To” to navigate, a direct line (or course) is cre-
ated to the waypoint. The direction you are to move is the heading
(N, S, E, W). If you stray off course you can use a bearing (com
-
pass pointer) to be redirected toward your destination. The Map,
Compass and Trip Computer Pages use these elements to direct
your navigation efforts.
1. Press the PAGE key repeatedly until the Compass Page is
displayed. This page contains a “Bearing Pointer” and a
“Compass Ring.
The Bearing Pointer indicates the direction to go and the
Compass Ring rotates to indicate North orientation when
you begin to move. Digital Data fields at the top of the
page display selectable navigation information such as
speed, distance to go, elapsed time, etc.
2. Press the
QUIT key to move to the Map Page and observe
your progress toward the waypoint. A Bearing line
displays
on the map and the Position Arrow moves as you move.
3. Press the
QUIT key again to move to the Trip Computer
Page. This page provides travel data such as a trip odom
-
eter, maximum speed, etc.
4. To stop navigation, press the
MENU key with the Com-
pass or Map Page displayed, then select “Stop Naviga
-
tion” and press
ENTER.
Using the Map Page
The Map Page displays a detailed
map of the area around your current
location. You can view your progress
when moving or navigating to a
chosen destination. The IN and OUT
keys allow you to change the map
scale and the configurable data fields
provide navigation information.
© Copyright 2005 Garmin Ltd. or its subsidiaries
Part Number: 190-00481-01 Rev. A Printed in Taiwan
1. Press and release the MARK
key to display the Mark
Waypoint Page. Observe that
your current position is
assigned a map symbol, a
unique identification number,
a date and time of recording,
location coordinates, and if
available elevation and depth.
2. To save the waypoint
to the Waypoints List, use the
ROCKER key to select OK
and press
ENTER.
To personalize the Waypoint, refer to the “Using Waypoints”
section of the Owner’s Manual.
1. Press the PAGE key to cycle
the Main Pages until the
Map Page is displayed.
2. Press the
MENU key to view options for the Map Page.
3. Begin to move about and observe the Position Arrow
on the map. Use the
ROCKER key to move the Panning
Arrow to highlight a map item or view more map
area.
Refer to the Owner’s Manual for more details.
Find Menu
Displays only these
Find item groups
when detailed map
data has not been
downloaded.
Waypoints List
Waypoint Information
Page
Using the on-screen buttons
allows you to delete the
waypoint, view it on the map
page or navigate to it.
Compass Page Map Page Trip Computer
Start-Up and Satellite Acquisition
Find a location where you have a clear view of the sky. If you’re
starting up for the first time or you have moved over 600 miles since
last using the GPSMAP 60Cx, it must initialize (determine its loca-
tion by searching for satellites that are in position over your current
location.) Press the
MENU key to use the Location option from the
Satellite Page Options Menu to mark your approximate location on
the Map Page so it looks for only those satellites above your location.
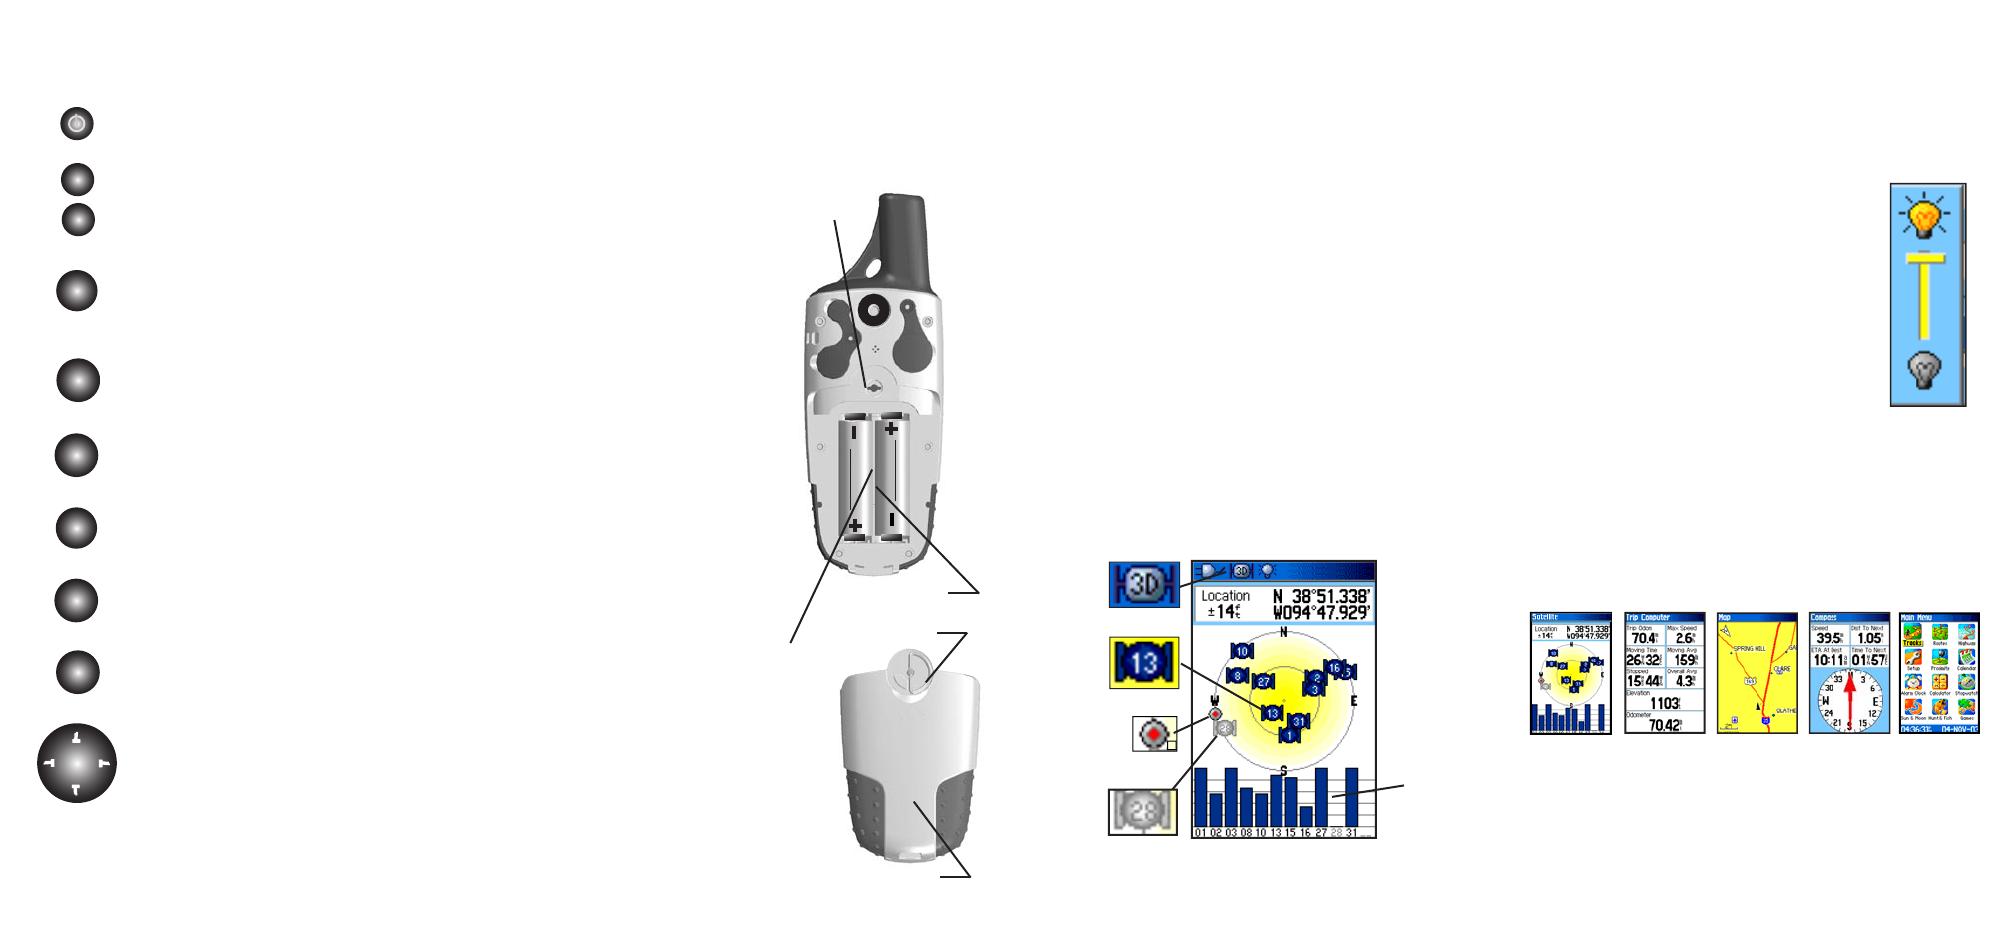
1. Turn On the GPSMAP 60Cx by pressing and releasing the
POWER key. A Welcome Page will briefly appear before
moving to the Satellite Page.
2. Observe the Satellite Page and the GPS status messages
as they appear at the top of the page.
Acquiring Satellites” message appears as the GPSmap
60C begins to search for satellites overhead.
Your “Location Coordinates” display when four or
more satellites are fixed (enough to determine an ap-
proximate elevation as well as ground location).
Unit Operation
Key Function
Battery Installation
The GPSMAP 60Cx operates on two “AA” batteries (not includ-
ed), which are located in the back of the unit. Alkaline or NiMH
batteries may be used (see the Owner’s Manual to set the battery
type). Stored data is not lost when the batteries are removed.
Battery Compartment
USE BY: 2009
USE BY: 2009
Locking
Pin Slot
1. To remove the battery cover
from the back of the unit,
turn the D-Ring 1/4 turn
counter-clockwise and then
pull the cover away.
2. Insert the batteries, observ-
ing the proper polarity.
A polarity diagram can be
found molded into the battery
compartment.
3. Reinstall the battery cover by
inserting the bottom slot over
the tab at the base of the
unit and reinserting the
locking pin in the back of the
unit.
4. Turn the D-Ring 1/4 turn
clockwise to lock the cover in
place.
When replacing batteries, use only new
or fully charged batteries. Do not mix
Alkaline and NiMH batteries. Recharge-
able batteries may have less capacity than
disposable batteries.
Extensive use of backlighting and/or WAAS
as well as key beep tones will significantly
reduce battery life.
Battery Cover
Backlight
Adjustment
Slider
IN
OUT
FIND
PAGE
MARK
ENTR
QUIT
V
V
V
V
MENU
POWER/BACKLIGHT Key - Press and hold to turn
unit On/Off. Press and release to adjust backlighting.
IN/OUT Zoom Keys - From the Map Page, press to
zoom in or out. From any other page, press to
scroll up or down a list.
FIND/MOB Key - Press and release at any time to
view the Find Menu Page. Press and hold for
MOB feature.
MARK Key - Press and release at any time to mark
your current location as a waypoint.
QUIT Key - Press and release to cancel data entry or
exit a page.
PAGE Key - Press to cycle through the main pages.
Press when using the on-screen keyboard to close.
MENU Key - Press and release to view options
for a page. Press twice to view the Main Menu.
ENTER Key - Press and release to enter highlighted
options, data or confirm on-screen messages.
ROCKER Key -
Move Up/Down or Right/Left to
move through lists, highlight fields, on-screen
buttons, icons, enter data or move the map pan-
ning arrow.
If the GPSMAP 60Cx can’t get past the “Acquiring Satellites”
message or you get a “Lost Satellite Signal” message, move to a new
location away from tall overhead obstacles.
Satellite Page
Displays your location coordinates, position accuracy, a view of the satellites
overhead, and bar graph showing the signal strength of each overhead satellite.
Satellite Page
Options
Turn GPS Off
• Orient display
to your direction
of movement “Track
Up” or... “North
Up” (as shown).
Change display colors
Use Map Page to
mark your location.
GPS Elevation
Status Bar
3D GPS
indicator
Received
Satellite icon
Position Bug indi
-
cates your direction
of movement
Overhead
Satellite not
yet received
Adjusting the Backlighting
Lighting conditions may make it difficult to view the GPSMAP
60Cx display. If so, you may need to turn on the backlighting and
adjust it to the desired level of brightness. Use of backlighting
increases the rate of battery depletion.
Viewing the Main Pages
The Main Pages provide the information you need for basic
navigation using the GPSMAP 60Cx. Press the PAGE key repeat-
edly to cycle from one Main Page to another.
1. With the GPSMAP 60Cx On, press and
release the POWER key to display the
Backlight Adjustment Slider.
2. Press and release the POWER key to
i
ncrease the brightness level to maximum.
3. Allow the Adjustment Slider to close on
its own or press the
ENTER key.
The backlight is factory set to timeout in 15
seconds, unless connected to an external power
source. Refer to Display Setup in the Owner’s
Manual to change the timeout period for the
backlight.
Satellite Page - Provides reference for satellites being tracked,
Trip Computer Page - Provides trip and navigation data.
Map Page - Displays a map and references your movements.
Compass Page - Provides guidance to a destination.
Main Menu - A directory of advanced features and settings.
Satellite
Page
Trip Computer
Page
Map
Page
Compass
Page
Main
Menu
D-Ring
Satellite Signal
Status Bars
The Micro SD Card used for storing detailed
mapping data is located beneath the
batteries. Refer to the Owner’s Manual for
detailed information.
  • Page 1 1
  • Page 2 2

Garmin GPSMAP 60CSX Reference guide

Category
Navigators
Type
Reference guide
This manual is also suitable for

Garmin GPSMAP 60CSX is a versatile and feature-rich color map navigator that combines ease of use with exceptional functionality and rugged durability. With its high-sensitivity GPS receiver, barometric altimeter, and electronic compass, the GPSMAP 60CSX provides accurate navigation and essential data for a wide range of outdoor activities. Explore topographic maps, create and follow routes, mark waypoints, and navigate to your destination with ease.

Ask a question and I''ll find the answer in the document

Finding information in a document is now easier with AI