Page is loading ...

IMP+ i.s.
INSTRUCTION MANUAL


IMP I.S. (FOURTH EDITION REV. 2)
June 2017
Part Number M-081-0-004-2P
COPYRIGHT
© Pulsar Process Measurement Limited, 2006-17. All rights reserved. No part of this publication may
be reproduced, transmitted, transcribed, stored in a retrieval system, or translated into any language in
any form without the written permission of Pulsar Process Measurement Limited.
WARRANTY AND LIABILITY
Pulsar Process Measurement Limited guarantee for a period of 2 years from the date of delivery that it
will either exchange or repair any part of this product returned to Pulsar Process Measurement
Limited if it is found to be defective in material or workmanship, subject to the defect not being due to
unfair wear and tear, misuse, modification or alteration, accident, misapplication or negligence.
DISCLAIMER
Pulsar Process Measurement Limited gives nor implies any process guarantee for this product, and
shall have no liability in respect of any loss, injury or damage whatsoever arising out of the
application or use of any product or circuit described herein.
Every effort has been made to ensure accuracy of this documentation, but Pulsar Process
Measurement Limited cannot be held liable for any errors.
Pulsar Process Measurement Limited operates a policy of constant development and improvement and
reserves the right to amend technical details as necessary.
TECHNICAL ENQUIRIES
Please contact Pulsar Process Measurement Limited for technical support.
COMMENTS AND SUGGESTIONS
If you have any comments or suggestions about this product, then please contact:
Pulsar Process Measurement Limited
Pulsar Process Measurement Inc.
Cardinal Building
Enigma Commercial Centre
Sandy’s Road
Malvern
Worcestershire
WR14 1JJ
United Kingdom
PO Box 5177
Niceville
FL 32578-5177
USA
Tel: + 44 (0) 1684 891371
Fax: + 44 (0) 1684 575985
Tel: + 1 850 279 4882
Fax: + 1 850 279 4886
Web Site: http://www.pulsar-pm.com
e-mail: [email protected] (general
information)
e-mail: support@ pulsar-pm.com (product
support)
Web Site: http://www.pulsar-pm.com
e-mail: info.usa@pulsar-pm.com (general
information)
e-mail: support.usa@ pulsar-pm.com (product
support)


Contents
Chapter 1 Start Here… ......................................................................................................................................... 1
About this Manual ........................................................................................................................................... 1
About the IMP+ i.s. Level Monitoring System ................................................................................................. 2
Functional Description ............................................................................................................................ 2
Product Specification....................................................................................................................................... 4
EU Declaration of Conformity ....................................................................................................................... 5
Chapter 2 Installation............................................................................................................................................ 6
Hazardous Area Installation ............................................................................................................................ 6
Information specific to Hazardous Area Installation.............................................................................. 6
Hazardous Area Specific Power Supply and barrier Requirements.............................................................. 7
Voltage drop due to i.s. safety Zener barrier........................................................................................... 8
Suitable recommended barriers ............................................................................................................... 9
Location and mounting information ............................................................................................................. 11
Preparation for Operation .............................................................................................................................. 15
Maintenance ................................................................................................................................................... 15
Chapter 3 How To Use Your IMP+ i.s. Level Monitoring System ...................................................................... 16
Operating the Controls .................................................................................................................................. 16
Display ................................................................................................................................................... 16
Run Mode .............................................................................................................................................. 16
Program Mode ....................................................................................................................................... 17
Button Functions .................................................................................................................................... 17
How to Access Program Mode ..................................................................................................................... 17
Parameter Defaults ........................................................................................................................................ 19
Factory Defaults ..................................................................................................................................... 19
Chapter 4 Getting Results With Your IMP+ i.s...................................................................................................... 20
Setting up Your Application ......................................................................................................................... 20
Empty Distance...................................................................................................................................... 20
Span ........................................................................................................................................................ 20
Near and Far Blanking .......................................................................................................................... 20
The 4-20 mA Output ..................................................................................................................................... 20
Setting Security Passcodes ............................................................................................................................ 21
Using A Passcode .................................................................................................................................. 21
Changing the Passcode .......................................................................................................................... 22
Resetting Factory Defaults ............................................................................................................................ 22
Checking the Information Specific to your IMP+ i.s. ........................................................................................ 22
Checking the Software Revision and Serial Number .......................................................................... 22
Chapter 5 Parameter Guide ................................................................................................................................ 23
Parameter Listing ........................................................................................................................................... 23
Application (APP) Menu .............................................................................................................................. 23
P100 Mode of Operation ....................................................................................................................... 23
P104 Measurement Units ...................................................................................................................... 23
P105 Empty Level ................................................................................................................................. 23
P106 Span .............................................................................................................................................. 24
P107 Near Blanking Distance ............................................................................................................... 24
P108 Far Blanking Distance ................................................................................................................. 24
Volume (UoL) Menu .................................................................................................................................... 25
P600 Vessel Shape ................................................................................................................................ 25
P601-P603 Vessel Dimensions ............................................................................................................. 27
P604 Calculated Volume....................................................................................................................... 27

P605 Volume Units ............................................................................................................................... 28
P606 Correction Factor ......................................................................................................................... 28
P607 Max Volume ................................................................................................................................ 28
Display (DiSP) Menu .................................................................................................................................... 29
P800 Display Units ................................................................................................................................ 29
P801 Decimal Places ............................................................................................................................. 29
P808 Fail-safe Mode ............................................................................................................................. 29
P809 Fail-safe Time .............................................................................................................................. 29
mA Output (LOOP) Menu ............................................................................................................................ 30
P834 mA Low Level ............................................................................................................................. 30
P835 mA High Level ............................................................................................................................ 30
P838 mA Low Trim .............................................................................................................................. 30
P839 mA High Trim .............................................................................................................................. 30
P840 mA Fail-safe Mode ...................................................................................................................... 30
Compensation (CoP) Menu .......................................................................................................................... 31
P851 Measurement Offset ..................................................................................................................... 31
P852 Temperature Source ..................................................................................................................... 31
P854 Fixed Temperature ....................................................................................................................... 31
P860 Sound Velocity ............................................................................................................................. 31
P645 Vapour Temperature Compensation ........................................................................................... 32
Stability (StA) Menu ..................................................................................................................................... 32
P870 Fill Damping ................................................................................................................................ 32
P871 Empty Damping ........................................................................................................................... 33
System (SyS1) Menu .................................................................................................................................... 33
P921 Enable Code ................................................................................................................................. 33
P922 Passcode ....................................................................................................................................... 33
P926 Software Revision ........................................................................................................................ 33
P928 Serial Number .............................................................................................................................. 33
P930 Factory Defaults ........................................................................................................................... 33
Test (tESt) Menu ........................................................................................................................................... 34
P991 Hard Test ...................................................................................................................................... 34
P992 mA Out Test ................................................................................................................................. 34
Chapter 6 Troubleshooting ................................................................................................................................ 35
Parameter Record .................................................................................................................................................. 36

Page 1
Chapter 1 Start Here…
Congratulations on your purchase of a Pulsar IMP+ i.s. Level Monitoring
System. This quality system has been developed over many years and
represents the latest in high technology ultrasonic level measurement and
control.
It has been designed to give you years of trouble-free performance, and a
few minutes spent reading this operating manual will ensure that your
installation is as simple as possible.
About this Manual
It is important that this manual is referred to for correct installation and
operation.
There are various parts of the manual that offer additional help or
information as shown:
Tips
TIP
At various parts of this manual you
will find tips to help you.
Additional Information
Additional Information
At various parts of the manual, you will find sections
like this that explain specific items in more detail.

Page 2
About the IMP+ i.s. Level Monitoring System
Functional Description
The IMP+ i.s. level monitoring system is a highly developed ultrasonic level
measurement system which provides non-contacting level measurement for
a wide variety of applications in both liquids and solids located in hazardous
areas. It is a 2 wire (loop powered) device.
Easy calibration and maintenance free “fit and forget” performance mean
that you can install the IMP+ i.s. Level Monitoring System rapidly and with
confidence. The measured distance, level or space is indicated by the current
drawn by the unit, fault conditions can be indicated by 3.5 or 22mA.
The IMP+ i.s. operates on the principle of timing the echo received from a
measured pulse of sound transmitted in air and utilises “state of the art”
echo extraction technology.
IMP+ i.s. comes in three models IMP 3 i.s. with a range from 0.20m (0.66
feet) to 3.00m (9.84 feet), IMP 6 i.s. with a range of 0.3m (0.98 feet) to
6.00m (19.69 feet) and IMP 10 i.s. with a range of 0.3m (0.98 feet) to
10.00m (32.81 feet).

Page 3
The IMP+ i.s. can show level, space, distance, on the display. The current
loop can be connected to a remote chart recorder or PLC that has a current
input, to monitor level, space or distance, dependant on the measurement
mode selected, and provides a ‘fault condition’ alarm of either 3.5mA or
22mA.
The IMP+ i.s. lid has an integral LCD display and 4 buttons which are used
for programming purposes when in Program Mode and as hot keys
providing additional information whilst in Run Mode.

Page 4
Product Specification
Physical
Dimensions O/A height 186mm (5.24 inches) x O/A
diameter 133mm (7.32 inches)
Mounting 1.5” BSP/NPT (IMP3 and 6 models) 2”
BSP/NPT (IMP10)
Weight Nominal 1kg
Cable entry 2 off cable glands 4.5 – 10mm. (torque to
2NM)
Environmental
IP Rating IP67
Min & Max Temperature (Ambient) -40 to +65°C (-40 to 149°F)
Min & Max Temperature (Transducer) -40 to +80°C (-40 to 176°F)
Approvals
CE Approval See EU Declaration of Conformity
Performance
Beam Angle <10° inclusive
Operating frequency Imp 3 125kHz, Imp 6 75kHz, Imp 10 41kHz
Range Imp 3 0.2 – 3m (0.66 – 10ft)
Imp 6 0.3 – 6m (0.98 – 20ft)
Imp 10 0.3 – 10m (0.98 – 33ft)
Digital echo processing
Accuracy ± 0.25% or 6mm (0.24 inches) whichever is
greater
Resolution ± 0.1% or 2mm (0.08inches) whichever is greater
4-20mA output Resolution 5µA
Temperature compensation via internal temperature sensor (± 0.5°C
accuracy)
Response time Power up to stable reading = 10 seconds
Input voltage range 12 – 26V DC at the IMP+ i.s. (not at the barrier)
Current output 3.5 – 22mA
Voltage input to IS barrier 20 – 24V DC
Programming
On-board programming via the 4-button keypad and 4-digit LCD
display

Page 5
EU Declaration of Conformity

Page 6
Chapter 2 Installation
Hazardous Area Installation
If the unit is to be used in a hazardous area, then power to the unit must pass
through an approved safety barrier or approved IS PSU.
Information specific to Hazardous Area Installation
(Reference European ATEX Directive 2014/34/EU, Annex II, 1.0.6.)
The following instructions apply to equipment covered by certificate number
Sira 06ATEX2014X:
1. The equipment may be used with flammable gases and vapours with
apparatus groups IIC, IIB, and IIA with temperature classes; T1, T2, T3,
T4 maximum ambient temperature range -40
o
C to +80
o
C.
2. The equipment is only certified for use in ambient temperatures in the
range -40
o
C to +80
o
C and should not be used outside this range
3. Installation shall be carried out in accordance with the applicable code of
practice by suitably-trained personnel
4. Repair of this equipment shall be carried out in accordance with the
applicable code of practice.
5. Certification marking as detailed in drawing number
D-804-0648-D.
6. If the equipment is likely to come into contact with aggressive
substances, then it is the responsibility of the user to take suitable
precautions that prevent it from being adversely affected, thus ensuring
that the type of protection is not compromised.
Aggressive Substances - e.g. acidic liquids or gases that may attack
metals or solvents that may affect polymeric materials.
Suitable Precautions - e.g. regular checks as part of routine inspections
or establishing from the material’s data sheet that it is resistant to
specific chemicals.

Page 7
7. The certificate number has an ‘X’ suffix that indicates that the following
special condition of certification applies;
In the case of IMP+ i.s. due to the housing and labels being non-
conductive plastic care needs to be taken with regards electrostatic
charge. The equipment shall not be installed if the conditions are
conducive to the buildup of electrostatic charge. Additionally, the
equipment should only be cleaned with a damp cloth.
8. The manufacturer should note that, on being put into service, the
equipment must be accompanied by a translation of the instructions in
the language or languages of the country in which the equipment is to be
used and by the instructions in the original language.
Hazardous Area Specific Power Supply and barrier Requirements
The IMP+ i.s. operates from a DC supply of 12 –26V and will typically draw
less than 22mA. The unit must be powered from an approved i.s. safety
barrier or approved i.s. Power supply with the following limits:
IS Safety Barrier – Uo >= 28V, Io >=93mA, Pi >= 0.65W
IS Power Supply – Uo >= 25.2V, Io >=162mA, Pi >= 1.03W
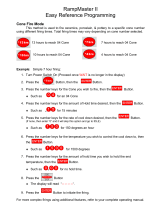
Label from IMP3 i.s. showing certification details (6 & 10 are the same)
All electronic products are susceptible to electrostatic
shock, so follow proper grounding procedures during
installation.
Cable Entry
The IMP+ i.s. Series has two M16 cable entries, fitted with a suitable gland, to
ensure moisture protection is maintained.

Page 8
Terminal Connection Details
The IMP+ i.s is a 2 wire (loop powered) unit, the terminal connections for IMP+ i.s.
is detailed below. Wiring details are also given on the terminal label under the
access cover.
Terminal 1 + ve: Direct Current (DC) input (12-26VDC) via barrier
Terminal 2 - ve: Ground side
Voltage drop due to i.s. safety Zener barrier
The IMP+ i.s. are 2 wire, 4-20mA loop powered devices. If used with a Zener
barrier (which contains resistors in series with the output) you will experience a
voltage drop across the barrier. The IMP+ i.s. range can be powered from 12-
24VDC, but as the drop across the barrier can be up to 9V depending on the
barrier you are using and the current being drawn (worst case 22mA). You must
also allow for any voltage drops in the cabling from the barrier to the IMP+ i.s..
For example, if an IMP+ i.s. was supplied via a dual Zener barrier with 24V on the
safe side of the barrier then if the unit was drawing 4mA the drop would be
approx. 2V, if the current was 22mA then this would be approx 9V. So as the
IMP+ i.s. requires a minimum of 12V to function correctly, the supply to the IMP+
i.s. at 22mA would be: 24 – 9 = 15V, this means that you could cope with a
voltage drop in the cabling of 3V.
Consideration should be given to any voltage drop in the measuring device.
If you consider say 16/0.2 (0.5mm
2)
conductor, this has a resistance of
39ohms/km, so the maximum length of cable would be as follows:
Maximum voltage drop allowed = 3V
Maximum current = 22mA
So, allowable resistance = 3V / 22mA = 136ohms
Therefore, if you were using 16/0.2 conductors you could use the following
maximum length of cable:
16/0.2 cable resistance = 39ohms/km
You must double this as you have to account for the full length (there and back)
giving 78ohms/km, so,
Absolute maximum cable length = 136 / 78 = 1.7km
In practice allow a reasonable margin.
If you are using a galvanic isolator then you do not have to consider the drop
across the barrier, but you must consider losses in the cable.

Page 9
2 Wire (loop powered)
IMP+ i.s.
wiring detail
Important Information
The IMP+ i.s. when installed in a hazardous area must be supplied through an
approved safety barrier or approved i.s power supply.
Suitable recommended barriers:
Barrier Type
Suggested Barriers
See
Fig.
Pepperl & Fuchs
MTL
Single Zener Barrier
Z728
7728+
1
Dual Zener Barrier
Z788
7788+
2
Galvanic Isolator source
KFD2-STC4-Ex1
(source only)
5041(source only)
3
Galvanic Isolator sink
KFD2-STC4-
Ex1Y122583 (sink
only)
5043(sink or source)
3

Page 10
Source means the measuring device applies a resistive load and sink means the
measuring device supplies power
Barriers must be fitted with reference to the manufacturers datasheets.

Page 11
Location and mounting information
The compact one-piece construction of the IMP+ i.s. can be mounted easily
using the integral nose thread (1.5" or 2" BSP/NPT, dependent on model).
When choosing a location to mount the Imp, bear in mind the following:
• For access to the LCD display and programming buttons it is
recommended that you mount it in an area which is easily
accessible.
• The ultrasonic signal path should be free of falling material and
obstructions such as pipes, beams etc.
• The IMP3 should be mounted at least 20cm (0.66 feet) above the
maximum level of the material and be perpendicular to the surface.
Whilst the IMP 6 and 10 should be mounted at least 30cm (0.98
feet) above the maximum level of the material and be perpendicular
to the surface.
• The ambient temperature is between -20ºC and 65ºC.
• There should be no high voltage cables or electrical inverters close
by.

Page 12
Dimensions
The dimensions of the IMP+ i.s. are as shown below.
1.5" BSP/NPT – IMP 3 & 6 i.s.
2" BSP/NPT – IMP 10 i.s.

Page 13
Outdoor and Open Vessel Installation
The IMP+ i.s. can be simply mounted on a bracket, suitable for the application
and secured using the thread located at the top of the transducer
(2"BSP/NPT).
Care should be taken to ensure that the IMP+ i.s. is not installed in direct
sunlight, in order to avoid errors in the measurement of ambient
temperature.
Attention should also be taken, when mounting the unit, to ensure that
strong windy conditions are avoided, wherever possible, to prevent
abnormal operation.
IMP+ i.s.
Model
Range
L =
Blanking
Imp 3
i.s.
3 metres
(9.84 feet)
200mm
(0.66 feet)
Imp 6
i.s.
6 metres
(19.69 feet)
300mm
(0.98 feet)
Imp 10
i.s.
10 metres
(32.81 feet)
300mm
(0.98 feet)
“L” should as a minimum be at least that as detailed in the table above,
but can be greater if required.
Closed Vessel Installation
“L” should as a minimum be at least that as detailed in the table above, but
can be greater if required. The IMP+ i.s. can be simply screwed into a flange
and secured using the thread located at the top of the transducer (1.5" or
2"BSP/NPT, dependent on model).
Where possible use, a flange made of a synthetic material such as PVC, in
cases where a metal flange is used it is advisable to fit a suitable gasket
between the flange of the IMP+ i.s. and the connection to the vessel.

Page 14
Stand Pipe Installations
When mounting the IMP+ i.s. to a standpipe care should be taken to ensure
that the standpipe is of sufficient diameter with reference to its length, see
the table below for details:
Dia. (D)
Max. Length (L)
mm
inches
mm
inches
80
3
220
8
100
4
300
12
150
6
420
16
200
8
560
22
When using a standpipe, fixed to the top of a vessel, ensure that the open
end of the standpipe is clear of any obstructions such as weld seams, gaskets
etc. in order to avoid unwanted signal returns.
If using standpipes which extend in to the vessel, beyond the blanking
distance, but not as far as the empty level, then the open end of the standpipe
should be cut to an angle of 45
o
.
Correct
standpipe
installation
Pipe should be free
of obstructions
such as weld seams
The maximum
level (100% of
Span) is inside the
Blanking Distance
/