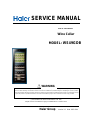
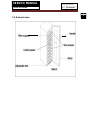
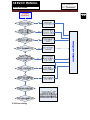
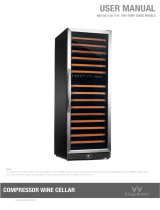
Haier WS49GDB wine cellar is designed to provide optimal storage conditions for your wine collection. With a gross capacity of 164 liters, it can hold up to 45 bottles of wine. The adjustable thermostat allows you to set the ideal temperature for your wines, ranging from 6 to 18 degrees Celsius. The wine cellar also features an interior light, adjustable shelves, and an over-temperature alarm to ensure the safety of your wine.
Haier WS49GDB wine cellar is designed to provide optimal storage conditions for your wine collection. With a gross capacity of 164 liters, it can hold up to 45 bottles of wine. The adjustable thermostat allows you to set the ideal temperature for your wines, ranging from 6 to 18 degrees Celsius. The wine cellar also features an interior light, adjustable shelves, and an over-temperature alarm to ensure the safety of your wine.


-
 1
1
-
 2
2
-
 3
3
-
 4
4
-
 5
5
-
 6
6
-
 7
7
-
 8
8
-
 9
9
-
 10
10
-
 11
11
-
 12
12
-
 13
13
-
 14
14
-
 15
15
-
 16
16
-
 17
17
-
 18
18
-
 19
19
-
 20
20
-
 21
21
-
 22
22
-
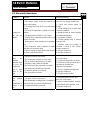 23
23
-
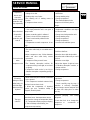 24
24
-
 25
25
-
 26
26
-
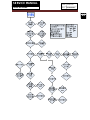 27
27
-
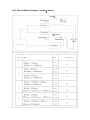 28
28
-
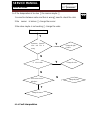 29
29
-
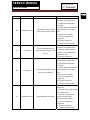 30
30
-
 31
31
-
 32
32


Haier WS49GDB wine cellar is designed to provide optimal storage conditions for your wine collection. With a gross capacity of 164 liters, it can hold up to 45 bottles of wine. The adjustable thermostat allows you to set the ideal temperature for your wines, ranging from 6 to 18 degrees Celsius. The wine cellar also features an interior light, adjustable shelves, and an over-temperature alarm to ensure the safety of your wine.
Ask a question and I''ll find the answer in the document
Finding information in a document is now easier with AI
Related papers
-
Haier HVF024BBG Datasheet
-
Haier HVZ035AB User manual
-
-
-
-
-
-
-
-
Other documents
-
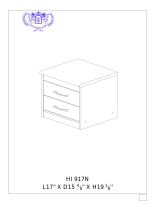 Hodedah HI 917N Quick start guide
-
Palsonic PAL42BWF Owner's manual
-
 KingsBottle KBU-50D-FG Wine Cooler Manual
-
HEC HFN-136 User manual
-
U-Line 1224WCINT-60B User manual
-
-
Perlick CR30R12R User manual
-
-
-
WhisperKool GSM-01 User manual

