Installation Instructions
www.Bestop.com - We’re here to help! Visit our web site and click on “Ask a Question”. Click here for more Truck Accessories by Bestop.
INSTALLATION TIME
SKILL LEVEL
45 Minutes
2 - Moderately Easy
TOOLS
BestRail
™
Overhead Rack
7/16" and 1/2"
3/16" and 1/8"
Can be used with BestRail™ Accessories:
42792 – 10' Ladder Rack 42793 – BestRail™ Tie Down
42794 – BestRail™ Retractable Tie Down 42795– 12' Ladder Rack
The channels in the Overhead Rack are the same as the BestRail™ and Ladder Rack.
Maximum load 1000 lbs. Always make sure all fasteners are tight.
Vehicle Application:
• 5-1/2 ft. Full-size Pickup
BestRail™ 42750
• 5-3/4 ft. Full-size Pickup
BestRail™ 42760
• 6-1/2 ft. Full-size Pickup
BestRail™ 42710
• 6-3/4 ft. Full-size Pickup
BestRail™ 42720
• Ford Super Duty Full-size Pickup
BestRail™ 42740
• 8 ft. Full-size Pickup
BestRail™ 42730
Overhead Rack
Part Number 42791
Fits:

BestRail
™
Overhead Rack Installation Instructions
Rev. C 0408 42791 pg. 2
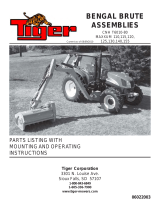
Parts List and
Hardware Identifi cation
Overhead Rack Cross Member.,
Part Number 431.40, Qty - 2
T-Bolt, Part Number
432.84, Qty - 6
1/4-20 x 2.25" Flat Head Cap Screw,
Part Number 436.14, Qty - 8
Front Bracket – Left, Part
Number 440.57, Qty - 1
5/16-18 Nylock Nut, Part
Number 436.17, Qty - 8
Overhead Rack Legs, Part
Number 431.39, Qty - 4
Adjustable Handle,
Part Number
436.11, Qty - 4
Rear Bracket – Left, Part
Number 440.59, Qty - 1
Overhead Rack Corner Cap – Left,
Part Number 431.47, Qty - 4
1/4-20 x 3.25" Flat Head Cap Screw,
Part Number 436.13, Qty - 8
1/4-20 Nylock Nut, Part
Number 436.17, Qty - 32
1/4-20 x 3" Socket Head Cap Screw,
Part Number 436.12, Qty - 16
5/16" Washer, Part Number
436.16, Qty - 12
1/4" Washer, Part Number
431.81, Qty - 16
Front Bracket – Right, Part
Number 440.56, Qty - 1
Rear Bracket – Right, Part
Number 440.58, Qty - 1
Overhead Rack Corner Cap – Right,
Part Number 431.46, Qty - 4
Gusset, Part Number
441.27, Qty - 2
1/4-20 x 3/8" Set Screw, Part
Number 439.35, Qty - 4

Rev. C 0408 42791 pg. 3
BestRail
™
Overhead Rack Installation Instructions
Locate two (2) Right and Left Overhead Rack
Corner Caps and match them into pairs. Use a
pair of the Corner Caps to mount an Overhead
Rack Cross Member to the top of each of the Front
Leg Assemblies. Install four (4) 1/4-20 x 3" Socket
Head Screws and four (4) 1/4-20 Nylock Nuts to
secure the caps to each Leg Assembly.
Install Front Overhead
Rack Cross Member
Assemble Legs to
Front Brackets
Locate the Left Front Bracket and orient it to the
vehicle. Take one of the Overhead Rack Legs and
orient it to the bracket with the angled edge to the
bottom and opening up toward the inside of the ve-
hicle bed. Align the holes in the Leg with the holes
in the Front Bracket. The wider side of the Leg will
follow the line of the vehicle bed from front to back.
Secure the Leg to the bracket with two (2) 1/4-20
x 2-1/4" Flat Head Screws, two (2) 1/4-20 x 3-1/4"
Flat Head Screws, two (2) 1/4" Washers and four
(4) 1/4-20 Nylock Nuts.
Repeat this procedure with the Right Front Bracket.
Leg
Left Front Bracket
1/4-20 x 3-1/4" Flat
Head Screws
1/4-20 x 2-1/4" Flat
Head Screws, 1/4"
Washers and 1/4-20
Nylock Nuts
1/4" Washers and
1/4-20 Nylock Nuts
Angled End of Leg
Assemble Legs to
Rear Brackets
Locate the Left Rear Bracket and orient it to the
vehicle. Take one of the Overhead Rack Legs and
orient it to the bracket with the angled edge to the
bottom and opening up toward the inside of the
vehicle bed. Align the holes in the Leg with the holes
in the Rear Bracket. The wider side of the Leg will
follow the line of the vehicle bed from front to back.
Secure the Leg to the bracket with two (2) 1/4-20 x
2-1/4" Flat Head Screws, two (2) 1/4-20 x 3-1/4" Flat
Head Screws, two (2) 1/4" Washers and four (4) 1/4-
20 Nylock Nuts.
Repeat this procedure with the Right Rear Bracket.
Leg
Left Rear Bracket
1/4-20 x 2-1/4" Flat
Head Screws
Angled End
of Leg
Front Assembly
Overhead Rack
Cross Member
1/4-20 x 3" Socket
Head Screws
Right and Left
Overhead Rack
Corner Caps
1/4" Washers
and 1/4-20
Nylock Nuts
1/4-20 x 3-1/4" Flat
Head Screws, 1/4"
Washers and 1/4-20
Nylock Nuts
1/4-20
Nylock
Nuts
(4)

BestRail
™
Overhead Rack Installation Instructions
Rev. C 0408 42791 pg. 4
Remove
Channel
Extrusion
Remove
Corner Cap
#8 x 5/8" Oval
Screws
Remove BestRail™ Corner Caps
Remove the #8 x 5/8" Oval Screws that secure the
Left Corner Cap to the BeltRail™. Set the screws
aside to be reused later.
Remove the Channel Extrusions from the outer
channels in the BestRail™ Front and Side Rails.
Install Front T-Bolts
Place two (2) T-Bolts in channel in the Front Rail.
Slide one across the vehicle until it butts up against
the Corner Cap on the other side. Replace the
Channel Extrusions and Corner Caps.
Replace
Corner Cap
T-Bolt
#8 x 5/8" Oval
Screws
Rear Assembly
Overhead Rack
Cross Member
Slide a Gusset into each Rear Leg Assembly and
the Rear Cross Member.
Install the Corner Caps as in Step 3. Do not pinch
the Gusset in the Corner Cap.
After the caps are installed, install and tighten two
(2) 1/4-20 x 3/8" Set Screws in each Gusset.
Install Rear Overhead
Rack Cross Member
Overhead Rack
Cross Member
Rear
Leg
Gusset
1/4-20 x 3" Socket
Head Screws
1/4-20
Nylock
Nuts
(4)
Do not pinch
Gusset in
Corner Cap
1/4-20 x 3/8"
Set Screw
Gusset

Rev. C 0408 42791 pg. 5
BestRail
™
Overhead Rack Installation Instructions
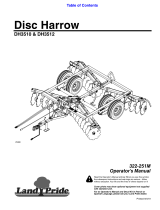
Install Front Overhead
Rack Assembly
Remove the safety screw in the top channel near the
tailgate in the Side Rails on each side of the vehicle.
Slide two (2) T-Bolts into the channel on each side.
Slide one bolt all the way forward until it meets the
front Corner Cap. Reinstall both safety screws.
Install Rear T-Bolts
Pick up the Front Overhead Rack Assembly and slide
the slots in the brackets over the T-Bolts installed in
Step 5. Install a 5/16" Washer and 5/16-18 Nylock Nut
over each pin in the T-Bolts.
Front Overhead
Rack Assembly
Install 5/16" Washers and
5/16-18 Nylock Nuts on
each T-Bolt
Install Rear Overhead
Rack Assembly
Pick up the Rear Overhead Rack Assembly and
slide the slots in the brackets over the T-Bolts in-
stalled in Step 6. Install a 5/16" Washer and Adjust-
able Handle over each pin in the T-Bolts.
The Adjustable Handles allow you to easily adjust
the Rear Overhead Rack forward or rearward.
To use the handles, start the handle on the T-Bolt
then lift the handle and ratchet it the rest of the way
down.
Safety
Screw
Slide (2) T-Bolts
into channel
Rear Overhead
Rack Assembly
Install 5/16"
Washers on
T-Bolt
Adjustable
Wrench
Slide (1) T-Bolt forward
to Corner Cap

BestRail
™
Overhead Rack Installation Instructions
Rev. C 0408 42791 pg. 6
LIMITED WARRANTY
We warrant our product to be free from defects in material and workmanship, for the terms specifi ed below, provided there has been normal use and
proper maintenance. This warranty applies to the original purchaser only. All remedies under this warranty are limited to the repair or replacement of
any item or items found by the factory to be defective within the time period specifi ed. If you have a warranty claim, fi rst you must call our factory at
the number below for instructions. You must retain proof of purchase and submit a copy with any items returned for warranty work. Upon completion
of warranty work, if any, we will return the repaired or replaced item or items to you freight prepaid. Damage to our products caused by accidents,
fi re, vandalism, negligence, misinstallation, misuse, Acts of God, or by defective parts not manufactured by us, is not covered under this warranty.
THE WARRANTY TIME PERIOD IS AS FOLLOWS FOR REPLACE-A-TOP™, SAILCLOTH REPLACE-A-TOP™, SUPERTOP®, SUPERTOP®
REPLACEMENT SKINS, SUNRIDER®, AND TIGERTOP®: TWO YEARS FROM DATE OF PURCHASE.
THE WARRANTY TIME PERIOD IS AS FOLLOWS FOR ALL OTHER “SOFT GOODS” MANUFACTURED BY OUR COMPANY (USING PRIMARILY
VINYLS, PLASTICS, AND/OR FOAM): ONE YEAR FROM DATE OF PURCHASE.
THE WARRANTY TIME PERIOD IS AS FOLLOWS FOR ALL OTHER “HARD GOODS” MANUFACTURED BY OUR COMPANY (USING PRIMAR-
ILY METALS, PLASTICS, AND/OR FIBERGLASS): ONE YEAR FROM DATE OF PURCHASE.
ANY IMPLIED WARRANTIES OF MERCHANTABILITY AND/OR FITNESS FOR A PARTICULAR PURPOSE CREATED HEREBY ARE LIMITED IN
DURATION TO THE SAME DURATION AND SCOPE AS THE EXPRESS WRITTEN WARRANTY. OUR COMPANY SHALL NOT BE LIABLE FOR
ANY INCIDENTAL OR CONSEQUENTIAL DAMAGE.
Some states do not allow limitations on how long an implied warranty lasts, or the exclusion or limitation of incidental or consequential damages,
so the above limitations or exclusions may not apply to you. This warranty gives you specifi c legal rights, and you may also have other rights which
vary from state to state.
For further information or request for warranty work, please contact:
Bestop Inc., Customer Service
Toll-Free: (800)845-3567
Main: (303)465-1755
E-mail: [email protected]
Website: www.Bestop.com
/