Page is loading ...

LP-Style
Guitar Kit
Assembly Instructions
Version 1.1
25 August 2016
www.alloyguitars.com
888-214-8314

LPAssem Version 1.1 25 August 2016
Copyright © 2014, 2015, 2016 Alloy Instruments, Inc.
Alloy Instruments Inc. disclaims all liability, including infringement on proprietary rights, relating to
the use of the information in this document. No license, express or implied, by estoppal or
otherwise, to any intellectual property rights is granted herein.
This material is protected under copyright and trade secret protections.
* Third-part brands and names are property of their respective owners.
Revision Number Release Date Comments
1.0 1 August 2016 Initial release
1.1 25 August 2016 Added photos and revised copy

LPAssem Version 1.1 1 25 August 2016
1.0 Welcome and Introduction. . . . . . . . . . . . . . . . . . . . . . . . . . . . . . . . . . . . . . . . . . . . . 1
1.1. Contacting Us . . . . . . . . . . . . . . . . . . . . . . . . . . . . . . . . . . . . . . . . . . . . . . . . . . . . . . . . . 1
2.0 Prepare for assembly. . . . . . . . . . . . . . . . . . . . . . . . . . . . . . . . . . . . . . . . . . . . . . . . . 2
2.1. Unpack . . . . . . . . . . . . . . . . . . . . . . . . . . . . . . . . . . . . . . . . . . . . . . . . . . . . . . . . . . . . . . 2
2.2. Tools you will need . . . . . . . . . . . . . . . . . . . . . . . . . . . . . . . . . . . . . . . . . . . . . . . . . . . . . 6
3.0 Neck Attachment . . . . . . . . . . . . . . . . . . . . . . . . . . . . . . . . . . . . . . . . . . . . . . . . . . . . 7
4.0 Finish . . . . . . . . . . . . . . . . . . . . . . . . . . . . . . . . . . . . . . . . . . . . . . . . . . . . . . . . . . . . . 9
5.0 Assembly . . . . . . . . . . . . . . . . . . . . . . . . . . . . . . . . . . . . . . . . . . . . . . . . . . . . . . . . . 10
5.1. Warnings. . . . . . . . . . . . . . . . . . . . . . . . . . . . . . . . . . . . . . . . . . . . . . . . . . . . . . . . . . . . 10
5.2. Controls assembly . . . . . . . . . . . . . . . . . . . . . . . . . . . . . . . . . . . . . . . . . . . . . . . . . . . . 10
5.3. Clear all screw holes. . . . . . . . . . . . . . . . . . . . . . . . . . . . . . . . . . . . . . . . . . . . . . . . . . . 10
5.4. Install the Neck . . . . . . . . . . . . . . . . . . . . . . . . . . . . . . . . . . . . . . . . . . . . . . . . . . . . . . . 11
5.5. Install the Tuning Machines . . . . . . . . . . . . . . . . . . . . . . . . . . . . . . . . . . . . . . . . . . . . . 11
5.6. Install the Controls . . . . . . . . . . . . . . . . . . . . . . . . . . . . . . . . . . . . . . . . . . . . . . . . . . . . 12
5.7. Install the Bridge and Tailpiece. . . . . . . . . . . . . . . . . . . . . . . . . . . . . . . . . . . . . . . . . . . 13
5.8. Install The Jack Plate . . . . . . . . . . . . . . . . . . . . . . . . . . . . . . . . . . . . . . . . . . . . . . . . . . 14
5.9. Install the Switch. . . . . . . . . . . . . . . . . . . . . . . . . . . . . . . . . . . . . . . . . . . . . . . . . . . . . . 14
5.10. Install the Pickups. . . . . . . . . . . . . . . . . . . . . . . . . . . . . . . . . . . . . . . . . . . . . . . . . . . . 15
5.11. Make Connections . . . . . . . . . . . . . . . . . . . . . . . . . . . . . . . . . . . . . . . . . . . . . . . . . . . 16
5.12. Installing the Strap Buttons. . . . . . . . . . . . . . . . . . . . . . . . . . . . . . . . . . . . . . . . . . . . . 17
5.13. Install the strings and initial tuning . . . . . . . . . . . . . . . . . . . . . . . . . . . . . . . . . . . . . . . 17
5.14. Sound Check! . . . . . . . . . . . . . . . . . . . . . . . . . . . . . . . . . . . . . . . . . . . . . . . . . . . . . . . 18
6.0 Final Setup. . . . . . . . . . . . . . . . . . . . . . . . . . . . . . . . . . . . . . . . . . . . . . . . . . . . . . . . 19
6.1. Truss Rod Adjustment . . . . . . . . . . . . . . . . . . . . . . . . . . . . . . . . . . . . . . . . . . . . . . . . . 19
6.2. Set the Bridge/String Height . . . . . . . . . . . . . . . . . . . . . . . . . . . . . . . . . . . . . . . . . . . . . 20
6.3. Adjust the Intonation. . . . . . . . . . . . . . . . . . . . . . . . . . . . . . . . . . . . . . . . . . . . . . . . . . . 20
6.4. Adjust the Nut Height . . . . . . . . . . . . . . . . . . . . . . . . . . . . . . . . . . . . . . . . . . . . . . . . . . 21
6.5. Set Pickup Height . . . . . . . . . . . . . . . . . . . . . . . . . . . . . . . . . . . . . . . . . . . . . . . . . . . . . 22
7.0 The End . . . . . . . . . . . . . . . . . . . . . . . . . . . . . . . . . . . . . . . . . . . . . . . . . . . . . . . . . . 23

25 August 2016 2 LPAssem Version 1.1

LPAssem Version 1.1 1 25 August 2016
1.0 Welcome and Introduction
Thanks and congratulations on your purchase of an Alloy Guitars Kit!
We believe that after you build your first kit, you will be hooked! We hope that you will come back to us for
future kits - perhaps a different model, or a “fancier” kit with better components - or just to try a different
finishing technique.
1.1. Contacting Us
You can contact us by phone, email, on the web, or postal mail:
Alloy Guitars
10940 SW Barnes Rd. #252
Portland, OR 97225
888-214-8314
www.alloyguitars.com

25 August 2016 2 LPAssem Version 1.1
2.0 Prepare for assembly.
Get a cup of coffee. Have a snack. Assembling a guitar is a process that takes time, patience, and thought.
It is not to be rushed. You will want to cherish this instrument for years to come. Go slow and be patient.
The assembly process is broken into the following sections:
• Unpacking and Parts Review
• Finishing
• Assembly
• Final Setup
Let’s get started. Open the box.
2.1. Unpack
Gently take out and unwrap the body and neck. Place them on a towel or work cloth. Remove all the
hardware and spread on a towel or large work cloth.
• Inspect the neck and body for any shipping damage.
• The neck should be smooth and ready for final sanding and finishing.
• The body should be ready for finish sanding and either sealing, staining, or painting. (You will have
to do finish work on the body and neck. That is half the fun of assembling your own guitar. Make it
yours!!)
Identify all the hardware components. Please see the photos below, but note that some of these photos
may differ slightly from the components that you received.
1.Body
2.Neck
3.Pickups x 2
4.Prewired volume and tone control harness, and switch
5.Strings
6.Bridge and stop tailpiece
7.Back Body Covers x 2
Figure 1 Box Contents

LPAssem Version 1.1 3 25 August 2016
8.Tuning Machines (Body, post, washer) X 6
9.Prewired Output Jack and Plate
10.Strap Pins (Pin, Screw, Washer) X 2
11.Truss rod cover and pickup selector plate
12.Screws
13.Allen Wenches
14.Alloy Guitars Pick!
If anything is missing or not correct, please contact our customer service department ASAP!
(www.AlloyGuitars.com, 888-214-8314, help@alloyguitars.com)
Figure 2 Body Figure 3 Neck
Figure 4 Output Jack and Plate Figure 5 Pickups

25 August 2016 4 LPAssem Version 1.1
Figure 6 Strings
Figure 7 Pickup selector switch Figure 8 Bridge and tailpiece parts
Figure 9 Back Body Covers Figure 10 Knobs
Figure 11 (optional) Plates Figure 12 Tuning Machines

LPAssem Version 1.1 5 25 August 2016
Figure 13 Wiring Harness Figure 14 Alloy Pick!

25 August 2016 6 LPAssem Version 1.1
2.2. Tools you will need
We do everything we can to make building your guitar straight-forward. Besides the materials to finish the
guitar (paint, stain, sealant, etc.) you shouldn’t need anything else that most people don’t already have in
their garages (such as a soldering iron, or saws). Nor do you need to do any exacting measurements that
might make it difficult to get a high quality instrument. You do, however, need a short list of tools and
supplies:
• #1 Phillips Screwdriver (small)
• #2 Phillips Screwdriver (medium)
• Short metal ruler (6”) with 1/32” markings or feeler gauges
• Needle-nosed pliers
• Painters or Masking Tape
• Wood Finishing Materials
• Bar soap or wax candle
• Large towel or work cloth (big enough to lay a guitar on)
• 10mm socket or box wrench for tuning machines and pot/switch nuts
• Allen wrench for truss rod adjustments (provided with kit)
• Wood glue (Titebond III recommended)
• Clamps and wood blocks
Additionally, you will be much happier and the setup steps detailed belove will be much easier to perform if
you have the following:
•a capo
• a chromatic electronic tuner
Figure 15 Tools

LPAssem Version 1.1 7 25 August 2016
3.0 Neck Attachment
For LP-style guitars, the neck is often attached prior to finishing so that the neck joint can be smoothly
finished after gluing. You may choose to do this assembly here, before finishing, or after finishing.
Start with the body resting on a sturdy, flat, soft surface.
• LOOK AT AND UNDERSTAND THE PICTURES. The neck should only be inserted from the top
, not
from the end. The neck widens as you approach the end, so it not fit into the front of the next slot.
(Figure 17)
• Attempting to insert the neck from the end can result in damaging the body and/or neck. (Figure 16)
• Ensure the neck sits flat and against the body. The fit will be snug but not extremely tight.
• Spread glue on all the surfaces of the neck pocket and the part of the neck that will contact the pocket.
You don’t need to use a lot of glue - a thin, even coating on both surfaces is all that is required. Work
quickly so that the glue does not dry. Using a small paintbrush to spread the glue works well.
• Before the glue has had a chance to set, fit the neck into the body and press it into place. place blocks
on the top and bottom and clamp the neck in place to dry. (Figure 18) .
Troubleshooting!
• If the neck does not fit flat against the body, remove and ensure the neck slot is clean and free of
debris. Ensure the neck is clean and free of debris and finish.
• If the neck does not fit into the slot, check the clearance on each side. Sometimes light sanding is
required on the neck to place into the slot. The fit is very snug by design and wood can expand and
contract depending on weather conditions.
• If the neck is not fitting , check both the neck and body for any raised grain areas, extra paint or
gloss. (Finish coats may be thicker than you think!)
• If you chose to finish the neck before attaching it to the body, use #320 or #400 sandpaper to
remove any excess finish that is affecting the neck fit. DO NOT OVERSAND! FIT SHOULD BE
SNUG!
Figure 16 The WRONG WAY to
insert the neck
Figure 17 The right way!

25 August 2016 8 LPAssem Version 1.1
• Wipe off excess glue that may squeeze out when you do the clamping. A slightly damp paper towel
works well here but don’t get the wood too wet.Don’t worry about being perfect here... you can easily
sand off any remaining glue before finishing the neck/body.
• Let the glue dry with the clamps in place for at least 24 hours. Remove the clamps.
• Lightly sand any glue squeeze out that remains prior to starting the finishing process.
Figure 18 Neck Clamping
Figure 19 Neck alignment at heel

LPAssem Version 1.1 9 25 August 2016
4.0 Finish
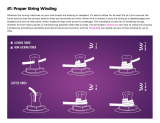
CAUTION: Do not sand the top of the spalted body very much or very hard.
The spalted wood is thin and you will sand through if you go too hard
Before you assemble your guitar, we suggest you complete all finishing of the wood components.
Otherwise, you will need to disassemble the guitar before finishing it.
Now... we know that most of you will want to assemble your guitar right out of the box and worry about
finishing it later. And this is OK! Just reverse all the steps in the instructions which follow carefully.
Weather you are going to oil to natural color, stain, paint, or attempt that sunburst you saw at the guitar
shop, in the end it should be what you want. Our only suggestion is to not bite off more than you can chew;
if this is your first instrument, don’t try to do a fancy 6 layer sunburst with custom color tone mixing. Rather,
start simple and plan on doing more instruments in the future. Things only get better with time and practice.
And we know from personal experience: building the first
guitar only makes you want to build another one. You
better start working on your spouse now. There are going
to be a lot of guitars in your house.
There are many books, articles, videos, and web sites
dedicated to different ways to finish a guitar. Additionally,
there are a large number of places to buy finishing
materials. Here are a suggestions for places to start:
Books:
• Guitar Finishing Step-by-Step
by Dan Erlewine. Dan is the primary guy at Stewart MacDonald. He has
been a guitar tech for decades and is a good teacher, too.
(http://www.amazon.com/gp/product/0977651908
)
• Understanding Wood Finishing
by Bob Flexner. This is truly a deep dive into the art and science of
finishing wood. Great book! http://www.amazon.com/Understanding-Wood-Finishing-HC-
Woodworker/dp/1565235487
Supplies:
• Stewart MacDonald. http://www.stewmac.com
A great source for tools and finishing supplies.
• Shellac.net. A good supply of different finishes, including Behlen’s line: http://www.shellac.net/
stringed_Instrument_finishes.html
• Wudtone. UK company, but they ship internationally. http://www.wudtone.com/
Online:
• Search for “guitar finishing” on youtube.com. There are hundreds of videos to watch.
And lastly, be safe. A few warnings:
• Many finishing products are flammable and can produce noxious fumes. Always work in well
ventilated areas away from sources of ignition. Wear appropriate mask and respirator gear!
• Sanding, polishing and steel wool can produce large quantities of fine dust. You don’t want to be
breathing this material. Wear appropriate mask and respirator gear!
• Both finishing (spraying or wiping coats) and sanding/buffing can make a real mess. Make sure
you are working in an area that can handle the fumes, dust, spills and overspray without forcing
you to sleep on the couch!
Alloy Pro Tip
We suggest that you clean out
screw holes with each layer of
finish that you do. This will
make it much easier to find the
holes!

25 August 2016 10 LPAssem Version 1.1
5.0 Assembly
Once your guitar body and neck
have the look you desire and is
COMPLETELY dry, it is time for final
assembly. Waiting is tough, but
fingerprints in that otherwise perfect
finish can be hard to live with. And
please be extra patient. Even after
finishes are dry to the touch, they still
need time to cure. If you mount
hardware, pickguards, tuners, etc.
too early, they will stick to the
uncured finish and potentially and damage the finish. Waiting is hard!
5.1. Warnings
Though we aren’t handling explosives here, there
are places that you can get hurt and we need to
give you a few warnings and suggestions.
• TAKE YOUR TIME!
• As mentioned earlier, you need to protect
your eyes and lungs while doing any of this
work - in particular when doing sanding and
finishing.
• Warning - Follow directions for any finishing products. Some of these materials are toxic, produce
noxious fumes or are flammable. Use in well ventilated areas and away from sources of ignition.
• You should always wear safety glasses while working on your guitar kit. These protective glasses
should meet the appropriate standards of the American National Standards Institute (ANSI).
• We assume that you have basic skills in working with hand tools - screwdrivers, pliers, Allen wrenches,
drills and the like. We assume that you are familiar with the safe operation and use of the various tools
and techniques described i this document. If you are not qualified to do these operations, then you
need to stop building your guitar kit for your own safety.
5.2. Controls assembly
If you received a fully wired guitar kit from us, there isn’t any work to do here - the pickups, volume and
tone controls, and output jack are pre wired with snap together connectors. If you received your kit
unwired, you will need to prepare the pickups, switch, and controls, including soldering all the connectors.
The rest of this manual assumes that this is all completed.
5.3. Clear all screw holes
It is important to clear all the screw holes prior to assembly. It can be difficult to screw through tough and
durable sealants, such as polyurethane. Additionally, it will be difficult to get everything lined up in the
correct locations. The best way to clear screw holes by hand with a very small drill bit (1/16”).
• On front of body:
• 8 pickup mounting holes
• On the back of the body
• 4 back cover holes
Alloy Pro Tip
“High Scratch Risk Zones!” ahead. The last thing
you want to do is scratch the surface of your
beautiful guitar. You will see “High Scratch Risk
zone!” notations in the remaining instructions. We
recommend placing painters tape on your guitar
in several areas to reduce the chance of damage
caused by screw slips, screwdriver gouges, and
the like. Go slow, be patient!
Alloy Pro Tip
Always think first. Don’t hurt yourself,
or your guitar. Gouges in your wood
grain will not heal. Measure twice, cut
once. If you don’t have experience
using the tools or techniques needed
for assembly, please seek help from
someone who does.

LPAssem Version 1.1 11 25 August 2016
• 3 round plate mounting holes
• On the guitar body edges
• 4 jack plate mount holes
• 2 strap button pilot holes
• On the headstock
• 6 tuner screw pilot holes
5.4. Install the Neck
If you didn’t install the neck prior to finishing now is the time to do it. Please refer to the earlier section in
this manual.
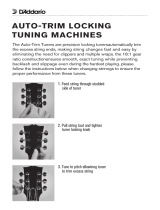
5.5. Install the Tuning Machines
There are four parts to each tuner: the tuner itself, a threaded barrel, a washer, and a small screw.
• There are three tuners to mount on the left side of the headstock (Figure 20), and three to go on the
right (Figure 21).
• Insert a tuner closest to the neck from behind the head stock, aligning the screw hole.
• Place the washer over the top of the tuner, then insert the barrel into the hole around the tuner. (Figure
22)
• Align the tuner screw hole with the hole in the back of the headstock.
• Hand tighten the barrel so it stays in place.
• Repeat for the other five tuners.
• Place a piece of painters tape along the bottom of the tuners to protect the headstock. (Figure 23)
• Rub the screws on the soap bar before attempting to scew them in.
• Carefully install the screws into each of the tuner screw holes.
Caution: Do not over tighten. It is very easy to strip the heads of these small screws - or break
them off entirely!
• Tighten each of the barrels on the front of the neck until the tuner is firmly in place using a 10mm
socket or, prefferably, a box wrench. If you have deep sockets use them so you have no risk of
scratching the tops of the tuners. (Figure 24)
• Twist each of the tuners to ensure it turns smoothly.
• Repeat for the other 5 tuners.

25 August 2016 12 LPAssem Version 1.1
• Remove the protective tape from the back of the neck and remove any film from the back of the tuners.
5.6. Install the Controls
• Remove the nuts and washers from the pots.
• Insert the wiring harness into the pocket and put the pots through the holes to the front of the guitar.
The volume pots go on the side of the pocket closest to the neck, and the tone pots go farther away
from the neck.
• Put the washer and nut on each of the pots on the surface of the guitar and tighten the nuts so they are
snug.
• Install the knobs on the four pots.
• Feed the single conductor wire with a bare end through the hole to the bridge post hole. When you
push the bushing into this hole and it pins the wire underneath this will serve to ground the bridge and
Figure 20 Left tuners Figure 21 Right tuners
Figure 22 Washer and Barrel
Figure 23 Painters tape and screws installed Figure 24 Tuner with wrench

LPAssem Version 1.1 13 25 August 2016
strings and thereby reduce the amount of noise nad electrical interference you might experience.
(Figure 25)
5.7. Install the Bridge and Tailpiece
These LP-style guitars have a TOM-style bridge and stop tail piece. Bushings are inserted into the body,
posts are screwed into the bushings, and the bridge and tailpiece are mounted on the posts. Ideally, you
have a drill press available for pressing the bushings into the body. However, the following description
assumes that you do not.
• Place the body face up on a sturdy, soft workspace.
• Make sure that the ground line from the controls is in the hole for the bridge bushing before pushing
the bushing in.
• With a small screw driver press the wire in the bridge post down into the hole. This way, it will stay in
place when we insert the bushing into the hole.
• Press in the bushings for the bridge (closest to the neck) and stop tailpiece (farthest from the neck).
Using your fingers to do this insertion works, though the fit may be quite tight. If you can’t push them in
using only your fingers, place a block of wood squarely on top of the bushing and press on it. (Figure
27)
• if you have a drill press (or arbor press) you can use this to press the bushings in. This assures that
you push the bushings straight into the body.
• Screw the posts for the bridge (Figure 28) and tailpiece (Figure 29) into the bushings. For now, you can
just screw them all the way in - we will adjust them upwards as necessary later in the setup process.
Figure 25 Ground wire to Bridge Post Figure 26 Clockwise from top right: Neck
volume, neck tone, bridge tone, bridge
volume.
Figure 27 Pressing bushings into body

25 August 2016 14 LPAssem Version 1.1
• You can test fit the bridge and tailpiece onto the posts at this time. Then remove them, since they will
fall off without strings in place while we finish the rest of the build.
5.8. Install The Jack Plate
The Jack plate goes in now so that the wires are accessible when installing the pickguard.
• Feed the wires (which are hooked into a connector) through the hole into the control cavity. (Figure 30)
• Place the Jack Plate onto the body and align the four screw holes. You might need to bend the
connectors a bit to get a proper fit.
• This is a High Scratch Risk zone! Place painters tape on the body around the jack plate ends. There is
no functional use for the tape. It is there to protect the finish.(Figure 31)
• Using a good fitting screwdriver, screw the plate onto body, careful not to over tighten, damage the
screw heads, or stripping the hole.
• Remove any tape used to protect the finish.
5.9. Install the Switch
• Carefully feed the wires from the switch trhough the hole in the switch cavity, to the neck pickup cavity,
the bridge pickup cavity and finally into the control pocket.
• Remove the nut and washer from the switch.
• Pass the switch into the switch cavity and out the top of the guitar. Be careful not to kink the wires while
you do this.
• Put on the washer and nut and make the nut snug. You will want to wait to tighten this down to make
Figure 28 Bridge posts Figure 29 Tailpiece posts
Figure 30 Wire Fed Through Figure 31 Protective tape

LPAssem Version 1.1 15 25 August 2016
sure that the switch is oriented correctly (usually with the “down“ position picking the bridge pickup).
5.10. Install the Pickups
Electrical connections are starting to come together!
• Ensure all of the 8 pickup mounting holes in the body are open and clean.
• Neck Pickup (Figure 37) and Bridge Pickup (Figure 38) differ in the thickness of the mounting rings, as
shown in the pictures. The low side on the mounting rings goes toward the neck.
• Pass the wires for the neck pickup through the passageway and into the control pocket.
• Pass the wires for the bridge pickup through the passageway and into the control pocket
Figure 32 Wire Fed into
switch cavity...
Figure 33 ...into the neck
pickup cavity
Figure 34 ... and feeding
through toward the bridge
pickup...
Figure 35 and through bridge
pickup cavity to control
pocket
Figure 36 Switch poking
through

25 August 2016 16 LPAssem Version 1.1
• Carefully screw in 4 screws to hold each of the pickup rings down. Do not over tighten.
5.11. Make Connections
All wire connections are done using snap together connectors. While we have had no issues with these
connectors, if you prefer a more traditional connection, you can solder the wires together.
• Connect the two conductor
connector from the jack to the two conductor connector coming from the
switch. ()
• Connect the two female connectors from the switch to the two male connectors on the volume
controls.
• Connect the two pickups connectors to the appropriate connectors on the volume controls.
• After you have finished the setup steps below, you can put the covers on the back of the guitars. But
wait until then so that you can correct any problems with the wiring first.
Figure 37 Neck Pickup Figure 38 Bridge Pickup
Figure 39 Output connector Figure 40
Troubleshooting!
• You may have to rearrange the wires several times to get them into body. It can be a tight fit. Be
patient and don’t force things as this can bend components and break wires.
/