McCulloch MC1375-AU User guide

Category
Steam cleaners
Type
User guide

McCulloch MC1375-AU is a powerful steam cleaning system that helps you clean and sanitize various surfaces in your home. With its 10-foot steam hose and adjustable steam intensity, you can easily remove dirt, grime, and stains from hard floors, carpets, upholstery, and more. It comes with a variety of accessories, including extension wands, a mop head, a scrubbing pad, and various brushes, making it versatile for different cleaning tasks.

McCulloch MC1375-AU is a powerful steam cleaning system that helps you clean and sanitize various surfaces in your home. With its 10-foot steam hose and adjustable steam intensity, you can easily remove dirt, grime, and stains from hard floors, carpets, upholstery, and more. It comes with a variety of accessories, including extension wands, a mop head, a scrubbing pad, and various brushes, making it versatile for different cleaning tasks.

Canister Steam System
Owner’s Guide
Model MC1375-AU
KEEP YOUR RECEIPT FOR WARRANTY PURPOSES
Please read all instructions before use.
English p. 2
2 | ENGLISH ENGLISH | 3
IMPORTANT INSTRUCTIONS
READ ALL INSTRUCTIONS BEFORE USING.
This owner's guide and any additional inserts are considered part of
the product. They contain important information about safety, use, and
disposal. Before using the product, please familiarize yourself with all
operating and safety instructions. Please keep all documents for future
reference and pass these documents on, together with the product, to any
future owner. Please refer to our website for the most current version of
our owner’s guide.
The following Warning messages are throughout this owners guide:
DANGER
Indicates a hazard with a HIGH level of risk which, if not avoided,
will result in death or serious injury. Please pay special attention to
any instructions given to avoid this threateningly dangerousrisk.
WARNING
Indicates a hazard with a MEDIUM level of risk which, if not avoided,
could result in death, serious injury, minor or moderate injury or
potential property damage.
INTENDED USE: This product is intended to be used indoors for
household cleaning. This product is not intended for commercial or
industrial uses. The manufacturer assumes no responsibility for damage
caused by failure to follow these instructions or improper product use. Any
such actions will invalidate the product warranty.
WARNING – When using electrical appliances, basic precautions should
always be followed to reduce the risk of re, electric shock and injury to
persons, including the following:
WARNING
Risk to Children and Other at Risk Groups of People.
This appliance can be used by children aged from 12 years and above.
This appliance is not intended for use by persons (including children)
with reduced physical, sensory or mental capabilities, or lack of
experience and knowledge, unless they have been given supervision or
instruction concerning use of the appliance by a person responsible for
their safety. Children should be supervised to ensure that they do not
play with the appliance.
Children shall not play with the appliance.
Cleaning and user maintenance shall not be made by children
without supervision.
This product and its packaging material are not toys and should be kept
out of reach of children.
DANGER
Directions to reduce risk of re, electrical shock, and injury:
Read all instructions before use.
Before plugging power cord into electrical outlet, be sure that all
electrical information on rating label agrees with your power supply.
To reduce likelihood of circuit overload, DO NOT operate another high
wattage appliance on the same circuit as this unit.
To reduce the risk of electric shock, do not immerse the appliance
in water or other liquids. If product falls into water or another liquid,
immediately unplug. Do not reach into the water while product is
plugged in.
Do not use power cord as handle, let it hang over edges of counters, or
be crimped or closed in doors.
Never yank power cord to disconnect from outlet; instead, grasp plug
and pull to disconnect.
Do not operate unit with a damaged power cord or if the unit has
been dropped or damaged. To avoid risk of electrical shock, do not
disassemble unit; contact McCulloch Consumer Service for examination
and repair. Incorrect reassembly can cause a risk of electrical shock
when unit is used. If the supply cord is damaged, it must be replaced by
the manufacturer, its service agent or similarly qualied persons in order
to avoid a hazard.
A loose t between wall outlet (receptacle) and plug may cause
overheating and distortion of the plug. Discontinue use of the product
in this outlet. Contact a qualied electrician to replace loose or worn
4 | ENGLISH ENGLISH | 5
outlets.
Do not leave unit unattended while plugged in. Unplug the appliance
immediately after each use.
Do not use unit where aerosol-based products are being used, or where
oxygen is being administered.
Unit is only meant to be used with recommended accessories. Using
other types of attachments may cause damage to unit or injury.
If Lighted On/Off Switch does not illuminate when set to “ON”
position while power cord is plugged in, unit is not operating normally.
Immediately disconnect cord from power supply, then refer to
troubleshooting guide of this manual for assistance.
Always turn unit off and unplug power cord before lling with water OR
DOING MAINTENANCE WORK. Do not attempt to use unit without
properly lling.
When lling, only water should be used in unit – other cleaning agents
could damage unit or cause injury. Distilled or de-mineralized water
is highly recommended, in order to minimize potential build-up of
mineral deposits. Do not overll with more than recommended amount
of water.
To avoid burns from escaping steam when removing cap to rell unit:
• Always allow unit to cool for 30 minutes.
• Press and hold Steam Button to release all remaining steam pressure.
• Do not open product to rell during use.
To reduce risk of contact with hot water emitting from Main Nozzle,
check appliance before each use by positioning it away from body and
turning it on. Do not operate unit if Main Nozzle is blocked.
Burns can occur from touching hot metal parts, hot water, or steam. Do
not touch Main Nozzle or attempt to connect accessories while unit
is in use. Do not touch bottom of Mop Head or attempt to attach a
Microber Pad by hand while unit is in use. Use caution when you turn
unit upside-down – there may be hot water.
WARNING: Danger of scalding. This location has hot steam, use
caution when handling.
Use caution when using unit on uneven surfaces, such as stairs. Do not
place, set or store the product near water, such as a bathtub or sink.
Never immerse the product in liquids. Do not allow cord to touch hot
surfaces.
When steaming any surface for the rst time, it is recommended that
you consult the manufacturer’s guidelines for material being steamed.
For items in question, test on an inconspicuous area before proceeding.
Steaming unsealed hardwood or unglazed ceramic surfaces is not
recommended, and may result in warping or damage to the surface.
Steam may remove the sheen from surfaces treated with wax.
When steam mopping, never leave unit resting in one spot on any
surface for any period of time – prolonged exposure to heat and
moisture may damage oor surfaces.
Do not allow power cord to touch hot surfaces during use. Bundle cord
loosely when storing.
Always allow unit to cool (at least 30 minutes for complete cooling) and
empty before storing. Do not store unit with a damp Microber Pad still
attached.
Do not open lling cap while in use. See rell instructions
The steam must not be directed towards equipment containing
electrical components, such as the interior of ovens.
SAVE THESE INSTRUCTIONS
6 | ENGLISH ENGLISH | 7
7
These features and accessories are included with your Canister Steam System. To obtain
additional parts, refer to Product Support on Page 19 of this manual.
UNIT FEATURES
10' Steam Hose
Pressure Gauge
Reservoir Cap
Steam Handle Cradle
Illuminated On/Off Switch
Steam Nozzle
Steam Trigger
Steam Adjustment Knob
1
2
3
4
5
6
7
8
Product Information
The 10' Steam Hose (1) safely channels the ow of steam from the Reservoir to the Steam
Nozzle.
The Pressure Gauge (2) measures the pressure in the Reservoir.
The Reservoir Cap (3) is designed to safely contain steam inside the Reservoir. The Reser-
voir Cap must be unscrewed and removed in order to ll the Reservoir with water.
The Steam Handle Cradle (4) functions as a convenient holder for the Steam Nozzle.
The Illuminated On/Off Switch (5) illuminates when the unit is powered On.
The Steam Nozzle (6) emits a ow of hot, penetrating steam whenever the Steam Trigger is
pressed and held.
The Steam Trigger (7) is pressed and held in order to start the ow of steam from the Steam
Nozzle, then released when you wish to stop.
The Steam Adjustment Knob (8) adjusts steam intensity.
Product Information
2
1
3
4
5
6
8
8 | ENGLISH ENGLISH | 9
Product Information
The 16.5" Extension Wands (1) connect to the Steam Nozzle. Used with mop attachment or
for high or hard-to-reach places.
The Microber Mop Pad (2) attach to the Mop Head, and are designed for removing scuffs and
stains from hard oors. The Pads are reusable and machine washable.
The Scrubbing Mop Pad (3) attach to the Mop Head, and are designed for removing scuffs
and stains from hard oors. The Pads are reusable and machine washable.
The 5.5" Jet Nozzle (4) focuses the ow of steam from the Steam Nozzle, and serves as the
base to which the Utility Brushes and Angled Nozzle connect.
The Triangle Brush (5) connects to the Steam Nozzle or Extension Wands, and is designed for
cleaning corners and other difcult angles.
The Large Brush (6) attaches to the Triangle Brush to cover large surfaces.
The 1.5" Nylon Utility Brush (7) connects to the Jet Nozzle, providing extra scrubbing power for
removing exceptionally tough dirt and stains.
The 1.5" Brass Utility Brush (8) connects to the Jet Nozzle and is designed for removing tough
stuck-on grease and grime from durable surfaces such as ovens and grills.
The Angled Nozzle (9) is designed for reaching difcult angles and areas that the Straight
Nozzle may not completely reach.
The 3" Scraper (10) attaches to the Steam Nozzle to scrape off stuck on grime.
The 13" x 8.5" Large Mop Head (11) attaches to Extension Wands to clean garage oors,
decks or any other extra large surface areas.
The Bristle Brush Attachment (12) attaches to Large Mop Head to scrub away stubborn spots
on oors.
The Storage Bag (13) stores all attachments neatly on one convenient bag.
• The Fill Cup (14) is used to ll Reservoir without spills.
The Accessory Net (15) stores brushes and other small accessories.
The 2.5" Round Brush (16) connects to the Jet Nozzle to scrub especially tough stains. The
Round Brush functions similar to the Nylon Utility Brush, only designed to more efciently
scrub larger surface areas.
The 2.5" Round Scrub Pad (17) connects to the Jet Nozzle and is designed to scrub tough dirt
and scuffs from surfaces.
Product Information
ACCESSORIES
2 - 16.5" Extension Wands
Microber Mop Pad
Scrubbing Mop Pad
5.5" Jet Nozzle
Triangle Brush
Large Brush
2 - 1.5" Nylon Utility Brushes
1.5" Brass Utility Brush
Angled Nozzle
3" Scraper
13" x 8.5" Large Mop Head
Bristle Brush Attachment
Storage Bag
Fill Cup
Accessory Net
2.5" Round Brush
2 - 2.5" Round Scrub Pads
1
2
3
4
5
6
7
8
9
10
11
12
13
14
15
16
17
5.5" Jet Nozzle
A1230-001
4" Triangle Brush
A1230-002
6" x 4.5" Large Brush
A1230-003
3" Scraper
A1230-009
Storage Bag
A1375-010
1.5" Nylon Utility
Brushes
A1230-005
1.5" Brass Utility
Brush
A1230-006
2.5" Round Scrub Pads
A1230-007
Microber Mop Pad
A1375-100
13" x 8.5" Large Mop Head
A1375-003-A
Bristle Brush Attachment
A1375-004
16.5" Extension
Wands
A1375-002
Angled Nozzle
A1375-001
2.5" Round Brush
A1350-001
Accessory Net
A1375-005
Fill Cup
A275-015
11 2
410
12
14
1
5
6
15
13
16 9 17 7 8
Scrubbing Mop Pad
A1375-101
3
10 | ENGLISH ENGLISH | 11
STEAM MOPPING ACCESSORIES
WARNING: Do not try to connect accessories while unit is emitting steam.
EXTENSION WANDS
1. Select one of the Extension Wands. Insert end (A) of Wand onto Steam Nozzle (B) with yellow
lock/release button slightly off center with hole. Fully insert and rotate wand slightly to allow
button to snap into hole.
2. Using the same instruction, attach remaining Extension Wand (C) to the rst Wand. Both
Extension Wands should now be connected to the Steam Nozzle.
MOP HEAD
1. Align Mop Head with open end of Extension Wand, so that hole in Mop Head aligns with yel-
low lock/release button on Wand.
2. Press down on yellow lock/release button. While continuing to hold button down, slide Mop
Head onto Extension Wand (See gure 1-A). Fully insert and rotate wand slightly until button
snaps through hole (See gure 1-B).
NOTE: Do not use excessive force when mopping or using Extension Wands as this
may cause the Wands to break.
BRISTLE BRUSH ATTACHMENT
1. Align Mop Head with Bristle Brush Attachment, so that the re-
lease tabs (A) on the Bristle Brush align with the sides of the Mop
Head (B).
2. Firmly press the Bristle Brush Attachment onto Mop Head until it
securely snaps into place.
Note: Do not use Bristle Brush Attachment with Microber or
Scrubbing Mop Pad.
MICROFIBER PADS
1. Lay one Microber Pad on at surface, with fastener-receiving side facing upward.
2. Align Mop Head with Microber Pad. Make sure Mop Head is oriented with Pad as shown,
and centered as best as possible (See gure 2-A).
3. Press Mop Head rmly down onto Microber Pad. Fastener strips will adhere to Pad Grips on
underside of Mop Head. Pad should now be attached and ready for use (See gure 2-B).
CAUTION: Use care when handling a recently used Microber Pad, as it may still be hot.
NOTE: Microber Pads are machine washable. To avoid picking up lint, washing
separately from other fabrics is recommended. Only use liquid detergent. Avoid using
any fabric softeners or bleach. Air drying is recommended; machine drying on a low
heat or air dry setting is acceptable as well.
The Mop Head and Microber Pads are perfect for use on these hard oor surfaces:
IMPORTANT: Do not use on unsealed hardwood or unglazed ceramic surfaces.
Surfaces that are not properly sealed may be warped or damaged by exposure to heat
and moisture.
Care should also be taken when steaming sealed hardwood oors, as prolonged
exposure to steam in a single spot may cause damage and discoloration. To avoid this,
keep the Mop Head in constant motion on these surfaces.
Steam may remove the sheen from some oors that have been treated with wax.
Extremely rough textured oors may tear or damage Microber Pads.
Before steaming any ooring, it is recommended to consult the manufacturers
guidelines. For ooring in question, always test on a small inconspicuous area
before proceeding.
Assembling Your Canister Steam
System
Sealed Laminate
Linoleum Glazed Ceramic
Granite
Sealed Hardwood
Stained Concrete Marble
Vinyl Tile
Assembling Your Canister Steam
System
B
C A
FIGURE 1
A
A
B
B
A B
FIGURE 2
12 | ENGLISH ENGLISH | 13
STEAM CLEANING ACCESSORIES
WARNING: Do not connect accessories while unit is emitting steam.
JET NOZZLE / SCRAPER / TRIANGLE BRUSH
1. Select one of the three accessories (Jet Nozzle shown as example) and push onto the Steam
Nozzle (A).
2. Rotate accessory until the yellow lock/release button snaps into the accessory hole (B).
NOTE: The Jet Nozzle, Scraper and Triangle Brush can be connected to the end of an
Extension Wand for reaching high or difcult spots. Connect the Extension Wand (or
Wands) as outlined on Page 8, then connect your desired accessory to the Wand in the
same way as you would normally connect to the Steam Nozzle.
UTILITY BRUSHES / ANGLED NOZZLE / SCRUB PAD
NOTE: Accessories connect to the Jet Nozzle, not the Steam Nozzle.
1. Firmly press accessories onto tip of Jet Nozzle. Press it on as far as possible to prevent
steam leakage.
2. To remove accessories, simply grip it rmly and pull it off Jet Nozzle.
LARGE BRUSH
NOTE: Large Brush connects to the Triangle Brush, not the
Jet Nozzle.
1. Place Large Brush over the Triangle Brush, and rmly press it on to
the Triangle Brush until it snaps into place.
2. To remove Large Brush, simply grip it rmly and pull it off of the
Triangle Brush.
ORDERING ACCESSORIES & PARTS
Replacement accessories and parts for your Canister Steam System (model MC1375-AU)
may be ordered through our Website:
www.mccullochsteam.com.au
You may also contact Consumer Service directly:
[email protected] or 1800 099 012
Assembling Your Canister Steam
System Assembling Your Canister Steam
System
Steam Nozzle
B
A
14 | ENGLISH ENGLISH | 15
FILLING RESERVOIR
1. Place Canister Steam System on a at, level surface.
2. Make sure illuminated On/Off Switch is turned to “Off” and grounded power cord is unplugged
from electrical outlet.
If unit has been in use, always use the following safety precautions before
removing the Reservoir cap to add water:
Allow unit to cool for 20 minutes or until pressure gauge is at zero.
Press and hold Steam Trigger to release ALL remaining steam.
WARNING: Failure to follow these precautions may result in burns from escaping steam
when the Reservoir Cap is removed.
3. Cautiously unscrew and remove Reservoir Cap.
WARNING: Water may be hot.
4. Drain any water remaining inside Reservoir.
NOTE: The Reservoir should be emptied after each use – this will help minimize mineral
build-up and prevent over-lling.
5. Using the Fill Cup, ll the unit with 48 oz (1,420 ml) of water.
NOTE: In order to signicantly reduce mineral build-up and prolong the life of your
Canister Steam System, use of distilled or de-mineralized water in the unit is highly
recommended. Refer to Page 18 for more information about mineral build-up.
WARNING: Caution should always be used when pouring water into the Reservoir. Do
not look directly down into ll hole when lling. Keep your free hand and any children
or pets at a safe distance.
6. Replace Reservoir Cap, ensuring that it is screwed on tightly to prevent hot steam from
escaping and causing injury.
!
WARNING: Do not use on unsealed hardwood or unglazed ceramic surfaces. For ooring
in question, always test on a small inconspicuous area before proceeding.
NOTE: Before cleaning electrical appliances, check and follow appliance manufacturer’s
cleaning guidelines. Never apply to electrical parts.
NOTE: Some delicate surfaces, such as painted wood or stainless steel may be scratched or
damaged by the bristle of the brushes, especially the Brass Utility Brush. Use careful judgment
when deciding what surface to clean with any of the brushes. If you are unsure if a surface will
be damaged, it is recommended that you test a small inconspicuous spot before proceeding.
Accessory Recommendations Using Your Canister Steam System
Jet Nozzle / Angled Nozzle Dirt, Grease, Grime, Cracks and Crevices, Golf
Clubs, Tread of Running Shoes
Triangle Brush Corners on Countertops, Bathtubs, Floors
Large Brush Floors, Grout
Scraper Baked on Food, Grime, Grease, Stove Tops, Ovens
Round Scrub Pad Countertops, Bathtubs, Sinks, Refrigerators, Ovens,
Slate
Nylon Utility Brush and Round Brush Ovens, Stove Tops, Faucet Fixtures, Microwaves,
Sports Equipment, Tile, Grout, Refrigerators, Toys,
Door Knobs, Showers, Bathtubs, Changing Tables
Brass Utility Brush BBQ Grills, Oven Wire Racks
Mop Stone, Slate, Glazed Ceramic Tile, Sealed Hardwood
Bristle Brush Attachment Stone, Slate, Grout
16 | ENGLISH ENGLISH | 17
GENERAL OPERATION
NOTE: Be sure that Reservoir has been lled and that all desired accessories are
connected before following these steps.
1. For rst time use, remove protective plastic cover from electrical plug. Plug power cord into
an electrical outlet.
2. Switch Lighted On/Off Switch to “On” position.
3. The pressure gauge indicates the operating pressure of the steam cleaner. Once the needle is
in the green section, the unit is ready to begin steaming.
During use and as steam is released, pressure will drop. This may cause the needle to move
down in the green section. This is a normal condition. As long as the needle is in the green
section, the product is operating normally. If the needle is continuously in the yellow or red
section, please contact Consumer Service at 1800 099 012.
4. Direct Nozzle (and any connected accessory) towards surface you desire to steam, and press
Steam Trigger. To sanitize surfaces, point Nozzle, press Trigger and hold approximately 1/2 inch
from surface for at least 5 seconds. This will insure that you have killed germs and bacteria.
CAUTION: Always be sure that Nozzle and any accessory are pointed in a safe direction
(away from yourself, other people, pets, and plants) before pressing Steam Trigger.
5. Keep Steam Trigger pressed for a continuous ow of steam. This will allow a continuous ow
of steam without need of holding the Steam Trigger down manually. Steam output can be
adjusted by simply turning the Steam Adjustment Knob.
6. Using a back-and-forth motion over the area you are steaming will further enhance the
cleaning process. Wipe steamed areas with a clean cloth to remove loosened dirt and grime.
Wiping the area while it is still wet is recommended, but use caution when wiping surfaces such as
metal that may still be hot.
7. Once steaming tasks are complete, turn the unit “Off” and unplug. Follow steps under Proper
Storage procedure on Page 18 of this manual.
Using Your Canister Steam System Using Your Canister Steam System
STEAM MOPPING
NOTE: Be sure that Reservoir has been lled and that all steam mopping accessories are
connected before following these steps.
It is recommended to sweep or vacuum hard oors before mopping.
1. Follow Steps 1-3 of General Operation section above.
Refer to Page 9 for a listing of hard oor surfaces that are recommended for cleaning
with the Canister Steam System.
2. For best results, use a continuous back-and-forth motion over oor surface, pushing the Mop
Head away and pulling it back towards you. Work your way backwards over the oor, in order
to avoid walking over freshly mopped areas.
NOTE: To avoid warping or damage caused by heat and moisture, do not use on
unsealed hardwood or unglazed ceramic surfaces. Steam may remove the sheen from
some oors that have been treated with wax.
3. The Microber Pad will absorb dirt and moisture during mopping. However, when you
are nished you may nd some residual moisture has been left behind. In this case, it is
recommended to allow oor time to air-dry. A fan may be directed towards mopped area to
facilitate drying.
18 | ENGLISH ENGLISH | 19
PROPER STORAGE
Preparing your Canister Steam System for storage is quick and simple. When you have nished
your steaming tasks, follow the steps listed below.
1. Turn unit “Off” and unplug power cord.
2. Allow unit to completely cool (at least 30 minutes).
3. Press and hold Steam Trigger to release all remaining steam.
4. Remove all accessories from unit.
5. Carefully remove Reservoir Cap.
6. Drain any remaining water from Reservoir into a sink or tub – this will help to minimize mineral
build-up and prevent over-lling during your next use. Replace Reservoir Cap loosely.
7. Store accessories. Utility Brushes can be conveniently stored in the Accessory Net.
Remaining accessories can be stored in the Storage Bag.
8. Store Canister Steam System in a cool, dry location.
MINERAL BUILD-UP
A common maintenance need for steam appliances is the removal of build-up caused by
high mineral content in many municipal water supplies. This mineral build-up may limit the
effectiveness and reduce the life of your Canister Steam System.
The best way to minimize mineral build-up is to use distilled or de-mineralized water when using
your Canister Steam System. If you are unable to use distilled water, it is recommended that the
following procedure be followed monthly to remove any mineral build-up:
1. Turn unit “Off” and unplug power cord.
2. Allow unit to completely cool (at least 30 minutes).
3. Press and hold Steam Trigger to release all remaining steam.
4. Remove all accessories from unit.
5. Carefully remove Reservoir Cap.
6. Drain water from Reservoir into a sink or tub.
7. Using Measuring Cup, measure 8 oz. (237 ml.) of vinegar.
8. Slowly pour vinegar into Reservoir.
9. Allow to stand for 40 minutes.
10. Drain vinegar from Reservoir.
11. Rinse Reservoir with fresh water, drain and repeat until vinegar odor dissipates.
12. Replace Reservoir Cap.
Storage & Care
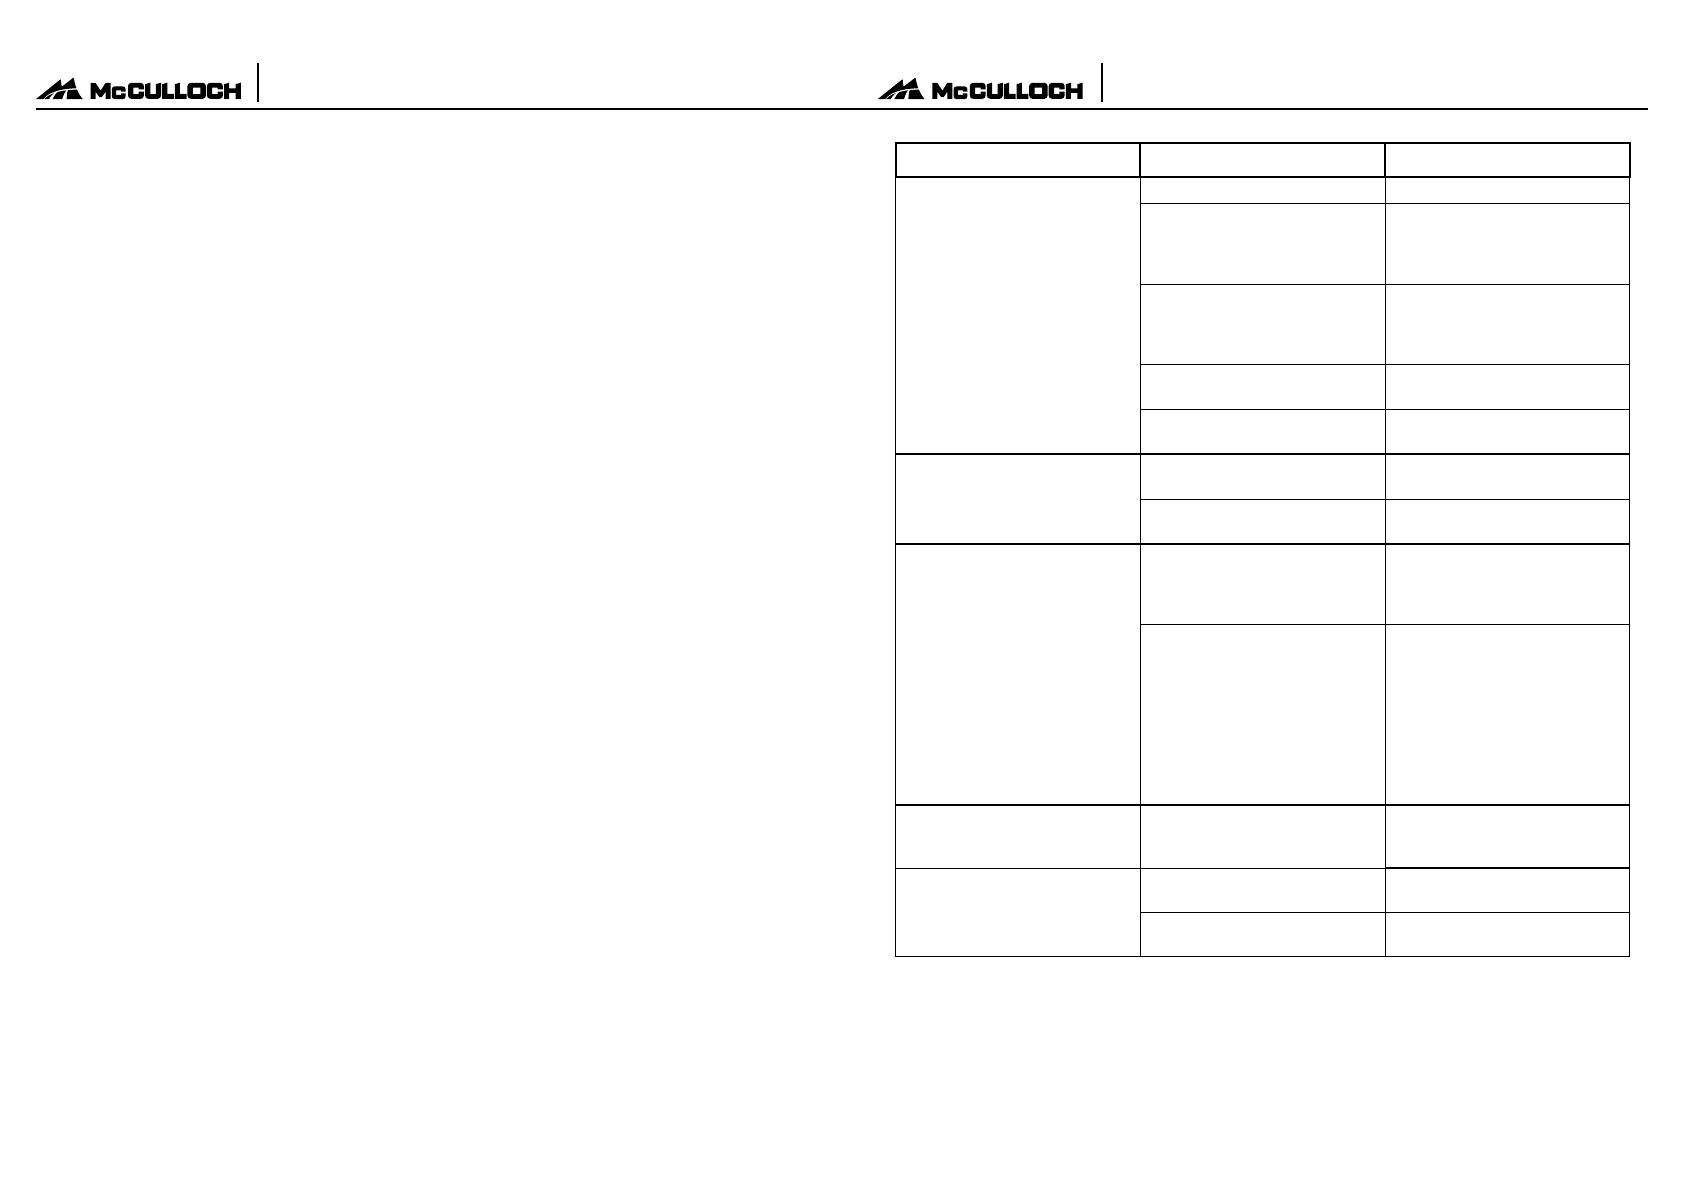
Unit fails to heat up.
Steam output is weak or
intermittent.
Excessive amount of water in
steam.
NOTE: Unit produces wet steam
– it is normal for steam to
contain some amount of water.
Unit is not plugged in.
Mineral build-up in unit.
Household circuit breaker / ground
fault interrupter has tripped or
blown a fuse.
Unit is damaged or otherwise in
need of repair.
Water level in Reservoir is running
low.
Reservoir is empty.
Water condensation in Steam
Hose.
Reservoir has been
overlled.
Plug power cord into electrical outlet.
Refer to Mineral Build-up section
on Page 18 for cleaning procedure.
Refer to Mineral Build-up section
on Page 18 for cleaning procedure.
Reset circuit breaker / ground
fault interrupter, or replace fuse.
If you need assistance, contact a
licensed electrician.
Immediately cease usage and
unplug. Contact Consumer
Service for further assistance
(see Page 21 for details).
Refer to Filling Reservoir proce-
dure on Page 15.
Refer to Filling Reservoir proce-
dure on Page 15.
Point nozzle towards sink, tub or
ground and shake while pressing
Steam Trigger. Continue until
excess water is released.
Filling the Reservoir with more
than 48 oz. (1,420 ml.) of water
interferes with steam production,
resulting in water condensation
in steam.
Always ll unit with correct amount
of water. (see Page 15 for details)
PROBLEM POSSIBLE CAUSE SOLUTION
Accessories do not stay rmly
connected to Steam Nozzle. Accessories not properly installed. Check to make sure that acces-
sories are properly connected, per
procedures on Pages 10-13.
Floor surfaces appear cloudy or
streaky after steaming. Microber Pad is dirty.
Hard water residue on oor.
Replace Microber Pad with a
clean one.
Switch to distilled or
de-mineralized water.
Troubleshooting
20 | ENGLISH ENGLISH | 21
Refer to the part numbers below when ordering parts and accessories
for your Canister Steam System.
Replacement Accessories
Part Numbers for Fast Reordering at www.mccullochsteam.com.au
Nylon Utility Brush - 5 Pack A1230-005-5
Brass Utility Brush- 5 Pack A1230-006-5
Round Scrub Pack - 5 Pack A1230-007-5
Microber Mop Pads - 2 Pack A1375-100
Scrubbing Mop Pads - 2 Pack A1375-101
Replacement Parts & Accessories Warranty Information
2-YEAR LIMITED WARRANTY
*Limited Warranty and repair terms and conditions
You will receive a voluntary 2 year manufacturer’s warranty from date of purchase on materials and workmanship of
the product. This extended manufacturer’s warranty is valid for all customers in Australia. The legal warranty claims are
unaffected by this additional regulation.
The manufacturer assumes no responsibility for damage caused by failure to follow these instructions or improper product
use. Any such actions will invalidate the product warranty.
This warranty does not apply to defects resulting from abuse of the Product, modication, alteration, repair or service of the
Product by anyone other than McCulloch or an Authorized Service Center, mishandling, improper maintenance, commercial
use of the Product, damages which occur in shipment or are attributed to acts of God.
Any unauthorized product modication, repair by unauthorized repair center, or use of non-approved replacement parts is
not recommended and any consequences will not be covered by support services or product warranties.
Exclusions are damages through inappropriate use or use of the product not according to the manual. For example, but not
limited to: If the product is exposed to wetness, extreme temperatures, environmental conditions, corrosion, oxidation, if
liquids are spilled over the device, if chemical substances impact the product or through other incidents that are not within
the reasonable range of inuence of the manufacturer.
Prerequisite for processing in the service department is the submission of a receipt or an invoice.
All technical information, data and instructions for the installation, connection and operation contained in these instructions
for use correspond to the latest available information at time of printing.
The contents of this manual may differ slightly from the actual product. Observe any additional supplements.
All company names and product names are trademarks of their respective owners. © All rights reserved.
Refer to back cover of owner’s guide for the Importer Information and your Authorized Service Center.
________________________________________________
© 2021 Vornado Air, LLC • Andover, KS 67002
Specications subject to change without notice. McCulloch® is a trademark owned by Vornado Air, LLC.
Manufactured in China.
McCulloch Consumer Service W: www.mccullochsteam.com.au • P: 1800 099 012 •
CL3-0906, R-V00
Manufactured by Vornado Air LLC under license from Husqvarna AB (publ).
For more information on other McCulloch products,
visit www.mccullochsteam.com.au
For questions, or comments or warranty information,
call 1800 099 012 or visit www.mccullochsteam.com.au
  • Page 1 1
  • Page 2 2
  • Page 3 3
  • Page 4 4
  • Page 5 5
  • Page 6 6
  • Page 7 7
  • Page 8 8
  • Page 9 9
  • Page 10 10
  • Page 11 11
  • Page 12 12
  • Page 13 13

McCulloch MC1375-AU User guide

Category
Steam cleaners
Type
User guide

McCulloch MC1375-AU is a powerful steam cleaning system that helps you clean and sanitize various surfaces in your home. With its 10-foot steam hose and adjustable steam intensity, you can easily remove dirt, grime, and stains from hard floors, carpets, upholstery, and more. It comes with a variety of accessories, including extension wands, a mop head, a scrubbing pad, and various brushes, making it versatile for different cleaning tasks.

Ask a question and I''ll find the answer in the document

Finding information in a document is now easier with AI