ZWO ASIAIR Plus User manual

Type
User manual

ZWO ASIAIR Plus is a powerful astrophotography device that allows you to control your entire imaging setup from your smartphone or tablet. With its built-in Wi-Fi module, you can connect to ASIAIR Plus from anywhere within range and control your camera, mount, filter wheel, and focuser. ASIAIR Plus also has a built-in power management system, so you can power all of your equipment from a single power source.

Here are some of the things you can do with ASIAIR Plus:

  • Control your DSLR or mirrorless camera for astrophotography
  • Control your telescope mount for GOTO and tracking
  • Use your smartphone or tablet as a wireless remote control
A S I A I R P l u s
U s e r M a n u a l V 1 . 2
2022.05
Q u i c k K e y w o r d S e a r c h
Keyword search is supported within this document. You can use th e keybo a rd sho r tc u t Command +
F on a Mac, or Control + F on Windows to find what you need.
S ec t i on J u m p
You can quickly access section s of th is document by cl ic k ing t h e rele v a n t section in the conten ts
table.
P r i n t Th i s D o c u m e n t
This is a high-resolution prin table document.
I co n U sa g e
S y m bo l s
Forbid Attention Tips Furth er Reading
S u p p o r t i n g M a t e r i a l
ZWO Provides instru ct io n a l v i d e o s and the followin g su p p o rt i n g doc u m ents for ASIAIR Plus use r s:
1. Qu ick Start Guid e
2. Us e r Man u a l (in c lu d i n g disclaimer and safety sum m ary)
It is recomm ended that users watch the instructiona l v i d e o firs t , and then read the Quick Start
Guide” to understand the installation and basic setu p .
For detailed product in f o rm ation, please read th e Use r Manual.
Y o u T u b e V id e o s
To watch some very useful vi d e o s : https : / / w ww.youtube.com/re s u l t s ? s e a r c h _ q uery=asiair
D ow n lo a d t h e A S I A I R A p p
Scan t h e QR co d e to download the ap p , iOS user s can search and dow n l o a d the a p p in the Ap p
Store, Androi d users will find th e app in the Goo g le Play Stor e .
ASIAIR app requires And r o id 6 .0 and above , i O S 11 an d above .
iOS / iPad OS requ ires 1GB and above: iPhon e 5 a n d above full series, iPod sixth gener a tion and
above, iPad third gene r a tion and above, iPad Air serie s, iPad Pro series.
Android devices: 4 GB or more of RAM is recomm ended.
T a b l e o f C o n t e n t s
0 1 . P r o d u c t O v e r v ie w
Introductio n
Features
Preparation
Device Compo n e n t
Indications
0 2 . I n i t i a l S e t u p
Data Cable Connection s
Power Cable Connectio n s
Network Conn e c t io n
Mount Connectio n vi a C ab l e s
Mount Connectio n vi a N e tw ork
DSLR Camera Connec ti o n
0 3 . A S I A I R A p p
Homepage
Basic Configura tion
Guiding
Mount Control Pan el
Additional Tool s
Quick Start Guide to Imagin g
Live Stacking
Autorun
0 4 . A p p e n d i x
Export Image File
Software Update s
ASIAIR OS Restore
Security Essential s
Disclaimer
After Sale Support
P r od u ct De s c r ip t io n
This section introdu ce s the A S I A IR Plu s.
I n t r o d u c t i o n
ASIAIR Plu s is a smart Wi-Fi devi c e . It is equipped with a power management module, ample U SB
connectivit y , telescope m ounting foot and ASIAIR App's rich fea tu r e set. A S IA I R P lu s is the third
generation of ASIAIR sin ce its first release in July 2018.
F e a t u r e s
The ASIAIR Plus case is construct ed of CNC milled aviat i o n alu m inum. T he ca s e is finished in a
rugged and pleasing anodized finis h . The case measures 100*70*26.5 mm, w hich m akes it excellent
in size and w eight, and ea sily mounte d on almost any telesc ope.
A lase r engraved star maps of the Ursa Majo r and Ursa Major Polaris adorn th e front of the u n it . M4
and 1 4-inch threads in th e b ottom and s i d es, com bined with the s upplied dovetail plate, make for
easy installatio n and re m oval .
The b u i lt - in p o w er mana g e m ent module makes ca b l e ma n a g e m e n t easy. A variety of USB port s
makes connecting equ i p m e n t a sim p le task. I n additio n to the USB ports, it als o pro v i d es a shutter
release port for SLR cameras, wh ic h suppor t s exp o s u r e over 30 s .
LED s tatus lights pro vide indicat i o ns to the operato r which are easily viewabl e .
P r e p a r at i o n
When shipped fr o m the factory , th e SD card, and the s i d e dovetai l plate on which the sy stem is
mounted ar e pr e i n s talled. B e f o re firs t u se p l e a se ensur e t h e SD Card is correctly and the dovetail is
tight as they may have moved in shipping .
Do no t use excessive force when tight e n ing the doveta i l bolts a s the se may become dam a ged.
P r o d u c t c e r t i f i c a t i o n s
(1) T h is device may not cau s e har m f u l interfe r en ce, an
This device complie s wi th Pa r t 15 of FCC Ru le s . Op e r a ti o n is Subject to foll o w i n g tw o co n ditions:
d
(2) This device mu s t accep t a n y int e r fe r e n ce received including inter fe r e n c e tha t cause undes ir e d
operation.
D e v ic e C o m p o n e n t
1. DS L R Ca m era Shut te r Relea s e Po r t (2.5 m m)
2. DC 5 . 5 x 2 .1 m m Power Ou t p u t x4
3. Re s e t
4. Ty pe-C Por t
5. Ins tallation H oles and Fin der Shoe
6. TF Card
7. RJ 4 5 Ether n et Port
8. US B 2.0 x2
9. US B 3.0 x2
10. Power Status Indicator
11. DC 12 V Inp u t
12. System Status Indica tor
13. Power Switch
14. External Hinge d WiFi Dual-b a n d A n t e n n a
I n d i c at io n s
I s s u es with Wi- F i can be corrected by p ress ing the RESET button and releas ing it after the light
flashes. The Wi-Fi hots p o t , passw ord and the details fo r stat io n mode will be reset after 5 second s .
I n i t i a l S e t u p
This section describe s the initial setup and conn ects to ASIAIR Plu s.
Co n n e c t i o n s
D a t a Ca b l e C on n e c t i o n s
Connect the main came ra and memory stick to U S B 3.0 port.
Connect guide cam e ra and te le s c o p e m o unt to USB 2.0 port.
EFW/EAF connec t via the mai n camer a hub.
DC 1 2 V @ 3 A ~5A powe r a d a pter is required for cool cam eras.
P o w er Ca b l e C o n n e c t i o n s
ASIAIR Plus requires a minimum of 12V@2A for corre ct ope r a tion. W ith the 4 x 12V outl e ts in u s e it is
recommend ed a minimum of 12V@ 5A is used.
ASIAIR P l u s power outlet s can provide power to connected eq u i p m ent such a s the main camera
cooling, EAF, EFW and dew heate r s .
ASIAIR Plu s only ne e d s 12V@2 A power su p p l y to wor k properly. But cons id e r in g powering other
devices throug h its 4 DC outputs, a 12V@5A p o w e r supply is recommende d .
Pay attention to cable ma n agement to avo i d en t a nglement when the equatorial mount rot a tes.
N e t w or k Co n n e c t i o n
S t ep 1 :
Turn on the power switch and wait f o r the ASIAI R to beep once .
S t e p 2 : C o n n e c t yo u r m o b i le device to ASIAIR n e t w o r k using 12345678 as the p a s s w o r d th e n open
the ASIAIR app.
S t e p 3 : Start your journe y into astro p h o to g r a p h y !
M o u n t C o n n e c t i o n v ia C a b l e s
1 . Co n n e c t i n g R S - 2 3 2
Most equatorial moun t s hav e a hand co n t ro l le r used to mana ge mou n t setti n gs a n d contro l .
Common ones are ARGO VAVIS, GTOCP s e r ie s , StarGo, NexStar series, SynScan V 3 / V4 series,
Pulsar2 G o T o , Go2Nova ser ie s , Gemini ser i e s , AutoStar Ser ie s , AudioStar series, PMC-8 and
Electronic FS-2 com monly used by DIY te l e s cope builders.
Many mounts now support direct USB connection, but you can also u s e the included RS 2 3 2 -U SB
adapter to connect to your m o u nt.
SynScan V5 need s t o use a US B T ype B Ty pe A printer data cable. If the conne ction typ e or baud
rate is incorrect, it will fail to connect in the app.
2 . D i r e ct US B C o n n e c t i o n t o t h e m o u n t
Many equatori a l mo u nts now have their contro l system built into th e equ a t o rial m o unt body and
allow d i r e c t USB c o n n e c t i o n . The equatorial m ount is connected to ASIAIR Plus by direct USB
connection .
To c o n fi rm whether your mount is supp o r te d by ASIAIR Plus or not, you may need to ch e ck t h e
documents of the mount f i r s t .
3 . E Q M o d w i t h E Q D i r c a b l e
For the E Q M O D system, use an EQDir ca b l e and conn e c t your mo u n t with ASIAIR Plus . Select
[EQMod Moun t] or [EQMo d wit h Sk yS a f a r i] in the app.
S u p p o r t e d E Q M o d M o u n t s :
EQ3-2
NEQ3
HEQ3
SkyView Pro EQ
EQ4
EQ5
HEQ5
EQ6
EQ6 Pro
NEQ6
EQ6-R PRO
AZ-EQ5GT
AZ-EQ6GT
EQ8
EQM-35 Pro
AZ-GTi*
M-Uno Fast Rever s e Single F o rk Arm EQ
Linear Fast Reverse EQ
Vixen GPDX/ Vixen SP fitte d with SynSc an Upgr a de kit (EQ5)
EQMod baud are 9600,exc e p t ZEQ5 which is 115200.
For AZ-GT via network con n ec t io n the co r r e ct baud rate is 1188 0 a n d U DP protoco l.
M o u n t C o n n e c t i o n v ia N e t w or k
1 . C on n e c t i n g v ia W i F i
Some mo u n t s now have built -i n Wi-Fi m odules or p ro v i d e an e x te r n a l Wi-Fi ac c e ss o r y , suc h as AZ-
GTi with Sy n S c a n WiFi module , StarFi Wi-Fi Adapter, SkyPortal Wi-Fi Mod u le , StarGo Wi-Fi mod e ,
PMC-8 Wi-Fi mode etc.
For a detailed description of ASIAIR Plus connection s , please ref e r to the releva n t do c u m ents on the
support page of ZWO officia l w ebsite.
2 . N e t w or k C a b l e C o n n e c t i o n
This method is mainly aimed at Vixen's StarB o ok series control syst em, including Star B ook,
StarBook One, StarBoo k -S , Sta r B o o k Te n , e t c . Specific steps are as fo ll o w s :
Power on t h e Star B o o k con t ro l s y st e m .
Directly connect the A SIAIR Plus and S t a r Book co ntrol systems via an R J45 stand ard (Cry s t a l
connector is also in A or B mode).
Open the ASIAIR App, select wired ethernet on the connection setting s p a g e to auto m atically
obtain an IP address.
Select the correspo n d in g S ta r B o o k control system op t io n an d fill in th e S t a rB o o k cont ro l system
IP in the IP inpu t b o x (obt a in e d at "M e n u -A b out LAN"), for example , 169 .2 5 4 . 0 .1 , port 80.
If the ASIAIR prompts that th e connectio n failed reconfirm on the About LAN p a g e in th e
StarBook, that it obtain e d an IP addre ss .
D S L R Ca m e r a C o n n e c t io n
DSLR cameras can only be used as the main c a m e r a , using Pr e v ie w , Autorun, Live.
Connect the DS L R cam er a to AS IA I R Plus through th e came r a da t a cable. B e fo r e connecting in the
app, select the followin g camera settin g s be f o re lau n c h i n g the app :
Ca m e r a M o d e :
M
S h u t t e r M o d e : B ulb
I m a g e F o r m a t :
RAW (RAW + JPEG not available)
I m a g e Q u a l i t y : L (maximum size )
In a d d it io n , turn off a n y p o w er saving mode or long exposure noise reduction. If using a DS L R
camera with mirror lock fun c ti o n s , you shoul d als o tur n thes e fu n c t io n s off.
To en s u r e that the rema i n in g spa c e of the camera 's SD card is sufficie n t refer to the "estimated
space" in the ASIAIR pla n shoo t i n g settings inte r f a ce and ensu r e yo u r DSLR ba ttery is sufficiently
charged or use an external power s o u rce.
ASIAIR Plus suppo rt s shu tt e r relea s e cabl e whi c h w il l break the limita t io n of 30 s e xp o s u r e .
A S I A I R A p p
This section introdu ce s the m ain features of the ASIAIR App.
H om e pa g e
With the AS I A IR Plus sw it ch e d on a n d the mobile device connected to the ASIAIR network select
the ASIAIR App:
Click Enter to enter the app homepa g e .
T op M e nu B a r
At the top of the scr e e n yo u will see a selectio n of icon s - F r o m lef t to r ig h t these are: ASIA IR Set t in g s ,
Main Camera Settings, Guid e Setting s , Teles c o p e Settings , Filter Whe e l Setti n g s , Focuser Setti n g s ,
Storage setting s . If a device is connect e d and enabled , the icon will be "lit", othe r w ise it will be
grayed out.
R i g h t S i d e
Switch between main functions. Touch preview to sw i tc h b e tw een main fu n c ti o n mo d e s su c h
as focus adjustment, po l a r axis ca l ib r a t io n , multi-t a rg e t s , live stac k in g , pla n m ode and video mo d e .
Bo t t o m I n f o r m a t i o n B a r
Displays curre n t ASIAIR Plus work i n g status infor m ation and came ra informatio n such as resolut i o n,
gain, temperatu r e , coo l in g po w e r , etc .
L ef t Si d e
Show tool s availab le in the curr e nt fun ction mode, includ i n g H i s t ogram, Guiding, Crosshair,
Annotate etcs. Touch th e icon t o open/c lose the cu r r e nt tool.
B a s e C o n f ig u r at i o n
N et w or k S et t i n g s
This area contains most of the basic settin g s re lated to ASIA IR .
I n f o D i s p l a y ASIAIR box serial number, C P U te m perature, i n p u t voltag e , in p u t curren t, total power
and e tc.
N et w or k Se t t i ng s
You can customize ASIAIR Plus wir e l e s s hotspot name an d password, sw it c h
Wi-Fi hotsp o t band between 2.4G hz a n d 5 G h z , configure Wi-F i STA m o d e and Et h e r n e t c a b l e
network.
D e v i c e O p e r a t i o n : Switch Devic e Aft e r completing the sett i n g for Station mode, you can switch
between multip l e de v i c e s in the home area ne t w ork. Shutdow n For safety reaso n s , the option of
shutdown in APP is provided.
S t a t i o n M o d e : After you complete th e s ettings above, you can conn ect the ASIA IR device to h ome
area netwo r k via Station Mode. By doing th at , you are n o w able to c o n tr o l your g e ar and
photogra p h t a r g e ts an y w h e r e of you r h o m e, break i n g the dist a n c e limitation of AP c o n n e c ti o n ! Also,
you will still have access to ne t w o r k in your phone or other mobile devices while ASIAIR doin g
astrophoto g ra p h y fo r you . Just be aware th a t the Statio n M o d e can only w o r k with 2.4 G h z Wi Fi .
Shut down the ASIAIR de v ic e and exit the app, please wait for 5-10s b e f o re disconnect in g the power
of the A S I A IR Plu s.
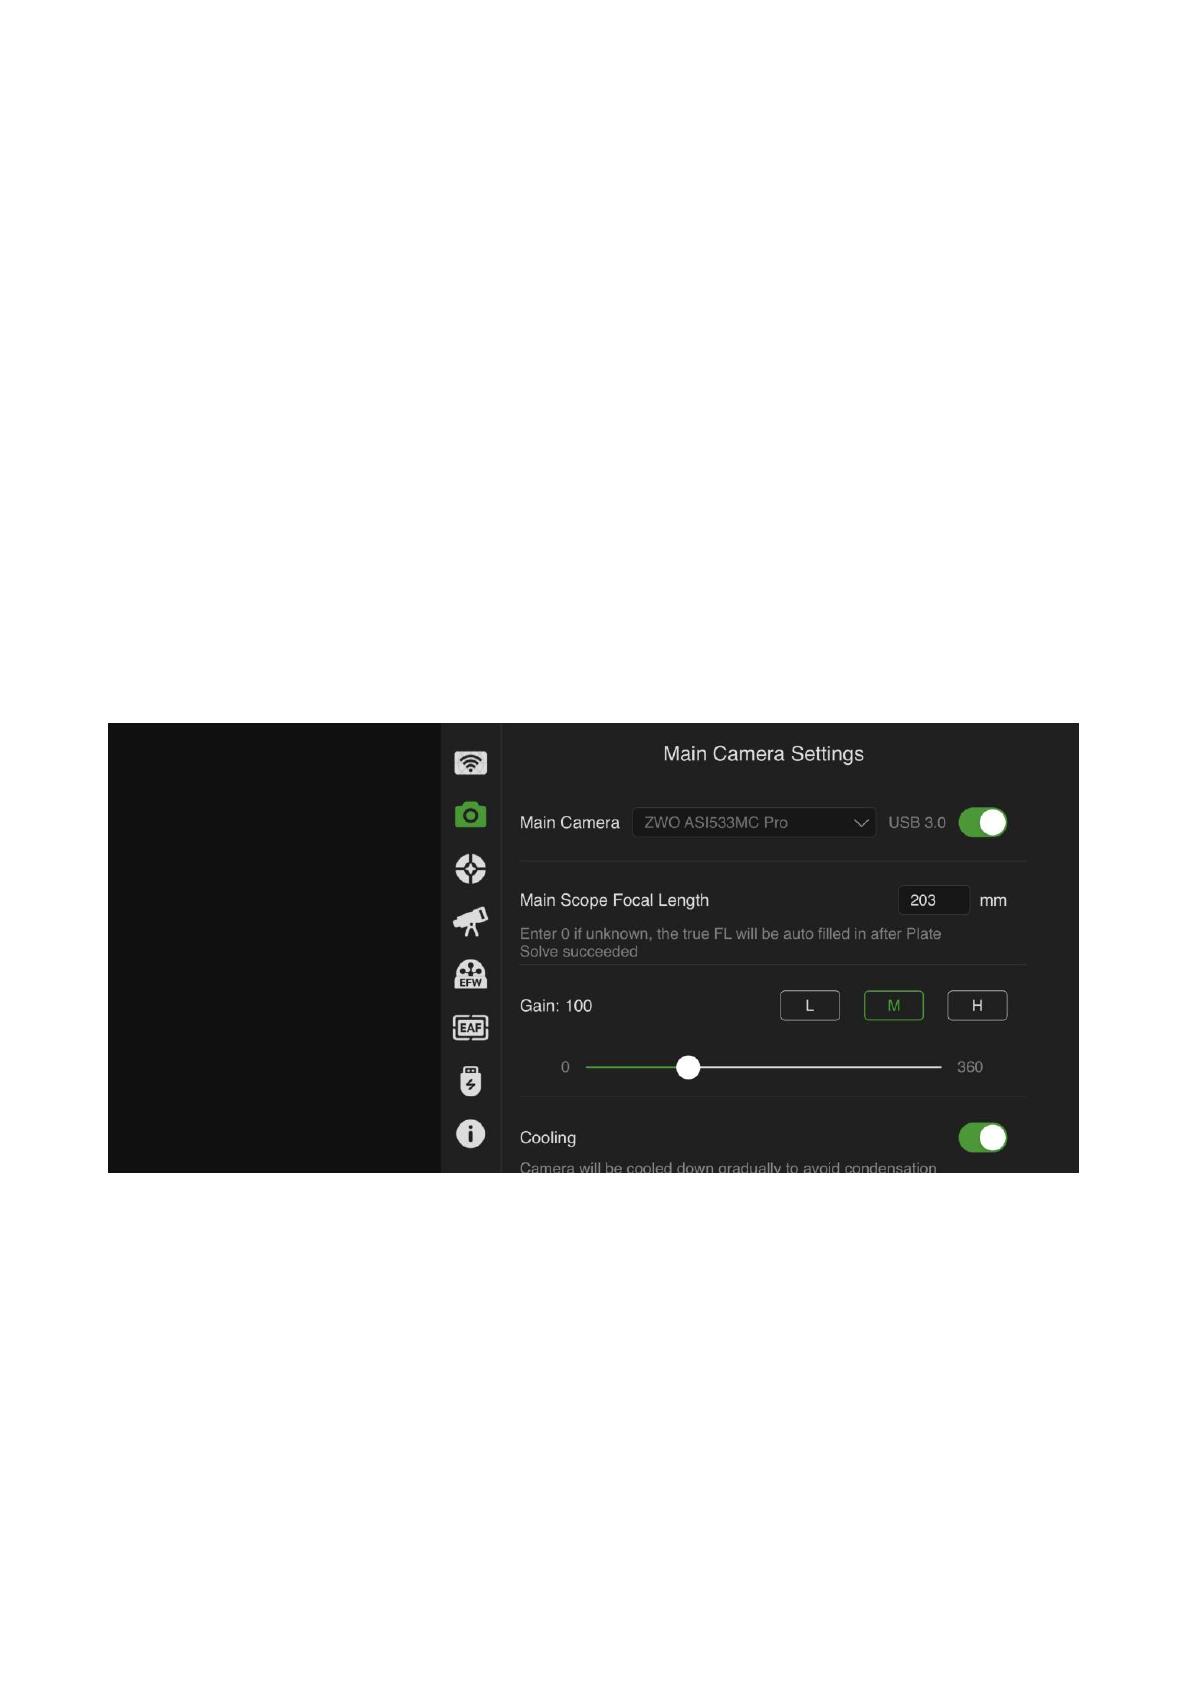
M a i n Ca m e r a S e t t in g s
Select the main camer a and sli d e the slide r switc h to the right to co n n ect it.
When s w itching camera s , please set the sw itch to off first . Then change camera, followe d by sliding
the slider switch on again.
Enter main scope focal leng t h an d choose gain settin g.
If you re using a cooled c a m era, the co o l in g func t io n is on after you o p e n the AP P b y d e f au l t . In
addition, some came ra s also ha v e heat i n g and an ti - dew functi o n s .
To use a DS L R camera a s the main camera please refer to the "DSLR Camera Con n ection" secti o n
for the DSL R camera models suppo r t e d by ASIAIR. For m o d e l s that do not support long expo s u re ,
you need to use the shutter release co n n e c t io n .
To cus t o m ize the file name, you can refer to "Custom ize File Name" option. The co mponents that
can be added in the f i le n a m e includes came r a mod e l, ga i n , date a n d te m perature.
It is recomm e n d e d to open the adv a n c e d settings , whic h in cludes Auto White Balance, M o n o Bin
and C o n t in u o u s P r ev i e w .
G u i d e Ca m e r a S e t t in g s
Select and connect the guid e ca m era. Be sure to fill in th e focal length of the guidesco p e.
You can enable dithe r in g accord i n g to your needs. If you are just starti n g to use A S IA I R for the first
time, we r e commended to keep this featu re off u ntil you are more famil i a r with its operation.
M o u n t S e t t in g s
Select the corresponding mount mode l a n d connection m e t h o d here, and slide the swit c h to
connect it. For the spec i fi c con n e c ti o n m e t h o d o f the moun t , p le a s e refer to sec t io n 2 of "Mo u n t
Connection " .
If the in fo r m ation such as th e geographic location an d time is ina c c u r a t e . You can also synchronize
the GPS infor m ation of the phone to the equatorial mount. If the Right A scension and Declin a t i o n
display is 0 0 ° 00 '00” ple a se res t ar t the moun t and re co n n e c t a f te r ch e c k in g your conn e ct io n s .
It is recom m ended to t u r n on Auto- C e n t e r GoTo commands and keep tra c k in g enab le d .
F i l t e r W h e e l S e t t i n g s
After selec t i n g and co n n e c t in g y o u r filter wheel you can customize the name of the filt e r wheel
positions.
You c a n select a filter position a nd the wheel will rotate to the f i l t e r h ole position. Tap C alibrate
EFW if y o u need to rec a li b r a te y o u r whee l po s it io n s.
F o cu s e r S e t t i n g s
After connecting the focuse r , yo u can change parameters such as fine and c o a r se steps, backlash
settings and sen d the focu s e r to a specific pos i t io n, or r e v e r s e the focuser In/Ou t com m ands. Ple ase
refer to Z WO EAF Man u a l for detailed operat i n g instru ctions.
It is recom m ended to t u r n on the beep.
S t or a g e S e t t in g s
Shows the location and usage of ASIAIR storage spac e. You can choose to store the image files in
eMMC storage of ASIAIR or SD card.
In Im a g e Manageme n t , you c a n sort the im a g e s files y o u ve captured, and preview, export or
delete the files in storage.
The USB Memory Stick supports FAT32 , exFat and NTFS for m ats, if you use a storag e device wi t h a
large c a p a c it y such as 128GB to 51 2 G B ext e rn a l drive, please ensu r e tha t the device h a s a power
supply connect e d , ASIAIR Plus USB power supply is not capable of supportin g reliable mem o r y
operations.
A bo u t
Selecting the Updat e Log will dis p lay the ASIAIR upda te log and terms of service.
G u i d i n g
Touch Preview/ A u to r u n /L i v e/ P l an mode, there will be a floa t in g window popping u p that showing
the brief g u iding information. Touch this gu i d ing floating win d ow to enter the guiding page.
On the gu i d in g page: O n t h e left s i d e you can turn the guiding g r a p h on and off, and on the righ t is
the guide cameras settin gs.
Tap this butt o n for the g u i d er calibratio n da ta. The graph shows the moveme nt of t h e st a r
formed by the guide pulse sent by ASIAIR du r in g calibratio n . The line represents th e RA and D e c
guide star r a t e s c a l c u la t e d as a result of the ca li b r a ti o n . They sh o u l d gen e ra l ly be appr o x im ately
vertical.
After setti n g the EXP exposu r e ti m e, touch this b utton t o start refres hing the image captured
by t h e guid e ca m era in real time. It is generally reco m mended to set the expo s u re time to 1-4 s .
Start calibra ti o n . Before tapping calibra t i o n , you c a n also manually selec t a star. Note, do no t
select the brightest star, gen erally choose the mediu m brightnes s on the image wi t h a HFD of 3-6.
You can also tap the butt o n direc t l y , an d AS I A IR will a u tomati cally selec t a suitab l e star for yo u to
start the calibration proc e ss. After the calibr a tion is complet e d, guiding will be turn e d enabled .
Touch this button if you want to stop guiding.
Normally you just need to kee p the default setting of t h e s e option s . Howev e r, some - times the
guiding graph can be very volat il e . In this ca s e you can ta p the sho w/hide button on the far
right, see the c o rr e c ti o n s signs and sligh t ly adjust t h e value of “D E C Aggr ”and “RA Aggr ” to help
flatten the guiding graph.
When you comp l e te the calibration work and get the re ady for gu i d ing, please first wait for 10-2 0
frames and the n tap the clear button on the left sid e of the guidi n g g r a p h for the previous gu i d in g
graph and the value of total error might not be t h a t correct.
M o u n t Co n t r o l P a n e l
The ASIAIR app p r o v id e s a range of features to you t o move your mount via the m o b i le device,
select a shoot in g target, complete a GoTo and ta r g e t composit io n . We c a ll it th e "Mount Contro l
Panel (MCP)". Mee t the control p a n el from top to bottom :
Target search box: Touch to enter the "celestial library" interface, we have carefully
selected more than 14,000 so la r sy st e m s and d e e p sky o b j e c t s, and there is a "best tonight" list,
making the choice of shooting t a r g e ts e v e n easier .
Some users ma y shoot ta rgets that are not i n cluded in the celesti a l libra r y , in this case a custom
target is added.
GoTo button: When the tar g e t object has been sele c t e d in the library, it will return to the
MCP inte r f a ce, touching the butto n ASIAIR will co m mand the mount, m o v e to the co-ordinat e s
where the target is located and com plete the automa tic centerin g rout i n e .
Direction b u ttons and sp eed slider: Through adjusting the direc t i o n a nd m ove speed, y ou can move
the righ t ascen si o n axis and dec li n a ti o n axis of you r mount, allowing you to make th e compositio n
you want or fulfilling your othe r need s .
The library includes NGC , IC , M catalog s, solar sys tem ob jects an d well- k nown st a r names . Future
updates add more. To enable GoTo s an equatorial mount with serial/US B connection is require d
and S T 4 co m mands are n o t supp o rted
  • Page 1 1
  • Page 2 2
  • Page 3 3
  • Page 4 4
  • Page 5 5
  • Page 6 6
  • Page 7 7
  • Page 8 8
  • Page 9 9
  • Page 10 10
  • Page 11 11
  • Page 12 12
  • Page 13 13
  • Page 14 14
  • Page 15 15
  • Page 16 16
  • Page 17 17
  • Page 18 18
  • Page 19 19
  • Page 20 20
  • Page 21 21
  • Page 22 22
  • Page 23 23
  • Page 24 24
  • Page 25 25
  • Page 26 26
  • Page 27 27
  • Page 28 28
  • Page 29 29

ZWO ASIAIR Plus User manual

Type
User manual

ZWO ASIAIR Plus is a powerful astrophotography device that allows you to control your entire imaging setup from your smartphone or tablet. With its built-in Wi-Fi module, you can connect to ASIAIR Plus from anywhere within range and control your camera, mount, filter wheel, and focuser. ASIAIR Plus also has a built-in power management system, so you can power all of your equipment from a single power source.

Here are some of the things you can do with ASIAIR Plus:

  • Control your DSLR or mirrorless camera for astrophotography
  • Control your telescope mount for GOTO and tracking
  • Use your smartphone or tablet as a wireless remote control

Ask a question and I''ll find the answer in the document

Finding information in a document is now easier with AI